← Printable guides
EventMann

Volunteer guide

For the people who help: answering an invitation, your shifts and tasks, your team and your details.

Edition of October 18, 2026

The latest version of every chapter is in the Help Centre: https://eventmann.com/help

Chapter 1

Volunteering

1.1 Volunteering at an event

Organizers on EventMann can ask you to help at their events for free, and some events let you offer your help from the event page. Everything about it — your invitations, your shifts, your tasks, your details and your thank-you ticket — is under My Volunteering in your account. This article is the map; each part has its own article.
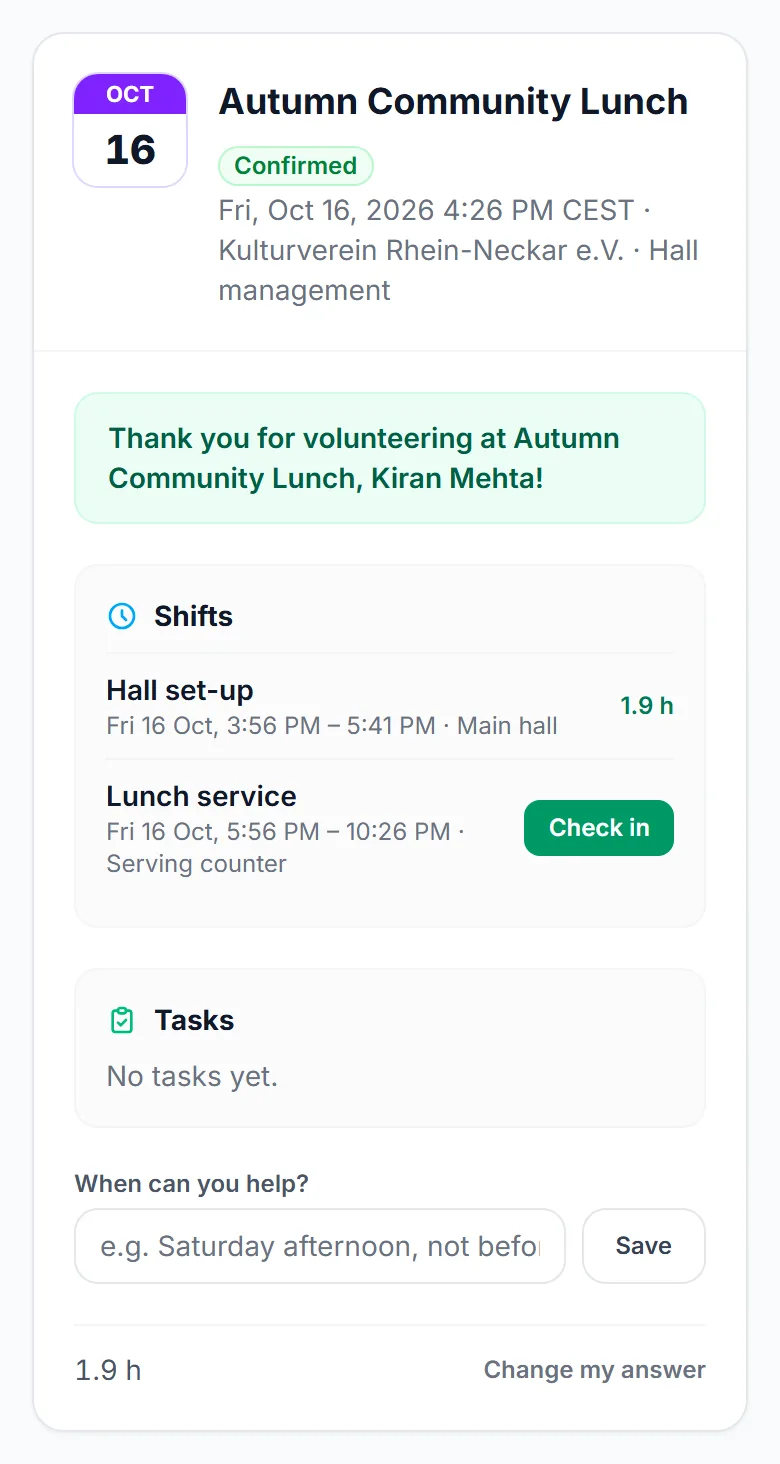
My Volunteering on a phone: today’s event with a finished shift, a shift ready for check-in and your tasks

What you can do here

  • Answer an invitation — the organizer’s email asks “Can you help?”. Open it and choose Yes or No. A no needs nothing; a yes needs a free EventMann account on that address, which you create or sign in to right there. See Answering an invitation.
  • Offer your help — when an event page says “Would you like to help at this event?”, or a team leader sends you a join link. See Sign up or join a team.
  • See your shifts, check in and out, take or give back a shift — see My Volunteering: shifts and check-in.
  • Work through your tasks — status, checklist and comments. See Your volunteer tasks.
  • Run part of an event — if the organizer gave you a role, such as volunteer coordinator or box office, or you lead a team. See Volunteer roles and My work and Team lead guide.
  • Get your volunteer ticket — if the organizer offers one, My Volunteering shows a Get my ticket button that opens the event page. Only confirmed volunteers can buy it, signed in. It is free or reduced, usually one each.

Where to find it

  • Sign in and choose My Volunteering in the menu of your account. The entry appears once an organizer has your email address on a volunteer roster, or you have signed up.
  • The page needs a confirmed email address. Organizers invite you by email; invitations are linked to your account only when that address is confirmed.

Good to know

  • You can change your answer: say yes after an earlier no, or step back if you can no longer come. Stepping back frees your shifts and hands your tasks back to the team.
  • You get an email when you are put on a shift or given a task, and a reminder about a day before each shift. A task with a start time sends a reminder shortly before it.
  • Volunteering is unpaid. Your name, email, phone number and skills are shared with the organizer so they can organise the team.
  • Every invitation carries a link to stop that organizer’s invitations. Other organizers are not affected.
  • Times on shifts and tasks are in the event’s own time zone.

Troubleshooting

  • My Volunteering is empty — sign in with the address the invitation was sent to, and make sure it is confirmed.
  • I cannot check in — check-in opens an hour before the shift starts and closes when it ends. Ask your lead or the organizer to check you in from their rota if you arrive outside that time.
  • I cannot see the volunteer ticket — it appears once you are confirmed for that event and signed in. If the event has none, the organizer has not set one up.
Related

1.2 Answering an invitation

When an organizer invites you to help at an event, you get an email “Can you help at …?” with a button Answer the invitation. The button opens a page just for you. Saying no takes one click and needs nothing else. Saying yes means having a free EventMann account on the address the invitation was sent to: that account is where you see your shifts, your tasks and the team. The link is personal: do not forward it.

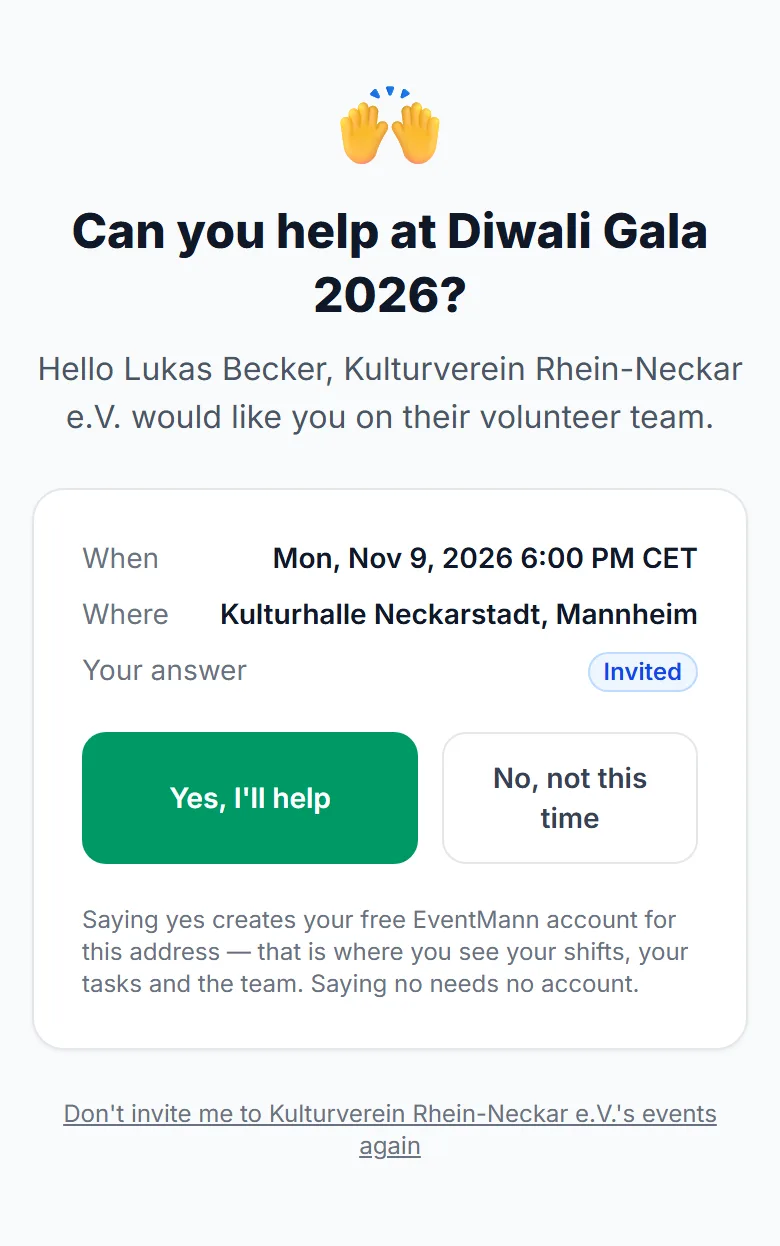
The invitation page on a phone, with the answer buttons, the account note and the opt-out link

Answer the invitation

  1. Open the link in the email. The page shows the event, when and where it is, and your current answer (Invited).
  2. Tap Yes, I’ll help ① to join the team, or No, not this time ② to decline. The line under the buttons ③ tells you what a yes needs from you.
  3. What happens after Yes depends on your account:
    • No account on that address yet — the page opens a short account form, described below.
    • You already have an account — you are taken to the sign-in page with your address filled in. After signing in you come straight back to the invitation, and your yes is recorded.
    • You are already signed in with that address — your yes is recorded at once.
    • Your address is not confirmed yet — you are asked to confirm it first. Your yes is recorded when you come back to the invitation.
    • You are signed in as somebody else — the page says so and offers Sign out and continue. A yes is never recorded for a different account.
  4. Once your yes is recorded you see a thank-you, the organizer is told, and you receive an email “You’re on the team”. The organizer then puts you on shifts and gives you tasks, and you are told by email each time.

Create your account and say yes

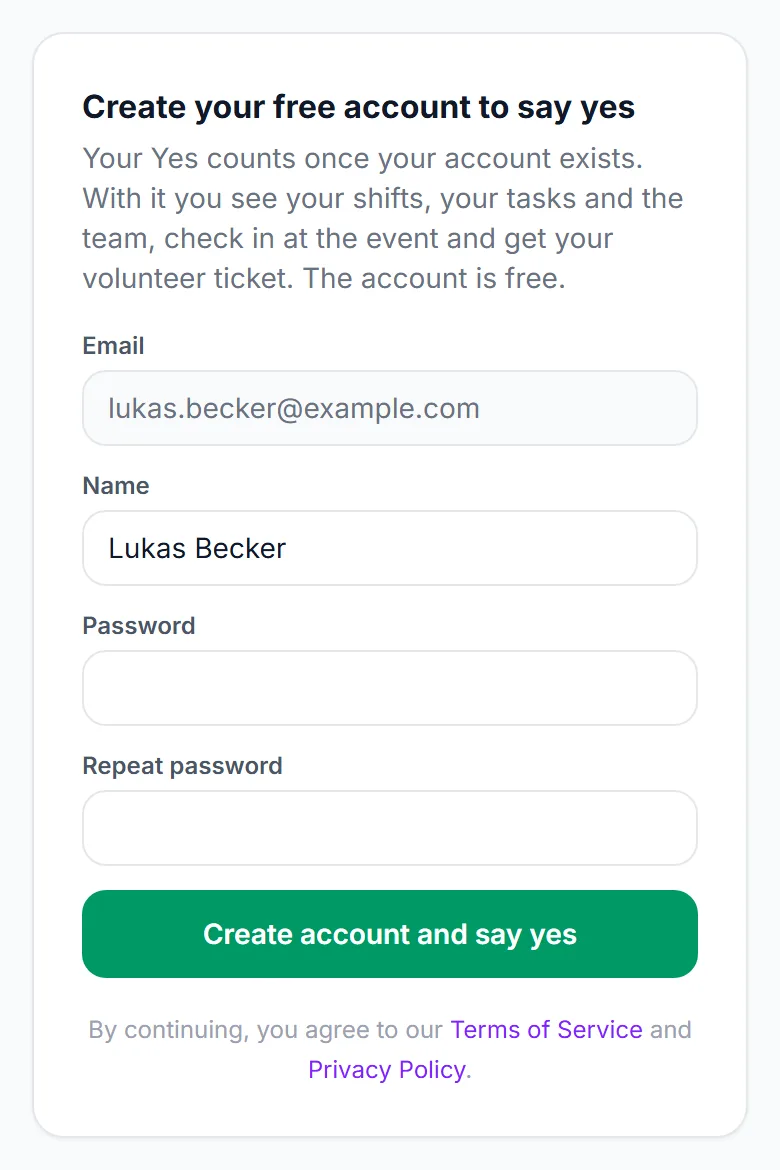
The account form that completes a yes, on a phone
  1. Under Create your free account to say yes check your name ①; the email address is fixed to the one the invitation was sent to.
  2. Choose a password ② and repeat it.
  3. Tap Create account and say yes ③.
  4. You are signed in and land on My Volunteering, already on the team. The account is confirmed straight away, because you reached it through the link sent to that address.

A link can never set a new password for an account that already exists: if somebody already has an account on that address, the page sends them to sign in instead.

Confirmed by the organizer

Sometimes the organizer or a team lead confirms you without waiting for your answer, because you already said yes on the phone. If you have no account yet, your “You’re on the team” email says so and its button Set up my account opens the same account form. The organizer can also send you that link again with Send sign-up link. Until you set up the account you are on the team, but you cannot see your shifts and tasks.

Change your mind

  • Open the same link again. After a yes the button reads I can’t make it after all; you are asked to confirm and your shifts are freed for somebody else.
  • After a no that you gave yourself, you can still choose Yes — with your account, as above. A sign-up the organizer declined cannot be reopened by you, and neither can an invitation that was removed.
  • Once the event is over or cancelled the page takes no more answers.

Stop receiving invitations

The line Don’t invite me to …’s events again ④ at the bottom stops volunteer invitations from this organizer, after you confirm. It needs no account. An invitation still open is declined. It does not affect other organizers. If you later sign up yourself on one of their event pages, that lifts the opt-out again.

Good to know

  • The organizer is told about your yes only once it is recorded — after you have created your account or signed in. Until then you are still Invited on their list.
  • The account is an ordinary, free EventMann account. You can use it to book tickets too.
  • The link works from any device. Saying no or opting out needs no sign-in.
  • My Volunteering lists the same invitation with the same two buttons while you have not answered.

Troubleshooting

  • “That answer is no longer possible here” — the organizer already changed your status, for example removed you. Contact them.
  • No Yes button — you already said yes, the sign-up was declined, the event is over, or you are signed in as somebody else (sign out first).
  • I signed in but my answer is still Invited — you signed in with a different address. Sign out and sign in with the address the invitation was sent to, then open the link again.
  • I forgot the password of my existing account — use Forgot your password? on the sign-in page, then open the invitation link again.
  • The link says not found — the event was deleted, or you opened a shortened or altered link. Use the button in the email.

Related

1.3 My Volunteering: shifts and check-in

My Volunteering is your page for everything you do as a volunteer. Sign in and choose My Volunteering in the menu of your account. There is one card per event, coming events first and finished events after them. Each card shows the event, the date, the organizer, your team and your status.

If you are a core member of one of the organizer’s standing teams, the page starts with a block Your teams: one card per team with all of the team’s tasks and a link to the team’s Inventory. See Your volunteer tasks and Your team’s inventory. If you lead a team, the block is called Teams you lead instead.

What a card tells you

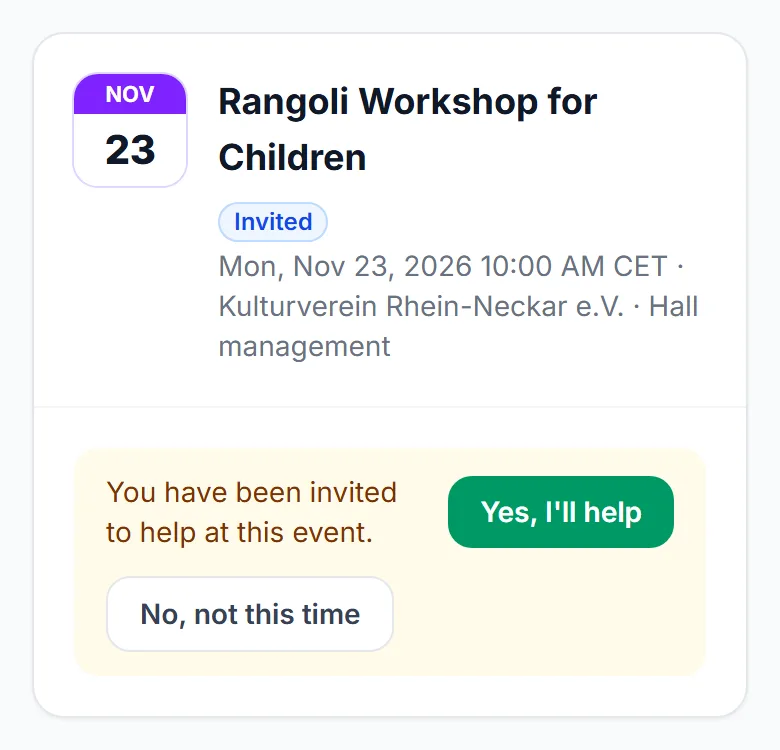
  • Invited — the card asks you to answer with Yes, I’ll help or No, not this time.
  • Applied — your sign-up is with the organizer. You get an email when they decide.
  • Confirmed — you are on the team. The card shows the organizer’s thank-you, your shifts and tasks, open shifts you may take, your availability and your hours.

On an invited card, tap Yes, I’ll help ① or No, not this time ②.

A card for an event you were invited to, with the two answer buttons

Check in and out

Your hours count from check-in to check-out, so do both.

  1. Open the card of today’s event; its title ① names the event. Each shift lists its title, time and place.
  2. Under Shifts find the shift ② and tap Check in ③ when you arrive. The button is available from an hour before the shift starts until it ends.
  3. When you finish, tap Check out. The shift then shows the hours you worked.
  4. Your total for the event is at the bottom of the card.
Today’s event: a finished shift with its hours, and a shift ready for check-in

A shift never checked out counts nothing until you or the organizer closes it.

Give a shift back

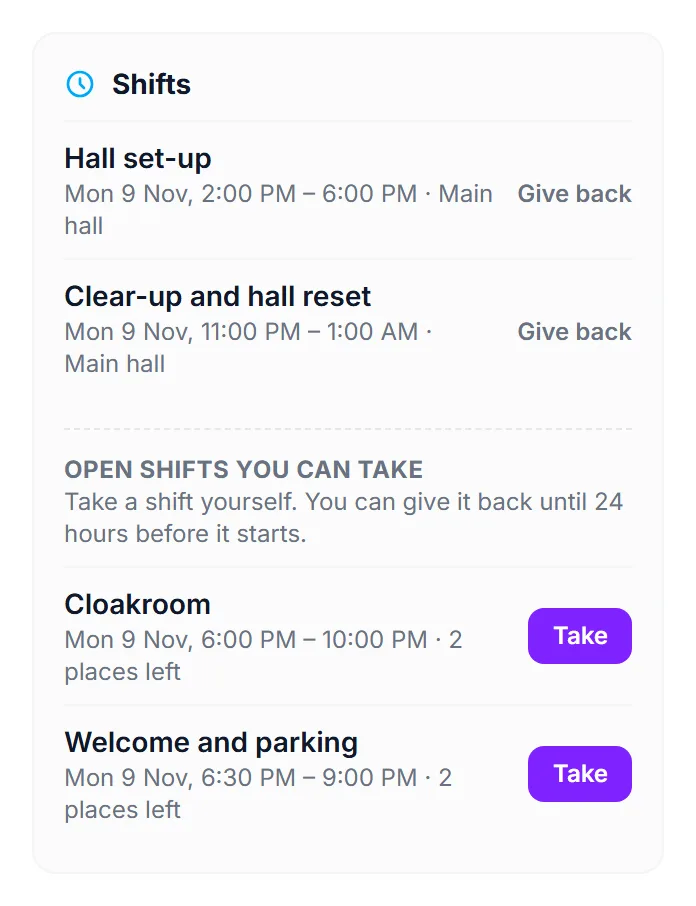
When the organizer lets volunteers choose their own shifts, you see Give back ② next to each of your shifts.

Two shifts of the Diwali Gala, each with a Give back link
  1. Tap Give back beside the shift ① and confirm.
  2. Your team’s leads and the organizer are told that the shift has a gap again.

You can give back until the cutoff the organizer set, 24 hours before the shift by default, and never after you have checked in. After that, talk to your lead; the button is gone on purpose.

Take an open shift

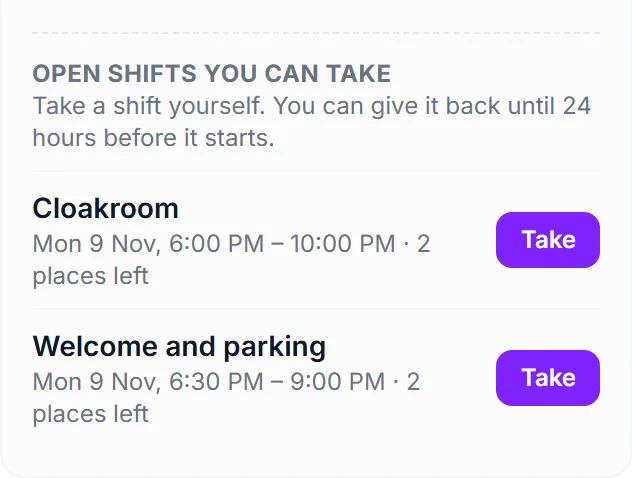
If the organizer switched on Volunteers choose their own shifts, the card has the block Open shifts you can take.

  1. Read the block ① — it says how long before the start you can still give the shift back.
  2. Tap Take ② on the shift you want.
Open shifts you can take, with the places that are left

You see your own team’s shifts and shifts that belong to no team, only those that have not started and still have places. A shift is refused if it overlaps one of yours, is full by the time you tap, or belongs to another team.

Say when you can help

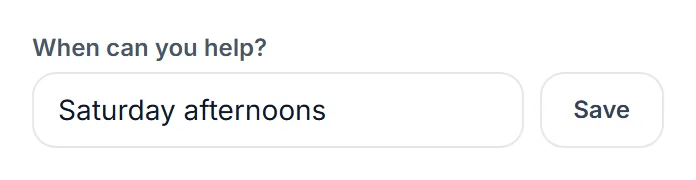
The field When can you help? on each card is free text for the organizer or your lead, for example “Saturday afternoons”. Type it and tap Save.

Enter your text ① and tap Save ②. It holds up to 500 characters.

The availability field on an event card

Good to know

  • Change my answer at the bottom of a card opens your invitation page, while the event still takes answers.
  • The volunteer ticket appears as a note with Get my ticket while the event has not ended.
  • You get a reminder email about a day before each shift, with the tasks for that shift.

Troubleshooting

  • No Check in button — it opens one hour before the shift. Outside that window ask your lead to check you in.
  • No Give back button — the event does not allow it, the cutoff has passed, or you have already checked in.
  • No open shifts — the organizer has not switched self-service on, or nothing is left for your team.
  • No Your teams block — you are not a core member of a team, or you lead it (then you see Teams you lead). Ask the organizer.

Related

1.4 Your volunteer tasks

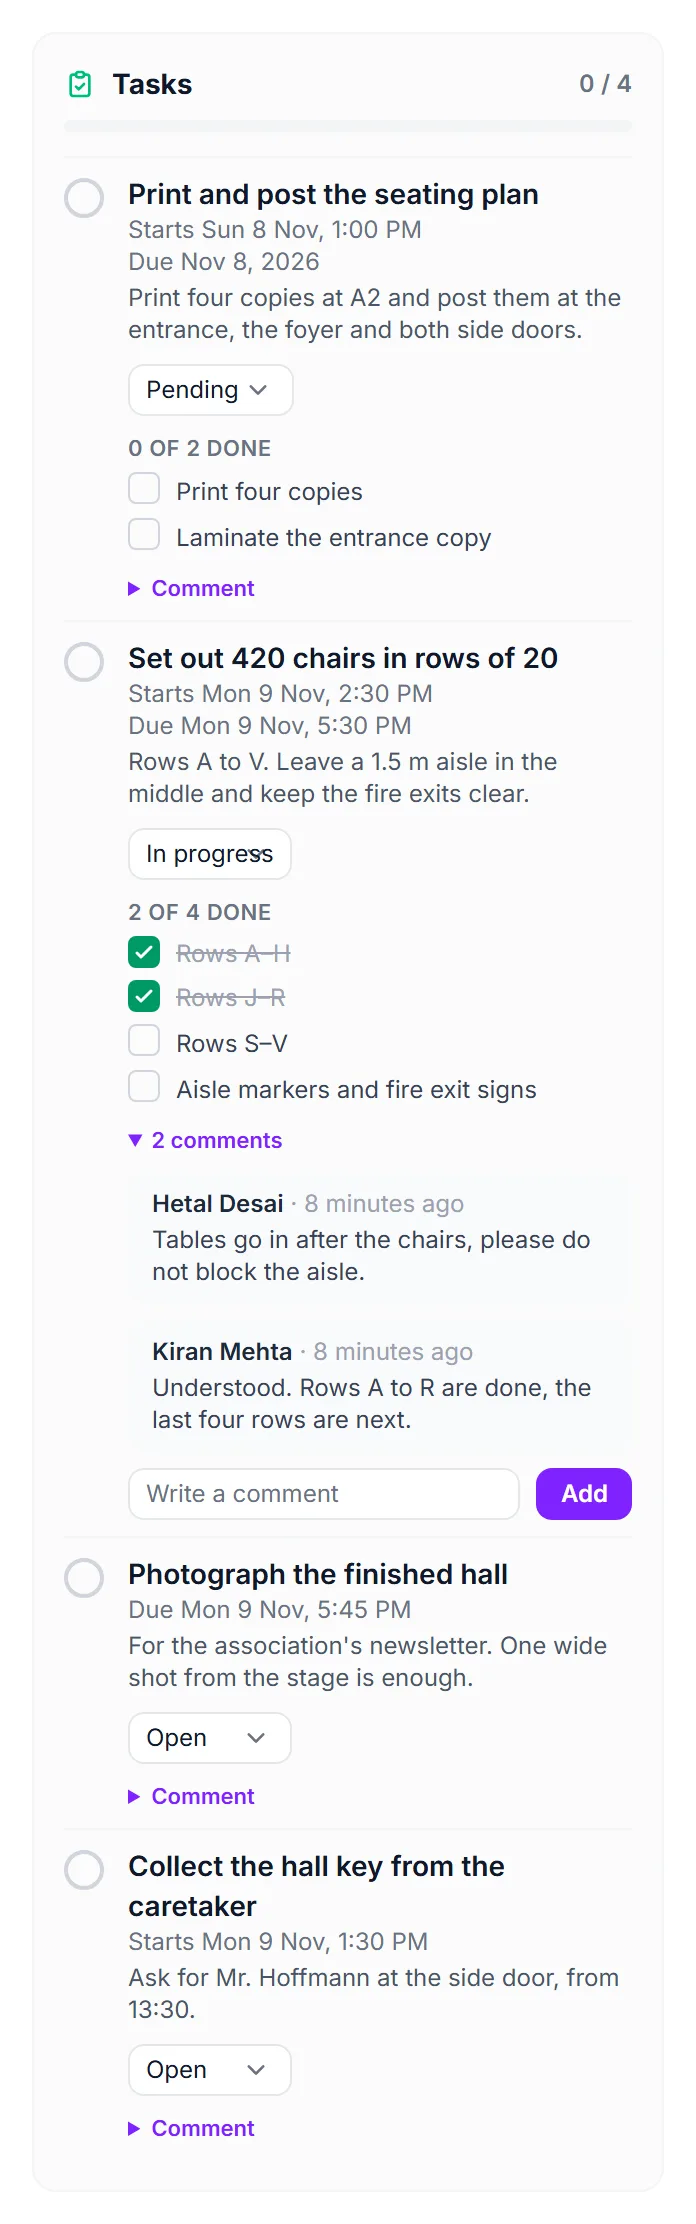
Tasks are the jobs you are asked to do for an event, such as “Set out 420 chairs”. They are on your card in My Volunteering under Tasks. You can tick them off, move them along, work through a checklist and write comments, all from your phone.

Which tasks are yours

  • Tasks given to you by name, alone or together with others.
  • Tasks for a shift you work: everyone on that shift sees it.
  • Tasks for your team at that event, when your team is set.
  • Tasks left open to the whole volunteer team.
  • Tasks from the organizer’s own task board, when the organizer handed one to you by name.
  • If you are a core member of a team: every task of that team, under Your teams at the top of the page.

Work on a task

  1. Read the title, the start and due time and the description under it.
  2. When you are done, tap the square ① in front of the task. Tap it again to reopen the task.
  3. To show how far you are, change the status ②. Your own list offers Open, In progress, Blocked and Done; choose Blocked when you are waiting for something. The change saves by itself.
  4. If the task has a checklist, tap each line ③ as you finish it. The heading says “2 of 4 done”.
  5. Open comments ④ to read what the team wrote and add your own. The list opens by itself when somebody wrote in the last day.
The tasks of the Diwali Gala: a board task, a task with a checklist and comments, and two team tasks

Tasks from the organizer’s task board

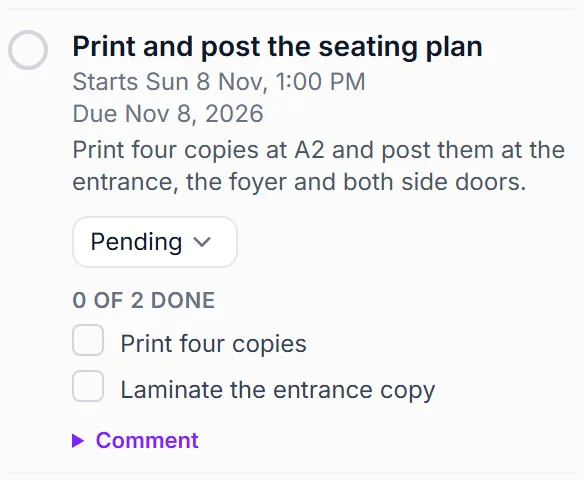
A task the organizer gave you on their own task board looks the same, with its own statuses: Pending, In Progress, Blocked and Completed.

Tick it ①, or move it along with the status ②.

A task from the organizer’s board, with its status and checklist

Your team’s tasks (core members)

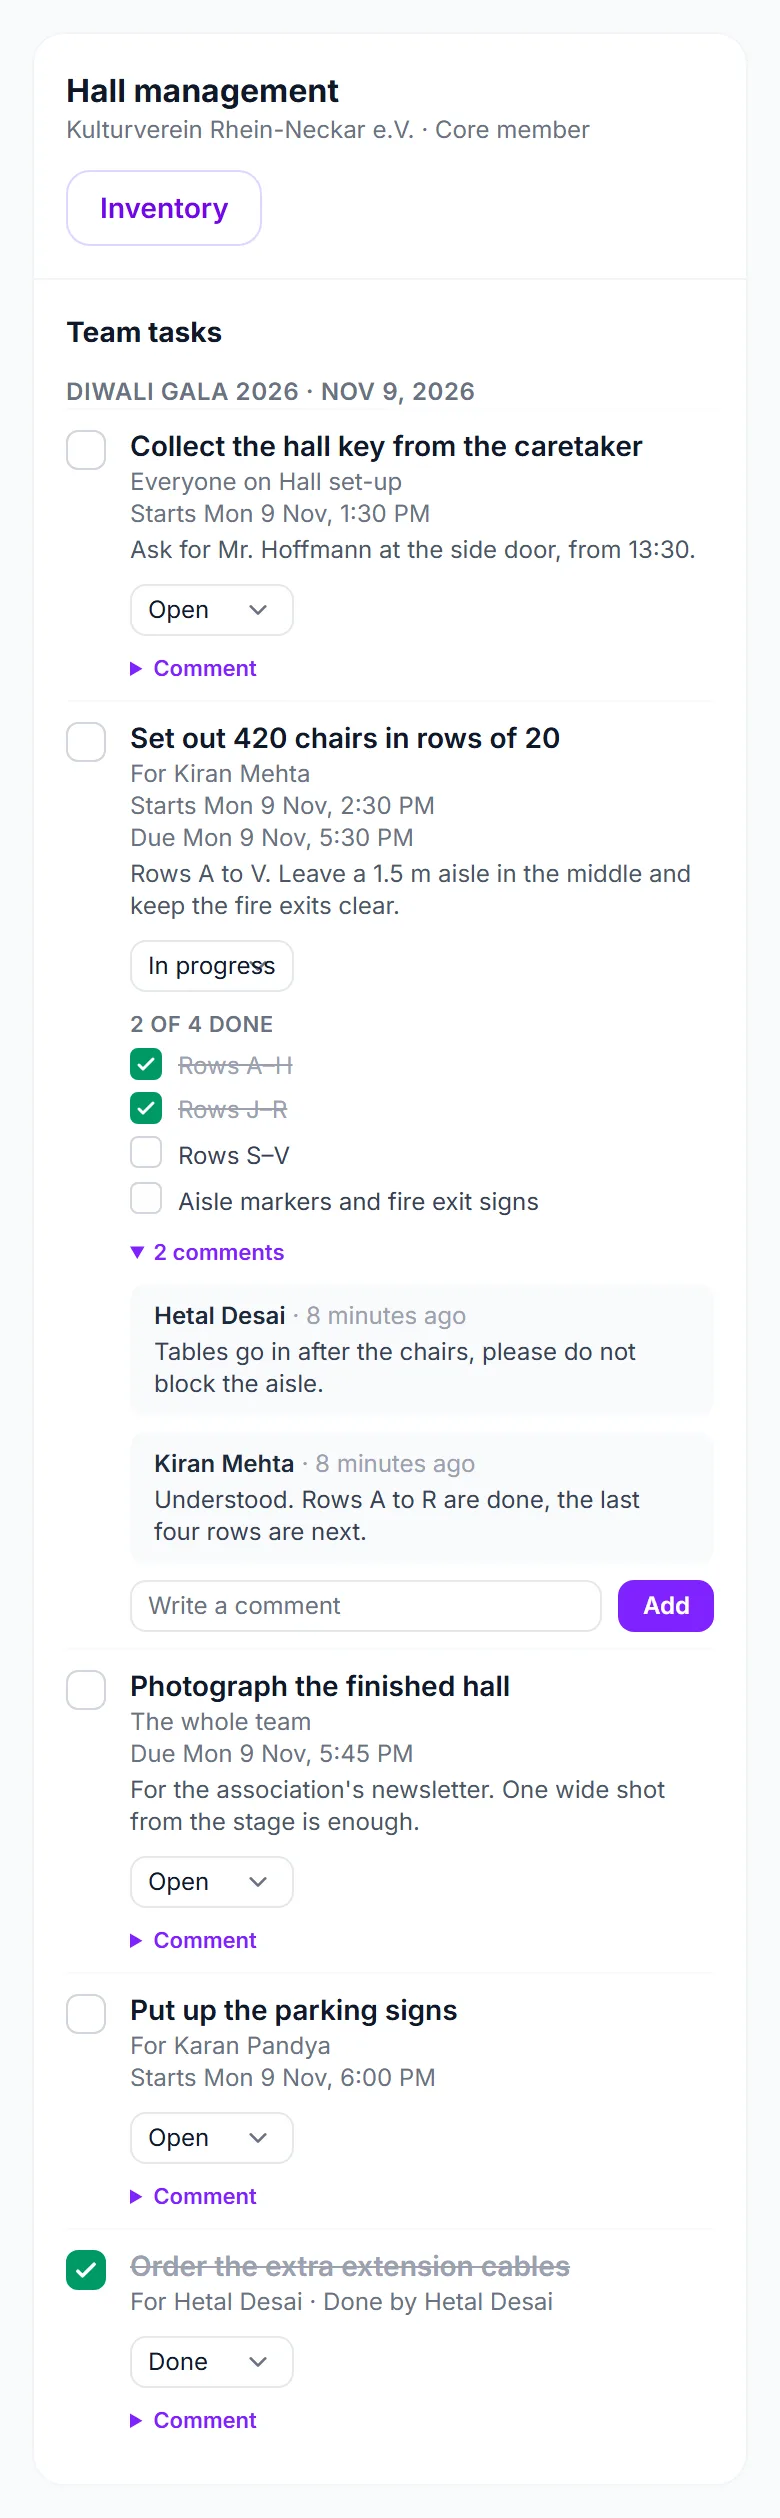
A core member of a standing team sees the whole team’s work, not only their own. At the top of My Volunteering, the block Your teams has one card per team you are core in, with the tasks of that team at the events you are confirmed for, grouped by event. Coming events come first; an event stays there for 30 days after it ends, so a follow-up such as finding missing items is still in reach.

  1. Find the card of your team ①. Inventory ② opens the team’s stock.
  2. Under each task you see who it is for ③: named people, everyone on a shift, or the whole team.
  3. Tick a task, change its status ④, work through its checklist or comment, exactly as on your own tasks. You can do this on any task of your team, for example to help a teammate who is stuck.
The Hall management card under Your teams: all of the team’s tasks at the Diwali Gala

Adding, deleting and handing tasks to people stays with the team lead and the organizer. A task that is also yours appears both here and on the event card; a change in one place shows in the other.

Good to know

  • A task shared by a shift or a team is a single task for many people. The organizer sees who ticked it.
  • You can only touch tasks that are yours, or tasks of a team you are a core member of. Everything you do on a task is checked against your confirmed place on that event.
  • If you step back from an event, tasks that were given to you by name go back to the team.
  • Tasks with a start time send you an email shortly before it begins; tasks for a shift appear in the shift reminder.

Troubleshooting

  • “No tasks yet” — nothing has been given to you or your team. Ask your lead.
  • A comment does not save — it must not be empty, and is at most 2,000 characters.
  • I ticked a task by mistake — tap the square again.

Related

1.5 Sign up or join a team

There are two ways to offer your help yourself instead of waiting for an invitation: the sign-up on an event page, and a join link that a team leader shares in their group chat. Both need an account with a confirmed email address.

Sign up from the event page

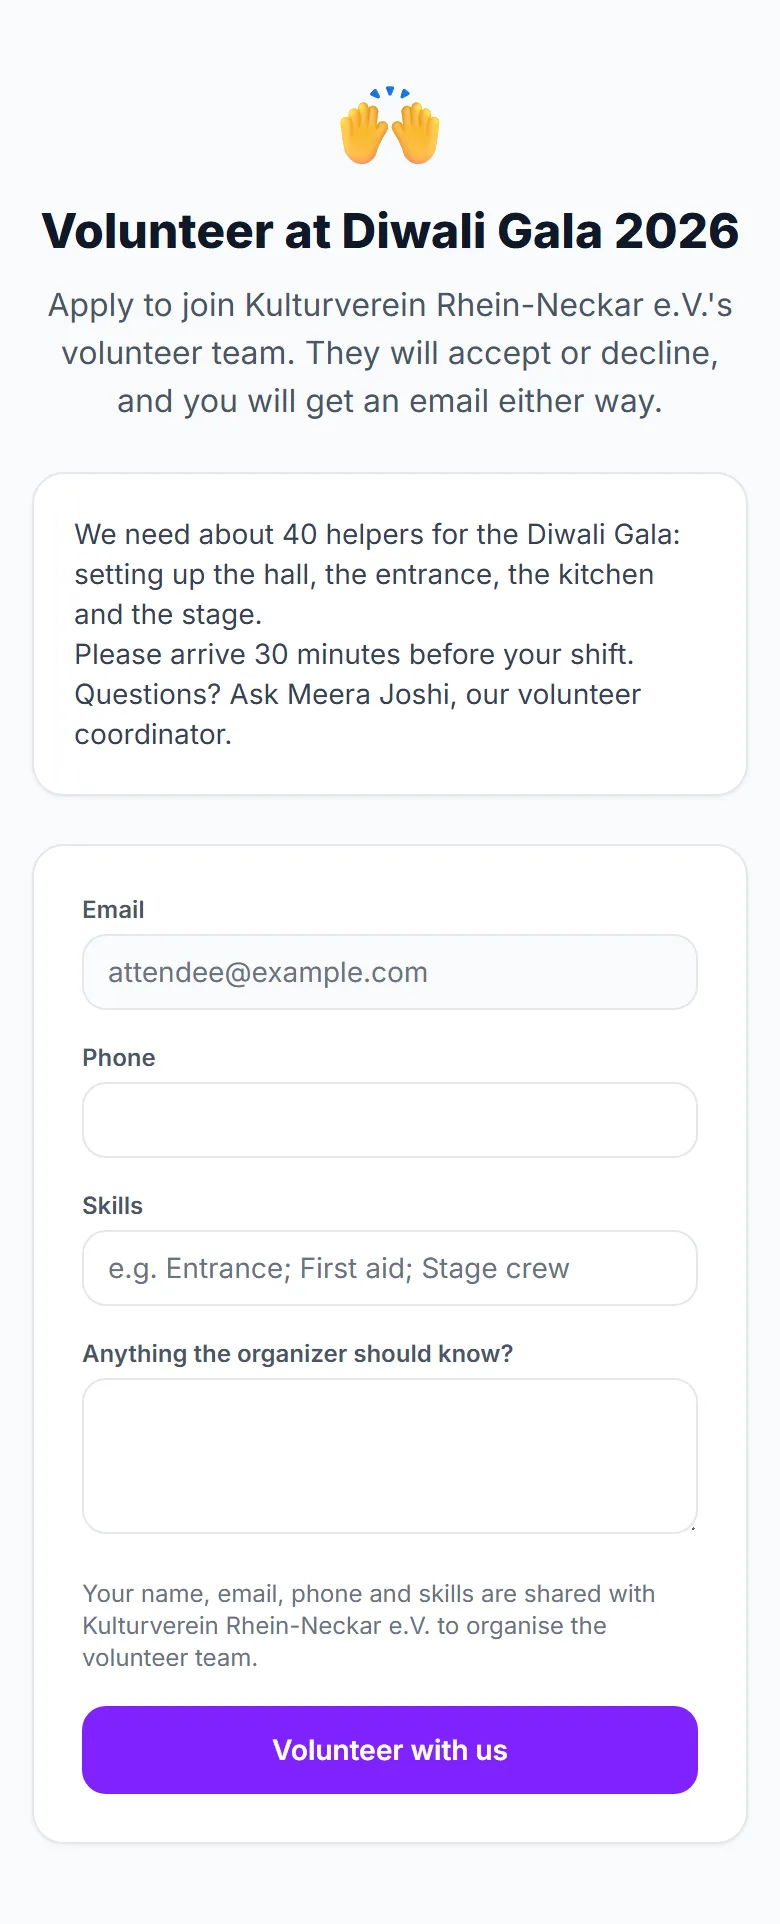
If the organizer switched on volunteer sign-up for a live event, its page shows “Would you like to help at this event?” with the link Volunteer with us. The link is also shown at the volunteer-only ticket.

The volunteer sign-up note on an event page
  1. Sign in and click Volunteer with us ①.
  2. Read the organizer’s text above the form: what helping involves, when to arrive, who to ask.
  3. Check the form. Your email address is fixed. Optionally add a Phone number ①, your Skills ② separated by semicolons or commas, and a message under Anything the organizer should know? ③.
  4. Tap Volunteer with us ④.
The sign-up form with the organizer’s introduction

Your application goes to the organizer, who accepts or declines. You get an email either way, and the application shows as Applied under My Volunteering until then. Nobody is accepted automatically. If you had already been invited, signing up counts as your yes.

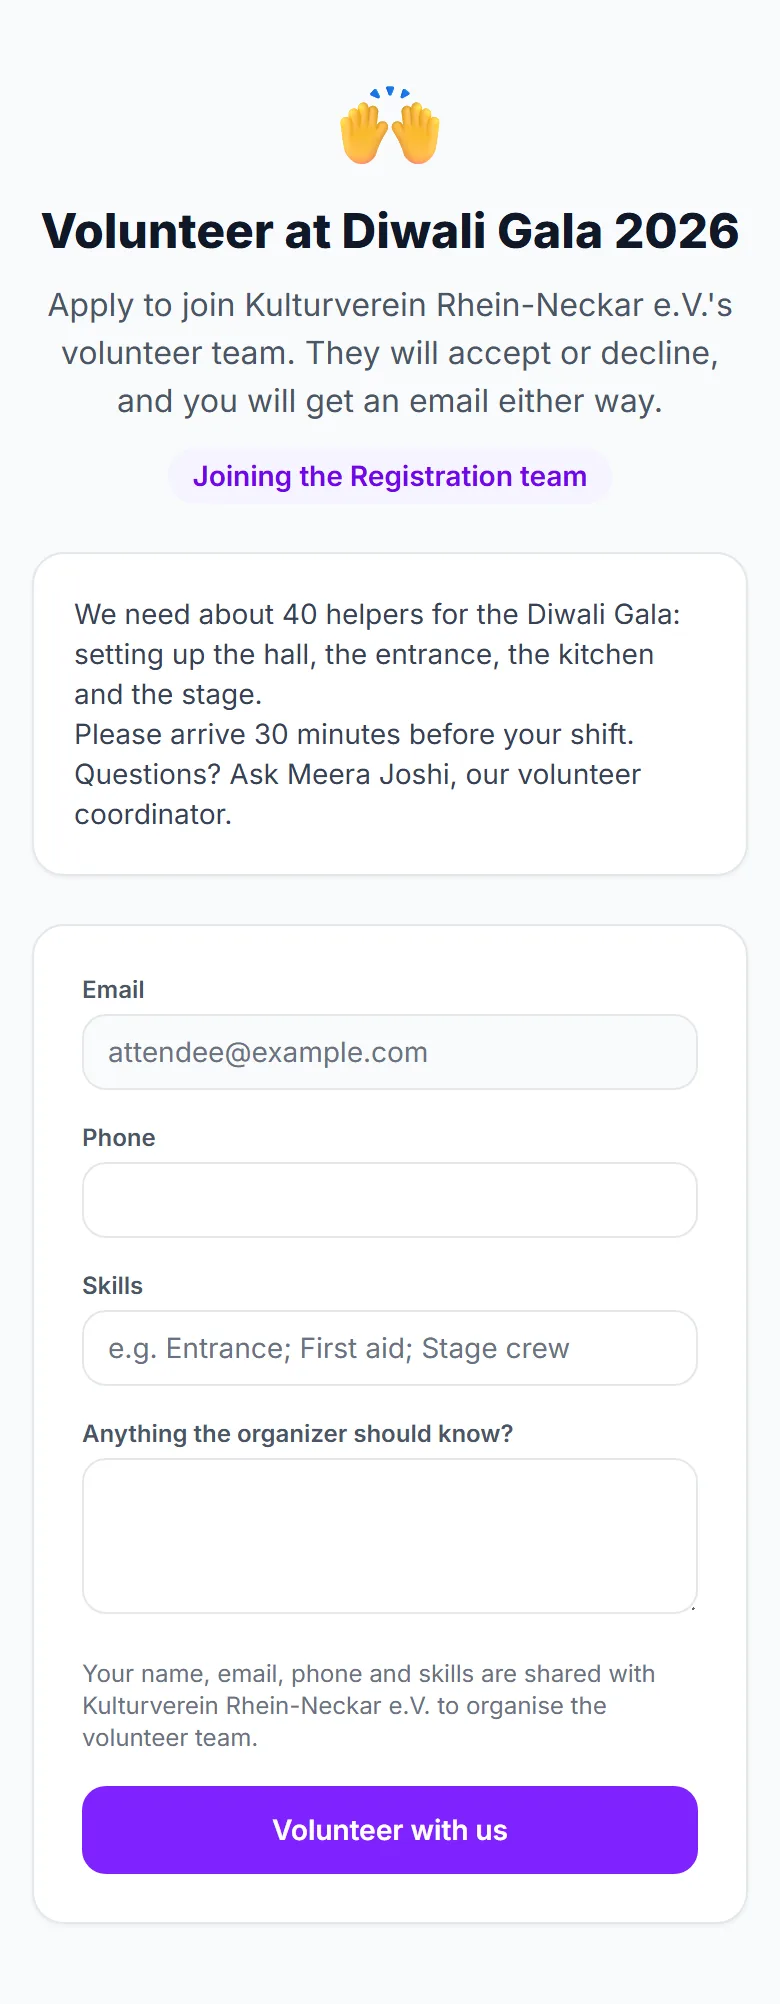
Join a team with a link

A team lead can post a join link for their team at an event. It works even when public sign-up on the event page is off.

  1. Open the link and sign in if asked.
  2. The page names the team you are joining ①.
  3. Fill in the form as above and tap Volunteer with us ②.
The join page for the Registration team, with the team badge

You land in that team as an applicant, and the team lead accepts you. If you were already on the event without a team, the link puts you in that team.

Good to know

  • Your phone number is added to the organizer’s roster only if it had none; skills are noted only when you are new to that organizer’s roster.
  • Signing up also lifts an earlier “do not invite me” from that organizer.
  • If you are already on the event, the page says so and shows your status.

Troubleshooting

  • The page is not found — sign-up is off, the event is not live, it has ended, or the join link was switched off by the lead.
  • I am sent to sign in — the pages need an account with a confirmed email address.
  • I never heard back — ask the organizer or the team lead; applications wait for their decision.

Related

1.6 Volunteer roles and My work

Some volunteers do more than help: an organizer can give you a role for one event, such as Volunteer coordinator, Box office, Door / check-in, Venue manager, Marketing or Finance, or one of their own custom roles. The role opens the organizer’s screens for that event, and only the ones the role needs.

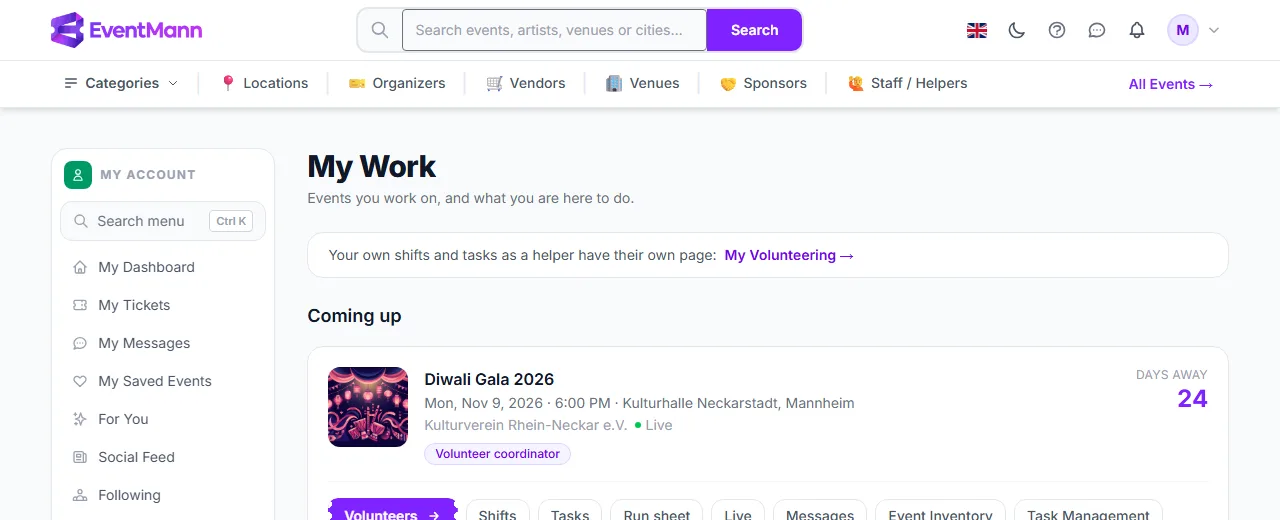
How you notice a role

  1. On the event’s card in My Volunteering you see a lilac note: You help run this event as: Volunteer coordinator ①, with the button Open My work ②.
  2. In the menu of your avatar, the row Event work lists your roles and links to My work. On a phone it is in the menu as My work.
The note on an event card that tells a coordinator which role they hold

My work

My work lists every event where you hold a role, with the role as a badge and the organizer and date. Each row has one button for the thing that role is for: Scan for the door, Orders, Volunteers, Task Management, Analytics or Overview.

  1. Find the event and read the role badge ①.
  2. Click the button ② to open that event’s screens.
My work for a volunteer coordinator, with the role badge and one button

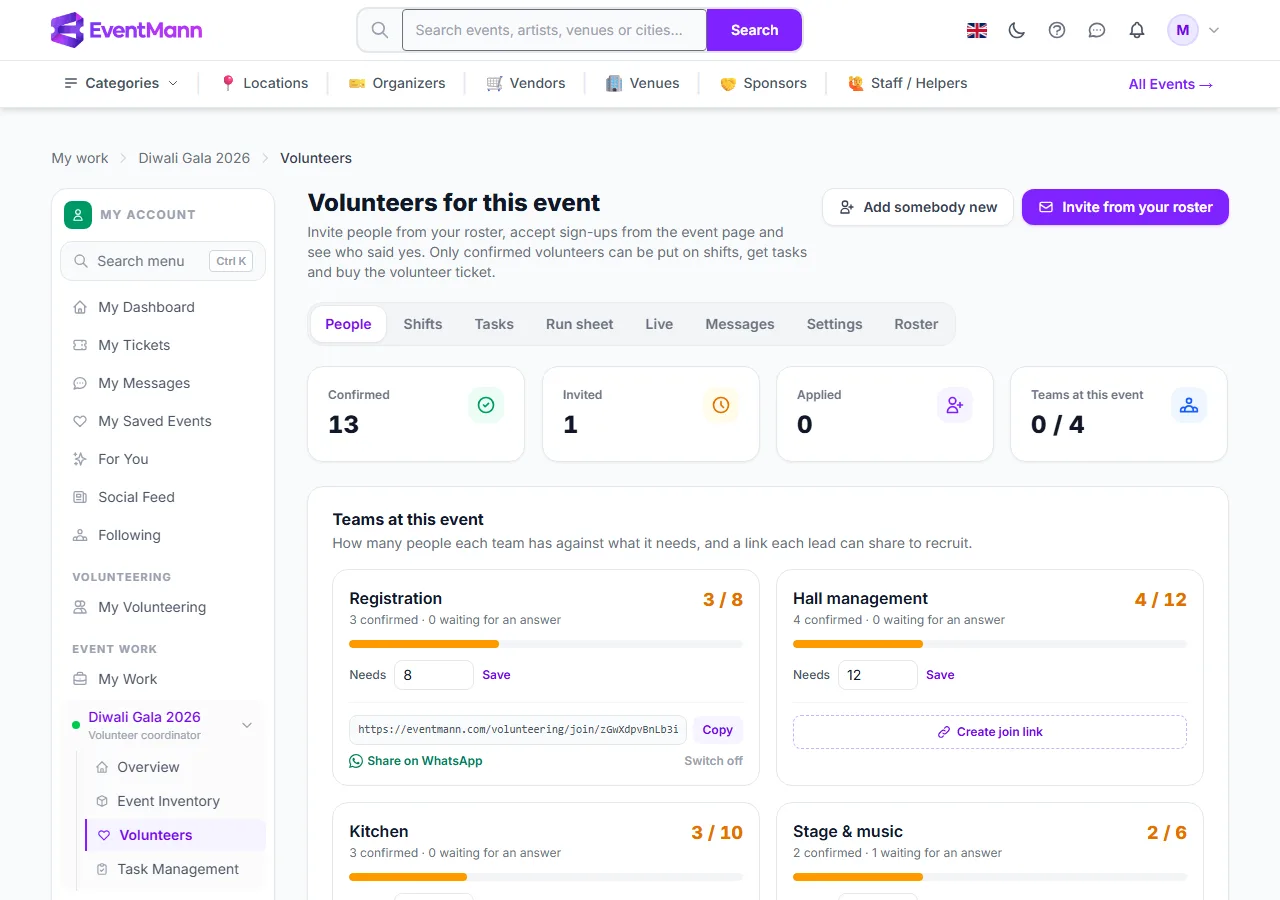
What a coordinator sees

A volunteer coordinator opens the event’s Volunteers pages with every tab — People, Shifts, Tasks, Run sheet, Live, Messages, Settings and Roster — and the task board. They invite and confirm people, plan shifts and tasks, send messages and, for the roles they hold themselves, hand roles to other volunteers. They also see the event overview and its packing lists. They do not see orders, money or settings that their role does not carry.

Only this event is open to you ①; the other events of the organizer stay closed.

The Volunteers page as a coordinator sees it: only the event they coordinate

Good to know

  • A role is for one event. It ends 30 days after the event, so finance work can be finished after the doors close.
  • It counts only while you are confirmed for the event and signed in with the confirmed address the organizer has on file. If you step back from the event, the roles end.
  • Nobody can hand out a role they do not fully hold themselves, so a coordinator can make another coordinator but cannot give out Finance.
  • Leads of standing teams also get a role by being a lead, and may get an extra one the organizer attached to the team (for example Box office for the Registration leads). See Team lead guide.
  • An email tells you when a role is given. If you have no account yet for that address, it points you to set one up.

Troubleshooting

  • No My work row — you hold no live role: the event ended more than 30 days ago, you are not confirmed, or you are signed in with another address.
  • A page says access denied — your role does not include it. Ask the organizer to change your role.

Related

1.7 Team lead guide

A team lead runs one standing team of an association, such as Registration or Hall management, at every event. As a lead you recruit people into your team, confirm them, plan the team’s shifts and tasks, write to your people, and look after the team’s stock. You do this from your account, not from an organizer panel of your own. This guide is the overview; each part links to its details.

What you can do here

  • Recruit from the organizer’s roster, with a join link or by adding somebody new.
  • Confirm applicants and decide whether somebody you invite is confirmed at once.
  • Plan shifts and tasks for your team and put your people on them.
  • Follow the day on the run sheet and the live page, and message your team.
  • Look after your team’s inventory: items, shopping list, purchases and receipts. See Your team’s inventory.

Open your events

  1. Open the menu of your avatar. Under Event work, choose your role, or open My work.
  2. Click the button on the event: Volunteers, or another button if your team also carries a role such as Box office.
  3. In the sidebar choose Volunteers. A lead sees the tabs People, Shifts, Tasks, Run sheet, Live, Messages and Roster. There is no Settings tab: event-wide settings stay with the organizer.

Recruit people

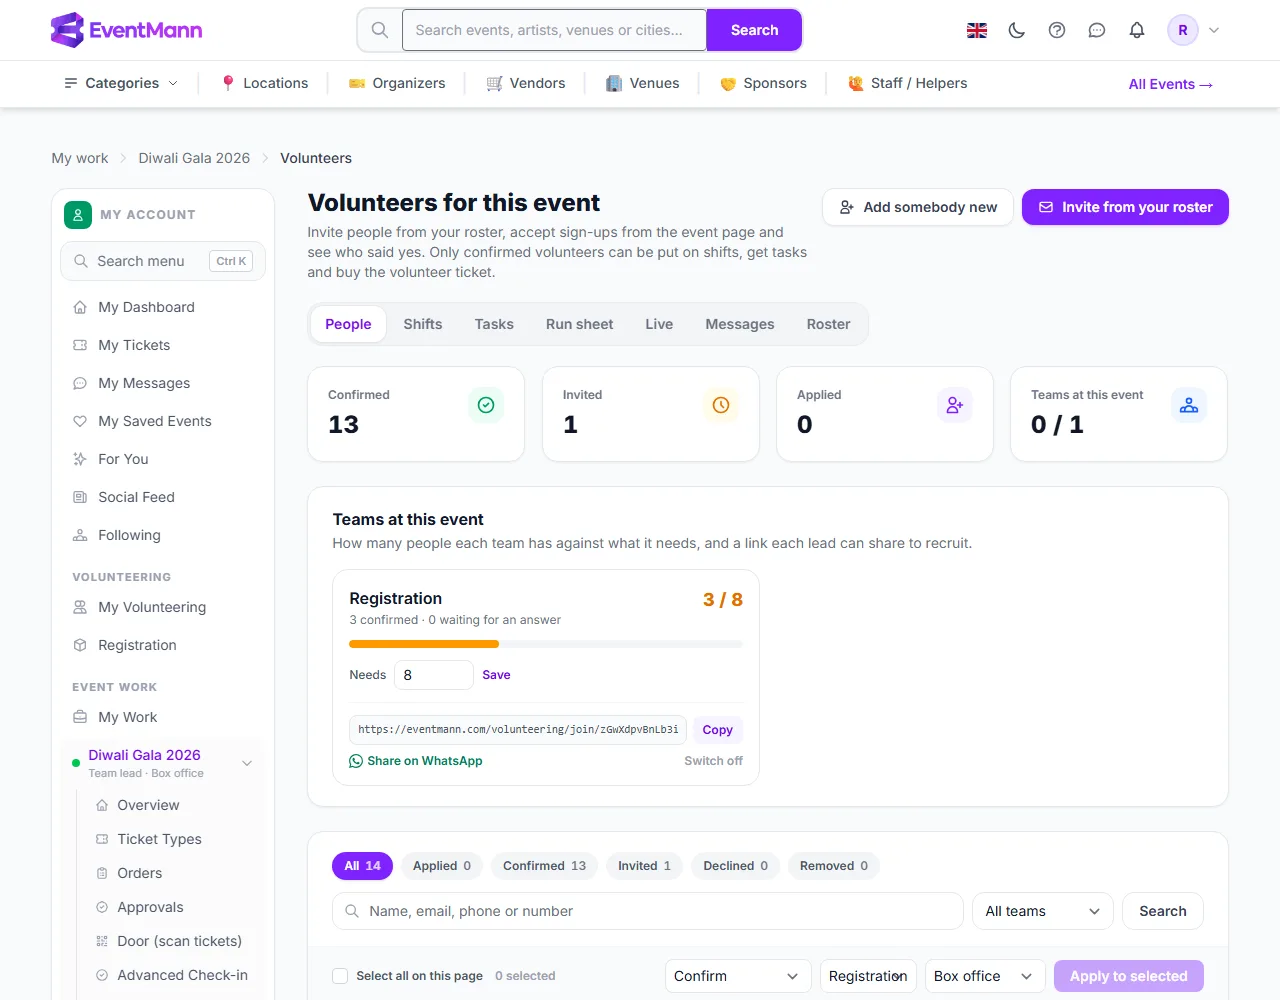
On People, the block Teams at this event shows each team you lead: how many are confirmed against what the team needs, and how many have not answered yet.

  1. Set how many people your team needs in Needs and tap Save.
  2. Under Join link ② create a link and use Copy or Share on WhatsApp. People who open it sign in and apply to your team; you accept them. Switch off stops the link; a new link replaces the old one. See Sign up or join a team.
  3. Click Invite from your roster ③ at the top of the page to ask people the organizer already knows.
The People page of a team lead: their team, its target and its join link

Invite from the roster: invite or confirm now

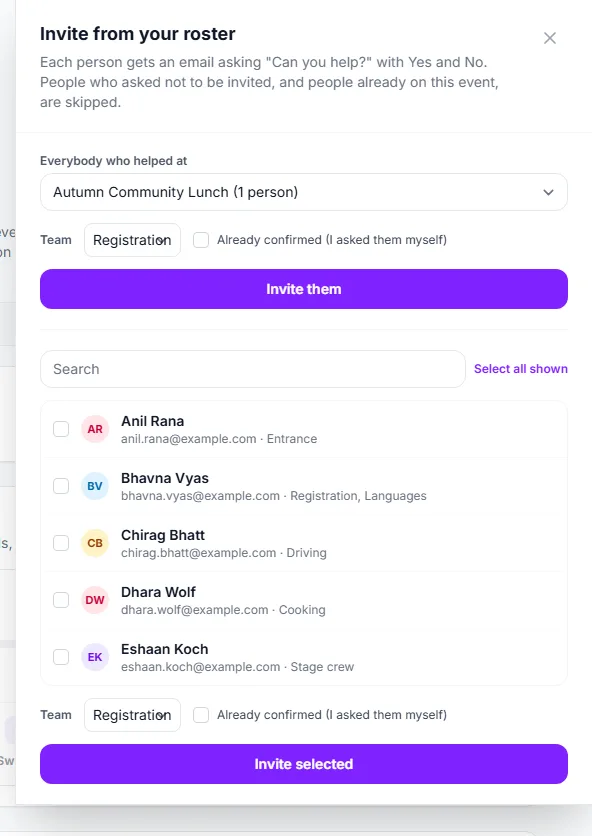
  1. Choose people in the list (search, Select all shown), or — in the first part ① — everybody who helped at one of the organizer’s earlier events.
  2. The Team ② lists only your teams. You must choose one.
  3. Leave Already confirmed (I asked them myself) ③ off to send the normal invitation “Can you help?”; the person answers Yes or No, and a yes asks them to create a free account or sign in before it counts. Tick it when somebody already agreed with you: they are confirmed straight away and receive “You’re on the team” instead of an invitation. If they have no account yet, that email carries a Set up my account button, and on People they show No account yet with a Send sign-up link button until they do.
  4. Click Invite them or Invite selected. A result line says how many were invited and how many skipped (already on the event or asked not to be invited).
Inviting from the roster into the Registration team, with the option to confirm at once

The same choice is on Add somebody new, which adds a person to the roster and invites them in one step. Invitations go out at the organizer’s hourly sending pace, so a large group is mailed over time.

Shifts and tasks

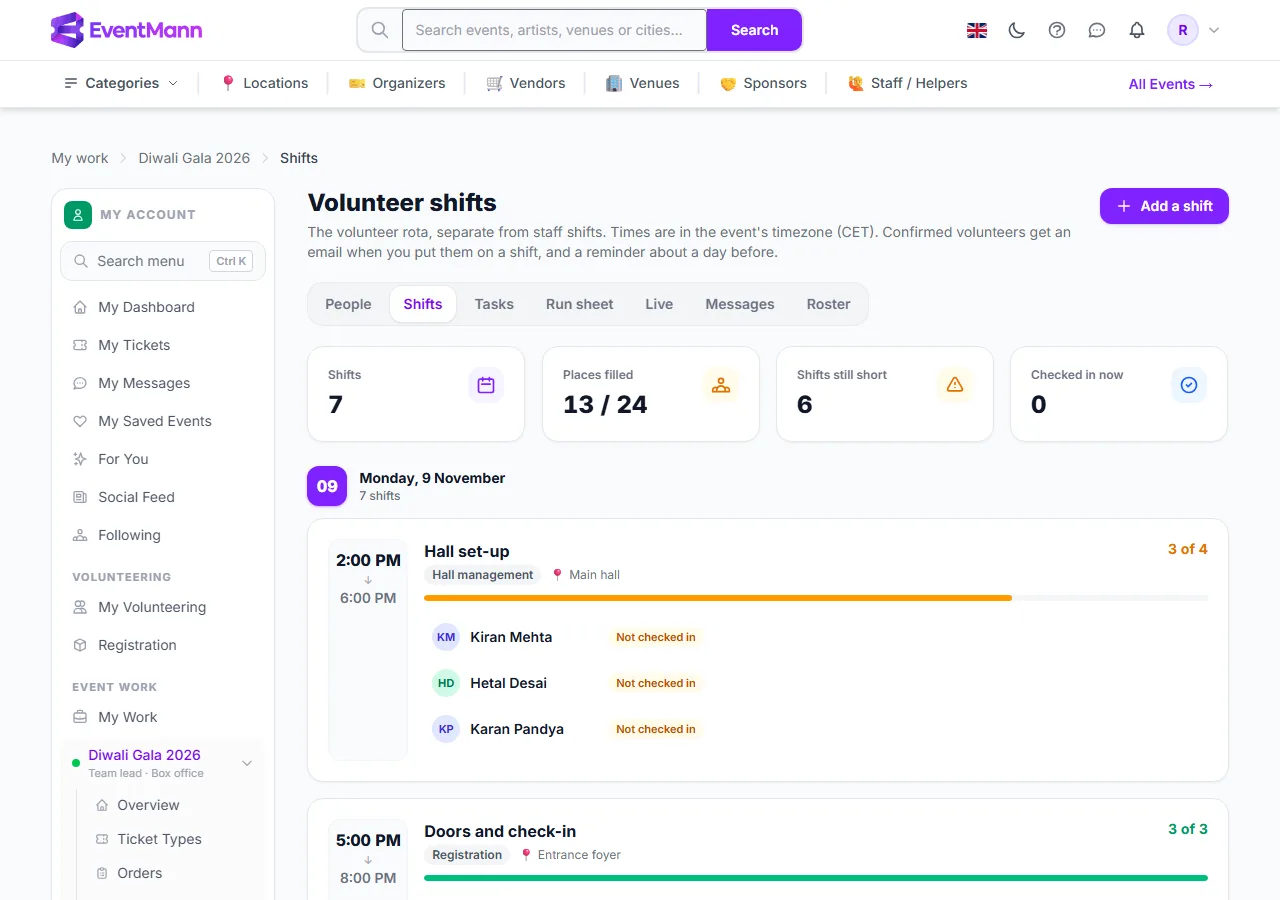
On Shifts you see every shift, but you add, change or fill only those of your teams. A new shift or task must be given to one of your teams.

  1. Open Add a shift ① and fill in what, when, where and how many people you need.
  2. Add confirmed members of your team to it. A person already on another shift at that time is skipped.
  3. On a shift of your team you can check people in or out, or Take off ② someone.
The Shifts page: add a shift, and take people off the shifts of your team

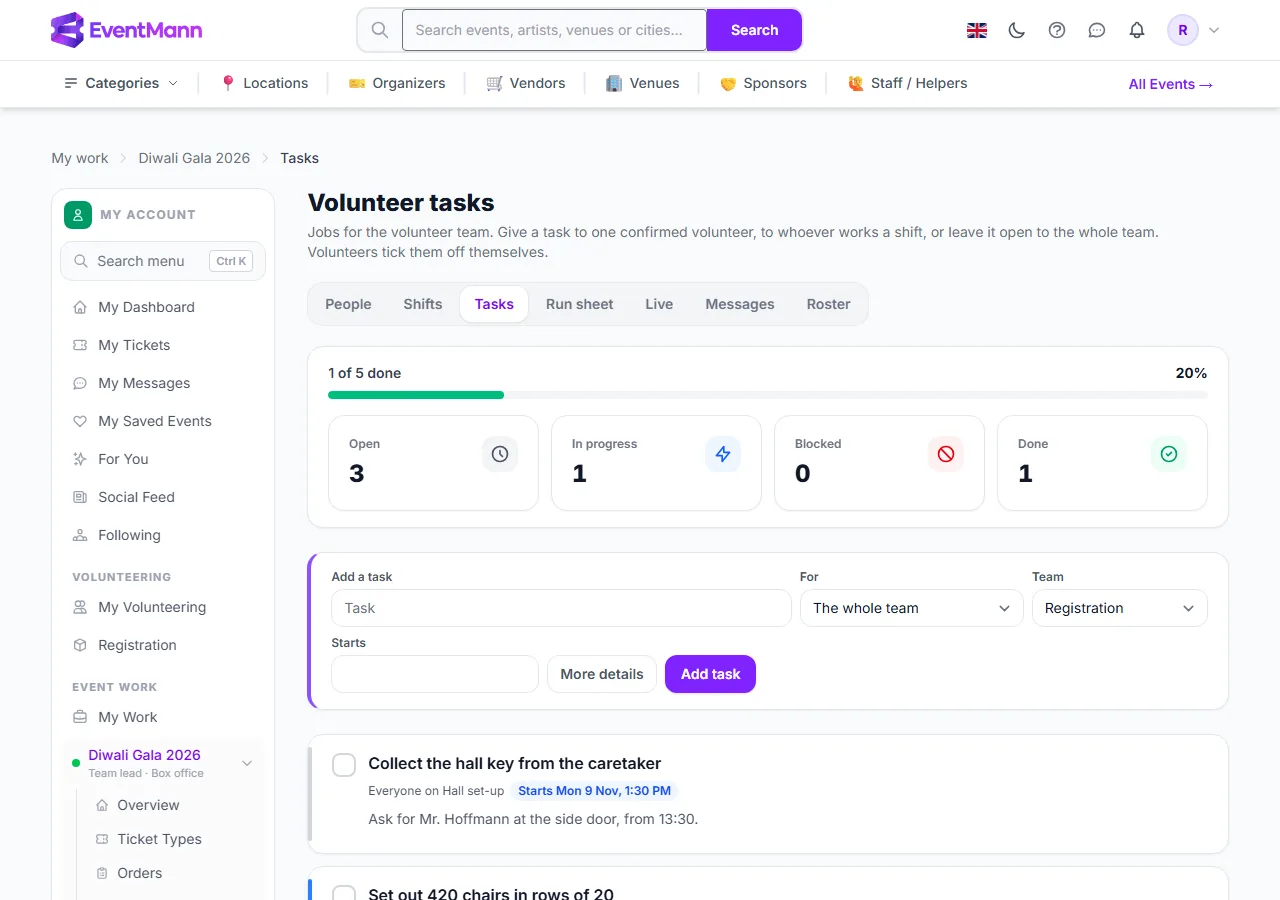
On Tasks, add a task with Add task ①, for one person, a shift or the whole team, with a start time, a due time and a checklist. Tasks ② show their status, checklist and comments, which your people write from My Volunteering.

The Tasks page: add a task for your team, and see its checklist and comments

Read-only and editable

  • You see everything, you change your team. You see the whole People list and the roster — you recruit from it — but you confirm, decline, resend, remove, set a team and message only people in your own teams. You may claim people who have no team yet into your team with the bulk action Set team.
  • Messages can go to your own teams and their shifts only.
  • Roles you can give are limited to those you hold yourself.
  • Copying the setup of an earlier event, and the event settings (sign-up, thank-you text, self-service shifts), stay with the organizer or a coordinator.
  • On the organizer’s own pages you cannot change categories, move an item to another team or mark purchases as paid back.

Good to know

  • Leads are on the core team of their group: at each event a lead is added as confirmed automatically, with the invitations of the other core members sent once the event is published.
  • When one of your people gives a shift back, you and the organizer receive a notice.
  • If the organizer attached a role to your team (the lead role), you hold it at every event you work, for example Box office.

Troubleshooting

  • I see no join link — create one under Teams at this event; there is none until you do.
  • A person is greyed out or skipped — already on this event in some status, or asked the organizer not to invite them.
  • An action is refused — the person or shift belongs to another team.

Related

1.8 Your team's inventory

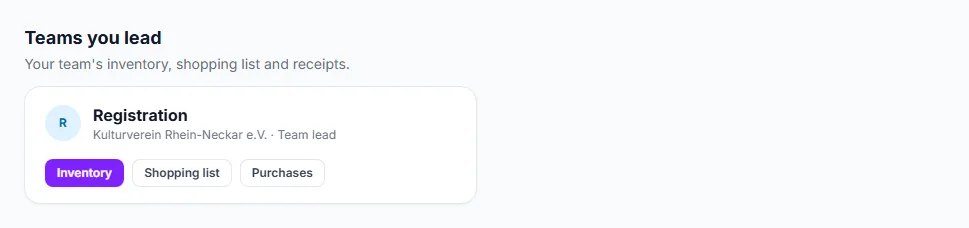
If you lead a team, you look after that team’s stock between events: what you have, where it is, what to buy and what was bought. It is on My Volunteering in the block Teams you lead, which has links for Inventory, Shopping list and Purchases. If you are a core member of a team, you see the same stock read-only, from the block Your teams; see Core members: see the team’s stock below.

What you can do here

  1. Find the block ① and the team you lead.
  2. Click Inventory ② for the team’s items, Shopping list ③ for what has fallen to its minimum, or Purchases ④ for the team’s purchases with their receipts.
The Teams you lead block on My Volunteering
  • The page title ① is Inventory: Registration. You see only your team’s items, never another team’s or the Shared pool.
  • Add Item ④ creates an item for your team. The team cannot be changed; it is yours.
  • Open an item with Edit to change it, say who holds it or where it is, restock it, log maintenance, record a purchase with its receipt, or delete it. The pages are the same as the organizer’s, see Items and Purchases.
  • The Shopping list ② has the text to copy into your team’s WhatsApp group.
  • QR labels prints labels for your team’s items.
The Registration team’s inventory in a lead’s account

Scan a label

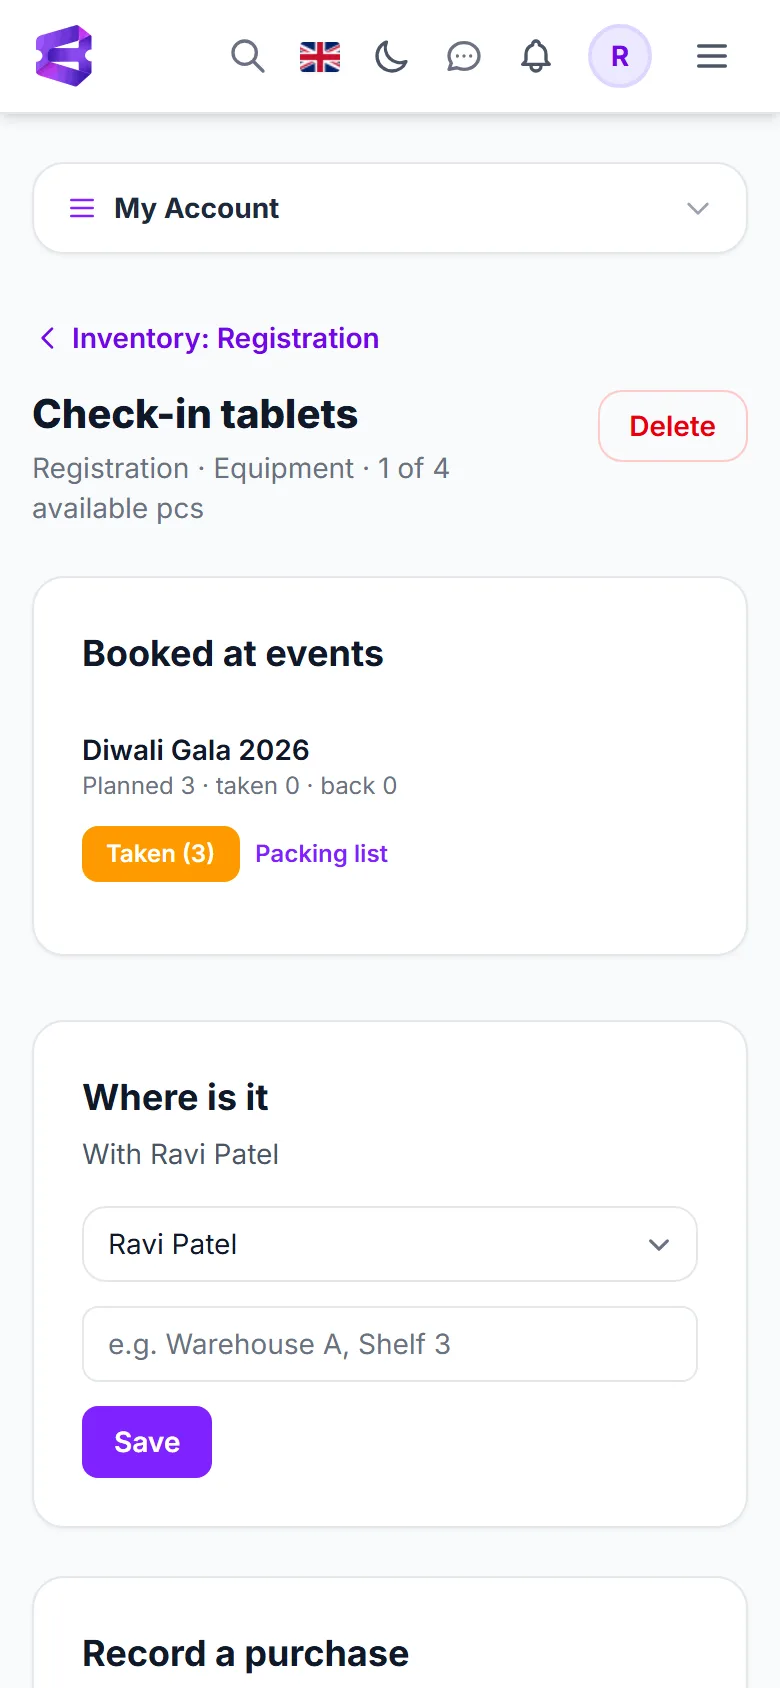
When your phone opens a label of one of your team’s items, you land on the item page. If the item is on a packing list for a current or coming event, the top panel Booked at events shows how many are planned, taken and back.

The panel ① has Taken ② to mark everything planned as taken, and All back when it is out. Below it, Where is it tells who holds the item.

A scanned label opened on a phone: the item and its quick buttons

Core members: see the team’s stock

A core member who does not lead the team gets a read-only page of the team’s items, so you know what exists and who has it before you go and fetch something.

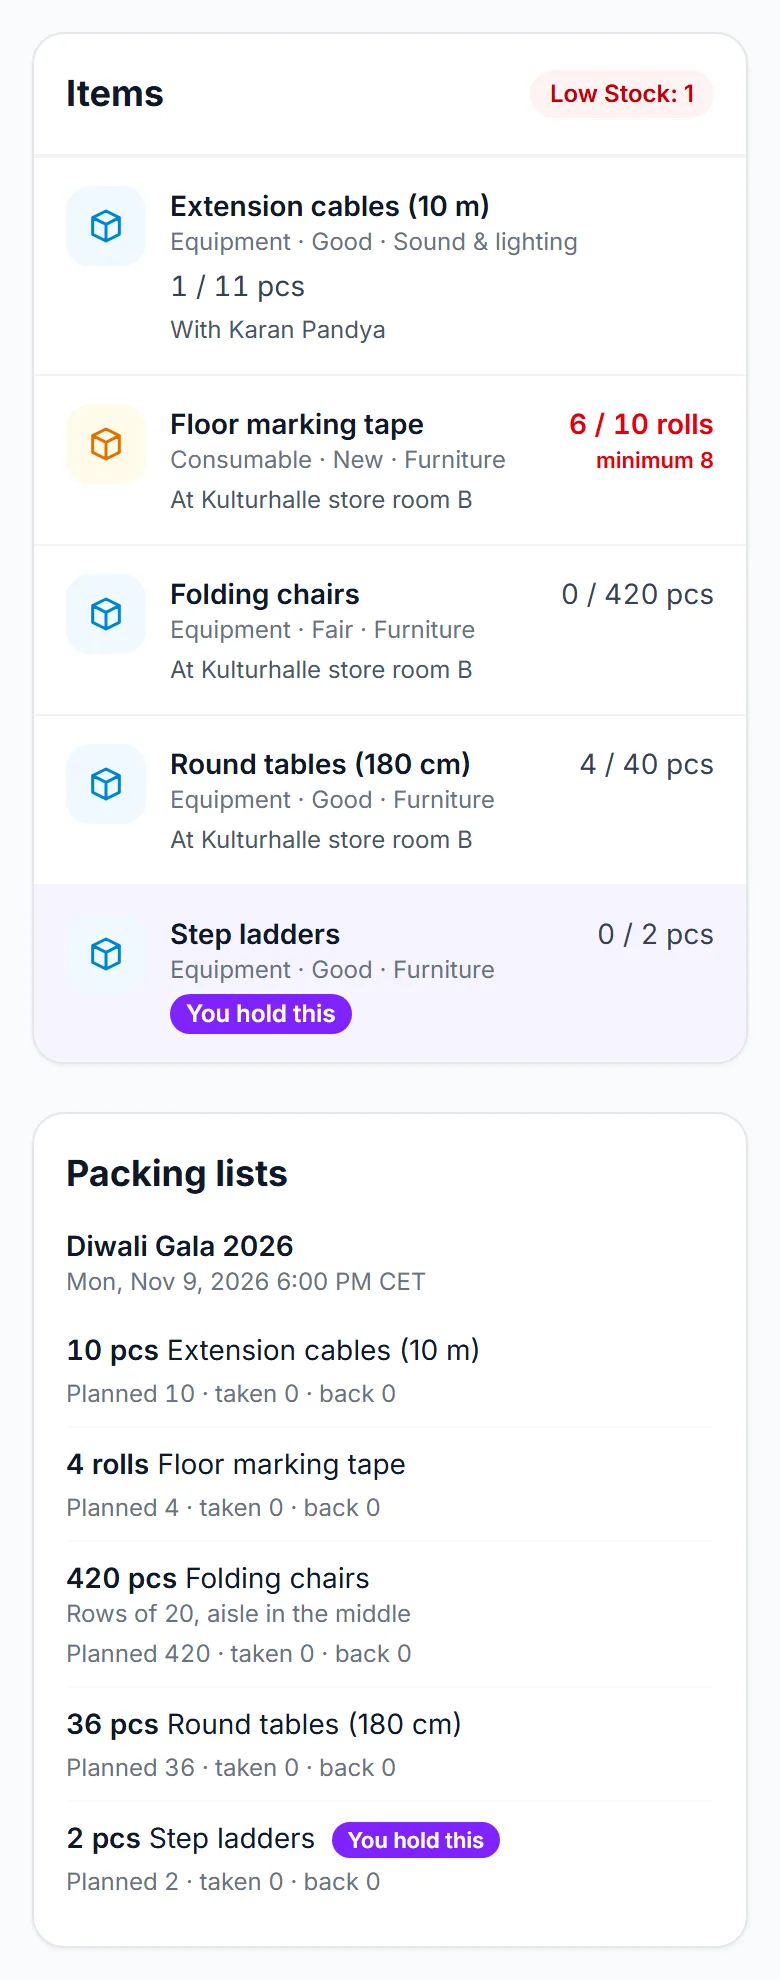
  1. On My Volunteering, under Your teams, click Inventory on your team’s card. The page is called Inventory: Hall management.
  2. Each item shows its type, condition and category, how many are available of the total, and who holds it (With …) or where it is stored (At …). Items you hold yourself are highlighted with You hold this ①.
  3. An item at or below its minimum shows its figures in red with the minimum ②; the heading counts how many items are low.
  4. Below the items, Packing lists ③ shows what the team takes to each coming event you are confirmed for: the planned quantity, how many were taken and how many came back.
The Hall management stock as a core member sees it, with the item they hold and the Gala packing list

Nothing on this page can be changed. Editing an item, saying who holds it, restocking and recording a purchase stay with the team lead and the organizer, so tell your lead when you take or return something.

Packing lists for your events

For an event you work, the packing list of your team is the Event Inventory page in the event’s Manage sidebar. You see and change only the lists of the teams you lead. See Event packing lists. After an event, missing items become a task for your team on My Volunteering.

Good to know

  • The organizer reimburses volunteers who paid out of their own pocket. You see that a purchase is To pay back but you cannot mark it paid back.
  • Receipts are private to the organizer and to you.
  • Categories are the organizer’s; you can pick one for an item but not add or remove them.
  • Items of other teams are not visible, and borrowing between teams happens by asking each other, outside the platform.

Troubleshooting

  • No Teams you lead block — the organizer has not marked you as lead of a team, or your roster entry is not linked to your confirmed email address.
  • No Inventory link under Your teams — you are not a core member of that team. Ordinary members do not see the team’s stock; ask your lead or the organizer.
  • The packing list is empty — nothing is planned for your team at a coming event you are confirmed for yet.
  • A scan is refused — the item belongs to another team or the Shared pool.

Related

Chapter 2

Account and security

2.1 My Profile

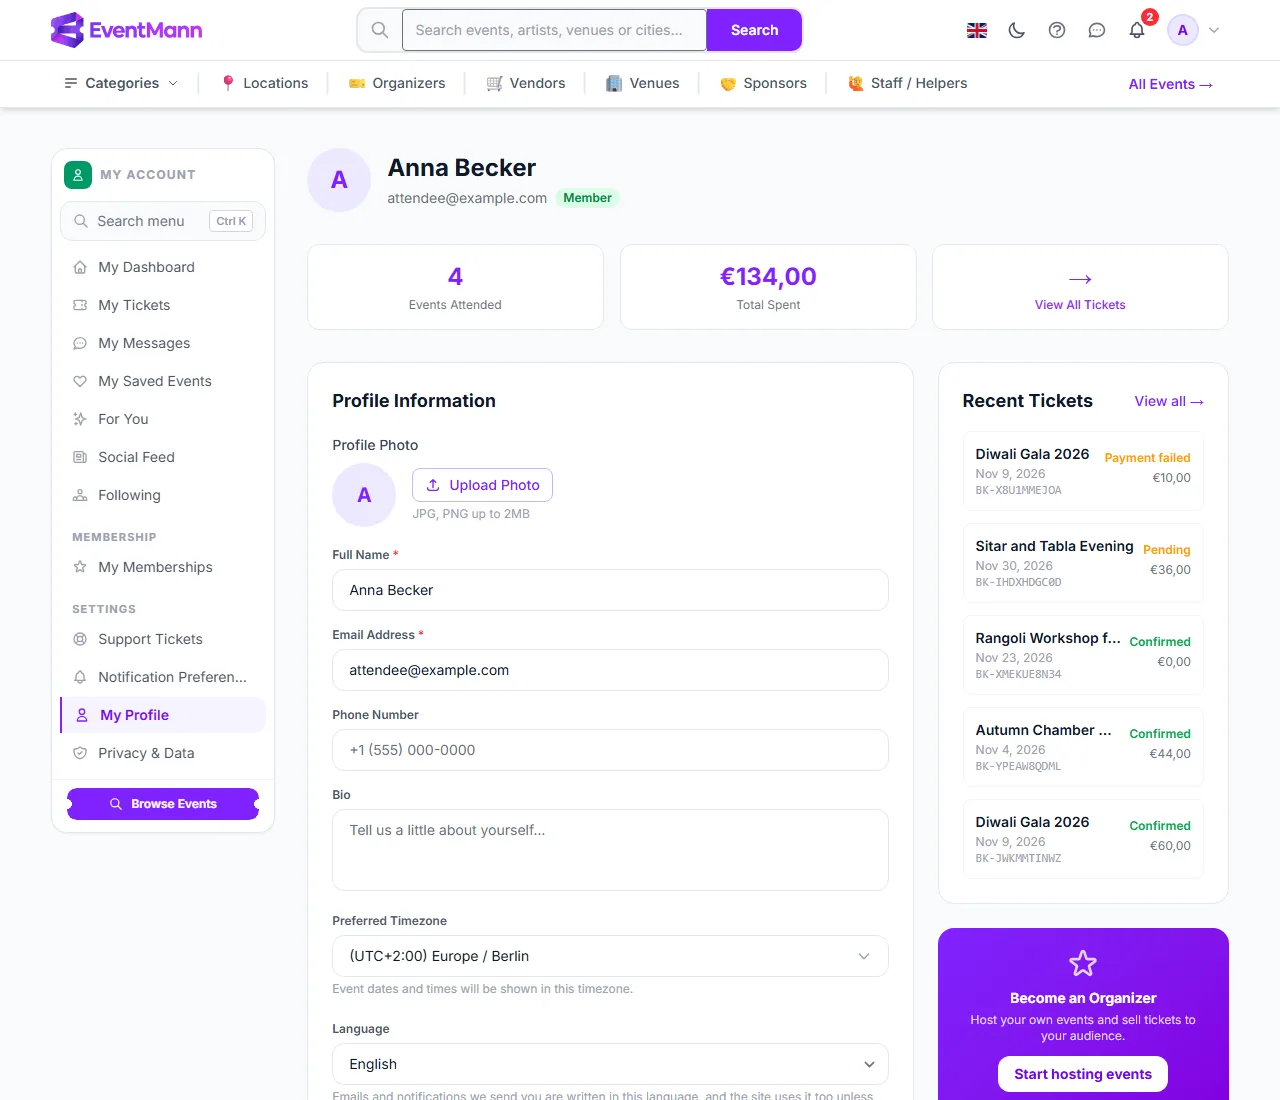
Every account on EventMann, whatever roles it holds, keeps the same core details on one page: My Profile. Open it from your avatar menu in the top right corner, or from My Profile in the sidebar of your portal. This article covers what lives there for everybody. Attendee-specific details are in Account Settings & Password.

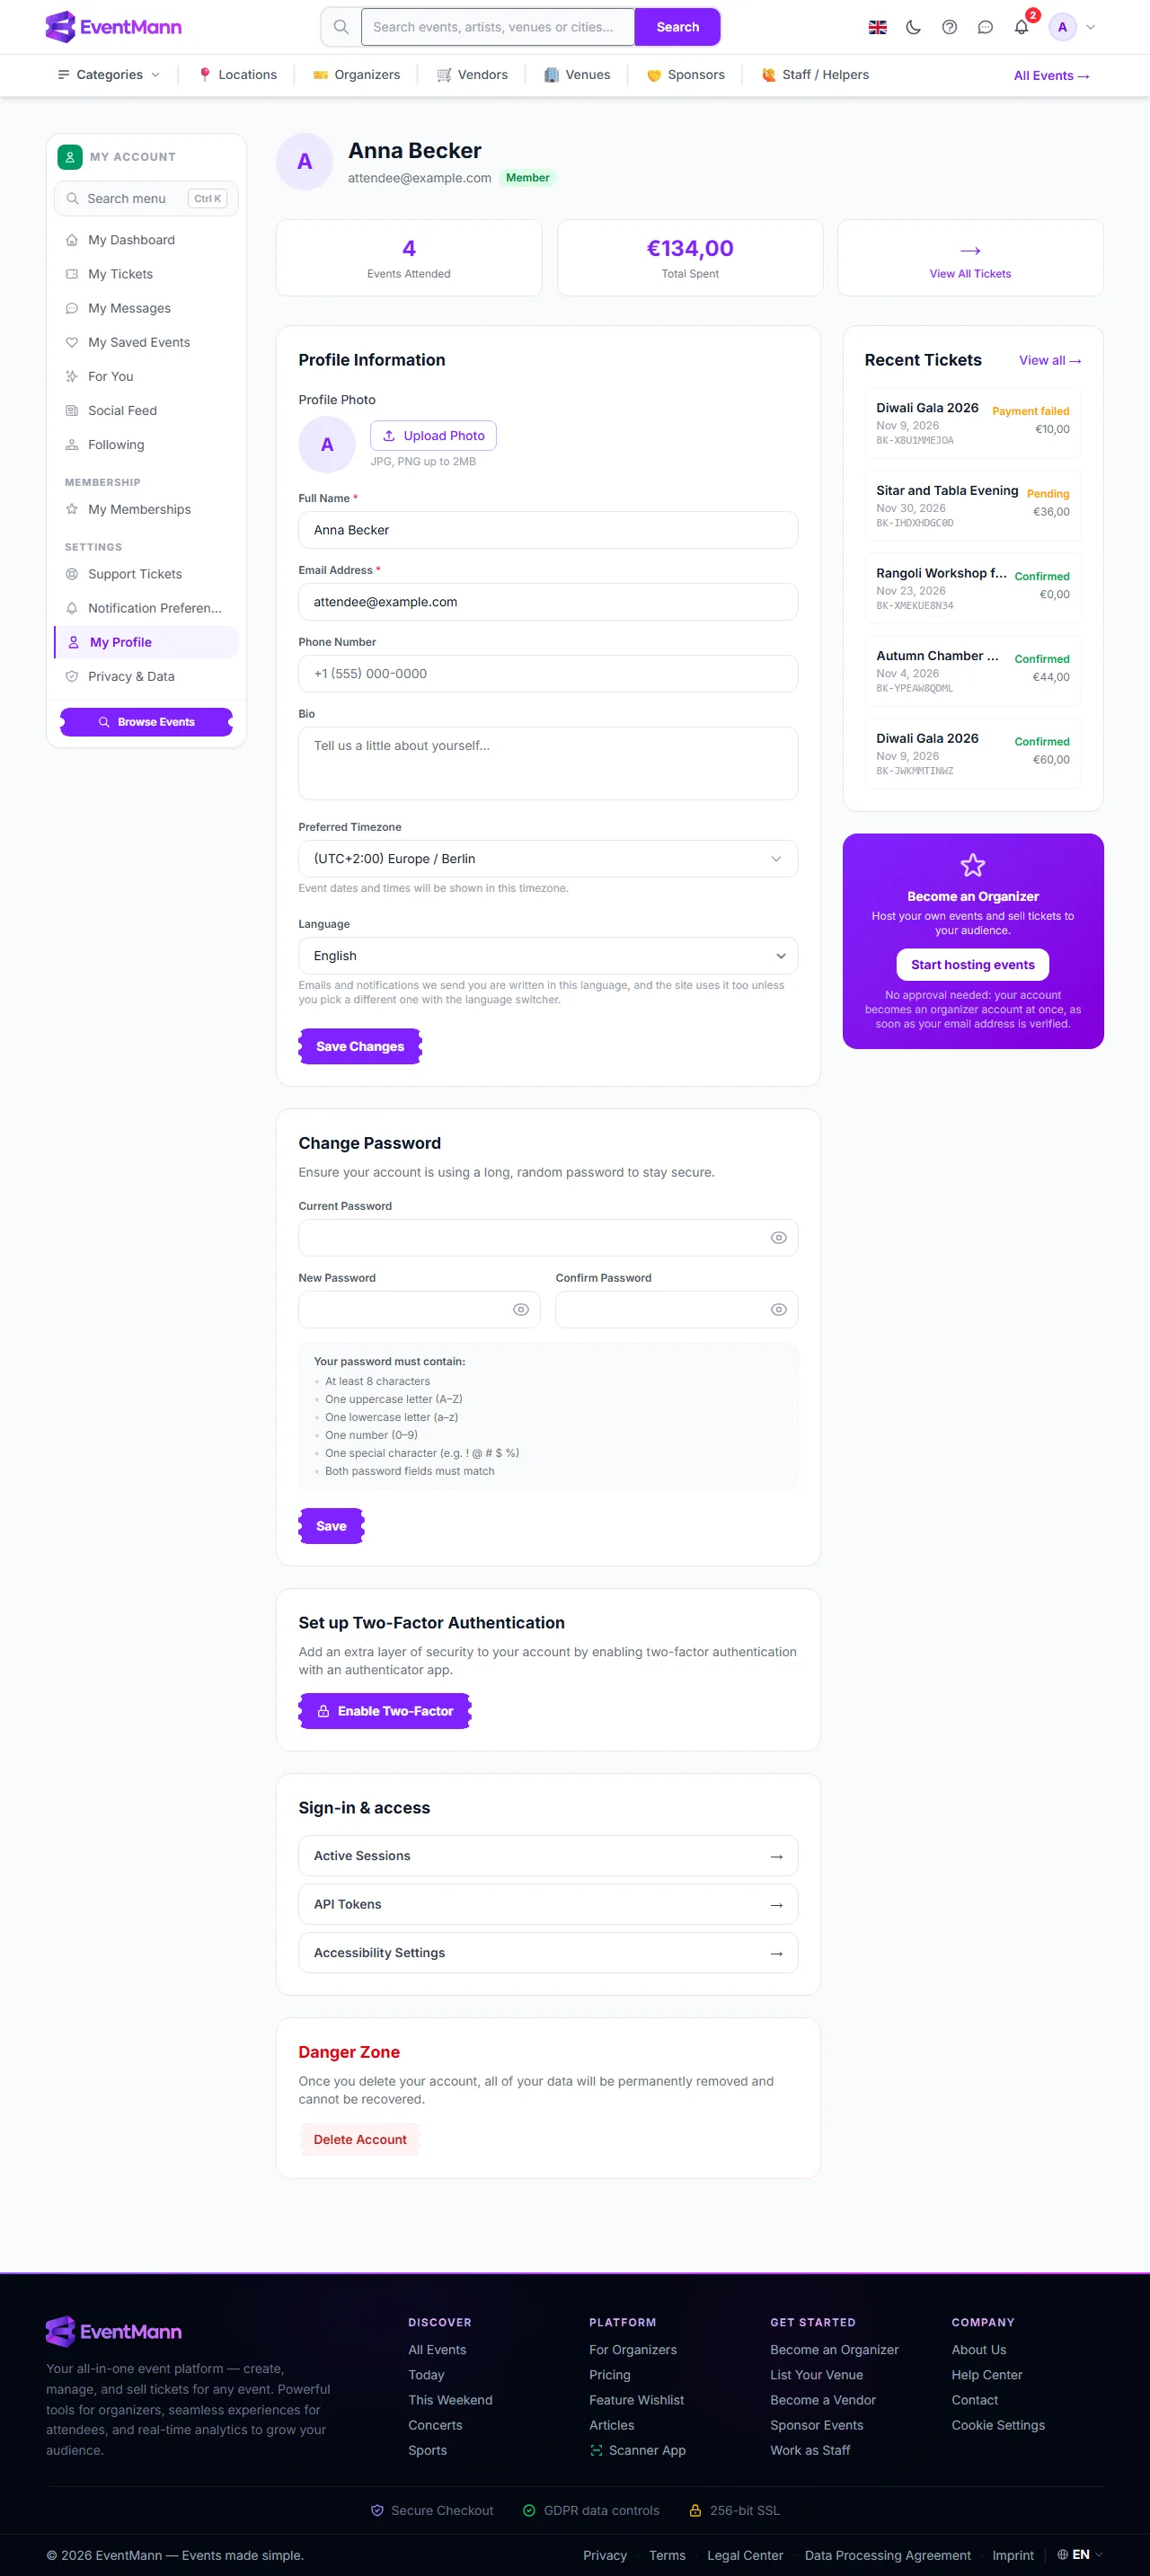
The profile form with photo, name, email, language and Save Changes

What you can do here

  • Profile photo ① — upload a JPG or PNG up to 2 MB, or remove your photo to go back to your initial. The old file is deleted when you replace or remove it; there is no undo beyond uploading again.
  • Full Name — required. It appears on your bookings and, for organizers, may appear with the events you publish.
  • Email Address ② — required. Changing it makes your address unverified until you confirm the new one with the emailed link (valid 72 hours); messages and features that need a verified address pause until then.
  • Phone Number and Bio — optional. For organizer accounts the bio may be shown publicly.
  • Preferred Timezone — the zone in which event times are shown to you. It never changes an event’s actual schedule, which always runs on the venue’s own time.
  • Language ③ — the language for the site, the emails and notifications we send you and your ticket PDFs. The flag in the top bar changes the language for the page you are on without saving anything.
  • Save Changes ④ stores the form. The light/dark switch (the moon icon in the top bar) is separate: it saves at once.

Below the form

  • Change Password, Set up Two-Factor Authentication and the Danger Zone (delete account). See Account Security & Two-Factor Authentication and Privacy & Data.
  • What else the page shows depends on your role: an attendee sees a ticket count, the total spent and recent tickets; an organizer sees event totals; an admin sees platform figures.
  • A card invites attendees to become an organizer. Its Start hosting events button turns your account into an organizer account at once, with no approval, as soon as your email address is verified (see Getting Started).

Other places that belong to your account

  • Notification Preferences — in your avatar menu. See Notification Preferences.
  • Active Sessions — the browsers signed in to your account; linked from the Sign-in & access card on your profile page. See Account Security.
  • API Tokens — personal tokens for scripts or the scanner app, in the same card. A token is shown once when you create it; copy it then.
  • Accessibility Settings — contrast, text size and motion, also in that card. See Accessibility.
  • Role switcher — if you hold more than one role, switch from the avatar menu.

Good to know

  • Your account has one name and one email for every role.
  • Social sign-in accounts (Google, Facebook, LinkedIn) have the same profile page. Their password form does not ask for a current password.

Troubleshooting

  • I changed my email and stopped getting some mail — confirm the new address with the verification email.
  • My timezone change did not move an event — expected: it only changes how times are shown to you.
  • The photo will not upload — use a JPG or PNG under 2 MB.
  • I cannot find Active sessions or API tokens — they are not in the menus; open the addresses above.

Related

2.2 Account Security & Two-Factor Authentication

Your password protects your account, and the settings in this article add layers on top of it. It explains each one: what it does, where to find it and what happens if you lose access. Most of it is on My Profile, reached from your avatar menu.

Password

On My Profile: the Change Password form, the two-factor button and the Danger Zone

Change it under Change Password ① on your profile. You enter your current password and the new one twice; the new one needs at least 8 characters with an uppercase letter, a lowercase letter, a number and a special character. If you registered with Google, Facebook or LinkedIn, you never chose a password, so the form does not ask for the current one.

If you are locked out, press Forgot your password? on the sign-in page. The emailed reset link is valid for 60 minutes; ask for a new one if it ran out.

Email verification

New accounts start unverified. Click the link in the verification email, valid for 72 hours, to confirm your address. It works on any device because it does not need you to be signed in there. Some features need a verified address, for example buying a membership, accepting a ticket transfer or publishing an event. If the link expired or never came, ask for another from the notice on the site or from your profile. Changing your email address makes it unverified again.

Two-factor authentication (2FA)

2FA adds a second step at sign-in: after your password you enter a 6-digit code from an authenticator app such as Google Authenticator or Authy.

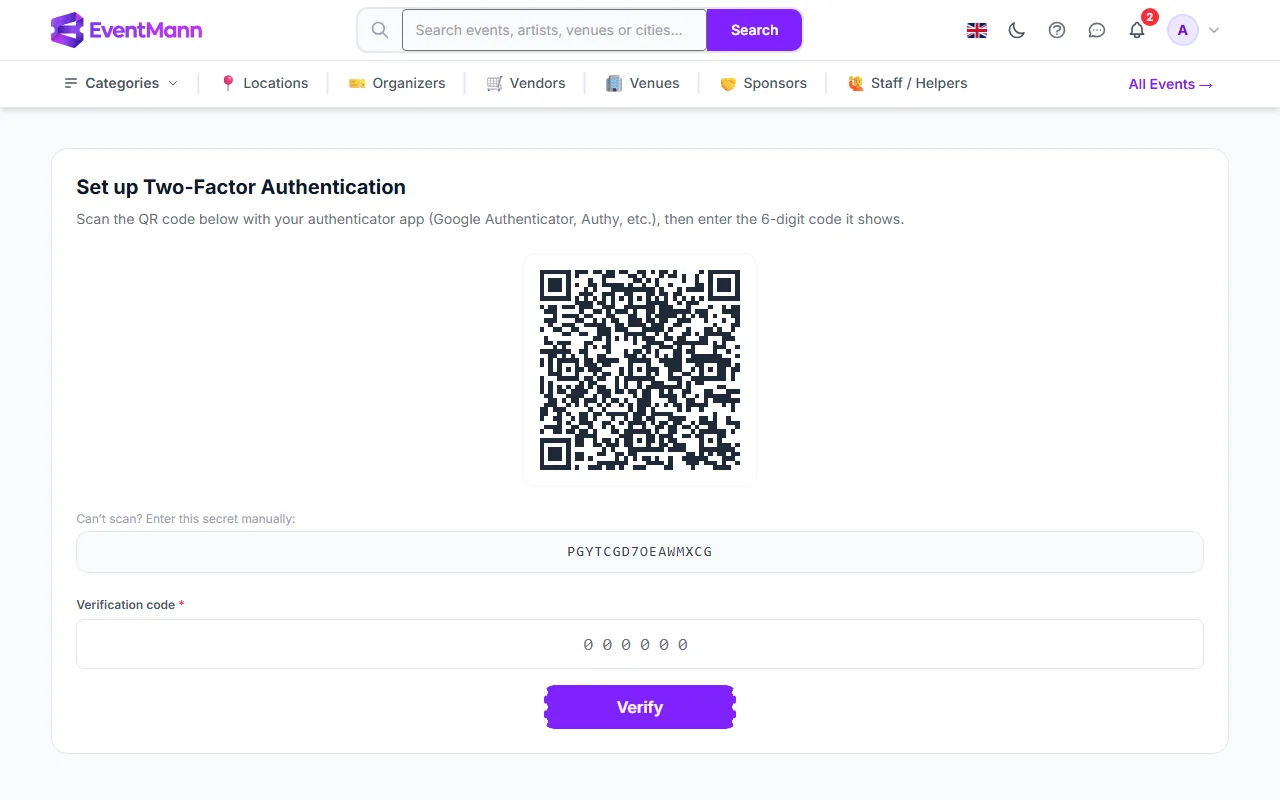
The two-factor setup page with the QR code, the manual secret and the verification code field
  1. On your profile press Enable Two-Factor ②. The setup page opens with a QR code.
  2. Scan the code with your app. If you cannot scan it, type the secret shown under Can’t scan? Enter this secret manually ① into the app.
  3. Enter the 6-digit code that your app now shows in the Verification code field ② and press Verify.
  4. You are given 8 recovery codes, shown once. Save them somewhere other than the phone with your authenticator app, such as a password manager or a printout.
  • From then on every sign-in asks for a code, after your password. At that screen, Use recovery code lets you enter a recovery code instead. Each recovery code works once and is then removed.
  • After 5 wrong codes in a row, 2FA sign-in is locked for 15 minutes.
  • To turn 2FA off, use the same section of your profile and confirm with your current password. The secret and the remaining recovery codes are deleted.
  • If you lose both your authenticator app and your recovery codes, there is no way to get back in yourself: that is the point of a second factor. Contact Support and be ready to prove who you are in another way.

Active sessions

Active Sessions: this browser marked as current and two other devices with a Sign out all others button

Open Active Sessions from the Sign-in & access card on your profile page (or go to /profile/sessions) to see every browser or device signed in to your account, with its IP address, browser and how long ago it was last active. Your current one is marked Current ①. Use the sign-out icon on a row to end that session, or Sign out all others ② to end every session except the one you are using. An account can hold at most 5 sessions; signing in on a sixth device signs out the least recently used one.

New device alerts

The first device you sign in with is trusted automatically. When you later sign in from a device we have not seen, we email you a New sign-in to your EventMann account message with the device and, when available, the location. Press Yes, this was me to confirm it. If it was not you, use the link in the email to secure your account and change your password at once.

Automatic sign-out

A session that has been idle for 30 minutes (the default) is signed out, so an unattended browser does not stay signed in. Background activity such as the notification bell does not count as activity.

Restrictions an administrator can apply

  • IP allow-listing — an administrator can limit an account to certain IP addresses. From another address you get an access-denied message instead of the sign-in screen. Ask whoever manages the account.
  • Suspension — a suspended account is signed out the next time it makes a request and cannot sign in until the suspension is lifted. Contact Support if you think it is a mistake.

Good to know

  • 2FA and your password are independent: changing your password does not turn 2FA off, and 2FA does not change the password rules.
  • Your 2FA secret and recovery codes can only be changed by the enable, confirm and disable steps above.
  • Deleting your account (Danger Zone) asks for your password and cannot be undone; see Privacy & Data.

Troubleshooting

  • My authenticator code is rejected — codes are time based. Set your phone’s clock to automatic and use the next code.
  • I lost my phone — sign in with a saved recovery code, then set 2FA up again on the new phone.
  • I used all my recovery codes and lost my app — contact Support.
  • I get no verification or reset email — check spam and the address on your account, then ask for a new link; old ones expire.
  • I was signed out on one device after signing in on another — you reached the limit of 5 sessions.

Related

2.3 Accessibility

EventMann has four settings you can adjust for yourself, and a set of accessibility features that are built into the pages. This article says what is there today and how to report something that does not work for you. The settings page is linked as Accessibility Settings from the Sign-in & access card on your profile page, and is also at /accessibility/settings, which works without signing in.

Accessibility Settings with High Contrast Mode, Reduce Animations, Screen Reader Optimised, a font size slider and Save Settings

The settings

  • High Contrast Mode ① — increases the contrast between text and background colours.
  • Reduce Animations ② — minimises motion effects and transitions. Nothing stops working; only the movement around it is removed.
  • Screen Reader Optimised — shows clearer focus outlines and keeps the skip links visible when they get keyboard focus.
  • Font Size ③ — a slider from Small to Extra Large (the default is Medium) that changes the text size across the platform.
  1. Open Accessibility Settings from your profile page, or go to /accessibility/settings.
  2. Switch on what you need and move the slider.
  3. Press Save Settings ④. The page confirms and the setting applies on every page.

When you are signed in, your choices are saved to your account and follow you to other devices. When you are signed out, they are kept for your current browser session only. They are separate from the light and dark theme, so you can combine both.

Built into the platform

  • Keyboard use — interactive elements can be reached and used without a mouse, and focus is visible.
  • Structure — semantic page structure and landmarks so screen readers can move through a page.
  • Forms — inputs have labels, and errors are described in text next to the field, not only in colour.
  • Accessible seating — organizers can mark seats and whole sections as wheelchair-accessible. Those seats carry a wheelchair symbol on the seat map and in the seat list, and you can filter to show only accessible seats. The organizer enters this information, so ask them if it matters for your booking.
  • Keyboard seat choice — every seat map has a seat list of real buttons that announce section, row, price, accessibility and availability. The picture of the map itself is pointer-only; the list is the full equivalent.

Known limitations

  • Images and descriptions added by organizers may lack alternative text or structure; that depends on the organizer.
  • PDF tickets contain text but are not optimised for every screen reader. The ticket page in the browser shows the same information.
  • Content from other providers, such as maps and payment forms, is outside our direct control.

Our aim is to conform to the Web Content Accessibility Guidelines (WCAG) 2.1 at level AA. The page Accessibility Statement, linked from the settings page, describes our approach and these limits.

Report a problem

If you meet a barrier, such as a control you cannot reach by keyboard, text that does not resize or something a screen reader mishandles, open a support ticket or use the contact details on the Accessibility Statement. Name the page and describe what happened. Accessibility reports are treated as faults, not as feature requests.

Good to know

  • The settings page works signed out as well, so you can adjust the site before you create an account.
  • Your browser’s own zoom works as usual; the settings here are in addition to it.

Troubleshooting

  • I cannot find the accessibility menu — it is not in the top menu; open it from the Sign-in & access card on your profile page, or go to /accessibility/settings directly.
  • My font size did not stick — press Save Settings. When signed out, the choice lasts only for the browser session.
  • The seat map cannot be used with my keyboard — use the seat list beside it.

Related

2.4 Supported Browsers & Devices

EventMann is a web application built for current browsers, so how well it runs depends mostly on how up to date your browser is. This article says what to expect, what must be switched on, and a limit that matters if you check people in with an iPhone.

Recommended browsers

  • Chrome, Firefox, Safari and Edge — the latest version of each is recommended.

The site uses modern web features, and the interactive parts (ticket quantities, menus, the payment form) rely on JavaScript, which must be enabled. An old browser is far more likely to cause trouble than any particular version number. Updating is the most reliable fix for layout or button problems.

Devices

The site adapts to desktop, tablet and phone screens. There is no EventMann app for attendees: you buy tickets, show them and manage your account in a browser on any device. Your tickets are web pages and PDFs, so a phone with a browser is enough at the door. A separate scanner app and an installable scanner web page exist for the people who check tickets (see below).

What has to be on

  • JavaScript — without it most pages cannot work.
  • Cookies — signing in and checkout use the site’s own cookies. The cookie banner lets you choose what else is allowed; refusing optional cookies does not stop you from buying.
  • Access to Stripe’s payment form — the card and payment form is loaded from our payment provider. If an ad blocker or a strict network prevents it, the page says The payment form could not load. Please disable any ad blocker for this page, or reload it.
  • Location (optional) — only if you ask for events near you on the For You page.
  • Notifications (optional) — only if you turn on browser push in Notification Preferences.

Check-in scanner on iPhone

Organizers and door staff can install the check-in page as a home-screen web app from the check-in page itself. There is no App Store listing, because iOS offers no install prompt for web apps. In Safari press the Share button and choose Add to Home Screen. This needs iOS 16.4 or later: on earlier versions the installed app cannot use the camera, so scan from the Safari tab instead. Android and desktop Chrome show a normal install button.

  • The installed scanner contains only the scanner. Signing in again, if your session ended, opens in your normal browser.
  • An Android scanner app is also offered as a direct download, linked as Scanner App in the site footer.

Good to know

  • Attendees do not need to install anything to show a ticket: open the ticket page or the PDF.
  • The light and dark appearance follows the switch in the top bar; text size and contrast are in the accessibility settings.

Troubleshooting

  • The scanner cannot use the camera after I installed it on my iPhone — check that iOS is 16.4 or later. Otherwise use the Safari tab version.
  • A button does nothing or the layout looks broken — update your browser, then reload. Also try without extensions that block scripts.
  • No page shows interactive content — check that JavaScript is enabled.
  • The payment form does not appear — disable the ad blocker for the page or try another network.

Related

2.5 Support

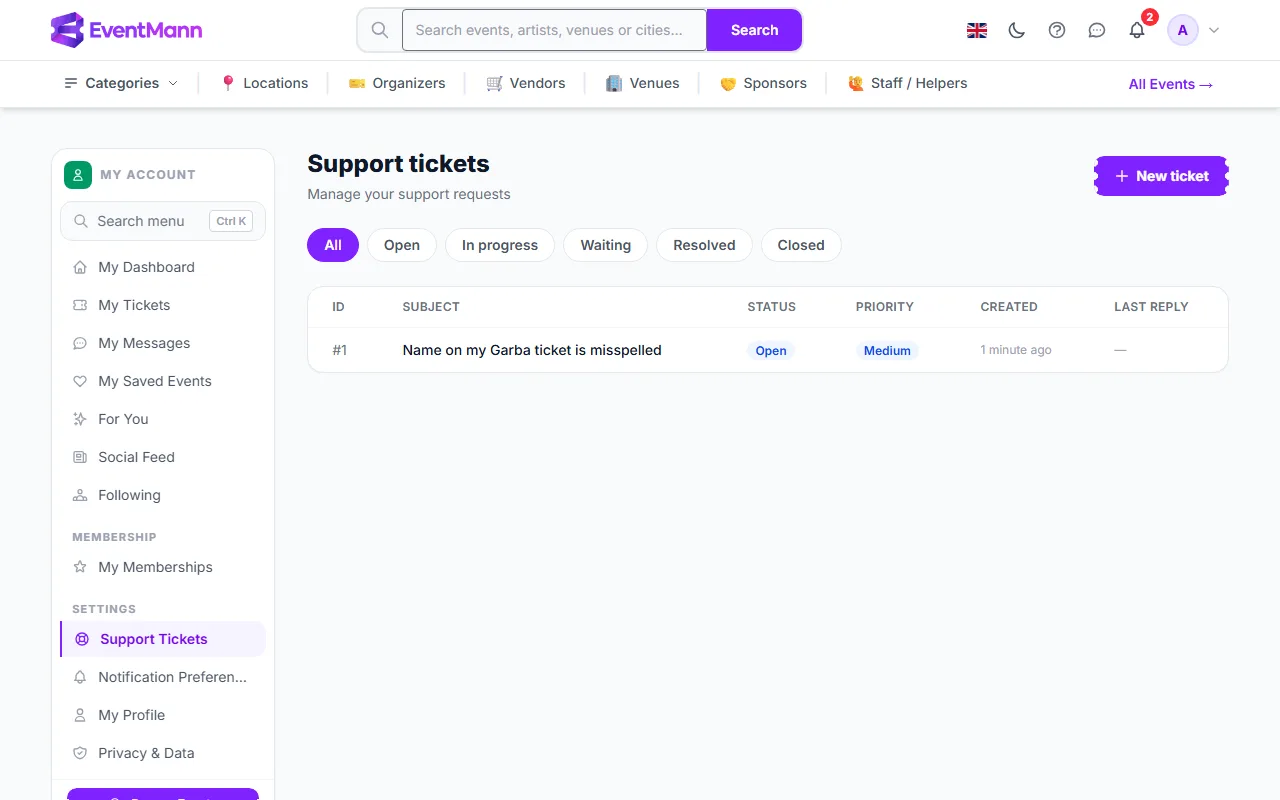
Use Support for anything about the platform itself: your account, a payment, a technical error, or a problem that the organizer cannot solve. Questions about a specific event, such as directions, the programme or what is included, are faster to answer if you ask the organizer (see How to Contact the Organizer). Open Support Tickets in your account sidebar. You need to be signed in; guests can use the Help & Contact page.

Support tickets with a status filter, a New ticket button and one open ticket

Raise a ticket

  1. Open Support Tickets and press New ticket ①.
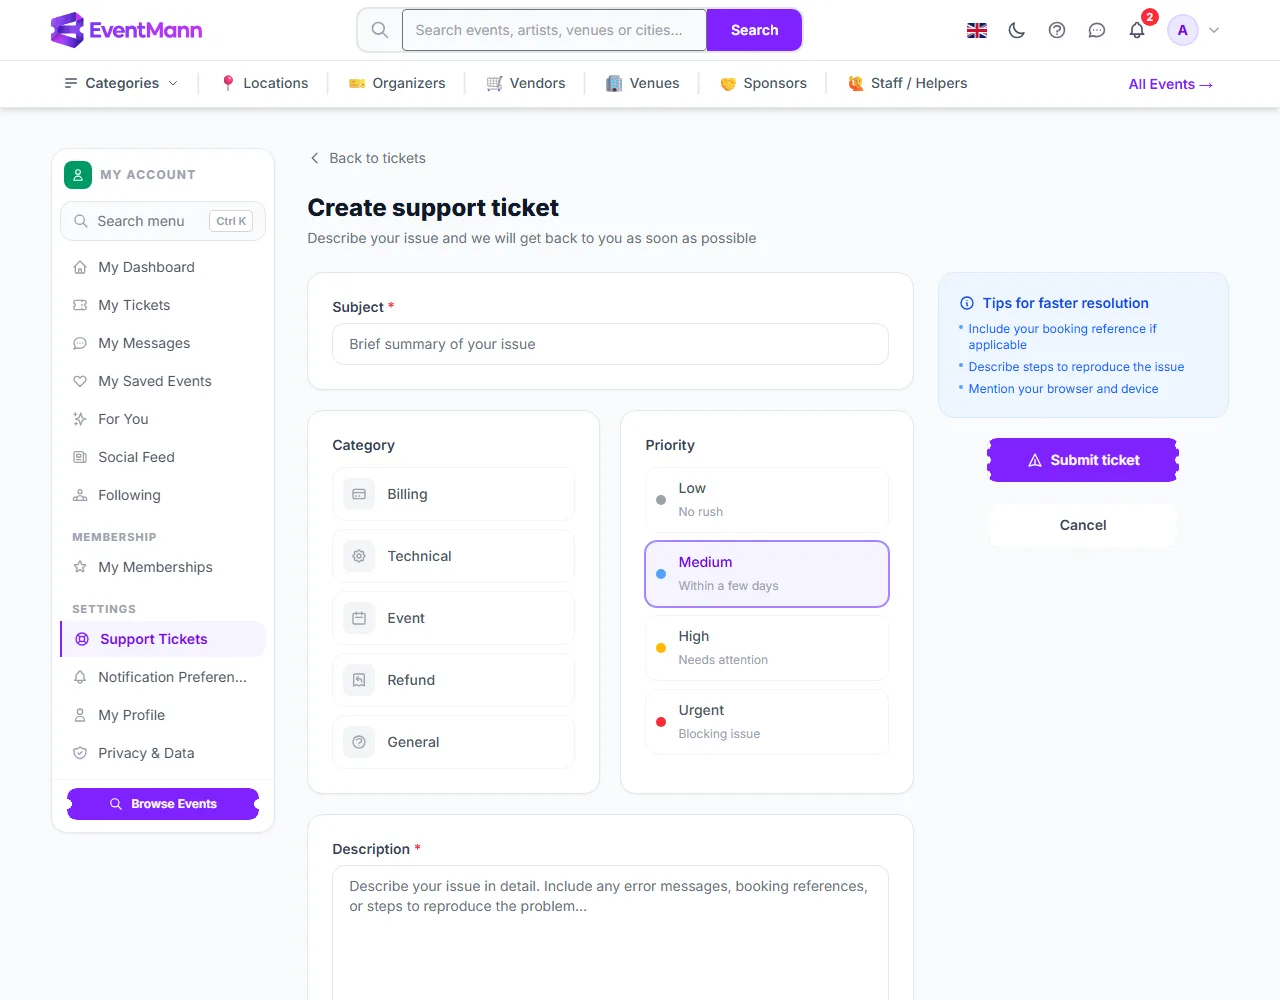
The new support ticket form with subject, category, priority and description
  1. Write a short Subject ①.
  2. Choose a Category ②: Billing, Technical, Event, Refund or General.
  3. Choose a Priority ③: Low (no rush), Medium (within a few days), High (needs attention) or Urgent (blocking issue). Pick honestly: it helps the right things get looked at first.
  4. Describe the problem in the Description (up to 5,000 characters). The tips beside the form suggest what to include: your booking reference, the steps to reproduce the problem, and your browser and device.
  5. Press Submit ticket ④.

Always give the booking reference (it starts with BK-) for anything about a purchase: it is how we find your order. You find it on your confirmation email and on the order in My Tickets.

Follow a ticket

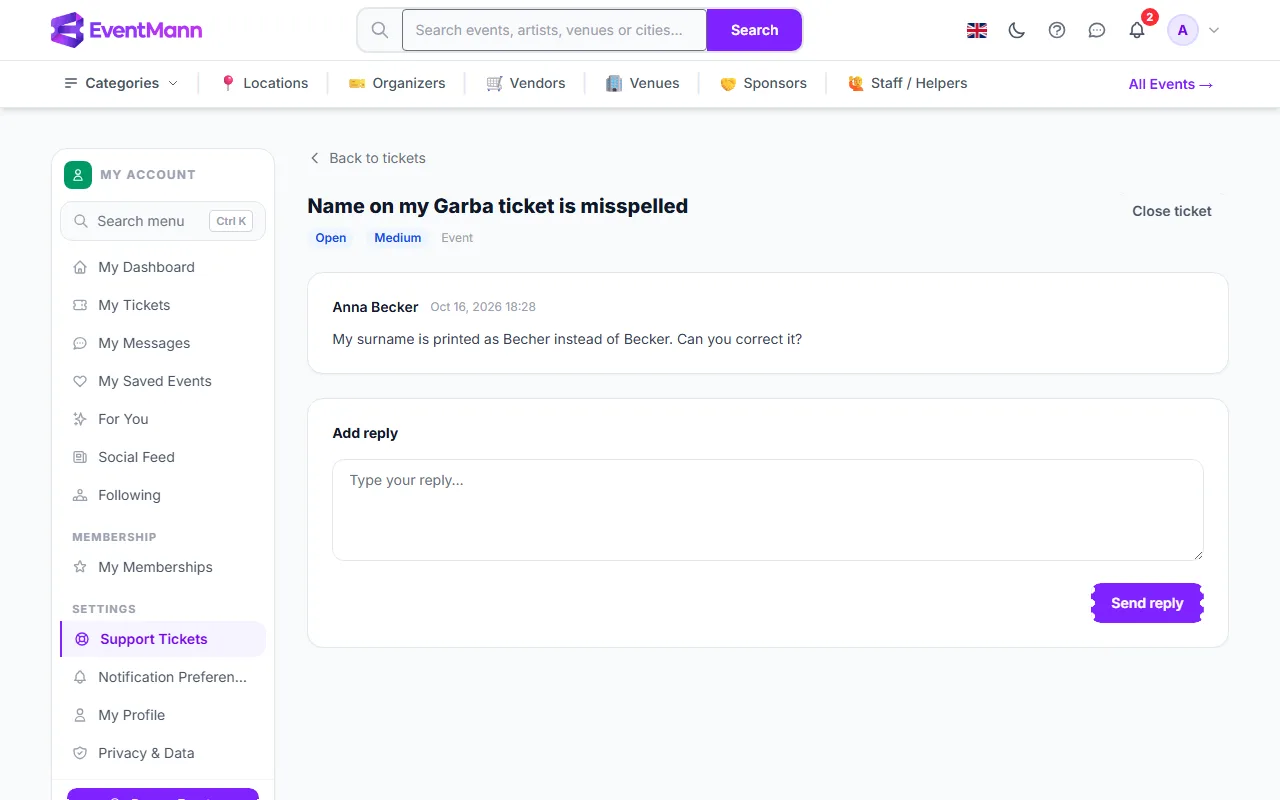
A support ticket with the question, a Close ticket button and a reply box
  • The list shows each ticket’s number, subject, status, priority and last reply. Filter it with All, Open, In progress, Waiting, Resolved or Closed.
  • Open a ticket to read the conversation. Type under Add reply ② and press Send reply. New answers appear in the thread without reloading the page.
  • Close ticket ① ends the conversation when you no longer need help.
  • You are notified of a reply and when a ticket is marked resolved, in the bell and by email, according to your Notification Preferences (Support reply and Ticket resolved).

What the statuses mean

StatusMeaning
OpenYour ticket is in the queue and has not been answered yet.
In progressThe support team has replied and is working on it.
WaitingOn hold while the ticket waits for further information.
ResolvedThe team believes the issue is dealt with. If you reply, the ticket reopens automatically.
ClosedFinished; no more replies are expected.

Good to know

  • Only you, the person handling the ticket and administrators can see a ticket. It is not public.
  • Replying to a resolved ticket reopens it; you do not need to open a new one.
  • There is no fixed response time. A correct priority and a clear description speed things up.
  • Support cannot decide a refund for an organizer’s event: the organizer decides, under their cancellation terms. See How to Get a Refund.

Troubleshooting

  • My ticket has been Open for a while — it moves to In progress when someone replies. Until then it is waiting in the queue.
  • I forgot something — open the ticket and add a reply with the missing information.
  • It says Resolved but it is not — reply on the same ticket and it reopens.
  • I cannot reach the support form — sign in first. If you cannot sign in, use the contact page.

Related