




Custom Roles
Organizer Guide
3 min read
Help articles may not be fully accurate — they can lag behind the app due to frequent updates and automated translation. If in doubt, please contact support.
On this page
- 1. What you can do here
- 2. Build a role
- 3. Good to know
- 4. Troubleshooting
- 5. Related
The five built-in roles cover most teams, but not always exactly. A custom role lets you tick the exact permissions a person needs. Open Settings → Teams → Custom Roles.
What you can do here
- Create a role — a name and a set of permissions, up to 80 characters for the name.
- Start from a preset — one click fills the boxes from a built-in role. The number beside each preset is how many permissions it holds.
- Edit or delete a role in the Your Custom Roles list below the form (it shows how many members use each).
- Assign it to a member from the invite form or from the member’s row on the Team Members tab.
Build a role
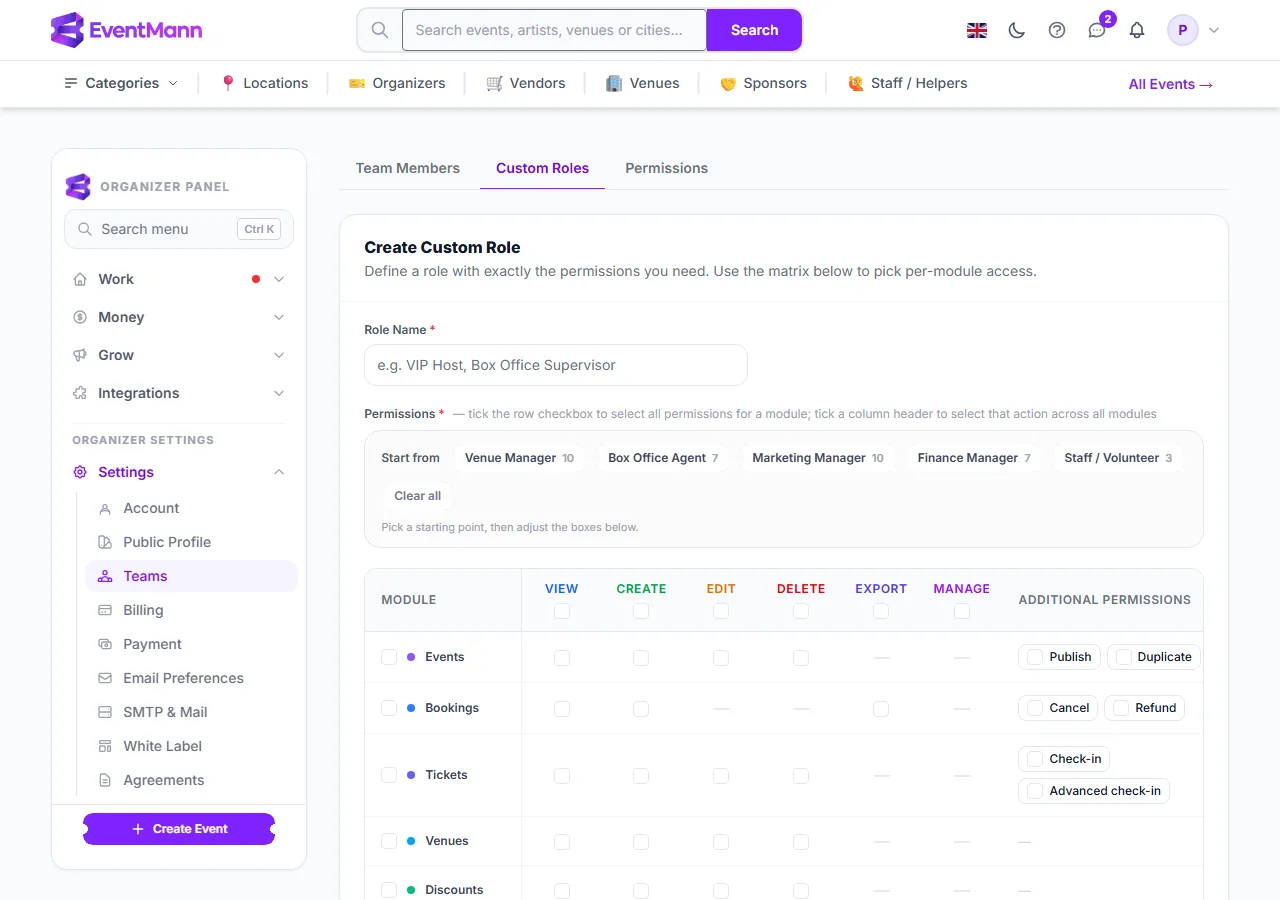
- Type a Role Name ①, for example “Door Supervisor” or “VIP Host”.
- Optionally click a preset ② such as Box Office Agent. It ticks that role’s boxes once; you then adjust them. Clear all empties the matrix.
- Tick boxes in the matrix. A row tick selects every standard action for a module; a column header tick ③ selects one action (View, Create, Edit, Delete, Export, Manage) across all modules.
- Some modules add extras in the last column — for example Events adds Publish ④ and Duplicate, Bookings adds Cancel and Refund, Tickets adds Check-in and Advanced check-in, Finance adds payouts, invoices and refunds, and Volunteers adds a team-lead permission for the team a person leads.
- Click Create Role. At least one permission is required.
- Assign the role: choose it in the Custom Role (optional) list when inviting, or in the member’s row afterwards.
Good to know
- A custom role is a plain, explicit list. It does not keep tracking a preset: if a built-in role changes later, roles you copied from it stay as they were.
- A custom role replaces the member’s built-in role. The built-in role is still stored and becomes the fallback again the moment the custom role is removed.
- Deleting a custom role does not remove anyone from your team; those members fall back to the built-in role chosen for them.
- Roles belong to your organizer account, so the same role works across all your events, present and future.
- Team members work in the Manage area of your events. Your own organizer panel — settings, billing, your Stripe connection and this team list — stays with you.
Troubleshooting
- The form will not save — a name and at least one ticked permission are required.
- A member lost access after I deleted a role — expected; they fall back to their built-in role, which is usually narrower. Recreate the role or assign another.
- I changed a role but nothing changed for the member — check the Permissions tab for that member and confirm the custom role is actually assigned to them.