




Check-in & Entry Management
Help articles may not be fully accurate — they can lag behind the app due to frequent updates and automated translation. If in doubt, please contact support.
On this page
Check-in is where you scan tickets at the door. It opens as a full-screen door screen with three tabs — Scan, Orders and Stats — works from any phone or tablet browser, and keeps working when the venue Wi-Fi does not. Open it from Day-of Operations → Door (scan tickets) in the event’s Manage menu. The Door page (/door) lists every event you can check people into, with tickets sold against capacity — the simplest bookmark for a team on the night.
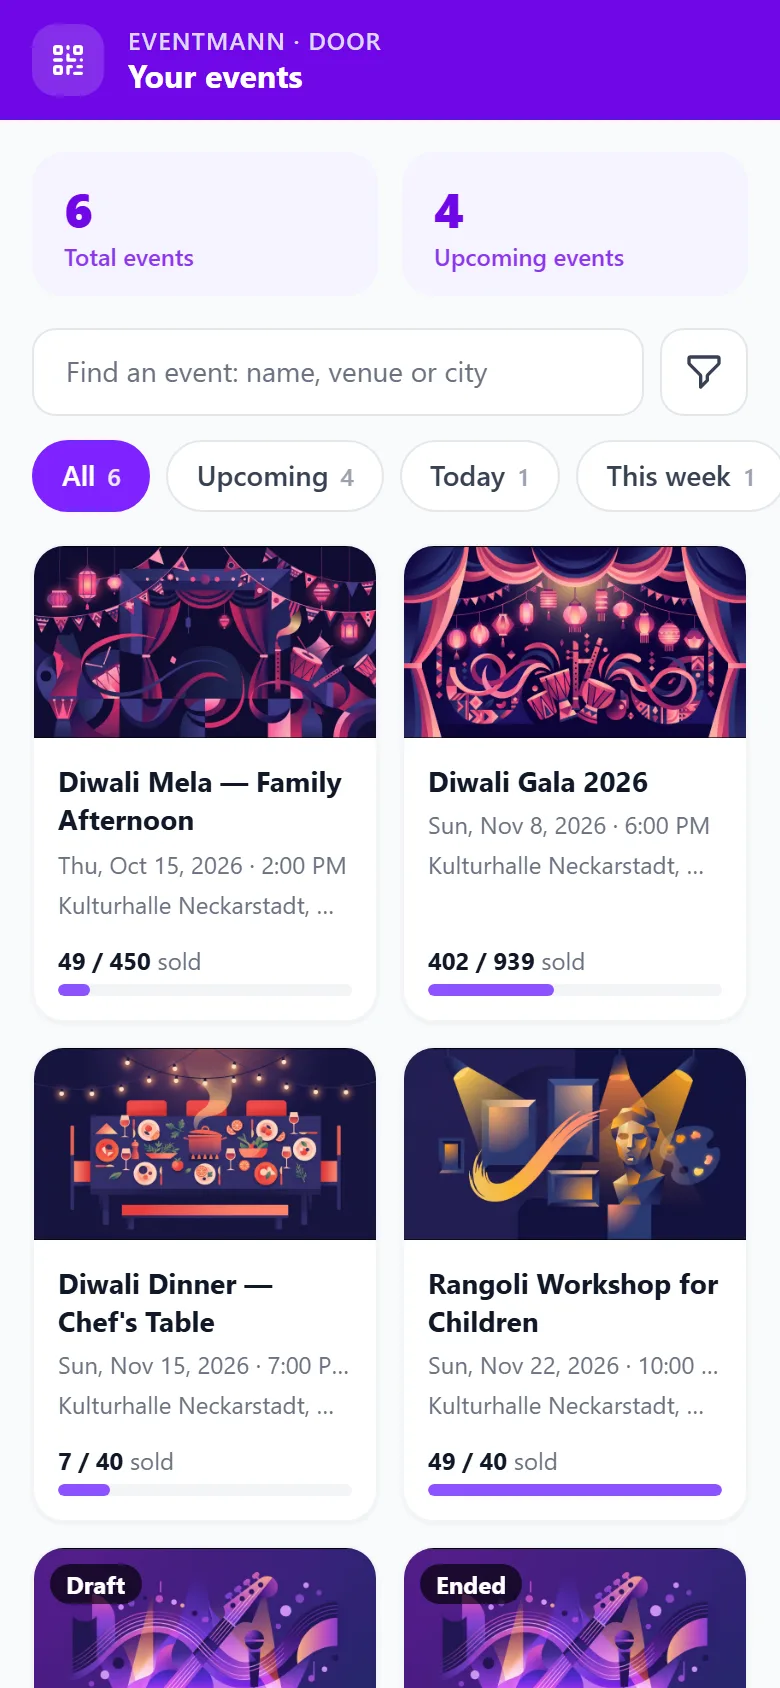
Tap an event ① to open its door screen.
Install it to the home screen first
The scanner is an installable app (a PWA), separate from your general EventMann bookmark, and it opens straight to this event’s door screen; the install steps are at the bottom of its Stats tab. Do this before doors open, not at them:
- iOS Safari (16.4+) — there is no install prompt on iPhone; the page walks through Share → Add to Home Screen instead. Camera scanning inside an installed app needs iOS 16.4 or later; the page warns you if your version is older.
- Android / desktop Chrome — a one-tap Install button appears automatically.
- Once installed, the app is scoped to the scan screen only — if your session expires mid-shift, signing back in opens in the regular browser, not inside the installed app. That is a deliberate trade-off so the installed icon can never turn into a second admin panel.
- Installing for a second event creates a separate home-screen icon; it does not overwrite the first.
The door screen
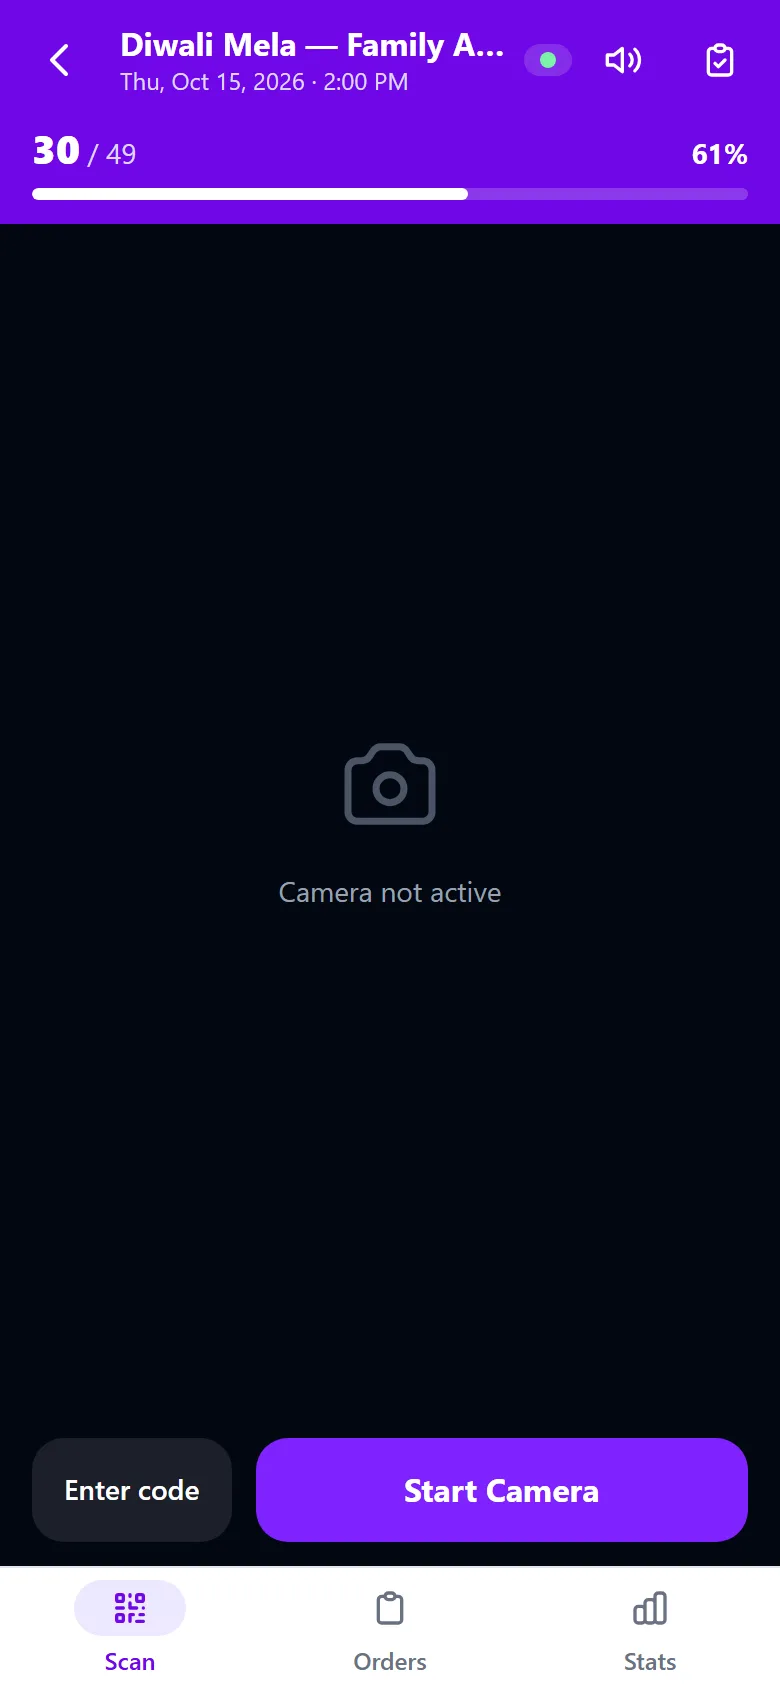
The purple bar at the top always shows how many guests are in ① (here 31 of 49 tickets) with a progress bar. The coloured dot beside it is green while you are online and amber when you are offline, with a count of scans waiting to sync. Enter code ② types a code instead of scanning, Start Camera ③ opens the camera, and the tabs at the bottom switch between Scan, Orders ④ and Stats.
Scanning tickets
- Tap Start Camera and point it at the attendee’s QR code (screen or print).
- A large banner gives the verdict. Admitted is green when the order is now complete and violet when other tickets of the same order are still outside (it says, for example, “1 of 2 in this order”). Not valid is red: the ticket was not found or cannot be admitted.
- If a ticket was already scanned you get an amber Already inside banner — not an error, just a heads-up. Tap Check out on it when a guest is leaving, so the inside count stays honest; a check-out shows a blue Checked out banner.
No camera, or a cracked screen? Tap Enter code instead — it accepts the ticket’s own token, the booking reference, or a partial name/email, in that order, so you can find someone even without their ticket in hand. The Orders tab lists the latest orders and finds any order as you type, with a check-in or check-out button on each ticket.
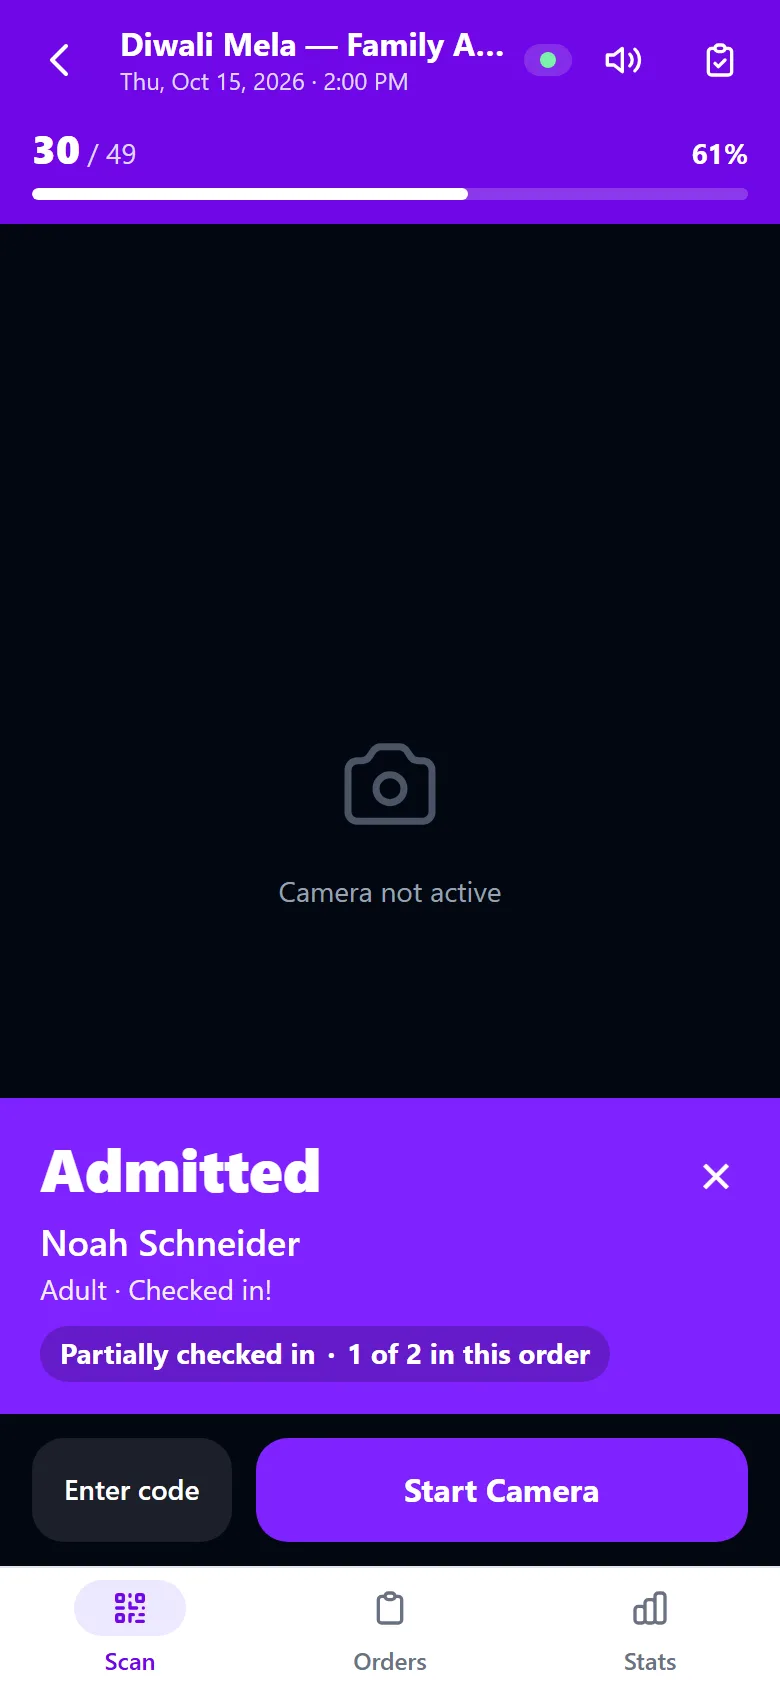
The verdict ① comes first, in large type, then who it is and why. The banner clears itself after a few seconds; a duplicate (Already inside) stays longest.
The Stats tab
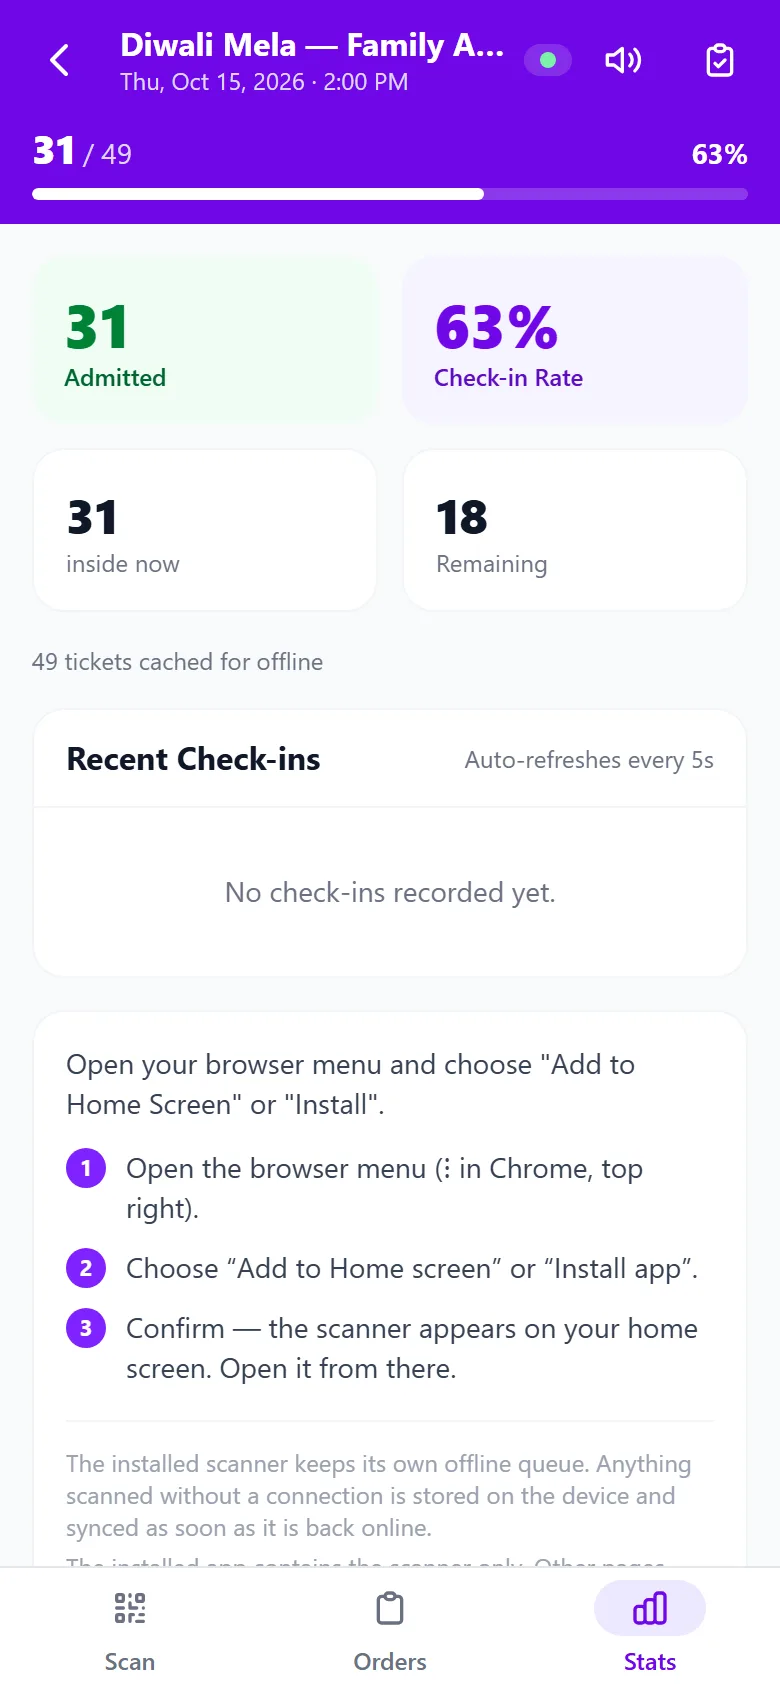
Stats shows how many are admitted, the check-in rate, how many are inside now and how many are still to come, how many tickets are cached for offline use, and a live list of recent check-ins (it refreshes every few seconds) with Undo check-in and Check out. At the bottom are the install steps, and on Android a link to the native scanner app, which has the same offline queue and a faster camera.
The Orders tab
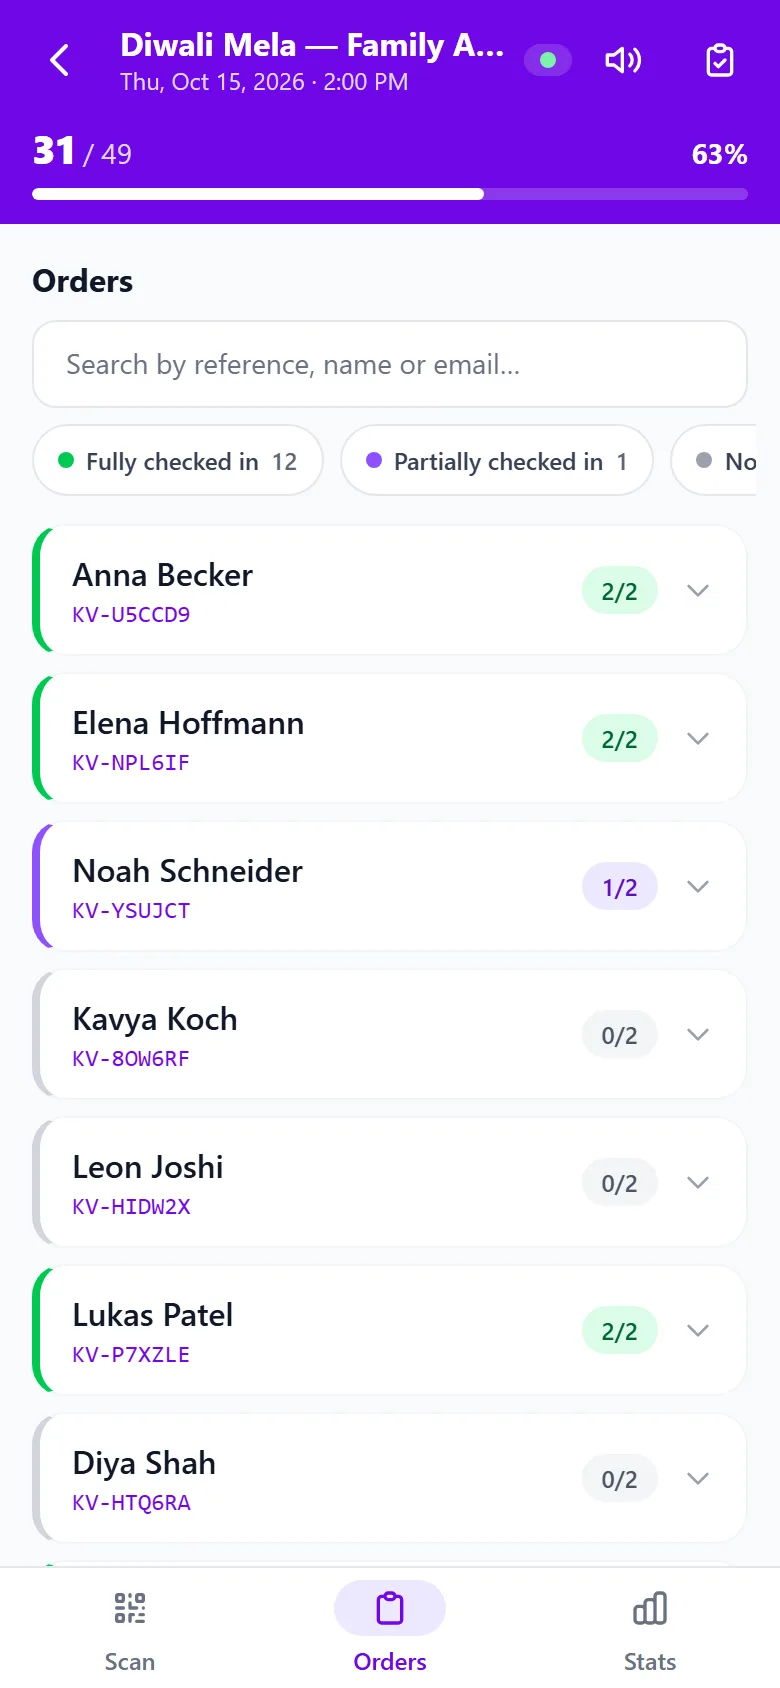
The Orders tab lists the latest orders and finds any order as you type in the search box ① (reference, name or email). The three chips filter by state — Fully checked in, Partially checked in, Not arrived yet — with a count on each. The colour bar and the figure on each row (2/2, 1/2, 0/2) show how many of the order’s tickets have arrived. Tap a row to expand its tickets and use Check in or Check out on each one.
Undo, sound, and the attendee list
- Undo check-in is available for 5 minutes after the scan; past that window the check-in log no longer offers an Undo button.
- Sound toggle — iOS installed apps have no vibration API, so an audible beep is the only non-visual confirmation a scan landed; the on/off choice is remembered per event.
- The clipboard icon at the top of the door screen (for people allowed to manage check-in) opens Advanced Check-in: search by name, email or reference, bulk check-in, no-shows and live rates.
Offline mode
- Load the scan page once while online — it downloads a manifest of every valid ticket so scans can still be validated with no signal.
- Everything the camera scan needs, including the QR decoder, is served by EventMann itself and kept on the device with the page, so the camera keeps reading codes with no connection.
- Scans made offline queue on the device and show a pending-sync count; they upload and reconcile automatically once connectivity returns.
- The server is always the source of truth for duplicates — if the same ticket was checked in elsewhere while you were offline, the sync marks it “already in” rather than double-counting it.
Good to know
- Only confirmed bookings resolve at all — a cancelled or refunded order’s ticket will not scan, even if the attendee still has the QR code.
- If the event’s venue has a capacity set, scanning stops with a “venue at capacity” message once that many people are checked in — regardless of how many tickets were sold in total.
- Team members need the box_office or staff sub-role (or an equivalent custom permission) to open this page at all. For helpers who are not on your team, create a door pass instead: no account needed, and only this event’s door.
Troubleshooting
- “Not found” on a ticket you know is valid — the order may have been cancelled or refunded since it was booked; check its status in Orders.
- Scanning stopped working for everyone — check whether the venue’s capacity has been reached; every further scan is blocked until you raise it or check people out.
- Can’t undo a wrong check-in — the 5-minute window has passed; there is no override past that point.
- Camera won’t open on an installed iPhone app — confirm the device is on iOS 16.4 or later; older versions block camera access for installed web apps.