




Create Event
Help articles may not be fully accurate — they can lag behind the app due to frequent updates and automated translation. If in doubt, please contact support.
On this page
- 1. Before you start
- 2. 1. Event Basics
- 3. 2. Date & Time and Location
- 4. 3. Tickets
- 5. 4. Event configuration
- 6. 5. Publishing
- 7. Good to know
- 8. Troubleshooting
- 9. Related
The event wizard creates a new event in one page: the basics, dates, location, tickets, checkout rules, cancellation terms and how it is published. Open it with Create Event in the sidebar, on the dashboard or in My Events (shortcut: g then n). Everything on the page has a sensible default, so you can fill in only what matters and change the rest later under Manage.
Before you start
- If your plan limits the number of events and you have reached it, you are sent back to My Events with a message instead of the form. The standard plan has no limit.
- If you saved an event as a template, a row Start from a template: appears at the top with one button per template. Choosing one ① fills the form with that event’s details, ticket types, custom fields and settings. See Duplicate an event and save templates.

1. Event Basics
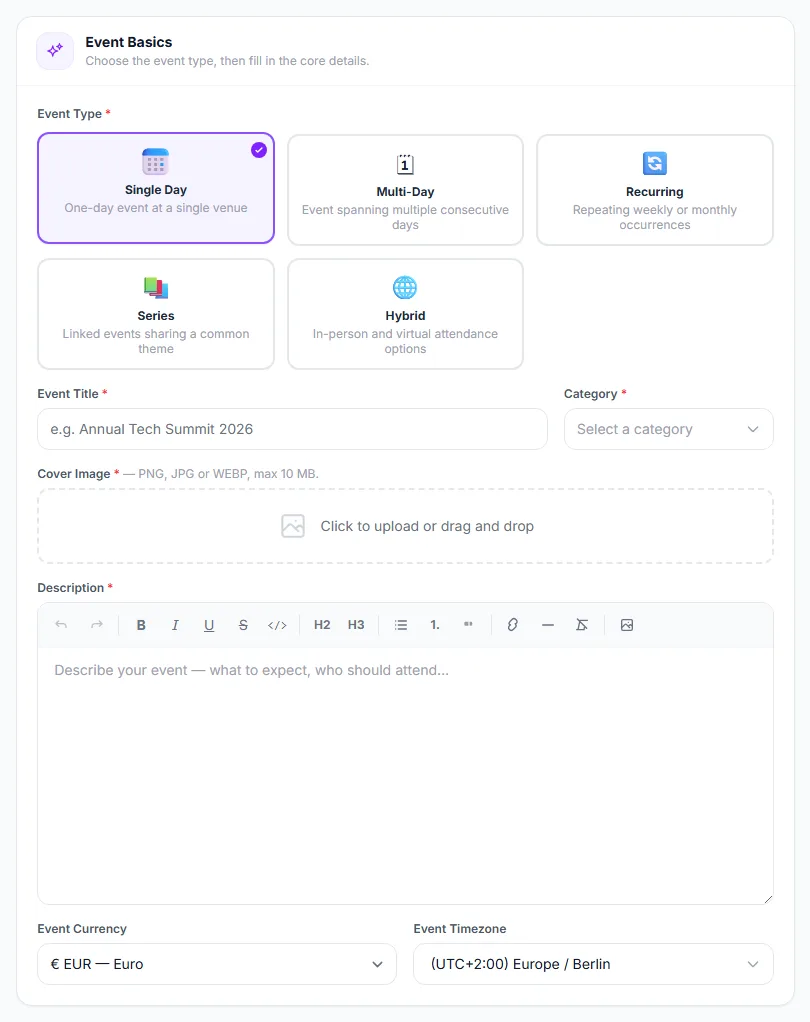
- Choose the Event Type ①: Single Day, Multi-Day, Recurring, Series or Hybrid. The type changes what the rest of the form asks for: Multi-Day lets you set a start and end time for each day (Times per day), Recurring adds a recurrence pattern and no location, and Hybrid requires a stream or meeting URL.
- Enter the Event Title ② and pick a Category ③.
- Upload a Cover Image ④ — required (PNG, JPG or WebP, up to 10 MB). The picker crops it to 16:9, the shape every listing card and the event page use. An image that is not 16:9 is refused.
- Write the Description with the rich-text editor. If AI features are switched on for you, a Write with AI button drafts a description from a few notes.
- Check the Event Currency ⑤ and Event Timezone. They default to your payment currency and your account timezone, and they are the event’s own for the rest of its life: all its dates are wall-clock times in that timezone.
2. Date & Time and Location
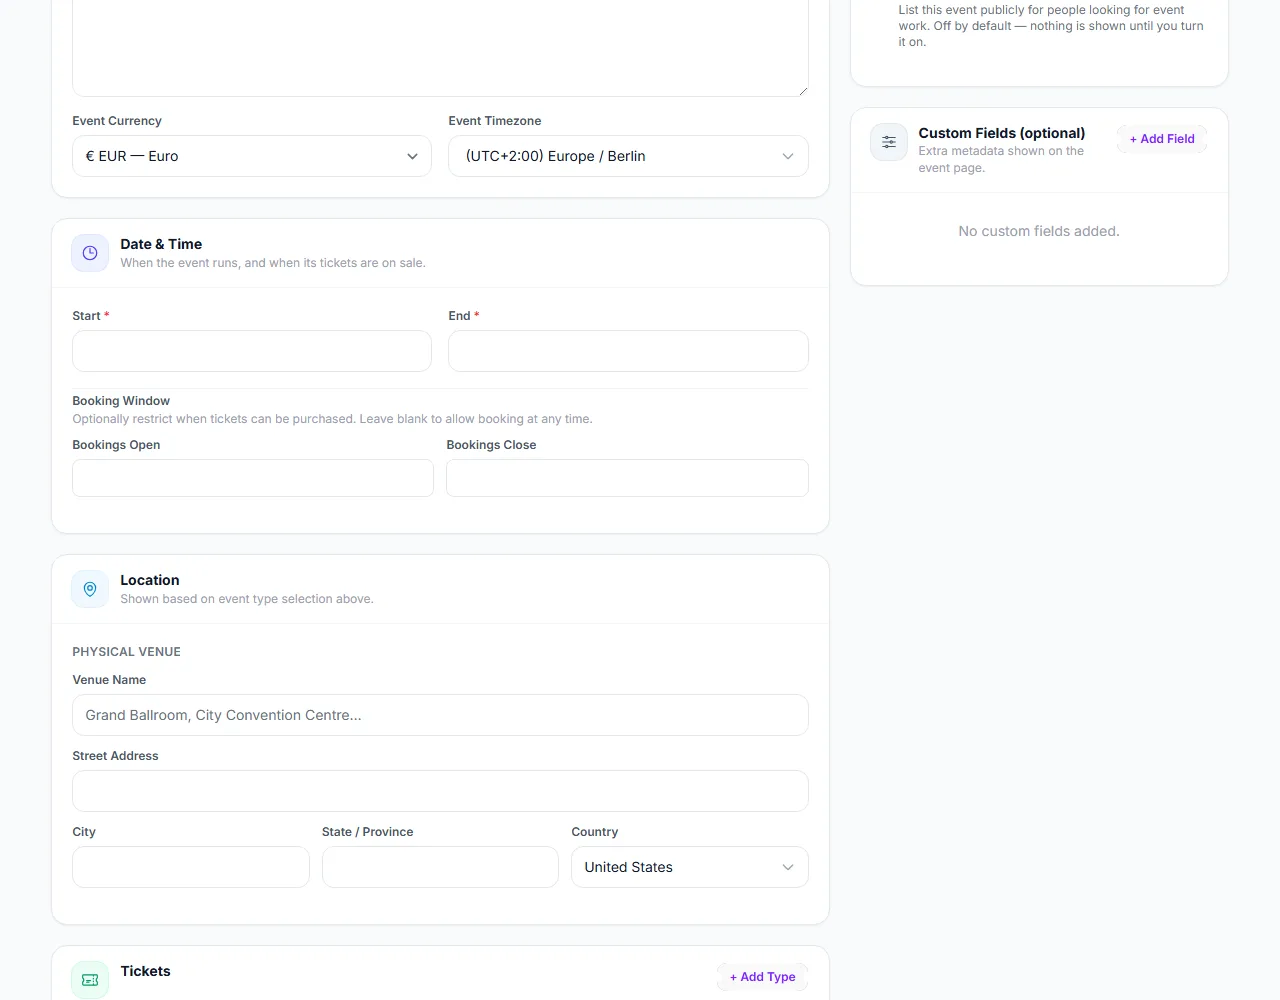
- Enter the Start ① and End. The start must be in the future and the end after the start.
- Optionally set the Booking Window ②: Bookings Open and Bookings Close. Leave both blank to sell at any time. Early-bird sales normally open months before the doors and close before them.
- For an in-person event fill in Venue Name ③, Street Address, City, State / Province and Country ④.
A Recurring event shows a Recurrence Pattern instead of a location:
- Choose the Frequency ① (Weekly or Monthly).
- Set Every N weeks / months ② and, for weekly, tick the days of the week.
- End the series with an Ends on date or Or after N occurrences ③ (at most 52).

See Recurring events for what is created. A Hybrid event asks for the physical venue and for a Stream / Meeting URL, which is required.
3. Tickets
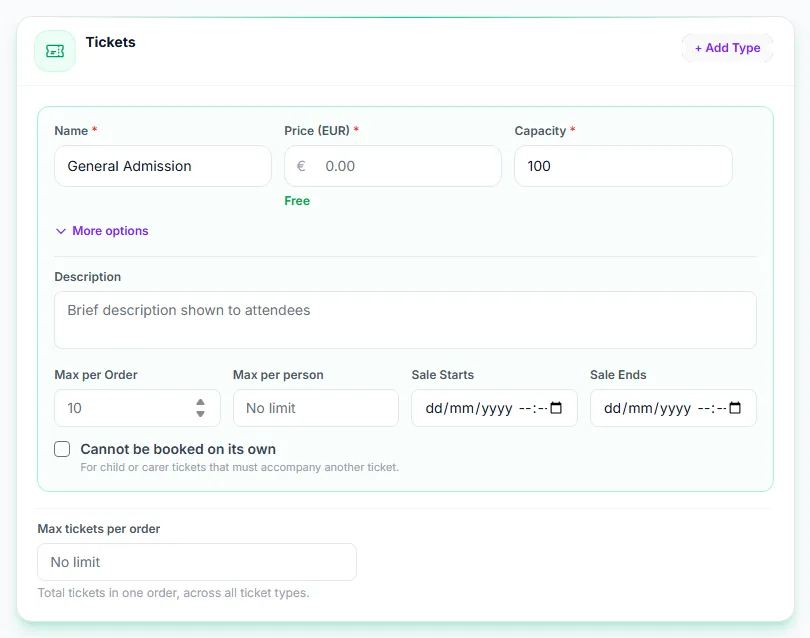
- Give the first ticket type a Name ①, a Price ② (0 means free) and a Capacity ③.
- Click + Add Type ④ for more types. If your plan caps ticket types per event, the button disappears at the limit.
- Open More options ⑤ for a description, Max per Order (default 10), Max per person, a sale start and end for that type, and Cannot be booked on its own for child or carer tickets.
- Below the types, Max tickets per order caps the whole basket across all types. Without it, 10 adults plus 10 children is a legal 20-ticket order.
Member prices, members-only tickets, volunteer tickets and the ticket tier are added later on the Ticket Types page. See Ticket Types.
4. Event configuration
The cards under Event configuration are the same options as under Manage; they are offered here because a first event should not go on sale on the platform’s assumptions. Anything you leave alone keeps the platform default, and a default changed later still reaches the event.
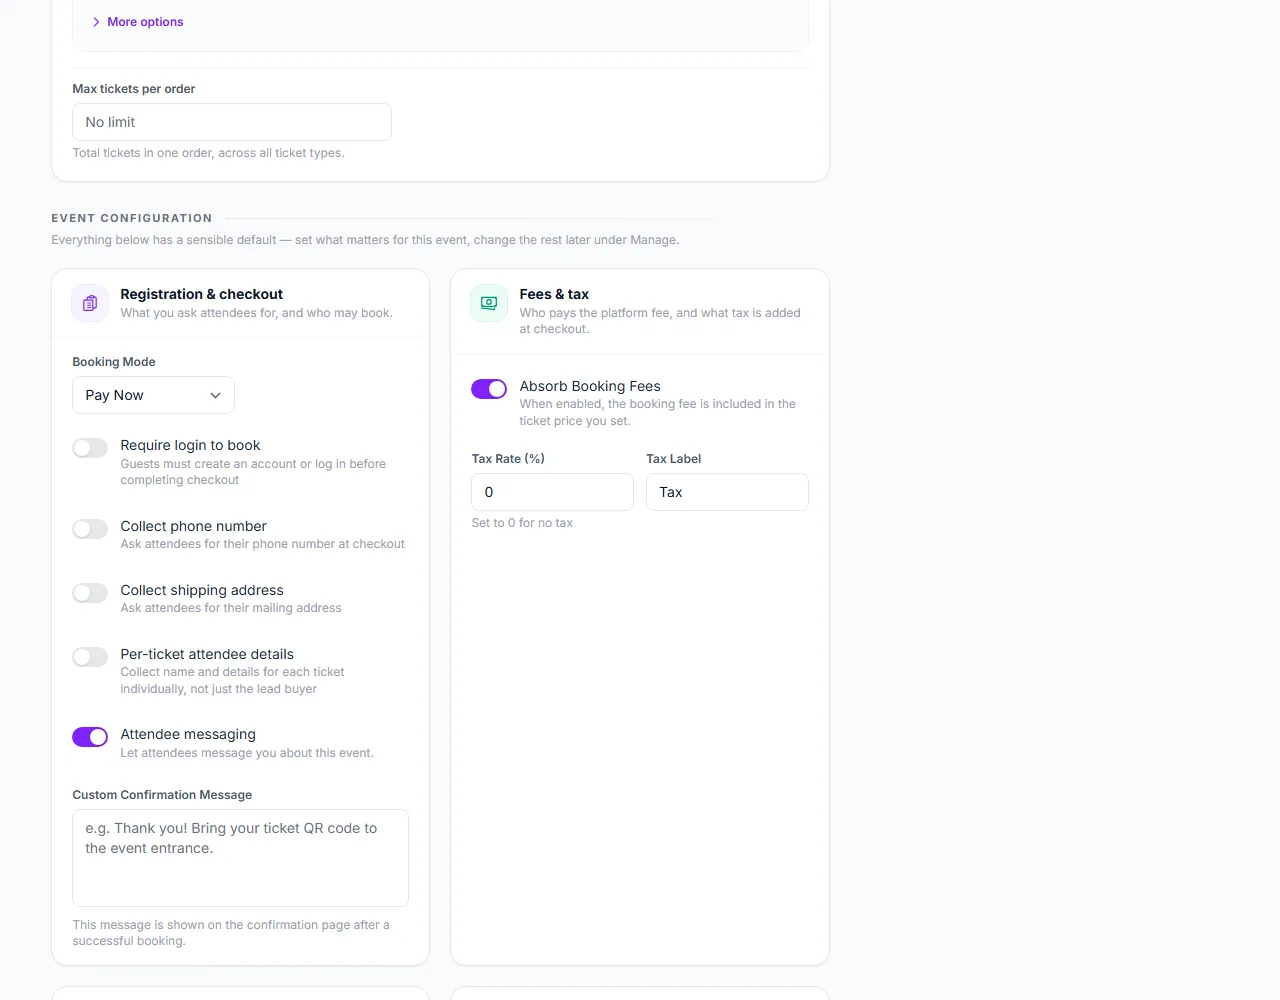
- Booking Mode ① — Pay Now or Request & Approve. See Booking Modes.
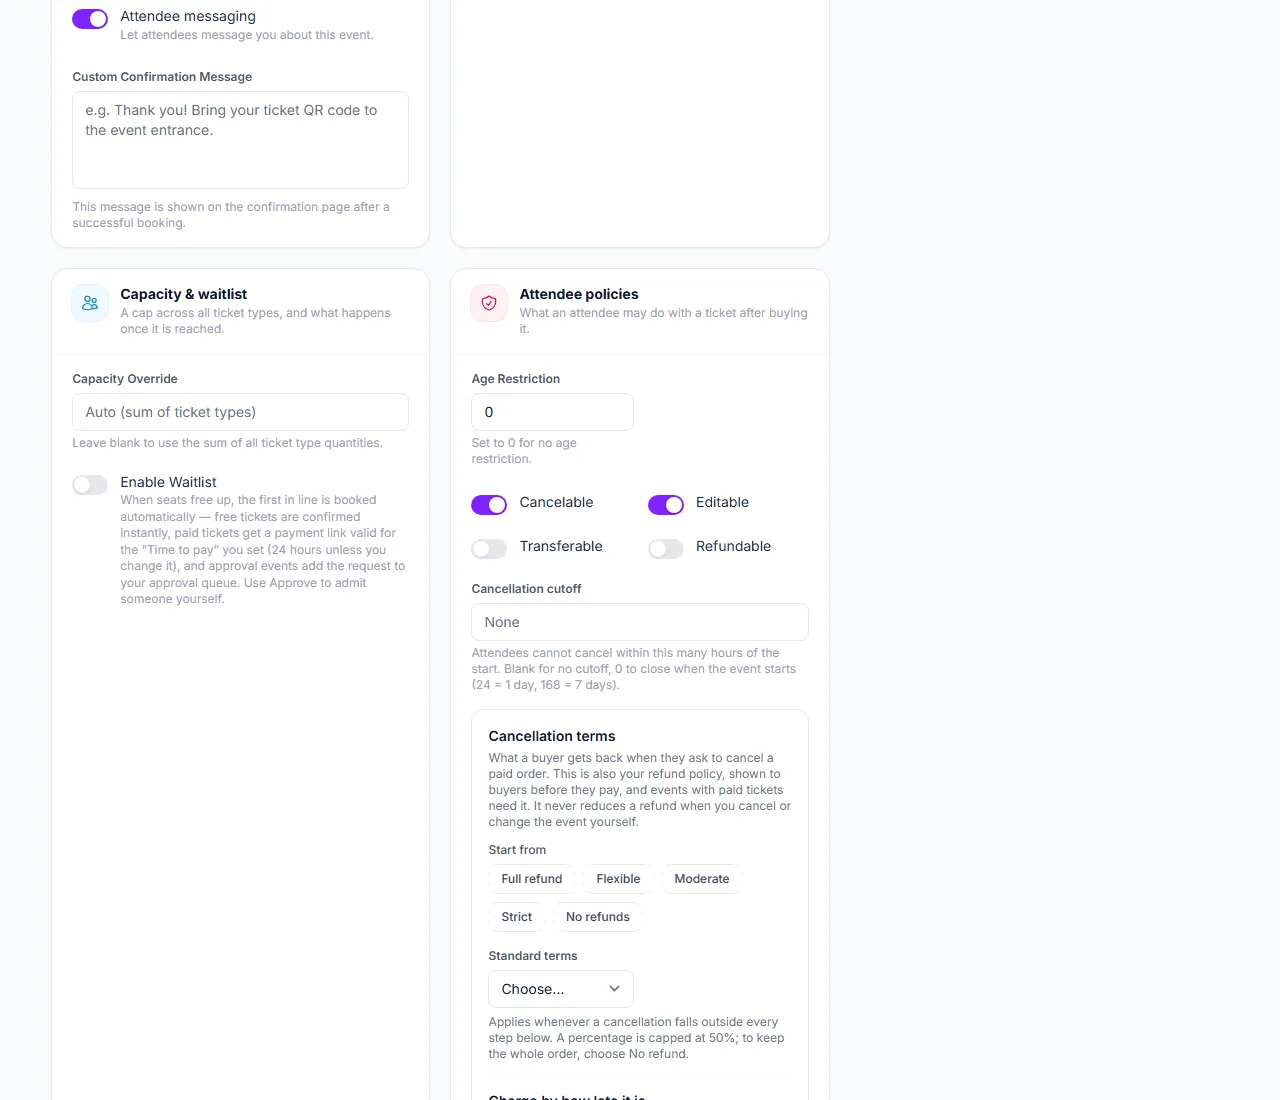
- Require login to book ②, Collect phone number, Collect shipping address, Per-ticket attendee details, Attendee messaging and a Custom Confirmation Message for the confirmation page.
- Absorb Booking Fees ③ — include the booking fee in the ticket price you set instead of adding it for the buyer. See Understanding fees.
- Tax Rate (%) ④ and Tax Label — 0 for no tax. See Tax rates.
- Capacity Override and Enable Waitlist under Capacity & waitlist. A capacity override is a ceiling across all ticket types.
- Under Attendee policies, set an Age Restriction (0 for none) and switch Cancelable ①, Editable, Transferable and Refundable. A Cancellation cutoff in hours stops cancellations shortly before the start.
- If any ticket is paid you must choose Cancellation terms: pick a preset such as Moderate ② or build your own, optionally with steps of the kind “no refund within 2 days” under Charge by how late it is ③. These terms are shown to buyers before they pay. See Cancellation terms.
- Member early access lets members of your organization book a number of hours before sales open to everybody. Add Checkout Questions to ask attendees something extra.
5. Publishing
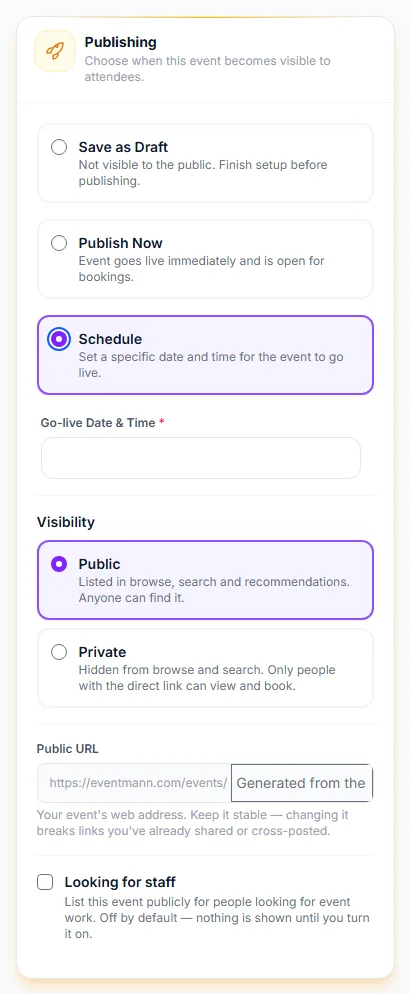
- Save as Draft ① — nothing is visible to the public.
- Publish Now ② — the event is created Live and open for bookings.
- Schedule ③ — choose a Go-live Date & Time; the event goes live automatically at that time, which is read in the event’s own timezone.
- Choose Visibility: Public (listed in browse and search) or Private ④ (hidden from search; only people with the link can see and book). Visibility is separate from the lifecycle status.
- Check the Public URL. It is generated from the title unless you type your own; keep it stable once shared.
- Tick Looking for staff only if you want the event listed publicly for people looking for event work. It is off by default.
The bar at the bottom shows how much of the form is filled in. Save as Draft keeps the event unpublished, Save as Template asks for a template name and also keeps the setup for later use, and Create Event creates it as chosen above. Custom Fields (optional) store extra text, number, URL or email facts shown on the event page.
Good to know
- Publishing can be held back. If you choose Publish Now or Schedule but your email address is not verified, a paid ticket needs Stripe Connect that is not finished, or a platform agreement is waiting, the event is created as a Draft and a message says why. Nothing you typed is lost.
- When the platform reviews events before they go live, or the event is flagged by the automatic risk check, it is created as a Draft and submitted for review; you publish once it is approved.
- A saved Draft lands you on Details & dates so you can carry on; a published or scheduled event lands on its Overview.
- Starting from a template copies its details, ticket types and settings, and gives the new event its own copy of the cover image, so replacing it later never changes the template.
- All dates are wall-clock times in the timezone you pick, not converted per viewer.
Troubleshooting
- “The image must have a 16:9 ratio” — use the cropper on the picker, or upload a 16:9 picture such as 1600×900.
- “The cancellation terms are required” — a paid ticket needs terms; choose a preset, even “Full refund”.
- Publish Now saved a Draft — read the message at the top of the next page: verify your email, finish Stripe, or accept the waiting agreement.
- I do not see recurrence fields — choose Event Type Recurring.
- The page lost my cover image after an error — a file kept from a failed submit stays attached; a new pick replaces it.