




Team Management
Organizer Guide
4 min read
Help articles may not be fully accurate — they can lag behind the app due to frequent updates and automated translation. If in doubt, please contact support.
On this page
Invite people to help run your events without sharing your own login. Open Settings → Teams; the page has three tabs — Team Members, Custom Roles and Permissions — and this article covers the first. A person’s access comes from one of five built-in roles, or from a custom role you build yourself.
What you can do here
- Fill in the invite form ①: Full Name, Email Address and a Role ②. Once you have created a custom role, a Custom Role (optional) list appears beside it.
- Click Send Invite. The person gets an email with an invitation link that is valid for 7 days, and appears in the list as Pending.
- To change an active member’s access, pick a different role or custom role in their row ③ and click Save.
- If an invitation never arrived, click Resend ④ — it issues a new link and a new 7-day expiry. The button only exists while a member is pending.
- Use the bin icon to remove a member, pending or active. Their access ends immediately.
- Open the Permissions tab ⑤ to see what everyone can do in one grid — see Permissions grid.
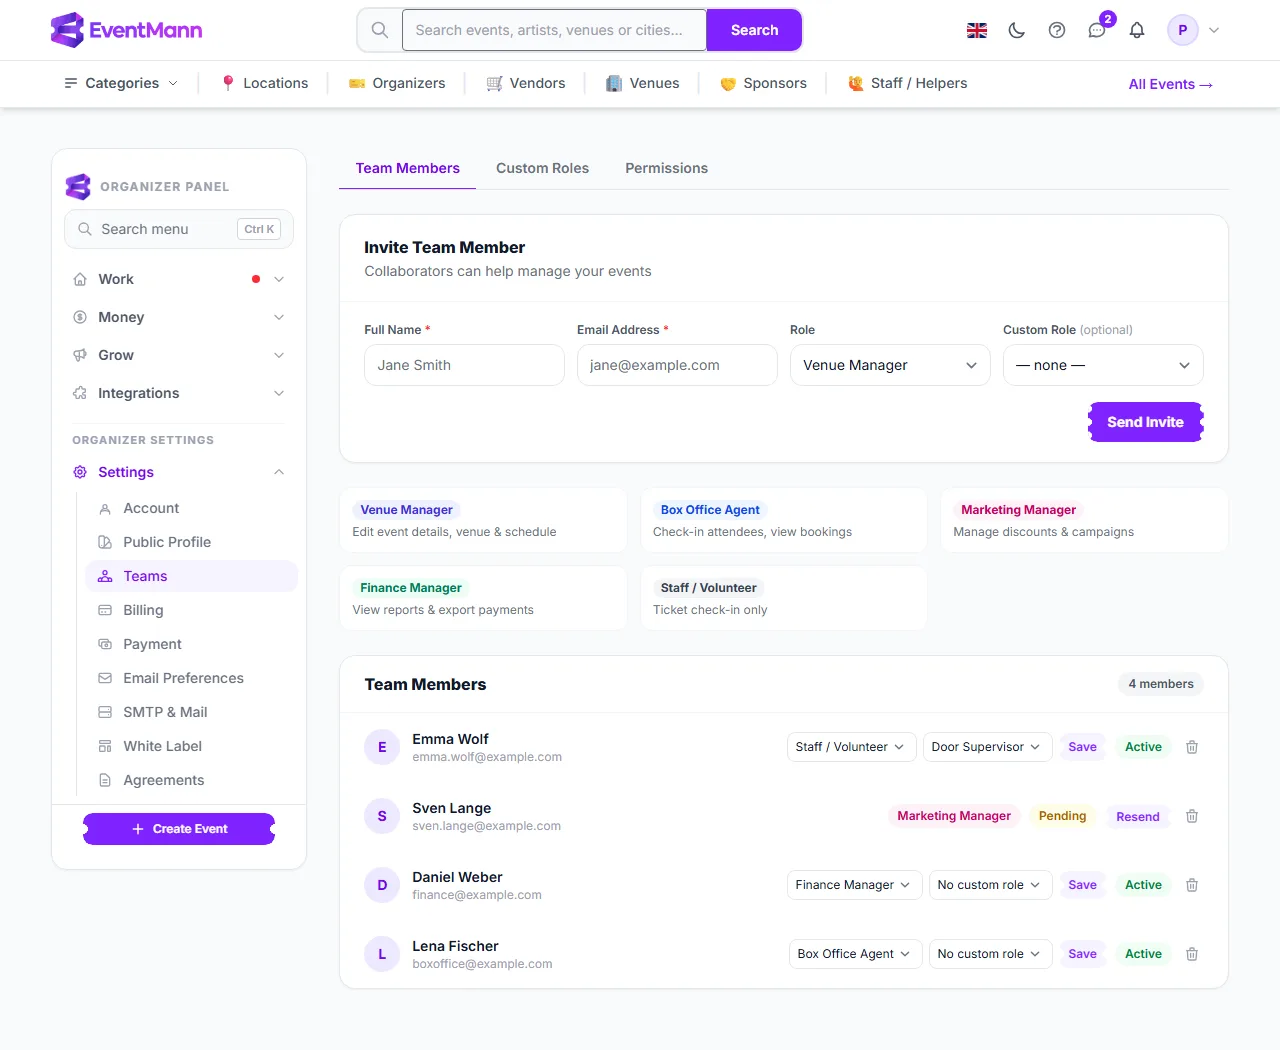
The five built-in roles
| Role | Meant for |
|---|---|
| Venue Manager | Editing event details, the venue and the schedule; also sees tickets, bookings and reports, and can process refunds. |
| Box Office Agent | Checking people in, seeing bookings, selling at the door and answering attendee messages. |
| Marketing Manager | Discounts and campaigns, plus reports. |
| Finance Manager | Reports and exports, bookings, the refund queue and the payout breakdown. |
| Staff / Volunteer | Ticket check-in only. |
The exact list of permissions behind each role is shown on the Permissions tab, and you can start a custom role from any of them.
How invitations work
- The invitation link is valid for 7 days. Anyone may follow it, but it can only be accepted once.
- If the person has no EventMann account yet, accepting creates one for them (an ordinary attendee account) and signs them in after they choose a password.
- If they already have an account under that email address, they must be signed in as themselves to accept. A forwarded link cannot be used to take over somebody else’s account.
- Box Office and Staff / Volunteer members are sent to the Scanner app after accepting, because check-in and door sales happen there. Everyone else lands on their profile page.
- You get a notification when somebody accepts.
Good to know
- A role is granted per organizer, not per event: one invitation gives the person the same role on every event you run, now and in the future.
- Accepting an invitation does not change the person’s platform role. A box-office agent stays an attendee account that also has team access; their work area is reachable from the role menu in the top bar.
- Inviting somebody who is already an active member is refused — change their role in the list instead. Typing an existing member’s address into the form never demotes them.
- Your plan can limit how many team members you may have. Pending invitations count against the limit, because the seat is already promised; the standard plan has no limit.
- Volunteers are a separate thing: unpaid helpers you recruit for a single event live under Manage → Volunteers and are not invited here. See Volunteers.
Troubleshooting
- The invitation email never arrived — check the address for typos, then use Resend instead of inviting again.
- There is no Resend button — the person has already accepted; there is nothing left to resend.
- “This invitation is invalid or has expired” — after 7 days the link stops working. Resend it.
- A member cannot do something their role should allow — check whether a custom role is attached; it replaces the built-in role completely.
- The team limit message appears — remove a member or a pending invitation, or contact us about your plan.