




Event Vendors
Help articles may not be fully accurate — they can lag behind the app due to frequent updates and automated translation. If in doubt, please contact support.
On this page
- 1. What you can do here
- 2. Assign a vendor
- 3. Work with one vendor
- 4. Read a contract
- 5. Settings explained
- 6. Good to know
- 7. Troubleshooting
- 8. Related
Event Vendors tracks the outside suppliers working your event — caterers, sound and light, photographers — from the first assignment through tasks, contracts and invoices to a review after the event. Open the event, then Team & Partners → Vendors. Vendors are separate businesses with their own EventMann account and vendor portal: you assign them here, and they answer, sign and invoice from their side.
What you can do here
- Assign a vendor from the vendors an administrator has approved, with an optional service and an agreed fee.
- Give a vendor tasks with a due date and follow them to completion.
- Issue a contract that the vendor signs online, and read the signed copy.
- Approve and pay invoices the vendor submits.
- Review the vendor after the event.
- Remove a vendor from the event.
Assign a vendor
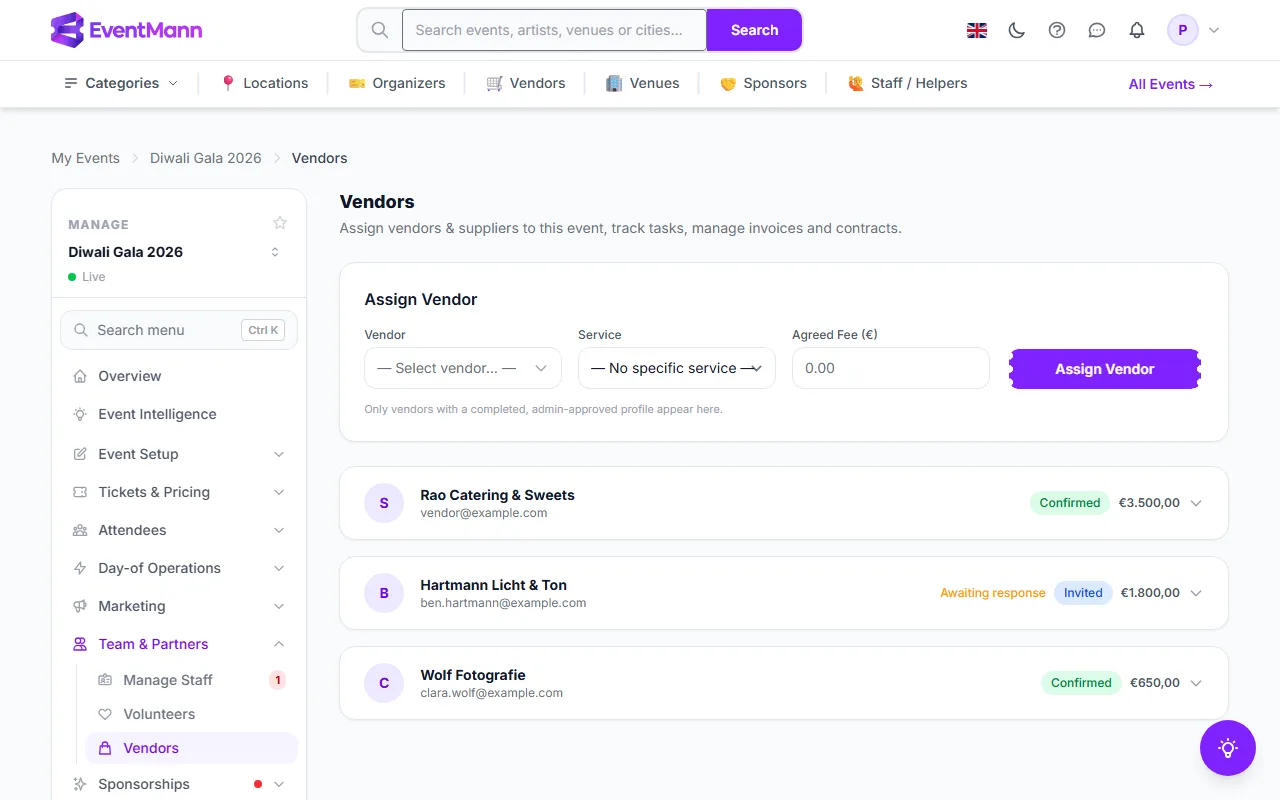
- Open the Assign Vendor box at the top and choose the Vendor ①. The list is searchable and shows the company name with the contact name. Only vendors whose profile is complete and approved by an administrator appear. A vendor who has marked a day of this event as unavailable in their calendar carries “Not available on …” with the dates; you can still assign them, for example when they have told you they will make an exception.
- Optionally pick a Service ②: the list shows each approved vendor’s active services, grouped under the vendor’s company name. Pick one of the vendor you chose on the left; a service of another vendor is refused. Leave No specific service for an assignment without one.
- Optionally enter the Agreed Fee ③ in the event’s currency. It is a reference figure for you and the vendor; nothing is charged.
- Click Assign Vendor ④. The vendor is told, and the assignment waits as an invitation.
Each assigned vendor is a row with their company name, status, agreed fee and a small arrow that opens the details. A vendor who has not answered shows Awaiting response ⑤ next to the status Invited; they accept or decline from their own portal, and the status becomes Confirmed or Declined. A vendor can be assigned to an event only once.
Work with one vendor
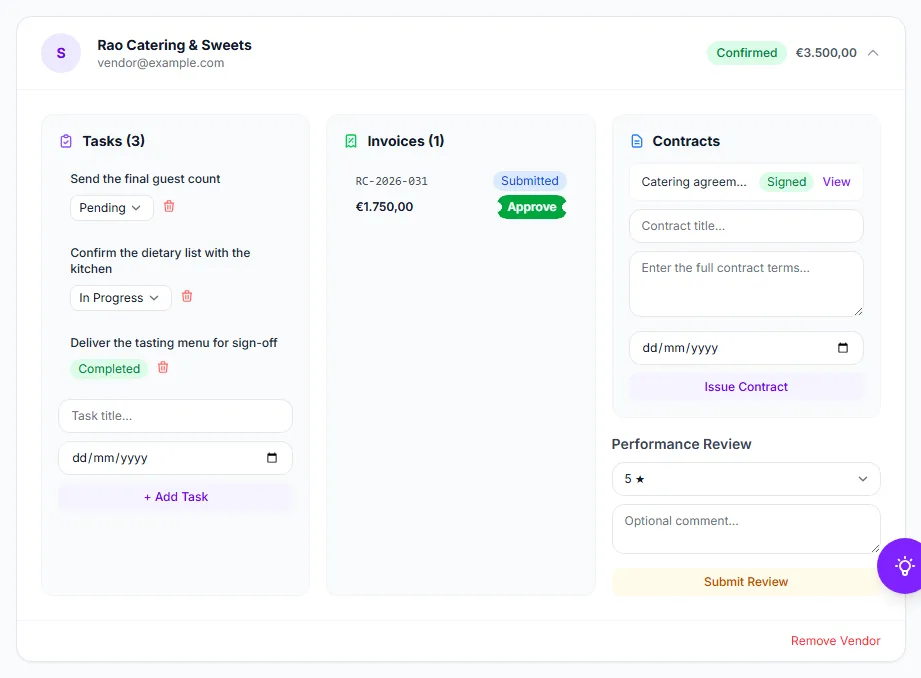
Click a vendor’s row ① to open it. Three columns appear: Tasks, Invoices and Contracts, with the Performance Review underneath.
- Tasks — type a title ③, optionally a date, and click + Add Task. Move a task between Pending, In Progress and Completed with its menu ②. A completed task cannot be reopened, and shows only its badge. The bin deletes a task.
- Invoices — the vendor submits them from their portal; you see the number, the total and the status. Once there is an invoice, a Pay to block underneath shows the bank details the vendor saved (account holder, IBAN, BIC, bank) — the same ones printed on their invoice PDF. Approve ④ moves a Submitted invoice to Approved; Mark Paid then records that you have paid it. An invoice has to be Submitted before you can approve it and Approved before you can mark it paid.
- Contracts — each contract is a row ⑤ with its status; View opens it. To issue a new one, give it a title, write the full terms and optionally pick an expiry date after today, then click Issue Contract ⑥. It is sent to the vendor at once.
- Performance Review — choose a rating of 1 to 5 stars ⑦, add an optional comment and click Submit Review. There is one review per vendor and event; Edit review changes it later.
- Remove Vendor at the bottom takes the vendor off the event after a confirmation.
Read a contract
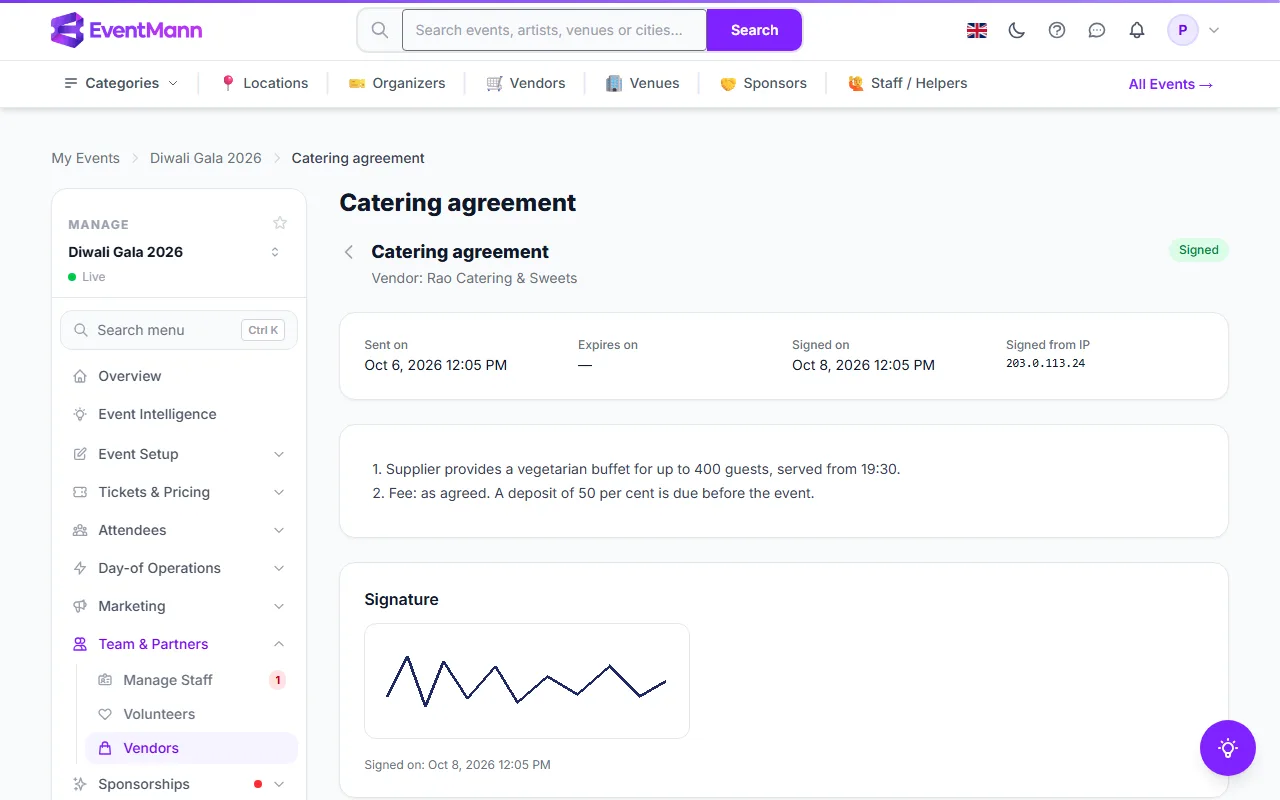
View opens the contract page: the terms as you wrote them, when it was sent, when it expires, and — once the vendor has signed — the date, the address the signature came from and the signature itself. A contract that the vendor has not signed shows “Waiting for the vendor to sign” and offers Cancel contract; the vendor can then no longer sign it, and this cannot be undone. A contract that expired unsigned says so.
Settings explained
- Agreed fee — informational only. It is not charged and not paid by EventMann.
- Service — one of the chosen vendor’s active services, optional.
- Contract expiry — optional, must be after today; empty means the contract does not expire.
- Vendor status — Invited, Confirmed, Declined or Cancelled. The vendor changes it from their portal.
- Not available on … — shown in the vendor list and on an assigned vendor’s row when the vendor blocked a day of this event in their own calendar. It is a warning from the vendor, not a lock. A vendor’s public profile lists their marked periods too, and shows you which of your upcoming events clash.
Good to know
- EventMann does not move money between you and a vendor. Mark Paid is your record that you have paid the invoice.
- A signed contract can never be cancelled. A contract that is Sent or has expired can be.
- Who can do what: assigning vendors, tasks, reviews and removal need the Vendors permission; approving and paying invoices and issuing or cancelling contracts have their own permissions, so a team member may see an invoice and still not be able to approve it.
Troubleshooting
- A vendor is missing from the list — their profile is still pending, was suspended, or is incomplete. An administrator approves vendors; you cannot approve them yourself.
- The service is refused — it belongs to another vendor than the one you chose. Pick one listed under that vendor’s name, or none.
- The vendor stays on Awaiting response — the vendor has not answered in their portal. Ask them to check their notifications, or remove and reassign them.
- Approve or Mark Paid does nothing — the invoice is in the wrong status. It must be Submitted to approve and Approved to mark paid.
- Cancel contract is missing — the contract is already signed or cancelled.