




Seat Map
Organizer Guide
4 min read
Help articles may not be fully accurate — they can lag behind the app due to frequent updates and automated translation. If in doubt, please contact support.
On this page
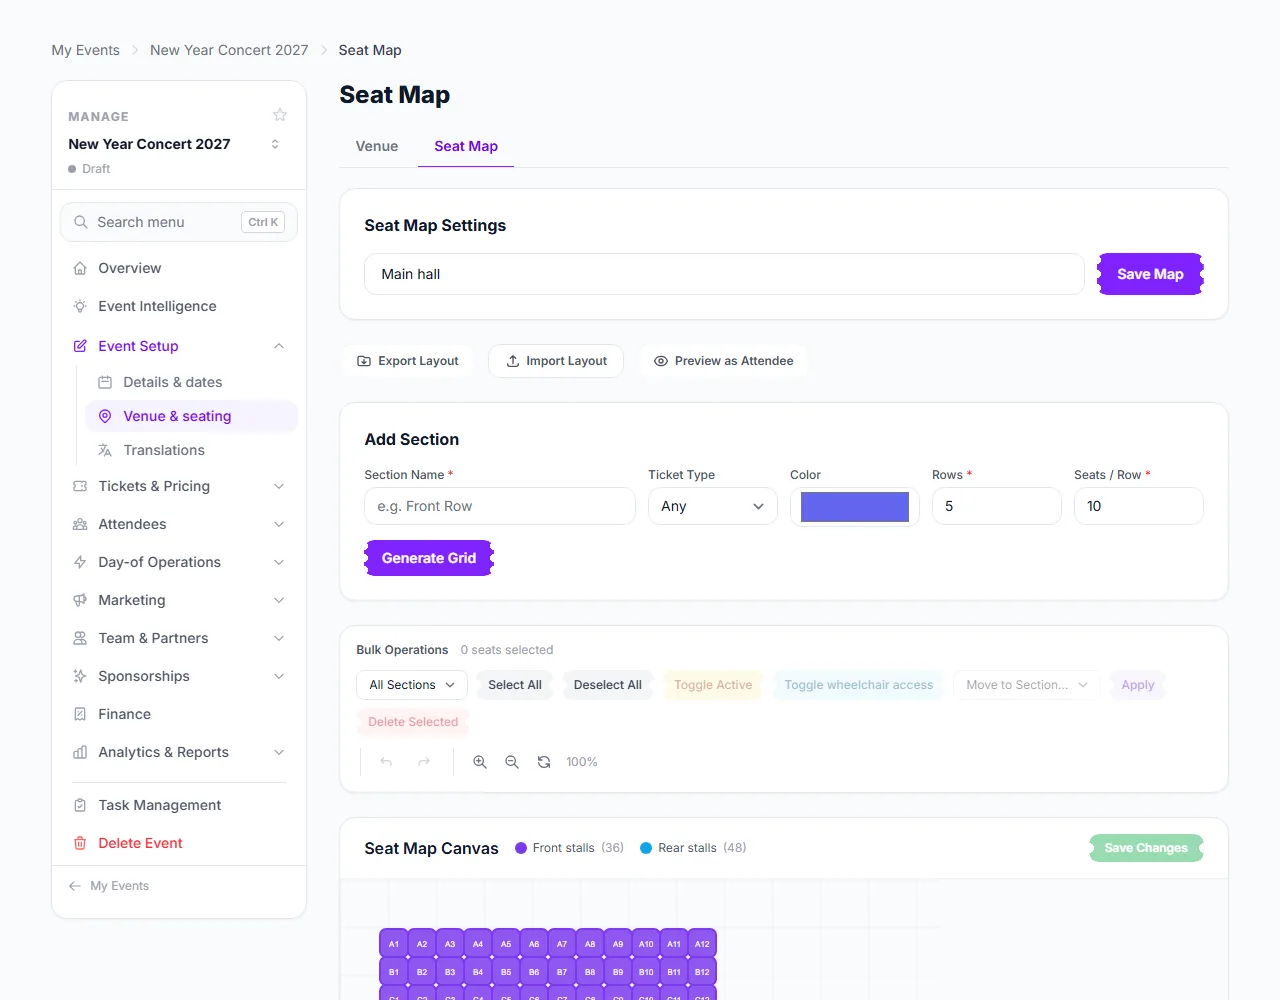
The seat map turns an event into seated sales: you lay out the hall in sections of rows and seats, link each section to a ticket type, and buyers choose their own seats at checkout. Open it under Manage → Event Setup → Venue & seating → Seat Map. An event without a seat map sells tickets without seat choice.
Build a seat map
- Enter a Map Name ① (for example “Main hall”) and click Save Map. Sections can only be added once the map has a name.
- Under Add Section enter a Section Name ⑤ such as “Front stalls”.
- Choose the Ticket Type ⑥ the section sells. Buyers of that ticket type pick seats from this section.
- Pick a Color, the number of Rows (up to 30) and Seats / Row (up to 50), then click Generate Grid ⑦. Rows are lettered A, B, C… and seats numbered from 1; each new section is placed below the previous one.
- Repeat for every section. The ticket types come from the Ticket Types page, so create them first.

A section without a ticket type is marked “No ticket type — unsellable” and a notice lists it: it is not shown or sold at checkout until you give it one (Edit on the section → Ticket Type).
Fine-tune the layout
- The seat canvas ② draws every seat in its section colour. Click seats, or drag a box around several, to select them, then use the bulk bar ① above it: All Sections filters by section, Select All / Deselect All, Toggle Active (take seats out of sale without deleting them), Toggle wheelchair access, Move to Section… with Apply, and Delete Selected.
- Drag seats to reposition them. Use undo and redo, and zoom in, zoom out and reset to work on a big hall.
- Click Save Changes ③ to keep your canvas edits. It is greyed out until something changed.
- Below the canvas each section has a card with its ticket type, seat count and active seats. Edit changes its name, colour, ticket type and wheelchair-accessible flag; Delete removes the section and its seats.
Preview, export and import
- Preview as Attendee shows the map the way a buyer sees it, with sold and held seats marked.
- Export Layout downloads the sections and seat positions as a JSON file; Import Layout loads such a file (up to 2 MB) into this event. Use them to reuse a hall layout for another event.
- When the event has a saved venue with seating zones, Clone layout on the Venue tab copies that venue’s blueprint. See Venue & seating.
How buyers use it
- At checkout the buyer chooses seats of the section that matches each ticket type; the number of seats must match the tickets.
- A chosen seat is held while the buyer completes checkout (15 minutes) and then released.
- Each ticket carries its seat.
- A ticket type that should not take a seat, such as a lap child, can be untoggled with requires a seat on the Ticket Types page; that option only appears on events with an active seat map.
Good to know
- A section sells as many seats as it has; keep the linked ticket type’s capacity in step with the seats you generated.
- Deleting a seat or section that has already been sold is a serious change: check Orders first.
- Seats can be marked wheelchair accessible; use it to find and reserve them.
- Replacing the map with a venue layout is refused once seats are sold.
Troubleshooting
- “Save the map name above to start adding sections” — save a Map Name first.
- A section does not appear at checkout — it has no ticket type, or all its seats are switched inactive.
- The grid will not generate — rows must be 1 to 30 and seats per row 1 to 50.
- Import fails — the file must be a layout exported from EventMann (JSON, up to 2 MB).
- My canvas edits disappeared — click Save Changes before leaving the page.