




The event task board
Help articles may not be fully accurate — they can lag behind the app due to frequent updates and automated translation. If in doubt, please contact support.
On this page
- 1. What you can do here
- 2. Add a task
- 3. Work with a task card
- 4. Edit a task
- 5. Assign a task
- 6. Use the template library
- 7. Good to know
- 8. Troubleshooting
- 9. Related
The task board is the organizer’s planning list for one event: everything that has to be done before, on and after the day, with a priority, a deadline, a start time, an owner and, where it matters, another task it has to wait for. Open the event and choose Task Management at the bottom of the Manage menu. It is separate from the volunteer tasks, which are the jobs of the volunteer team; the board is where you plan, and you can hand a board task to a team member or to a confirmed volunteer.
What you can do here
- Add tasks with a title, a category, a priority, a due date and a start time.
- Apply ready-made tasks from the template library and let the deadlines fall into place.
- Assign a task to yourself, to a team member or to a confirmed volunteer.
- Make a task wait for another one, and keep a checklist and comments on it.
- Watch the six counters — total, pending, in progress, completed, blocked and overdue — and the overall progress bar.
Add a task
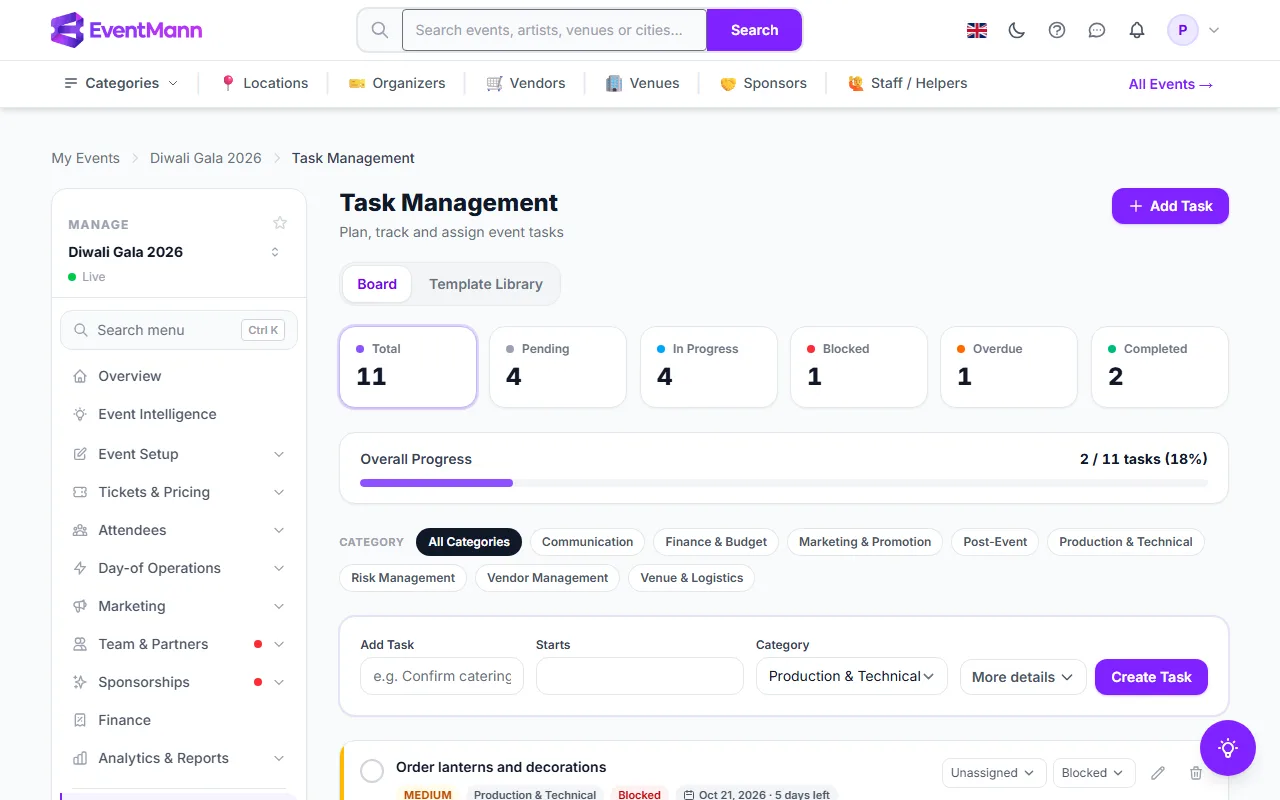
The row near the top is a quick add: a title is enough.
- Type the title ④, for example “Confirm catering order”.
- Optionally set Starts ⑤ — the date and time the work begins. A task with a start time shows on the volunteer Run sheet, and a volunteer it is assigned to gets a reminder about two hours before.
- Choose the Category: Venue & Logistics, Marketing & Promotion, Production & Technical, Vendor Management, Communication, Finance & Budget, Risk Management or Post-Event.
- Click More details to set a priority (High, Medium, Low), a due date and a description.
- Click Create Task ⑥. The task starts as Pending, with priority Medium unless you chose another.
The cards at the top count the tasks by status; click one, such as Blocked ③, to see only those tasks, and the chips under them filter by category. The Template Library tab ① opens the ready-made tasks and Add Task ② jumps to the quick add.
Work with a task card
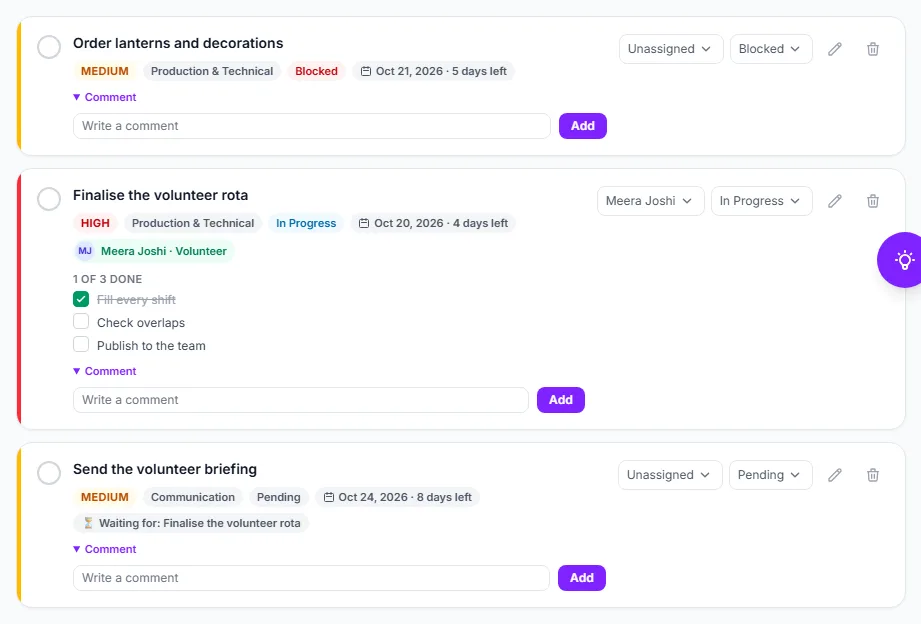
Each card shows its priority, its category, its start time, its due date and its status. The round box ① marks it complete. A grey Waiting for badge ② appears while the task it depends on is not completed. A green badge ③ with a volunteer’s name shows who it is given to. The first dropdown ④ assigns it, the second ⑤ changes its status between Pending, In Progress and Blocked, and the pencil ⑥ opens the edit form. A due date in the past turns the card red and marks it Overdue.
Edit a task
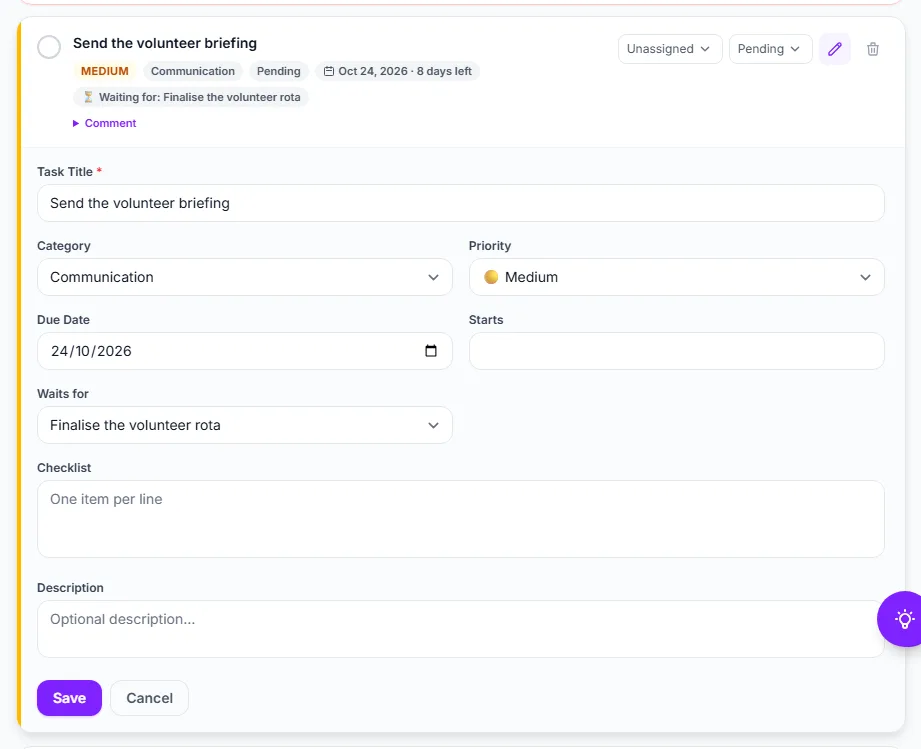
- Click the pencil on the card.
- Change the Task Title ①, the Category ②, the Priority ③, the Due Date ④ and Starts ⑤.
- Under Waits for ⑥ choose another task of this event that has to be completed first. The card then shows Waiting for that task until it is done. A task cannot wait for itself, and two tasks cannot wait for each other.
- Under Checklist ⑦ write one item per line; items you leave unchanged keep their tick.
- Add a description and click Save.
Assign a task
The first dropdown on each card has two groups. Team lists you (Me (owner)) and the members of your organizer team. Volunteers lists the volunteers who are confirmed on this event.
- A team member can take a task only if their role covers it: a venue manager takes Venue and Risk tasks, a finance manager Finance, marketing Marketing and Communication, and the catch-all staff role anything. A task from the template library may name its own role. Otherwise you are told which role to assign instead. You as the owner can take anything.
- A team member who is assigned a task gets a notification.
- A volunteer gets the same “New volunteer task” email as for a volunteer task and sees the task on My Volunteering, where they can move its status, tick the checklist and comment. A task has one person at a time; choosing somebody else replaces the first.
- Choose Unassigned to clear it.
Use the template library
- Click Template Library.
- Tick the tasks you want ②, one by one or a whole category at a time with Select all ①.
- Click Apply Selected Templates ③. The tasks are created for this event.

The library holds ready-made tasks in the eight categories, each with a priority and a typical lead time such as “30 days before”. Due dates are worked out from the event date. If your event is closer than the template’s own lead time, the deadlines are compressed so that none lands in the past, and keep their order. Post-event tasks stay after the event. Templates you already applied show a tick and cannot be applied twice.
Good to know
- Who may use the board is decided by the Tasks permission: the organizer, venue managers and volunteer coordinators have it, and you can tick it in a custom role. It is a separate permission from editing the event.
- A completed task shows when it was done. Unticking it sets it back to Pending.
- Deleting a task asks for confirmation first.
- Board tasks with a start time appear on the Run sheet, for people who hold the Tasks permission.
- If volunteers have been invited but nobody has confirmed, the page says so and links to People; only confirmed volunteers appear in the list.
Troubleshooting
- “… cannot take a … task” — the team member’s role does not cover the category. Choose a member with the right role, a staff member or a volunteer.
- The volunteer is not in the list — they are not confirmed for this event yet.
- “That task cannot be waited for” — the task is on another event, or choosing it would make two tasks wait for each other.
- The deadlines of applied templates look too close together — the event is near, so the lead times were compressed to fit.