




Event Staff
Help articles may not be fully accurate — they can lag behind the app due to frequent updates and automated translation. If in doubt, please contact support.
On this page
- 1. What you can do here
- 2. The tabs of this page
- 3. Let jobseekers find the event
- 4. Invite staff
- 5. Review applications
- 6. Plan shifts
- 7. Check staff in
- 8. Approved staff, rates, tasks and messages
- 9. Messages
- 10. Shift swaps
- 11. Settings explained
- 12. Good to know
- 13. Troubleshooting
- 14. Related
Event Staff is where you build the paid day-of team for one event: invite people, review applications, plan shifts, check people in, hand out tasks and write to them. Open the event, then Team & Partners → Manage Staff. It is separate from Team Management, which controls who may use your organizer account, and from Volunteers, which is the unpaid helper module with its own roster and rota. Staff here can be paid by the hour and run through Staff Payroll.
What you can do here
- List the event for jobseekers so people can apply.
- Invite people by email with a link that expires after 7 days.
- Review applications and approve or reject them, setting an hourly rate on approval.
- Plan shifts with date, times, capacity and place, and put approved staff on them.
- Check staff in from the shift card when they arrive.
- Give tasks to a staff member and follow them until done.
- Message staff one by one or all at once, and read their replies.
- Approve shift swaps that staff ask for.
The tabs of this page
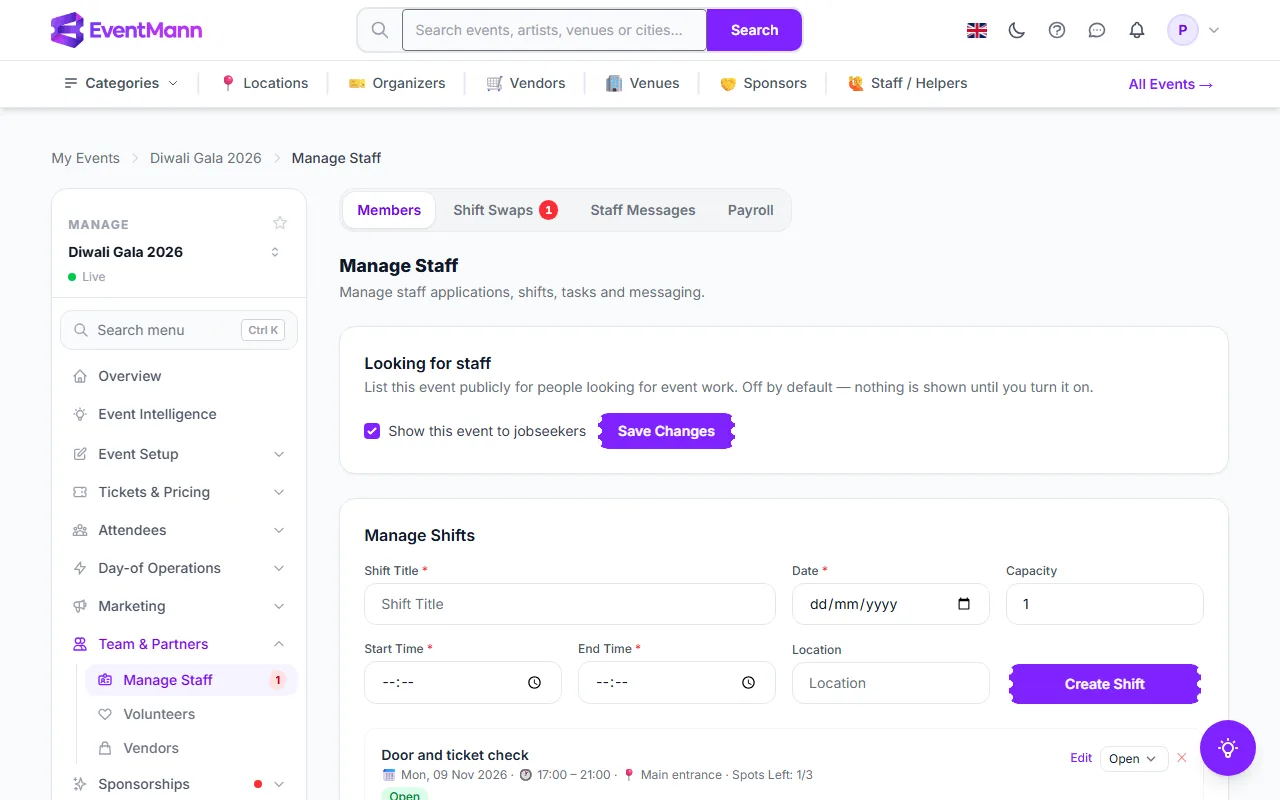
A strip of four tabs runs across the top. Members ① is this page, with recruiting, shifts, invitations, applications and your approved staff. Shift Swaps ② lists swap requests and shows how many are waiting. Staff Messages ③ is the inbox. Payroll ④ opens the pay periods. Below the tabs, the box Looking for staff has one tick box ⑤, and Manage Shifts starts with a form that ends in Create Shift ⑥.
Let jobseekers find the event
Tick Show this event to jobseekers ⑤ and click Save Changes to list the event publicly for people looking for event work, in the “Events looking for staff” list of the staff page. It is off by default, and nothing is shown until you turn it on. People who apply appear under Pending Applications.
Invite staff
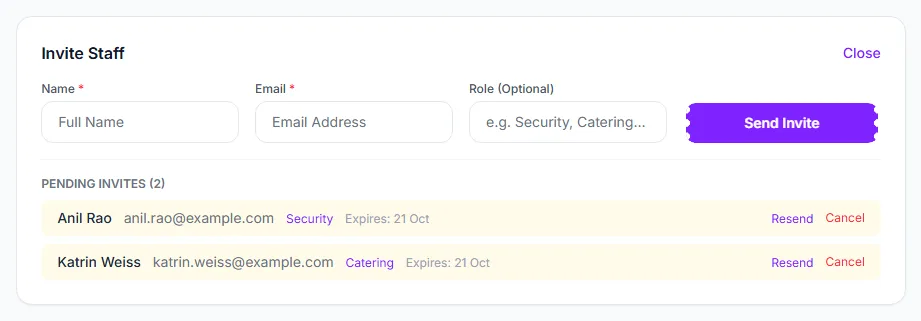
- Click + Invite Staff to open the form.
- Type the person’s Name ① and Email ②. Both are required.
- Optionally add a Role ③ such as “Security” or “Catering”. It is only a label; it does not grant any access.
- Click Send Invite ④. The person gets an email with a link that works for 7 days.
Invitations that are still open are listed under Pending Invites with their expiry date. Resend ⑤ sends a fresh link and starts another 7 days; Cancel ⑥ ends the invitation. You cannot send a second open invitation to the same address for the same event. When the person accepts, they are approved for this event straight away, with your role label, and they appear under Approved Staff. They still have no rate until you set one.
Review applications
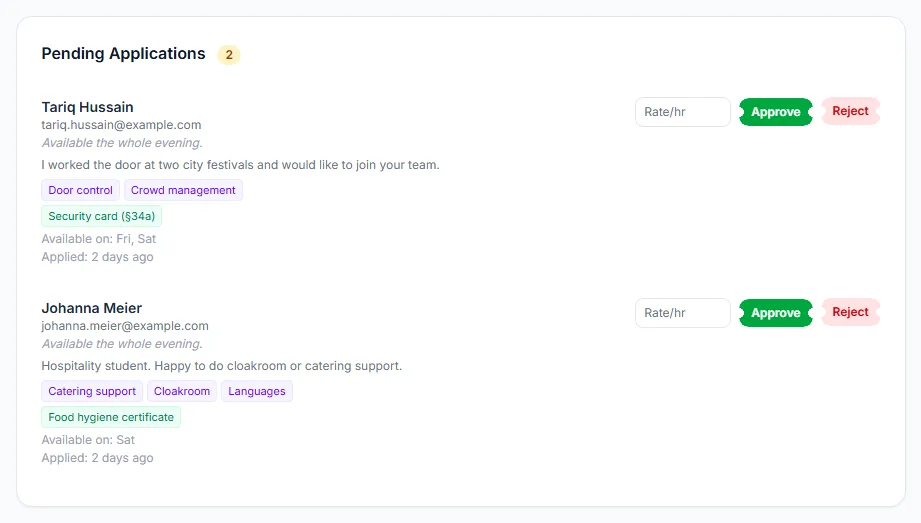
People who applied from the staff pages wait under Pending Applications. You see their name and email, their note, a short bio, their skills and certificates, the days they are available and when they applied. Type an hourly rate in Rate/hr ③ if you will pay them, then click Approve ④, or click Reject ⑤. Their skills ② help you decide. Either way the applicant is told.
Plan shifts
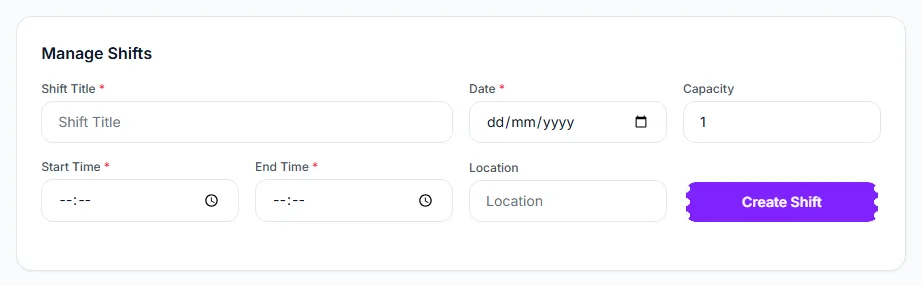
- In Manage Shifts, fill in the Shift Title ①, the Date ②, the Capacity ③ and the Start Time ④ and End Time ⑤. The date must be today or later, the end must be after the start, and the capacity is 1 to 255.
- Optionally add a Location ⑥ such as “Main entrance”.
- Click Create Shift ⑦.
Each shift becomes a card showing its title, date, times, place and Spots Left. Edit ① changes it. The status menu ② sets Open, Closed or Cancelled: a closed or cancelled shift takes no more people, but keeps its assignments and check-in history, which deleting it (the cross ⑦) would not. To staff the shift, choose a person in the list ③ — it offers only approved staff — and click Assign ④. Under the shift, each assigned person has Check In ⑤ and a cross ⑥ that removes them from the shift.
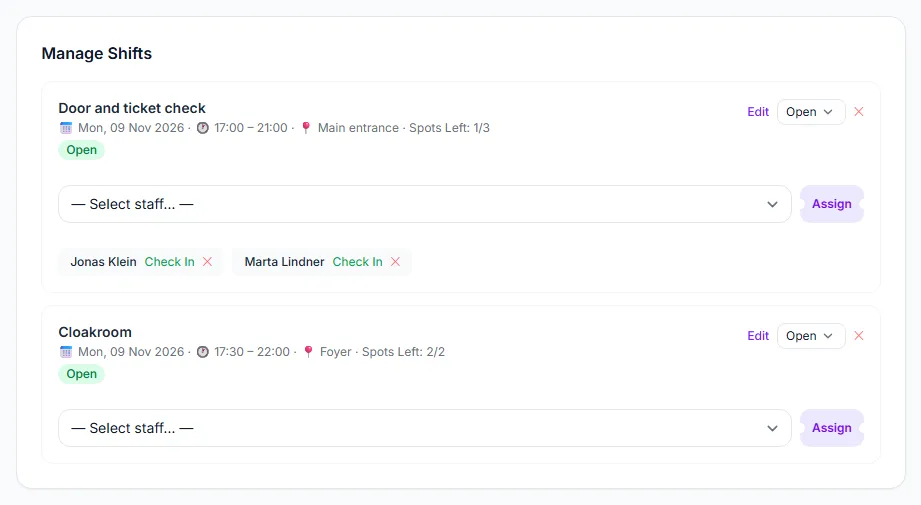
Check staff in
Click Check In next to the person when they arrive; their arrival time then shows as a tick. You can check someone in from two hours before the shift starts until four hours after it ends, and only while they are approved for the event. Checking out is done by the staff member themselves from their own staff pages, which records the hours. Payroll can only pay a shift once both times exist.
Approved staff, rates, tasks and messages
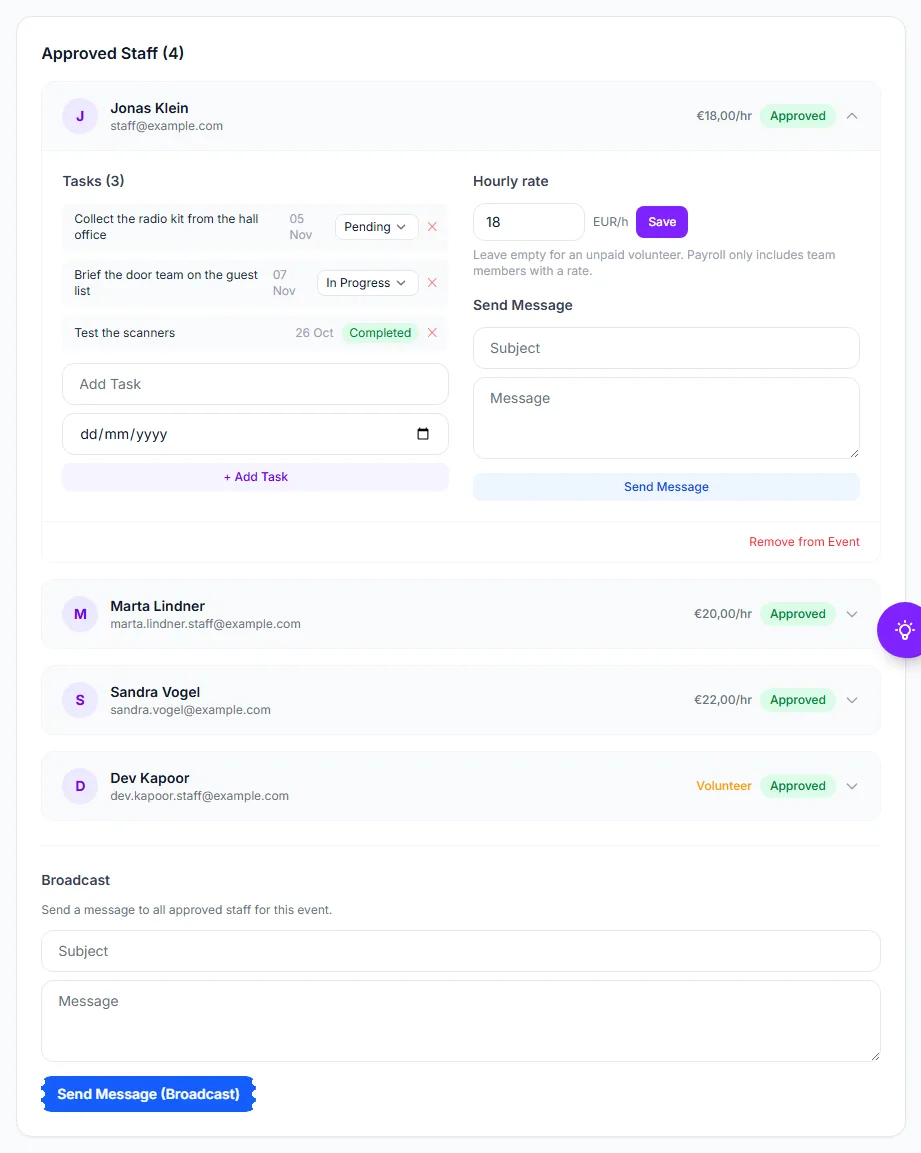
Under Approved Staff, each person is a row with their rate ① and status; click it to open the details. There you set their Hourly rate ④ (leave it empty for an unpaid helper, shown as Volunteer), give them Tasks and write to them. Add a task with a title and an optional due date; the person is notified, and you move it between Pending and In Progress with the menu ②. Once a task is Completed it shows only its badge. Use Add Task ③ for the next one. Send Message ⑤ writes to this person; Remove from Event ⑥ takes them off the team. At the bottom, Broadcast sends one message to every approved staff member of the event.
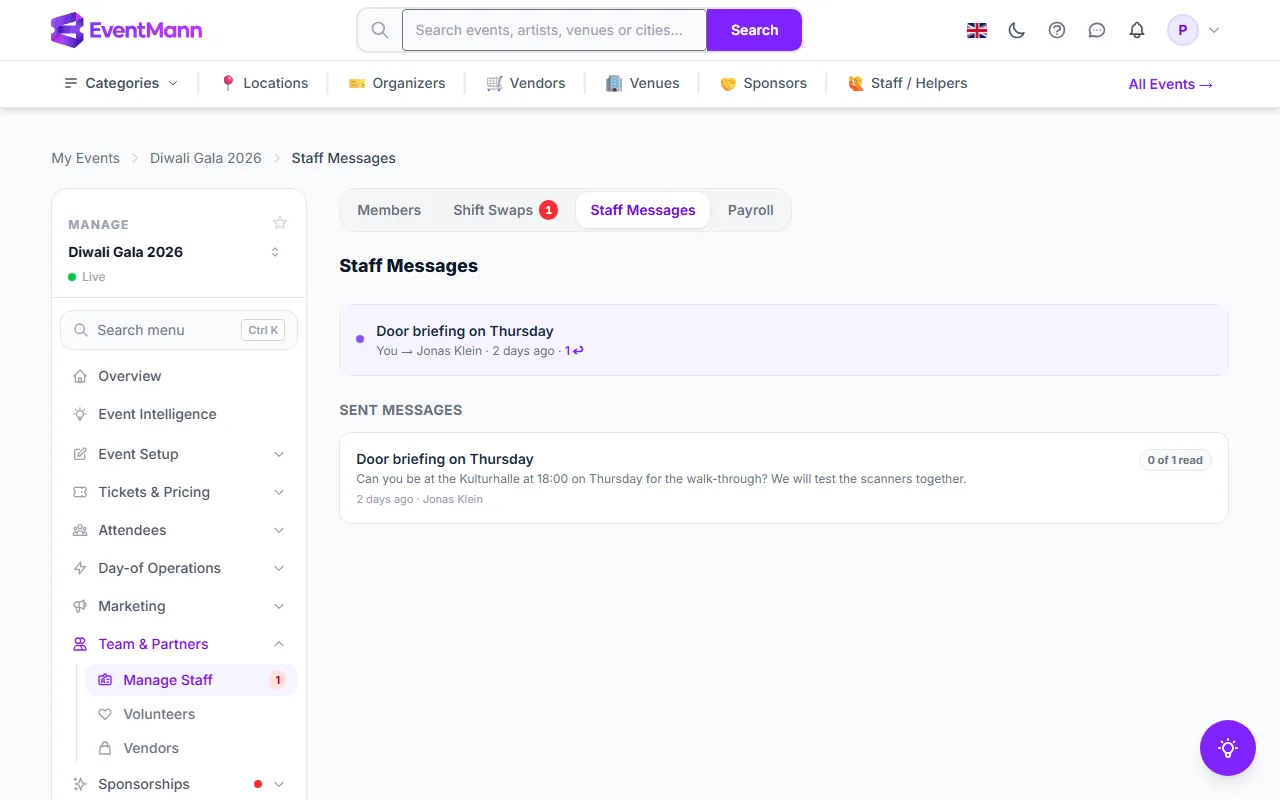
Messages
The Staff Messages tab is your inbox for this event. Conversations you started and replies to them appear at the top ①, newest first, with a mark when something is unread. Under Sent Messages you see each message you sent and how many recipients have read it ②. Open a conversation to read it and reply.
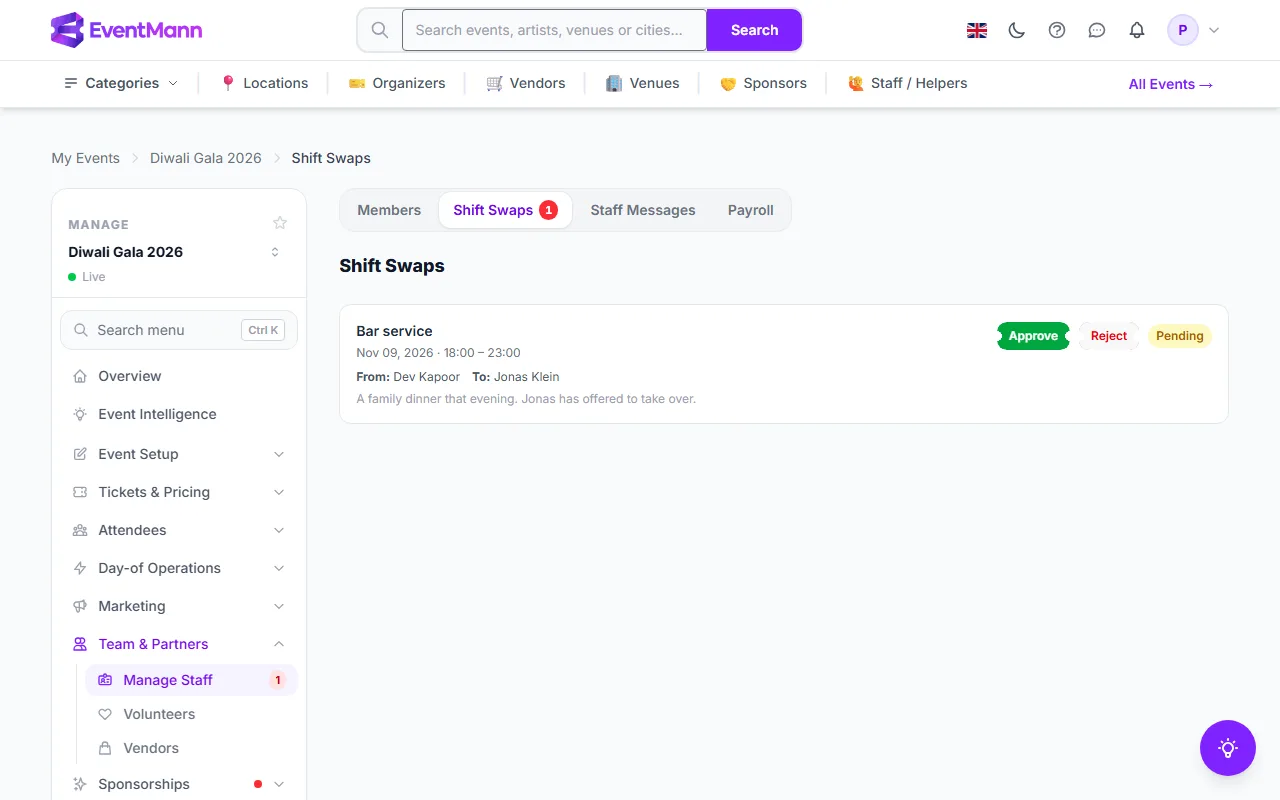
Shift swaps
When a staff member asks to hand a shift to a colleague, the request appears on the Shift Swaps tab with the shift, who asks, who would take it and their reason. Approve ① moves the assignment to the colleague, unless they already work an overlapping shift; Reject ② keeps things as they are. Both people are told. The status badge ③ shows what is still pending.
Settings explained
- Capacity — how many people a shift holds. Assigning stops once it is full, and the shift shows as full.
- Hourly rate — empty means unpaid. Payroll includes only people with a rate.
- Role (on invite) — a free-text label shown on the invitation and the team entry. It grants no permissions.
- Location — free text on the shift card, useful for several check-in points.
- Shift status — Open, Closed or Cancelled. Full is set automatically when the last place is taken.
Good to know
- Staff here are not the same as volunteers. People with no rate are labelled Volunteer on this page, but they are still staff accounts; the Volunteers module has its own roster, invitations and rota.
- There is no Suspend button here. Remove from Event takes the person off this event only, frees the shifts they have not started yet and tells them. Hours they already worked stay on record and can still be paid.
- A person cannot be assigned to two shifts that overlap, and a staff member suspended by an administrator cannot be assigned at all.
- A staff invite that nobody accepts simply expires after 7 days. Cancel it and send a new one, or use Resend.
- Seeing and working on this page needs the Staff permission; shift actions need the Shifts permission; payroll needs permission to edit the event. A team member without one of them gets a 403 for that action.
Troubleshooting
- A person is missing in the assign list — only approved staff are offered. Check Pending Applications.
- “This shift is not open” — set the shift back to Open with its status menu.
- Check In gives a message about the time — check-in opens two hours before the shift and closes four hours after it ends.
- Someone’s hours never show up in payroll — they were never checked out, or they have no rate. Ask them to check out from their own page.
- The invitation link says it is invalid — it expired or was cancelled. Use Resend.