




Event Sponsors
Help articles may not be fully accurate — they can lag behind the app due to frequent updates and automated translation. If in doubt, please contact support.
On this page
Sponsorships have two pages under Sponsorships in the event’s Manage menu. Sponsor Packages is where you define what a sponsor can buy; Manage Sponsors is where applications arrive, get approved, are paid for, tracked through deliverables and completed. EventMann takes no commission on sponsorship — the agreement and the money are between you and your sponsor.
What you can do here
- Create sponsorship packages with a tier, a price, a cap on how many sponsors can buy it and a list of what the sponsor gets.
- Show the packages on the event page so visitors can see what sponsoring costs.
- Record a sponsor you already have, one who agreed with you offline and has no EventMann account.
- Approve or reject applications from sponsors who found your event.
- Take payment through a payment invoice, or record a payment you received yourself.
- Track deliverables such as the logo and the signed agreement, and message the sponsor.
- Complete a sponsorship once everything required is done.
Sponsor packages
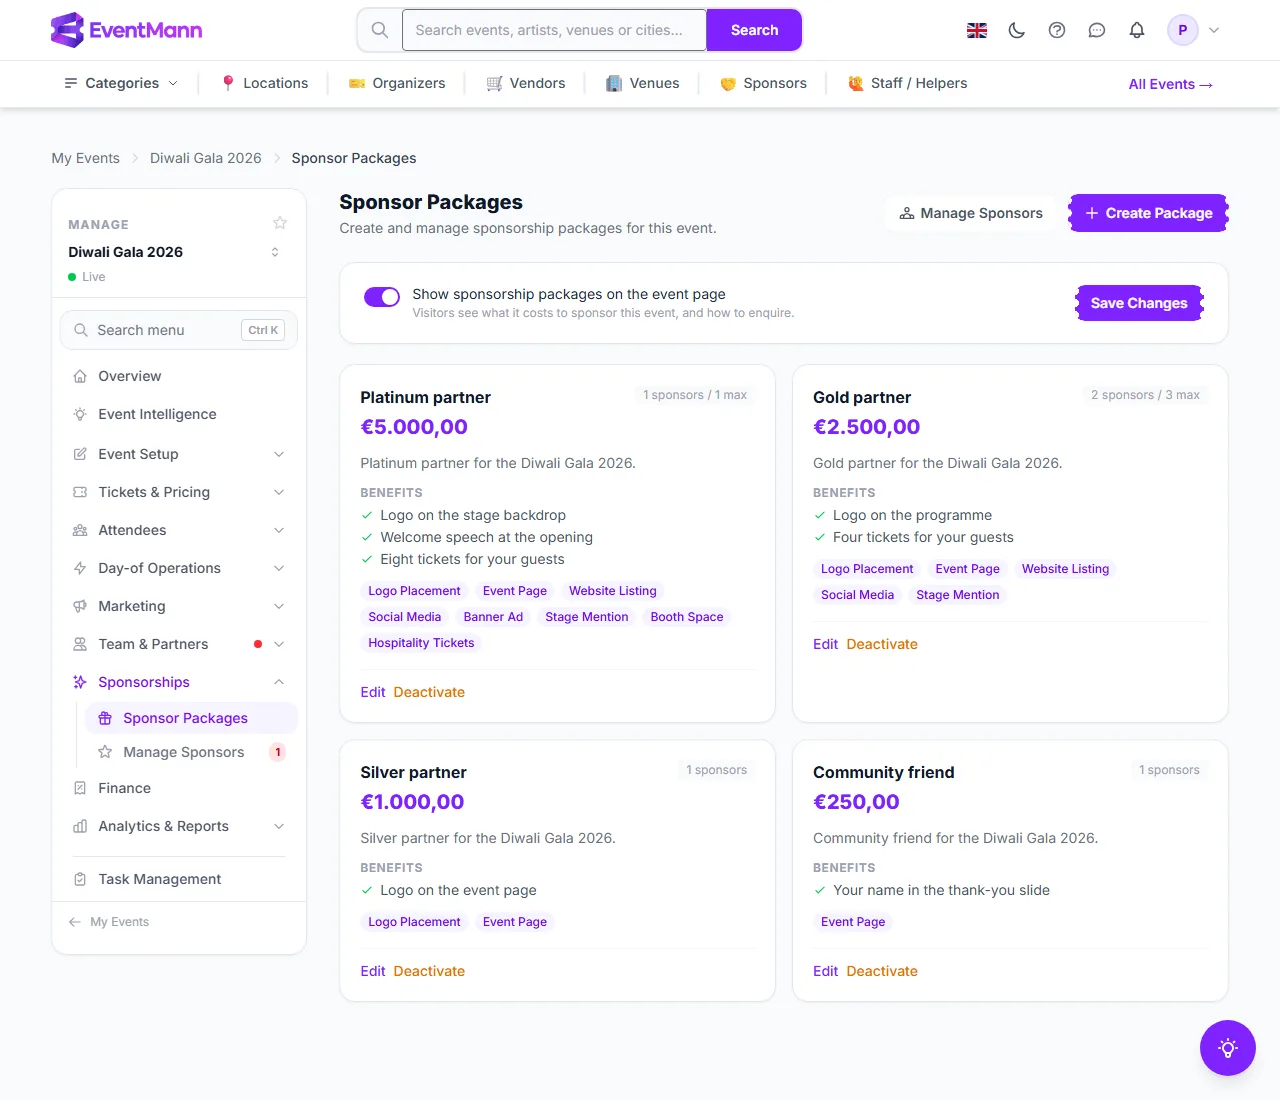
The Sponsor Packages page shows your packages as cards, ordered Platinum, Gold, Silver, Bronze and then custom ones. Each card has its price, how many sponsors it has against its maximum (“1 sponsors / 1 max”), the benefits you listed and the benefit tags you ticked. The tick box at the top ② controls whether the packages appear on the public event page: when it is on, visitors see what it costs to sponsor the event and how to enquire. If no active package is attached to the event, the page says nothing will show yet. Create Package ① starts a new one, Edit ④ changes it and Deactivate ⑤ takes it off sale — sponsors can no longer see or apply for it, nothing already agreed is affected, and Activate brings it back. A package that already has sponsors cannot be deleted; deactivate it instead.
Create a package
- Click Create Package.
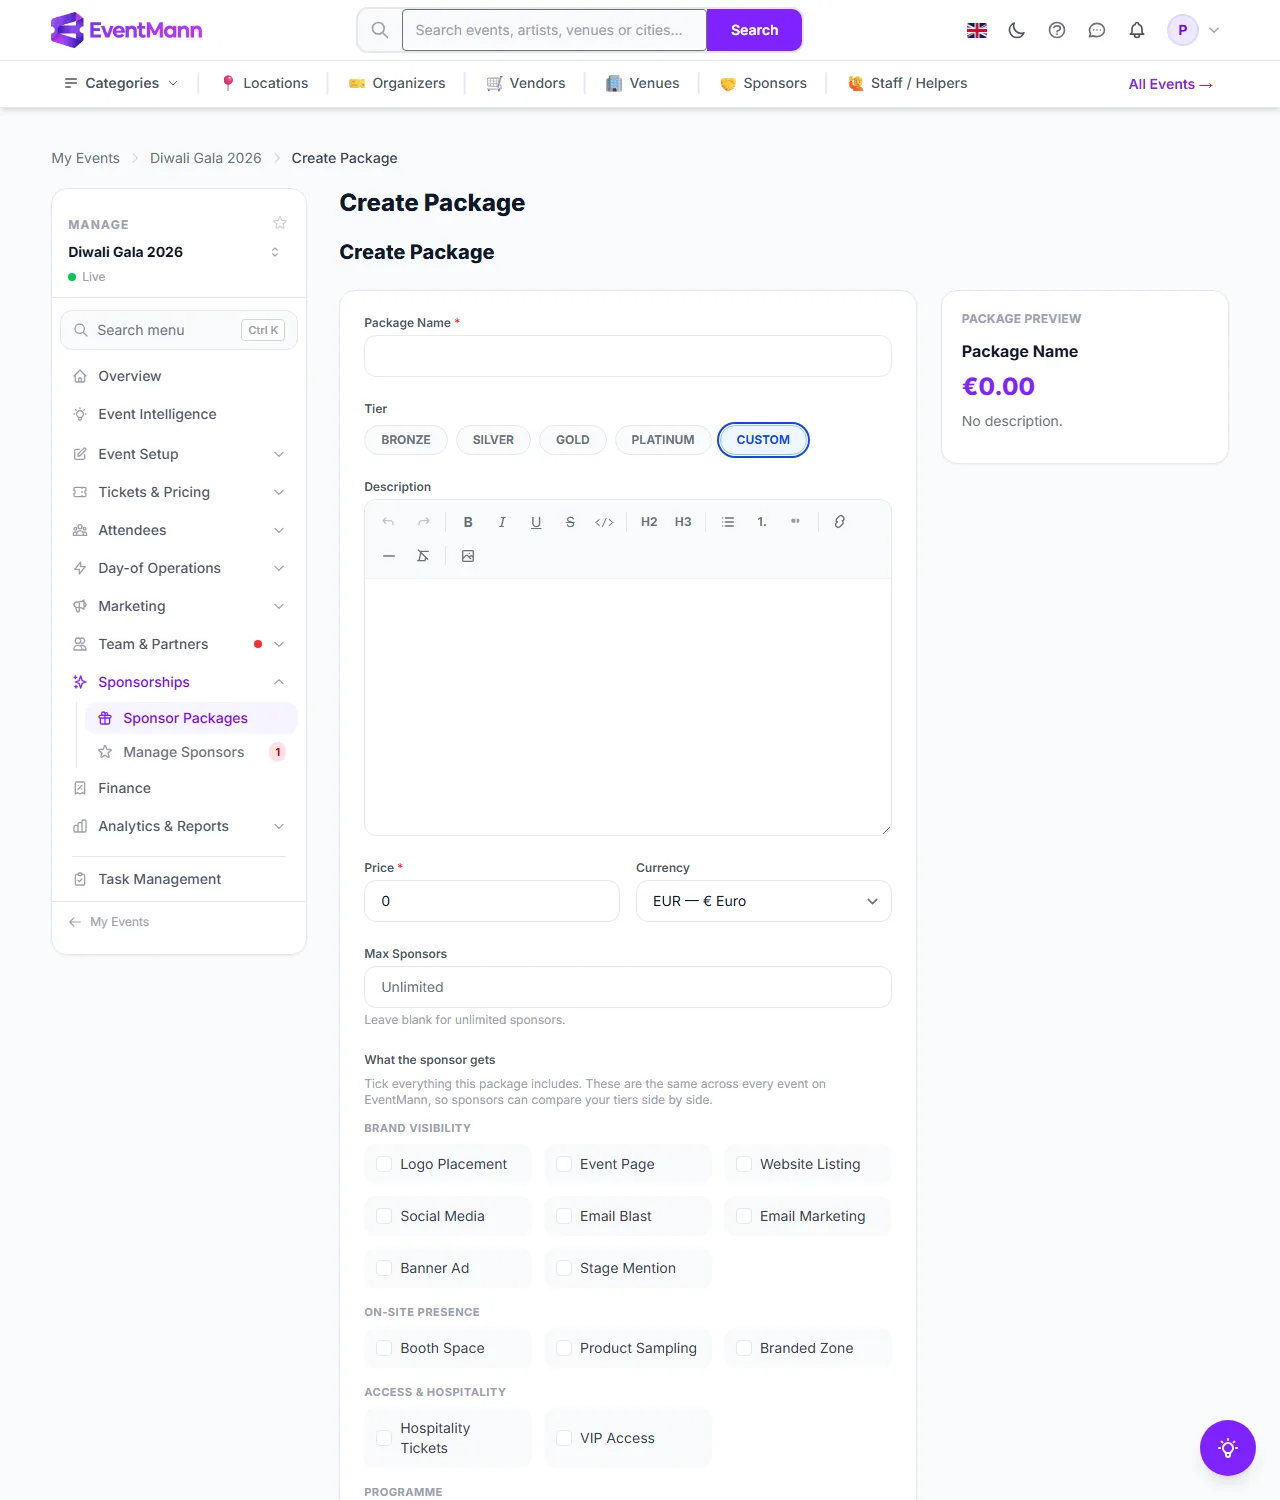
- Type the Package Name ① (up to 120 characters).
- Choose the Tier ②: Bronze, Silver, Gold, Platinum or Custom.
- Write a Description in the editor.
- Enter the Price ③ and pick the Currency.
- Set Max Sponsors ④, or leave it empty for no limit. When the maximum is reached, the package stops being offered.
- Under What the sponsor gets tick every benefit the package includes ⑤. The list is the same on every event on EventMann, which lets sponsors compare tiers side by side. It is grouped into brand visibility, on-site presence, access and hospitality, programme and more.
- Use Anything else for items the list does not cover. Sponsors see these but cannot compare them.
- Check the Package Preview on the right and click Create Package.
The sponsors list
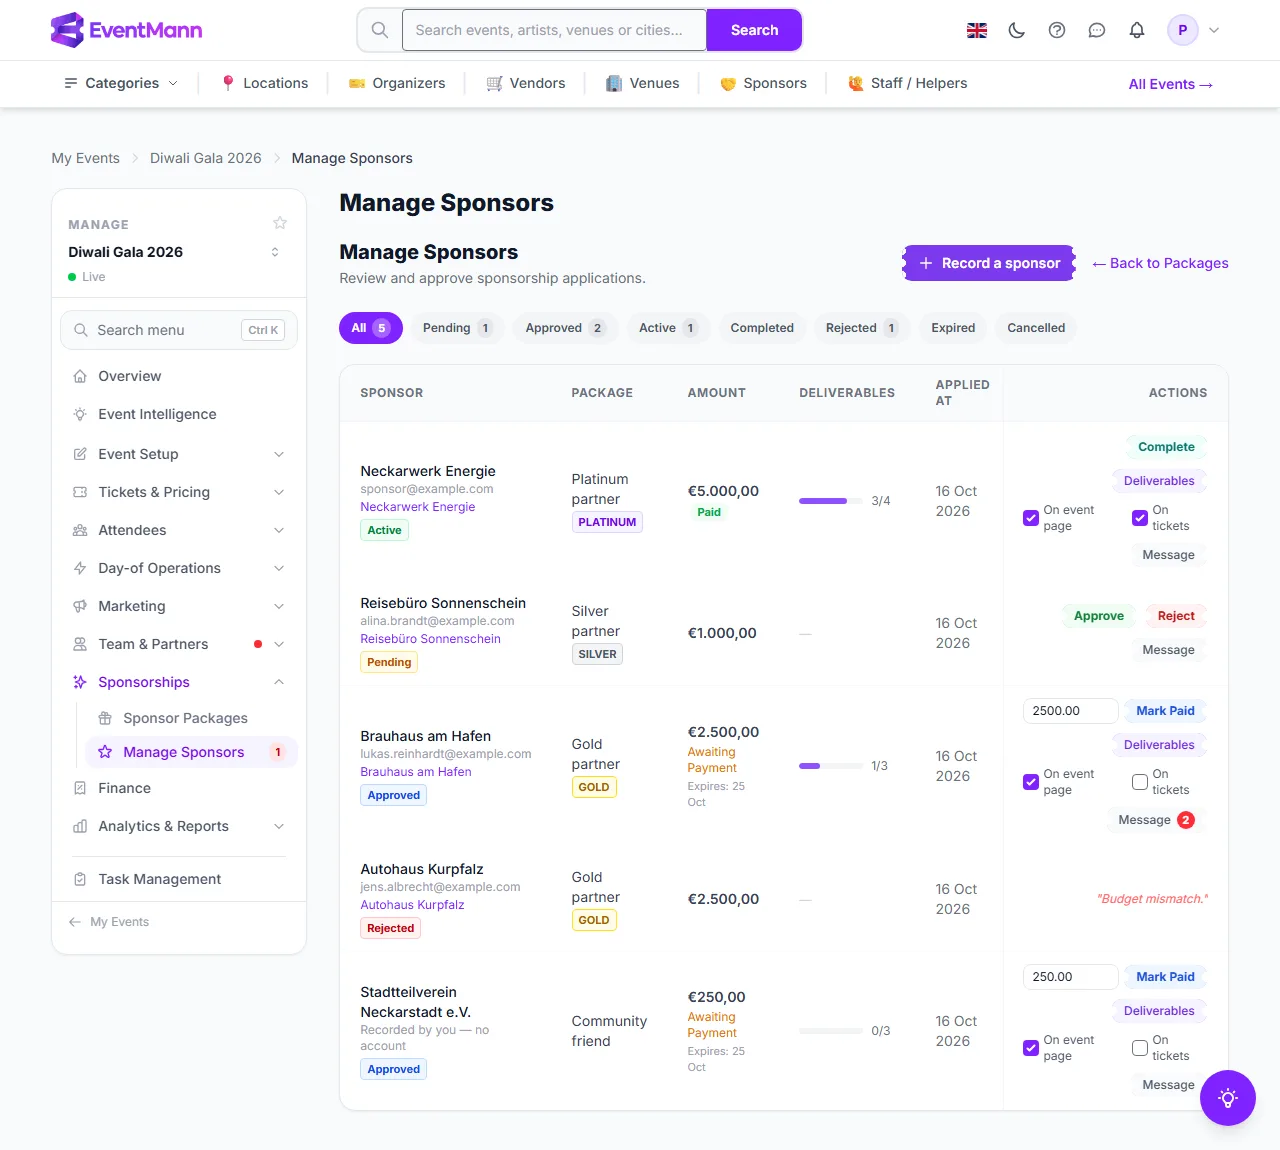
The status chips along the top filter the list and carry a count: All, Pending ②, Approved, Active, Completed, Rejected, Expired and Cancelled. Each row shows the sponsor, the package and its tier, the amount with its payment status, a progress bar of the deliverables and the date. The buttons change with the status:
- Pending — Approve ③ and Reject.
- Approved (waiting for payment) — an amount field with Mark Paid ④.
- Active — Complete ⑥.
- Approved and Active rows also show Deliverables ⑤ and two tick boxes, On event page and On tickets, which decide where the sponsor’s name and logo are shown. Every row except a rejected one has Message, with a red number for unread messages.
- Rejected — the reason you gave, in quotes.
Approve an application and take payment
- Open the Pending chip and read the application. To decline, click Reject, optionally write a reason (it is shown to the sponsor) and confirm.
- Click Approve ③. The sponsorship becomes Approved and the sponsor gets 14 days to pay. Three required deliverables are created: the logo, the signed agreement and the payment. If the application came with a logo, the logo deliverable is ticked straight away, in the sponsor’s name. The sponsor is told by notification, and by email if their notification settings allow it.
- If your Stripe account is connected and the sponsor has an email address, EventMann also sends them a Stripe invoice from your account, due in 14 days. When they pay it, the sponsorship becomes Active by itself and its Payment deliverable is ticked. Without a connected account, a manual payment record is created instead.
- If the sponsor pays you another way, enter the amount in the field next to Mark Paid ④ — it starts with the agreed amount — and click the button. The sponsorship becomes Active and its Payment deliverable is ticked in your name.
- Work through the Deliverables (see below) and click Complete when all required ones are done.
Record a sponsor you already have
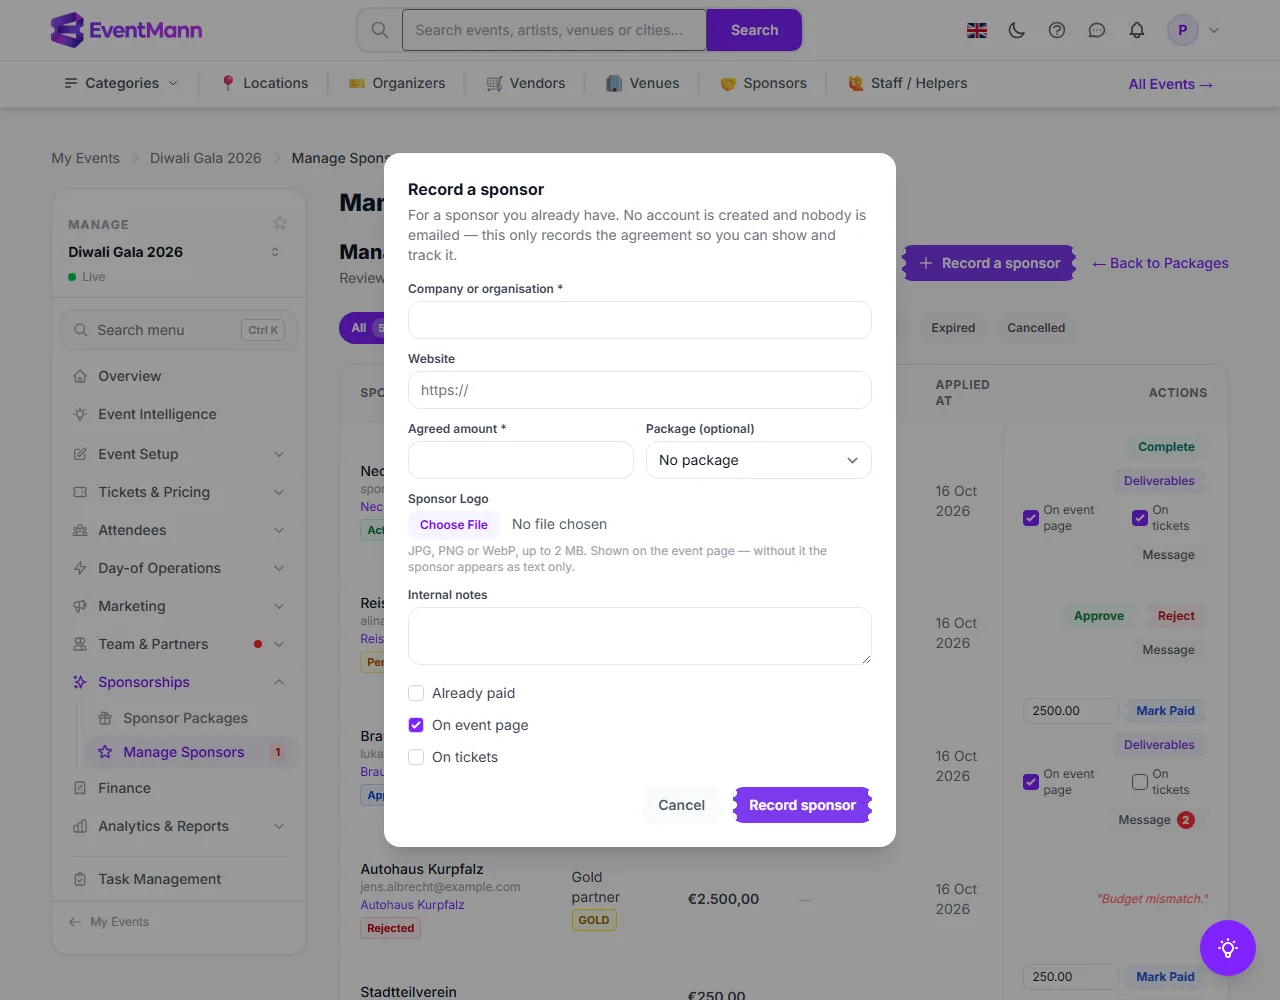
A local bank, a neighbourhood association or a shop that agreed with you in person has no account. Click Record a sponsor above the list.
- Enter the Company or organisation ① and, optionally, the Website.
- Enter the Agreed amount ② and optionally choose the Package ③ it belongs to.
- Upload the Sponsor Logo ④ (JPG, PNG or WebP, up to 2 MB). Without it the sponsor shows as text only.
- Tick Already paid ⑤ if you have the money. Choose where they appear: On event page (on by default) and On tickets ⑥.
- Add internal notes if you like, then click Record sponsor.
No account is created and nobody is emailed. The sponsorship starts as Approved with no payment deadline, because there is no application to wait for, and with its three deliverables; if you ticked Already paid or uploaded a logo, the matching deliverables are ticked for you and a paid sponsor becomes Active at once.
Deliverables
Deliverables opens the checklist of one sponsorship, with a progress bar. Each line has a type, a due date, a status and Mark Complete ① and Delete ② buttons. Required lines carry a red Required badge. To add one, enter the Title ③, choose the Type ④, optionally a due date and description, tick Required ⑤ if the sponsorship cannot be completed without it, and click Add Deliverable ⑥.
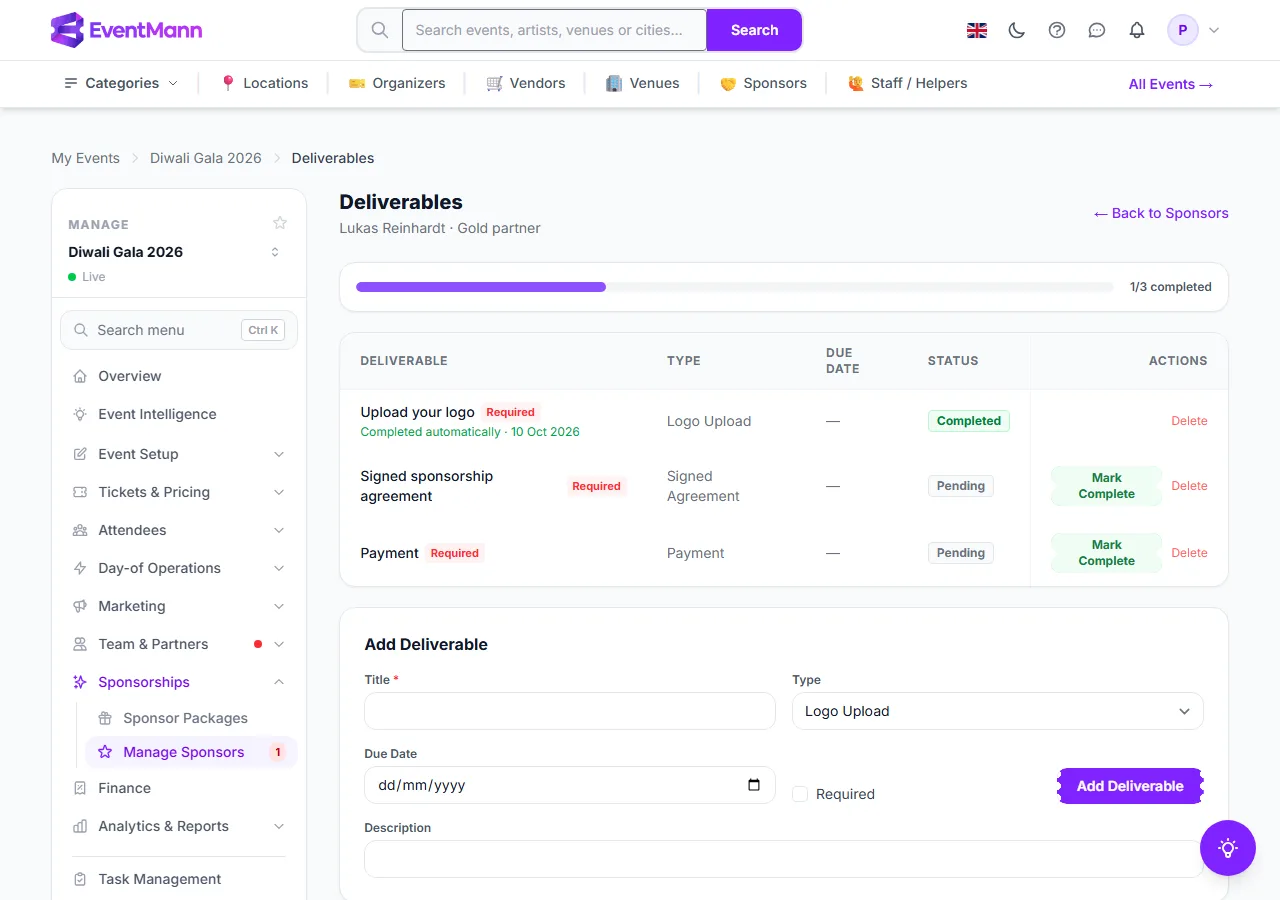
Two types tick themselves, so you do not have to chase work that EventMann has already seen done:
- Logo Upload — when the sponsor uploads or replaces their logo on My Sponsorships (or sent one with the application), the line shows Completed by with the sponsor’s name.
- Payment — when Stripe reports the sponsorship invoice paid, the line shows Completed automatically; when you click Mark Paid, it shows your name.
Every other type — a banner, the signed agreement, a social post, a stage mention — stays with you, because it happens outside EventMann. An automatic tick never unticks anything and never overwrites a line you already completed.
Messages
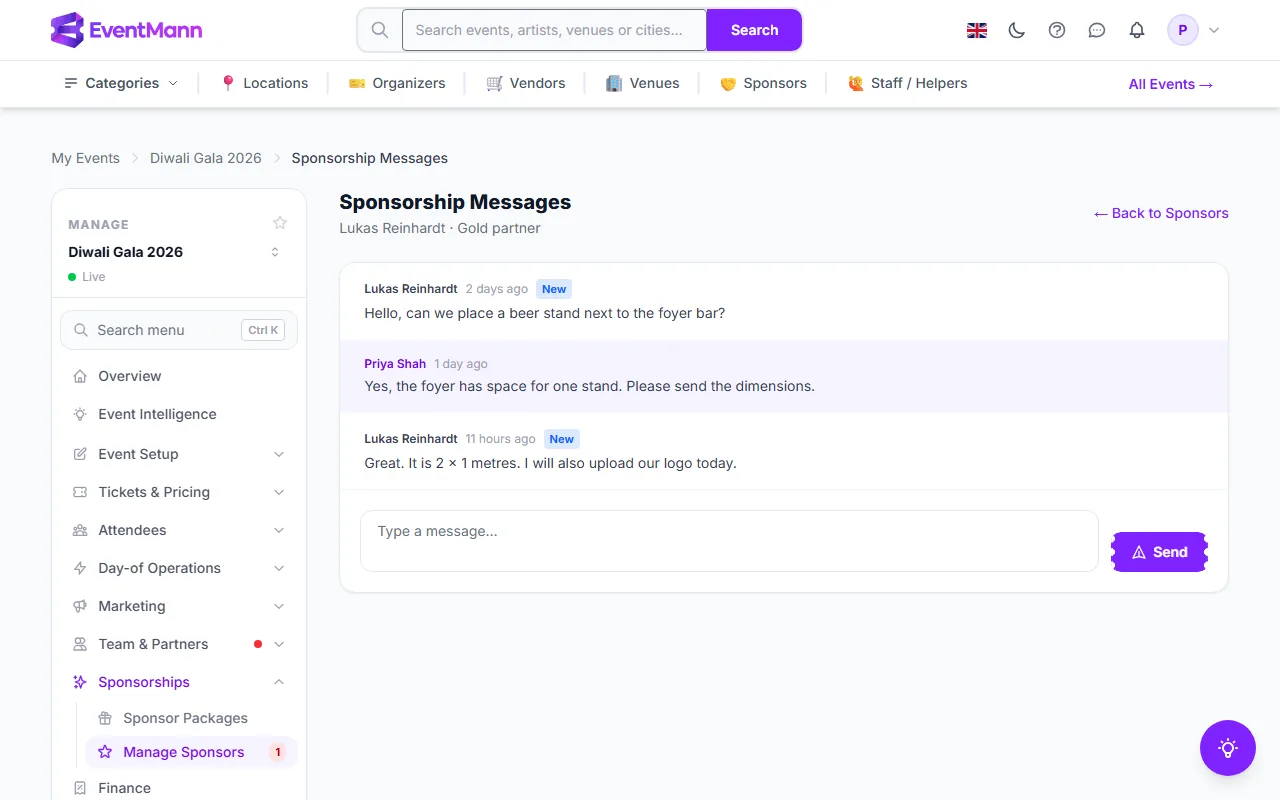
Message opens a conversation with the sponsor. Both sides see it, new messages appear without reloading, and the sponsor is notified when you write. Type in the box ① and click Send ②.
Settings explained
- Recording a sponsor yourself — the sponsorship is created already approved, with no payment deadline and no application. Its deliverables are ticked where the information you entered already covers them.
- Max Sponsors — leave it empty for unlimited; once reached, the package is no longer offered.
- Benefits — a record of what you promised the sponsor. EventMann does not automatically place a banner or a stage mention for you.
- On event page / On tickets — where the sponsor appears. Logos on tickets also need Show sponsor logos on tickets to be on in Ticket Design.
Good to know
- An approved sponsorship that came in as an application and is not paid within its 14 days expires: an hourly check moves it to Expired. A sponsor you recorded yourself has no deadline and never expires.
- You can only complete an Active sponsorship, and only when every required deliverable is complete. Otherwise the page says the deliverables block it.
- Mark Paid accepts an amount of up to twice the agreed one, as a guard against typing errors.
- Sponsor logos appear on tickets from sponsorships that are Active or Approved and have On tickets ticked, at most five of them.
- Permissions: viewing needs Sponsorships view, editing (approving, recording, paying, deliverables) needs edit, creating and deleting packages their own permissions, and writing messages needs the messages permission.
Troubleshooting
- Complete shows an error — a required deliverable, usually the signed agreement or the logo, is still open.
- The sponsor uploaded a logo but the line is still open — only a deliverable of type Logo Upload ticks itself. A logo request added as Other or Banner Upload needs your tick.
- A sponsorship disappeared from Approved — it expired after 14 unpaid days. Look under Expired.
- Mark Paid is missing — the sponsorship is not Approved. A pending application must be approved first; an Active one is already paid.
- The sponsor is not on the event page — On event page is not ticked, or the sponsorship is not yet approved.
- A package cannot be deleted — it has sponsors. Deactivate it.