




Advanced Check-in
Help articles may not be fully accurate — they can lag behind the app due to frequent updates and automated translation. If in doubt, please contact support.
On this page
Advanced Check-in is the control room for the door: live numbers, a search across every attendee, bulk check-in, no-shows and an export of who came. It complements the phone scanner described in Check-in & Entry Management and is meant for the person running the entrance from a laptop or tablet. Find it under Day-of Operations → Advanced Check-in, or tap the clipboard icon at the top of the door screen. It needs the permission to manage check-in.
What you can do here
- Watch the door live: total tickets, checked in, remaining, no-shows and the check-in rate, refreshed automatically.
- See the pace: scans per minute over the last ten minutes and the busiest hour so far.
- Break the event down by order: fully checked in, partially checked in, not arrived yet.
- Search every attendee by name, email or booking reference and check people in, one or many at a time.
- Mark someone as a no-show.
- Open the VIP list and, on events with a seat map, the occupancy of each zone.
- Export check-ins as a file.
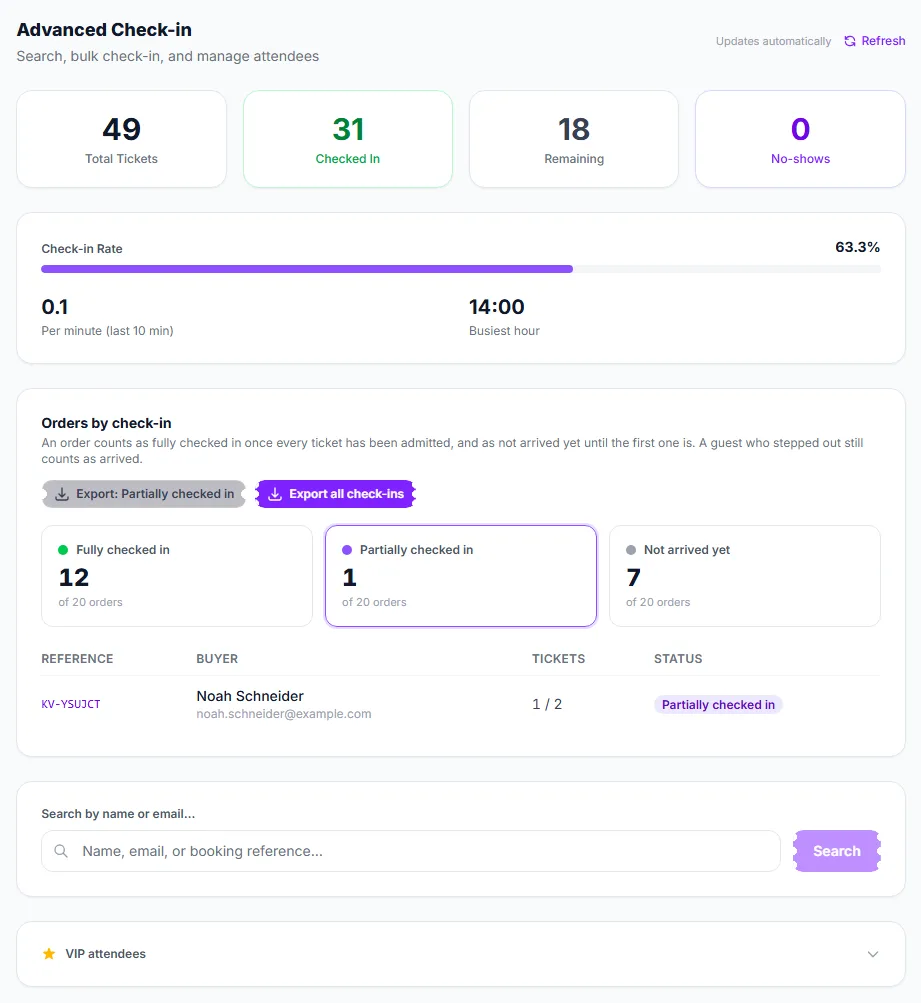
The tiles at the top ① are the numbers the door is asked all night. Orders by check-in ② counts orders rather than tickets: an order is fully checked in once every ticket has been admitted, and not arrived yet until the first one is. A guest who stepped out still counts as arrived. Click a group to list its orders. Use the search box ③ to find attendees.
How to check people in by search
- Type at least two characters of a name, email or booking reference in the search box and click Search.
- Each match shows the person with a status: Pending (not in yet), Checked in or No-show.
- Tick the people to admit — one or many; people already inside cannot be ticked — and click the green Check in button that shows how many are selected. You are told how many were checked in and how many could not be.
- To record that somebody did not come, use No-show on their row and confirm.
Exports
- Export all check-ins downloads every check-in for the event.
- The button beside it, Export: …, exports just the group you have selected (for example the orders that are partially checked in — the people to chase).
Good to know
- The numbers refresh by themselves; Refresh forces an update.
- Only confirmed bookings are counted and can be admitted. A cancelled or refunded order never appears.
- Scans made with the phone scanner, a door pass or a team member’s own account all land here, so you see the whole door in one place.
- If the venue has a capacity, check-in stops with a “venue at capacity” message once that many people are inside.
- Zone occupancy only has data for events with a seat map; otherwise it says there is no zone data yet.
Troubleshooting
- The page is not in my menu — you need the permission to manage check-in; ask the event owner.
- Search says “Enter at least 2 characters” — type a little more.
- Some people could not be checked in — the message after a bulk check-in says how many; typical causes are an order that was cancelled in the meantime or a venue that reached capacity.