




Ticket Design
Help articles may not be fully accurate — they can lag behind the app due to frequent updates and automated translation. If in doubt, please contact support.
On this page
Ticket Design controls how your tickets look: the style, layout, colours and font, which details are printed, your logo and your sponsors. One renderer produces both the PDF an attendee downloads and the PDF attached to the confirmation email, so what the live preview shows is what is delivered. Open the event, then Tickets & Pricing → Ticket Design. You need the permission to edit the event.
What you can do here
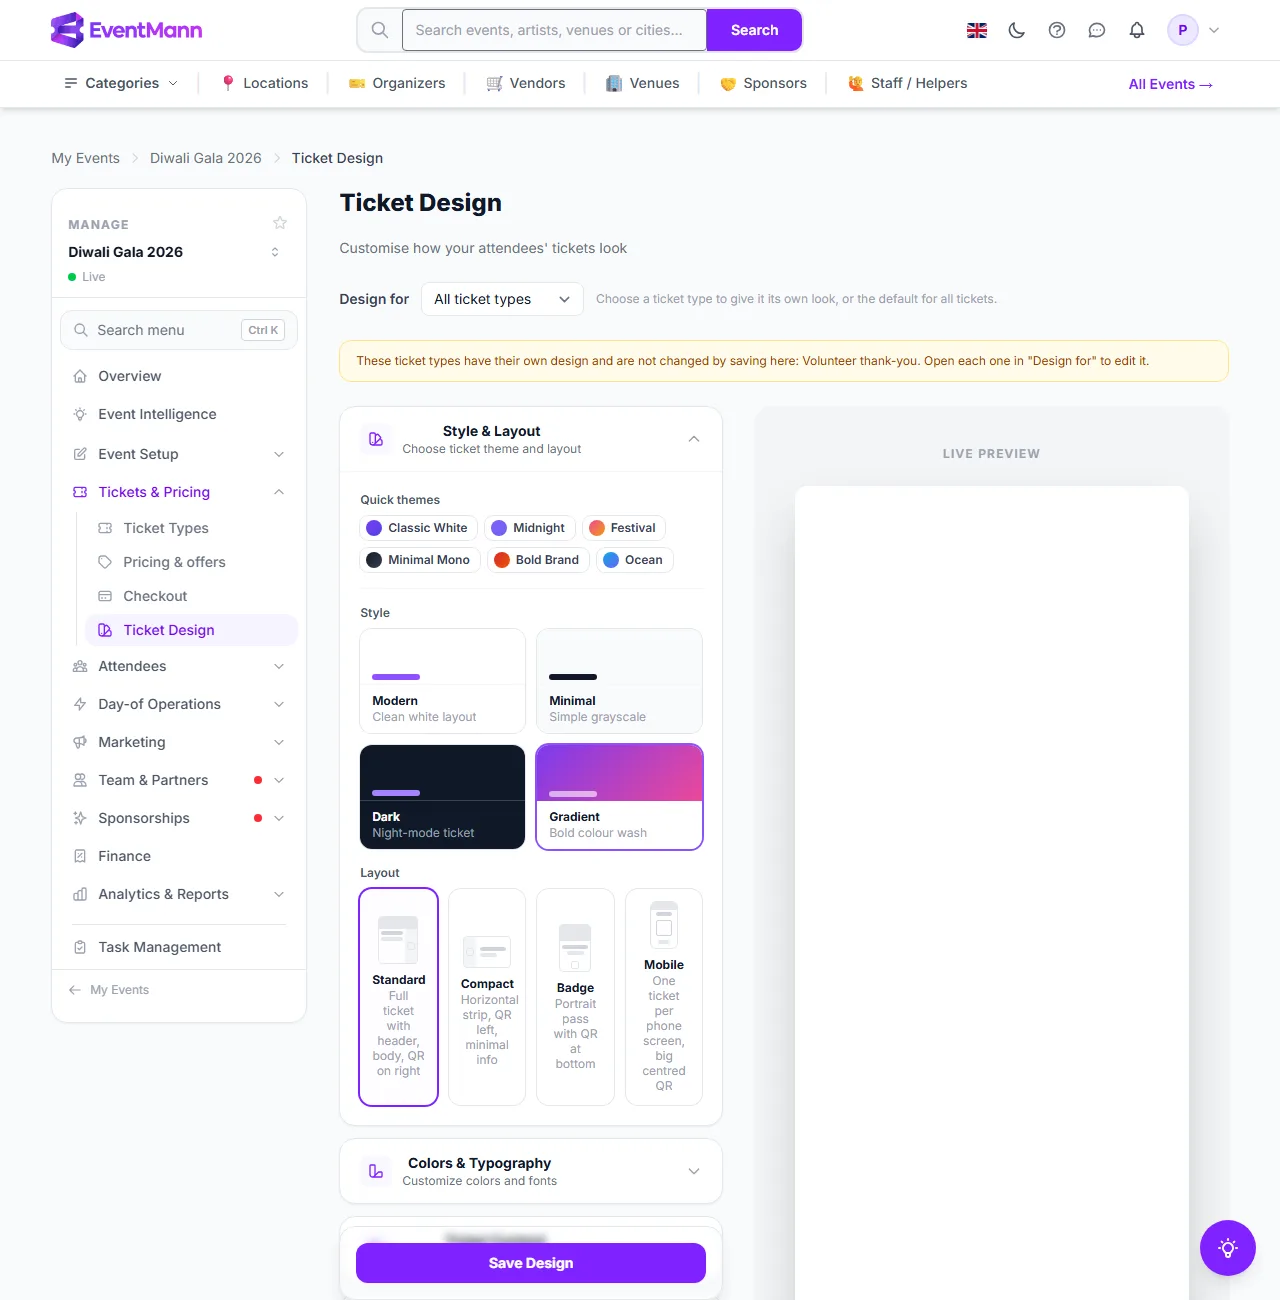
- Pick a style and layout, or start from one of six quick themes.
- Set colours and typography and the language of the labels on the ticket.
- Show or hide the date, venue, ticket type, category, price, attendee name, booking reference and ticket ID.
- Add your logo, a background picture and your organizer branding.
- Add sponsors and partners with their logos and a position.
- Give one ticket type its own design.
- Preview live and download a sample PDF.
The page
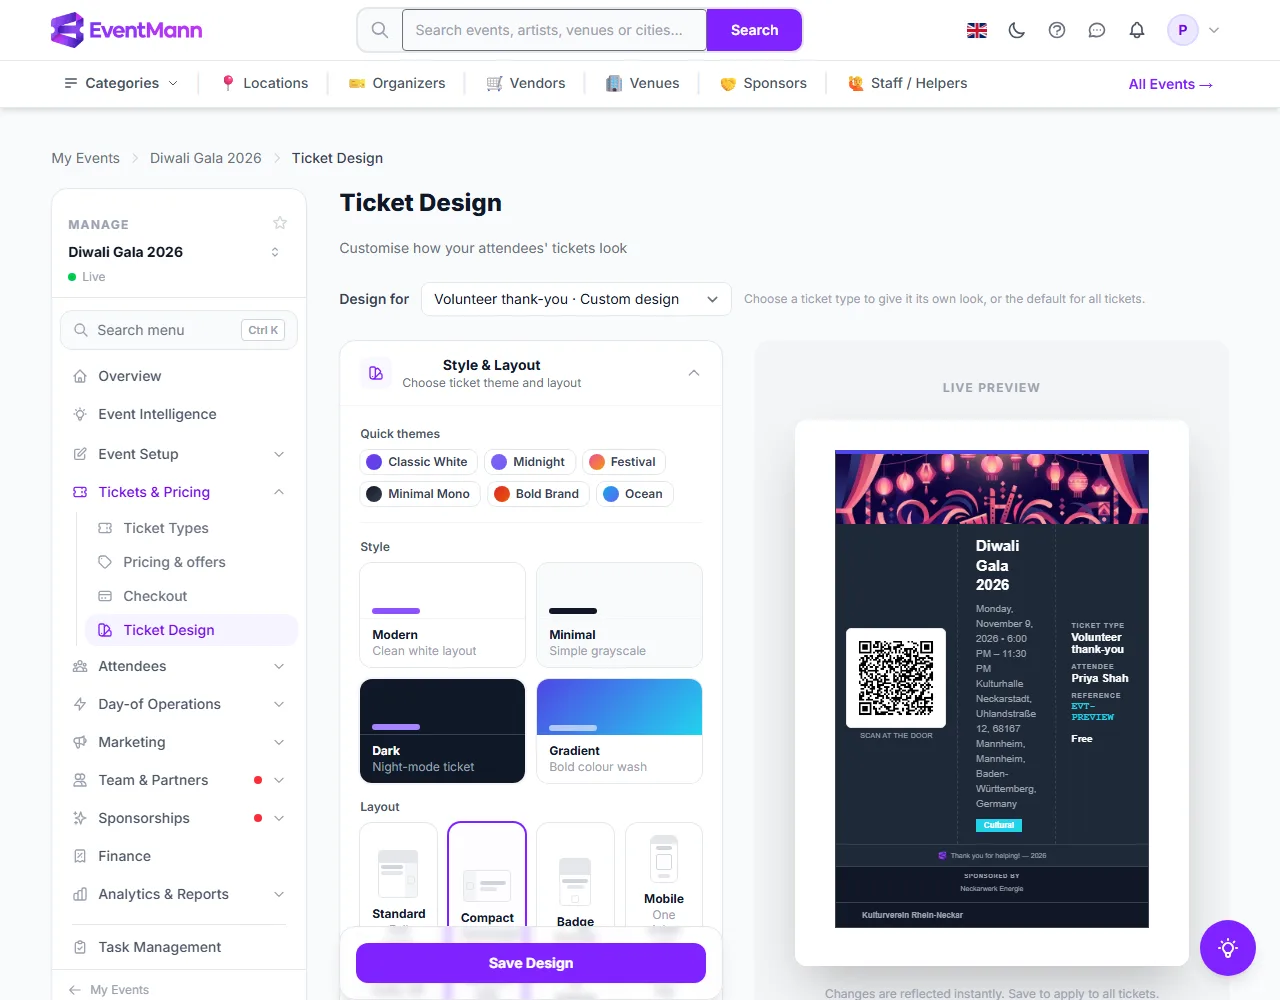
The settings are in collapsible panels on the left; the live preview of a ticket stays on the right and redraws a moment after every change. Design for ① at the top chooses what you are editing: All ticket types or one ticket type. The Style & Layout panel starts open. Quick themes such as Midnight ② set style, colours, layout and font in one click. Pick a Style — Modern, Minimal, Dark or Gradient ③ — and a Layout — Standard, Compact, Badge ④ or Mobile (one ticket per phone screen with a large centred QR code). Save Design ⑤ stays at the bottom of the page. The preview ⑥ uses sample data, so you do not need a real booking.
Colours, font and language
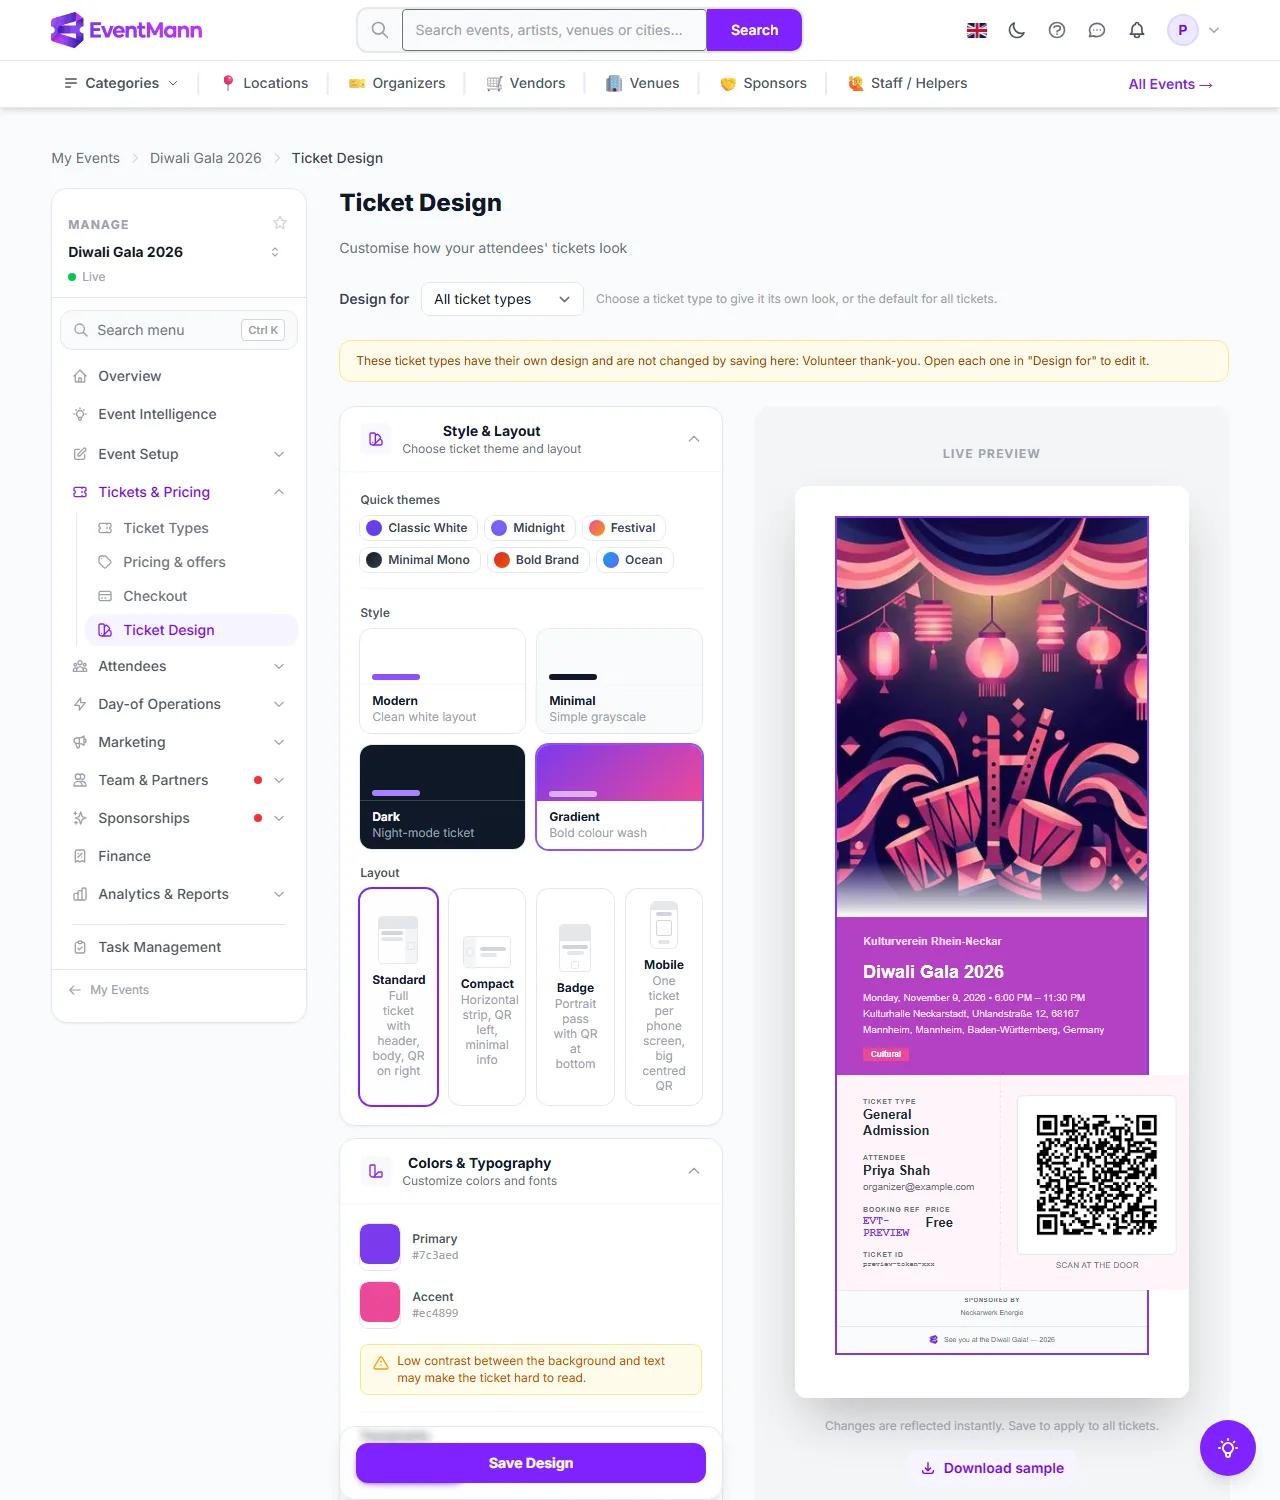
Open Colors & Typography. Choose Primary ① and Accent with the colour pickers; Background appears only for the Modern and Minimal styles, because Dark and Gradient have their own. A yellow warning shows when the contrast makes the ticket hard to read. Typography offers Sans-serif ②, Serif and Monospace. Ticket language ③ sets the language of the labels printed on every ticket, in the email and the download alike — it does not follow the buyer’s browser, so all copies of a ticket read the same. If you never set it, the event owner’s language is used.
Open Ticket Content to switch details on or off: Show Date ④, Show Venue / Location, Show Ticket Type, Show Category Badge, Show Price ⑤ (which also hides the discount-code line), Show Attendee Name (it prints the email under the name), Show Booking Reference and Show Ticket ID. Under the date and venue switches, Location text, Date text and Time text let you print your own words instead of the event’s details; leave them empty to use the event’s own. Edit these copies the real values into the fields, and Use event details clears them again.
Logo, background and organizer branding
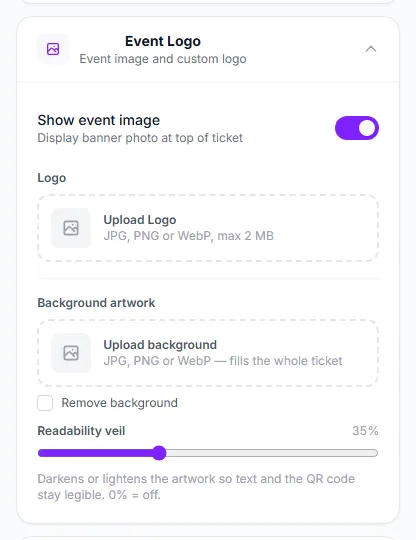
In Event Logo, Show event image ① prints the banner photo at the top of the ticket (your event image, or the category artwork when you have none; never for an online-only event). Upload Logo ② takes a JPG, PNG or WebP of up to 2 MB, and offers two colours taken from it to apply. Upload background ③ fills the whole ticket with a picture (also up to 2 MB); the Readability veil ④ lays a white layer over it, from 0 (off) to 100 per cent, 35 by default, so the text stays readable.
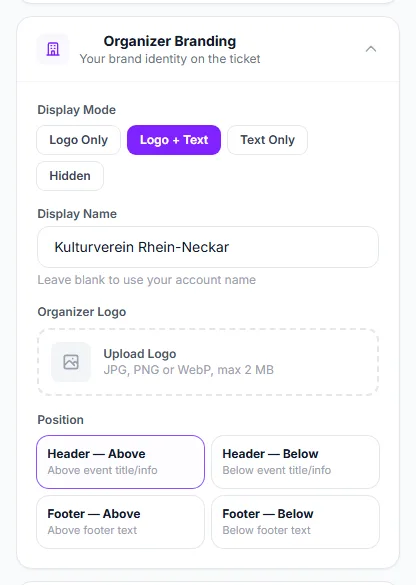
In Organizer Branding, choose a Display Mode ① — Logo Only, Logo + Text, Text Only or Hidden — and a Display Name ② of up to 100 characters. Left empty, the name is your company name from your profile, else your account name. Add an Organizer Logo and choose its Position ③: above or below the event information in the header, or above or below the footer text.
Sponsors and partners
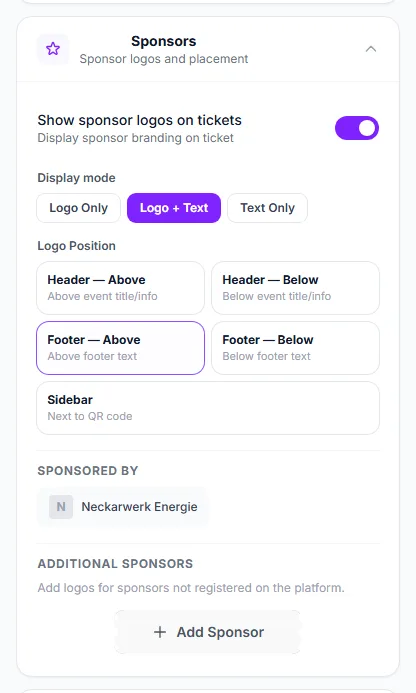
The Sponsors panel has the switch Show sponsor logos on tickets ①, a Display mode ② (Logo Only, Logo + Text, Text Only) and a Logo Position: the four header and footer positions or Sidebar ③ next to the QR code. Sponsored by lists the sponsors who qualify automatically: those whose sponsorship is Active or Approved and has On tickets ticked in Event Sponsors, at most five. Add Sponsor ④ under Additional Sponsors adds one who is not on EventMann: a name and a logo of up to 1 MB (JPG, PNG or WebP), one per save. The Partners panel works the same way for co-organizers, media partners or venues, with an extra website field; it is off by default.
Footer, QR code and size
In Footer & QR you can write a custom footer of up to 200 characters; the year is added after it. Show QR label prints “Scan at the door” under the code, and QR code size is Small, Medium or Large. Ticket size offers an A4 sheet, an A6 landscape ticket and a 7 × 3 inch pass with or without a bleed for printers, and Spacing is Compact, Standard or Roomy. The QR code itself is always printed, and the footer always names you, the organizer, as the issuer, next to the small EventMann mark of the platform the ticket was sold through.
Give one ticket type its own design
- Choose the ticket type under Design for ①. The page reloads for that type.
- Change the style ②, the layout ③ and anything else.
- Click Save Design ④. The ticket type now carries a full design of its own and shows Custom design in the list.
A ticket type without a design of its own follows the event’s design. When you save the event default, a notice lists the types that have their own design and are not changed. Once a type has its own design, later changes to the event design do not reach it, and there is no button that returns it to the default.
Settings explained
- Design for — the event default, or one ticket type with a design of its own.
- Display Name — overrides the organizer name printed on the ticket.
- Show sponsor logos on tickets / Show partners on tickets — when off, no such section is drawn at all.
- Logo files — JPG, PNG or WebP. The logo, organizer logo and background may be up to 2 MB, sponsor and partner logos up to 1 MB. SVG is not accepted.
- Ticket language — one of the eleven languages EventMann is published in.
Good to know
- The download and the email attachment use the same design, and an order of several tickets arrives as one PDF with a page for each.
- Only the Standard layout honours every position for organizer branding, sponsors and partners. Compact, Badge and Mobile place them in a fixed spot.
- Clicking the Modern, Minimal or Dark style card also resets the background colour to that style’s own.
- Download sample produces a PDF of the last saved design; only the live preview shows edits you have not saved yet.
- Duplicating an event, or saving it as a template, keeps the design but drops the date, time and venue texts you typed.
- Chinese, Japanese, Korean, Thai and Latin, Cyrillic and Greek text print correctly. Arabic, Hebrew and Indic scripts print with the right glyphs; with the simple renderer, the joining and the positioning of marks can look slightly off.
Troubleshooting
- My logo is rejected — the file is not a JPG, PNG or WebP, or it is too large. The form shows an error rather than skipping the picture.
- A sponsor does not appear on tickets — its sponsorship must be Active or Approved with On tickets ticked, and Show sponsor logos on tickets must be on here. Only five are printed.
- The sample PDF does not show my change — save the design first; the sample uses the saved one.
- One ticket type looks different from the others — it has its own design. Choose it under Design for to edit it.
- The event image is missing — Show event image is off, or the event is online-only.