← Printable guides
EventMann

Running events with volunteer teams

For associations whose events are run by volunteers: the roster, standing teams and their leads, roles, shifts, tasks, team inventory and the event day, and what your volunteers see.

Edition of October 18, 2026

The latest version of every chapter is in the Help Centre: https://eventmann.com/help

Chapter 1

Volunteers

1.1 Volunteers

Volunteers are the people who help at your events for free. EventMann gives them their own tools: a roster you keep across all your events, standing teams with leads, an invitation per event, a rota, tasks, messages and a live view for the day itself. It is built for associations whose whole event team is volunteers, and it works just as well for a single helper at a single event. You find it in two places: Volunteers in the Grow group of your sidebar for everything that spans events (roster, teams, import), and Volunteers under Team & Partners in an event’s Manage menu for everything that belongs to one event.

The sidebar entry Volunteers ① opens the volunteer roster. Its tab strip leads to Teams ② and Import volunteers ③.
The organizer sidebar with Volunteers under Grow, and the three pages across all events: roster, Teams and Import volunteers

Volunteers, staff and members are three different things

VolunteersStaffMembers
WhoPeople who help for free, often again and againPaid helpers for one eventPeople who bought a membership from you
WhereRoster, Teams and Manage → VolunteersManage → Manage Staff, the staff portalSettings → Membership
RotaVolunteer shiftsStaff shifts, with swaps and payrollNone
MoneyNone. Hours are only recordedHourly rates and payrollPlan price, paid by the member

The three do not mix. A volunteer is never put on the staff rota, and a volunteer rota never feeds payroll. If you pay somebody, they belong under Event Staff.

What you can do here

The pages of one event

Open an event, then Team & Partners → Volunteers ①. A strip of tabs runs across the top. People ② lists who was asked and what they answered. Shifts ③ and Tasks ④ are the rota and the job list, Run sheet ⑤ puts both in time order, Live ⑥ shows what is happening right now, Messages ⑦ writes to the team, Settings ⑧ holds the event’s volunteer options and Roster ⑨ is the same roster as in your organizer panel, for people who only hold this one event.
The Volunteers section of the Diwali Gala with its eight tabs

A typical path

  1. Build your roster once and set up your teams. Make the people who are always there core: they are added to every new event.
  2. On the event, open People and invite the rest, or post a join link in your WhatsApp group.
  3. Add Shifts and Tasks, or copy them from last year’s event, then put confirmed people on the shifts.
  4. Before the day, send a Message, print the Run sheet and check the team sizes on People.
  5. On the day, keep Live open. Afterwards the hours are on the roster, and you can download an hours statement for each volunteer.

Good to know

  • Being on the roster is not an invitation. Importing a list sends no email; you decide per event whom to ask.
  • Only confirmed volunteers can be put on shifts, be given tasks, hold a role and buy the thank-you ticket.
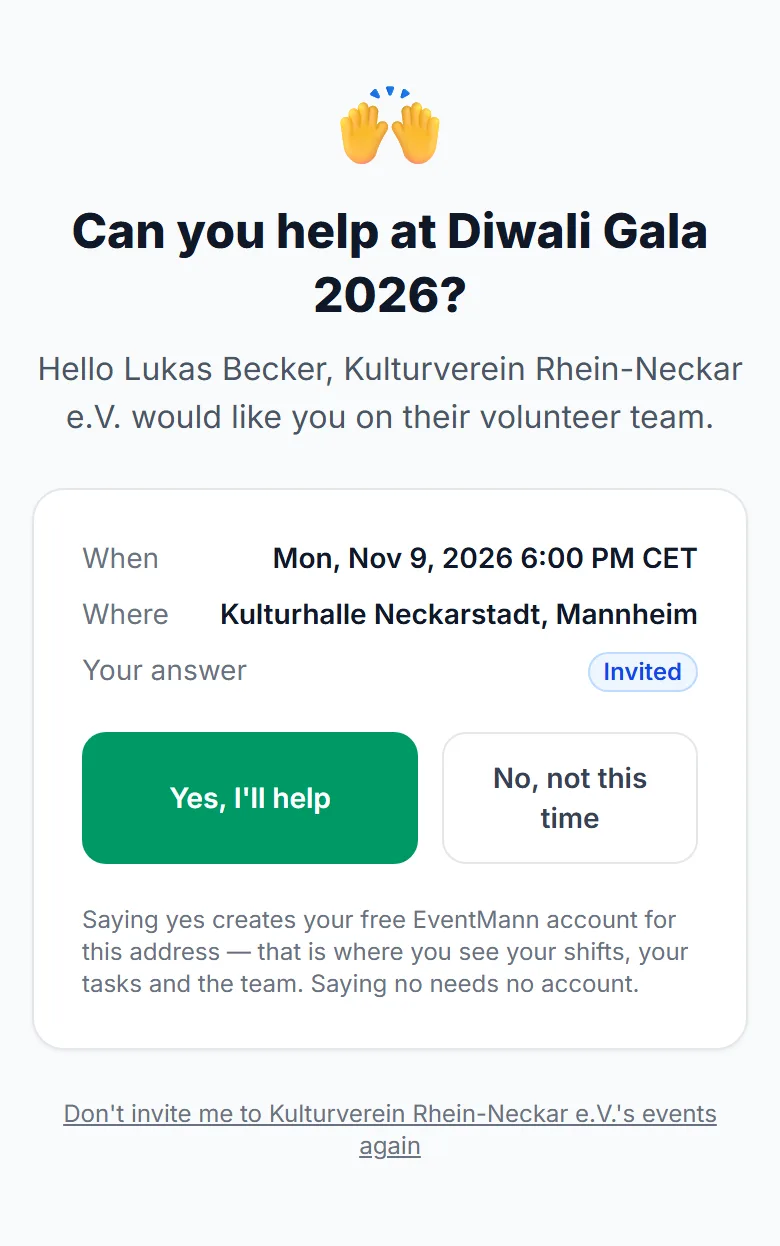
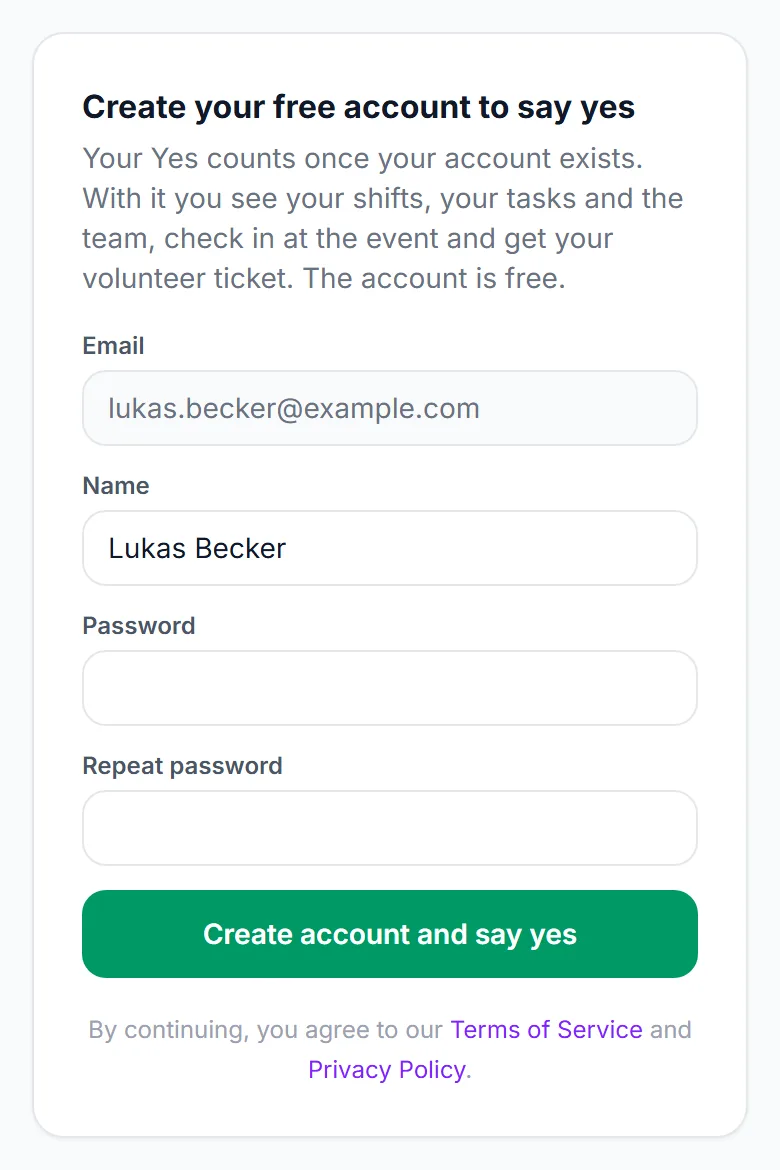
  • Saying no to an invitation needs no account. Saying yes does: the volunteer creates a free account from the invitation page, or signs in, and only then are they confirmed and you are told. The account is how they see their shifts and tasks, check in and buy the thank-you ticket. Their side is described in Volunteering at an event.
  • Invitation, confirmation and message emails leave at your own hourly sending limit (Settings → Email), so a hundred invitations are spread out rather than sent in one burst.
  • Every invitation carries a link to opt out of your volunteer invitations. People who opted out are skipped whenever you invite them, and show as No invitations wanted on the roster.
  • A team member can work with volunteers when their role holds the Volunteers permission; Team lead (own teams only) limits it to the teams they lead. The Tasks permission opens the task board. Both are ticked in Custom Roles.

Troubleshooting

  • The Volunteers entries are missing from the menu — your role does not hold the Volunteers permission for that event. Ask the organizer who owns it.
  • A volunteer says they cannot see their shifts — they need an account on the email address you invited and the address must be confirmed. If People shows No account yet beside them, use Send sign-up link.
  • Somebody was skipped when you invited — they are already on this event in some status, or they opted out of your invitations.
Related

1.2 The volunteer roster and CSV import

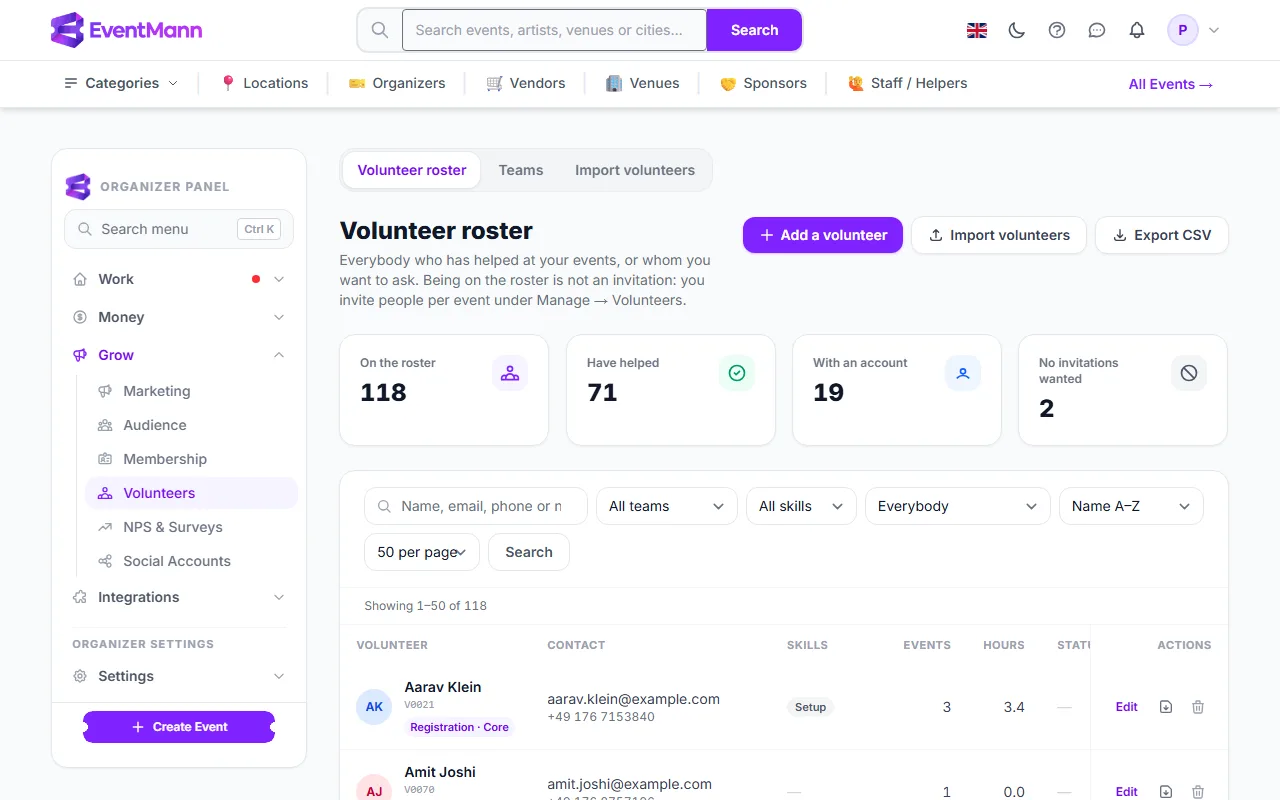
The volunteer roster is your list of everybody who has helped at your events, or whom you would like to ask. It belongs to you, not to one event: a person is added once, gets a volunteer number such as V0001, and keeps their history across all your events. Open it under Grow → Volunteers in your organizer sidebar.

What you can do here

  • Add people one by one, or import the list you already keep as a CSV file.
  • Search and filter by name, team, skill, whether they have an account, whether they have helped before or have asked not to be invited.
  • Edit contact details, skills and your own notes.
  • See how many events and hours each person has behind them, and download an hours statement as a PDF.
  • Export the whole roster as a CSV file, or delete a person together with their history.
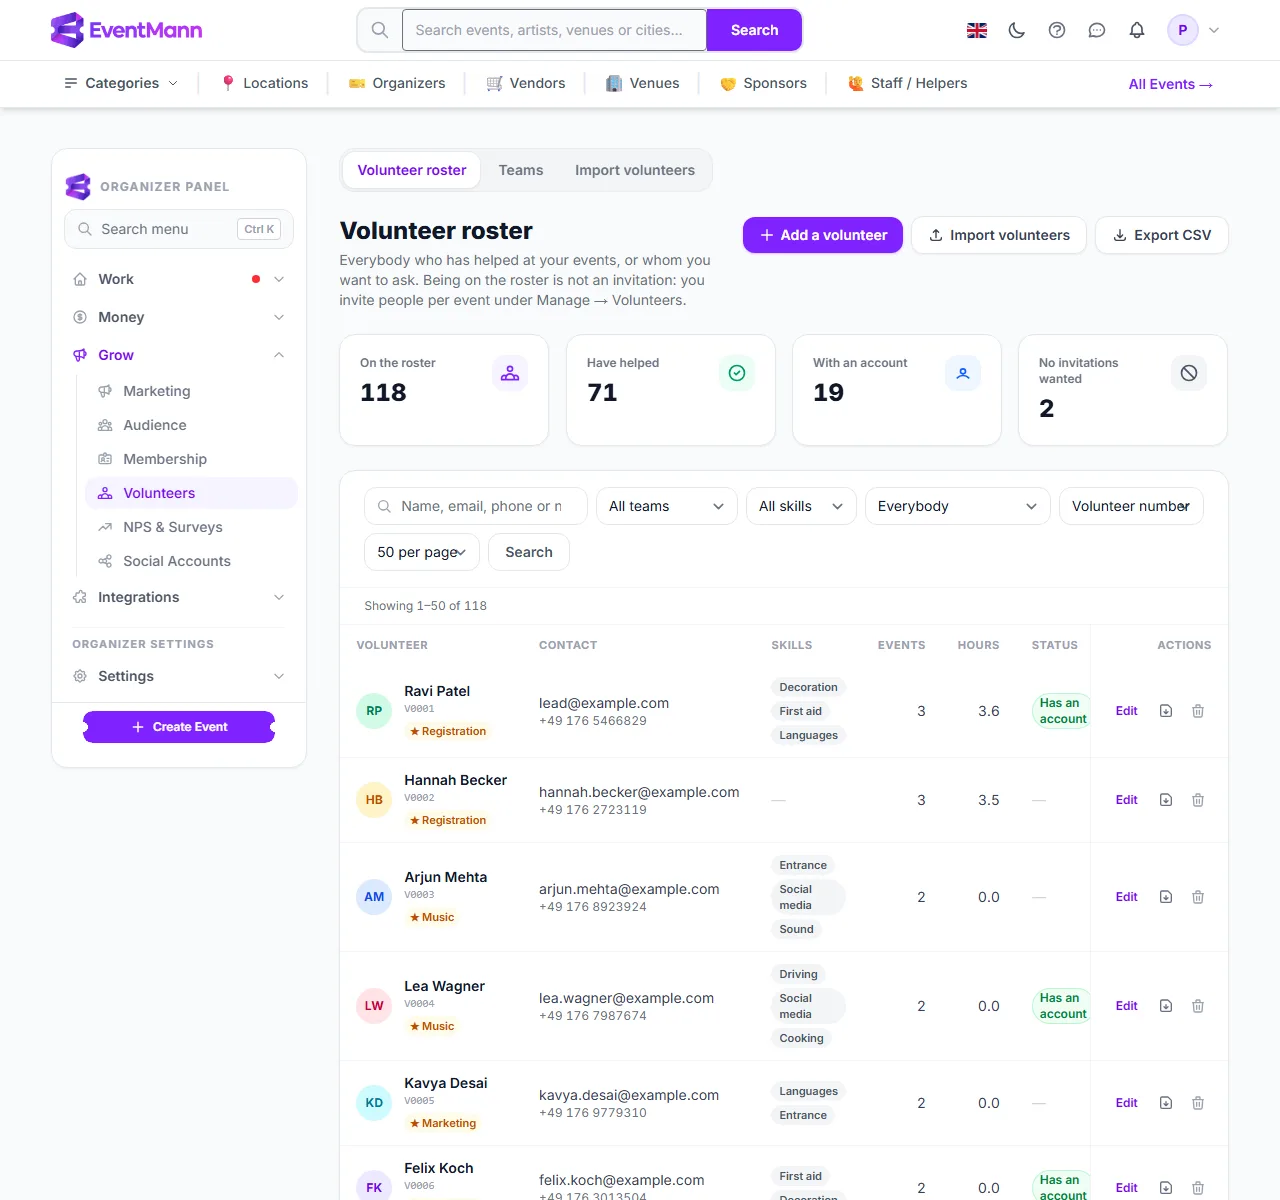
The volunteer roster with its four counters, filters and the first volunteers

Click Add a volunteer ① to add somebody, Import volunteers ② to load a file, or Export CSV ③ to download the list. The four cards above the table count everybody on the roster, those who have helped, those With an account ④ and those who asked for no invitations; each card is a shortcut to that filter. Use the search box ⑤ for a name, email, phone number or volunteer number, and the dropdowns, such as Everybody ⑥, to narrow the list further.

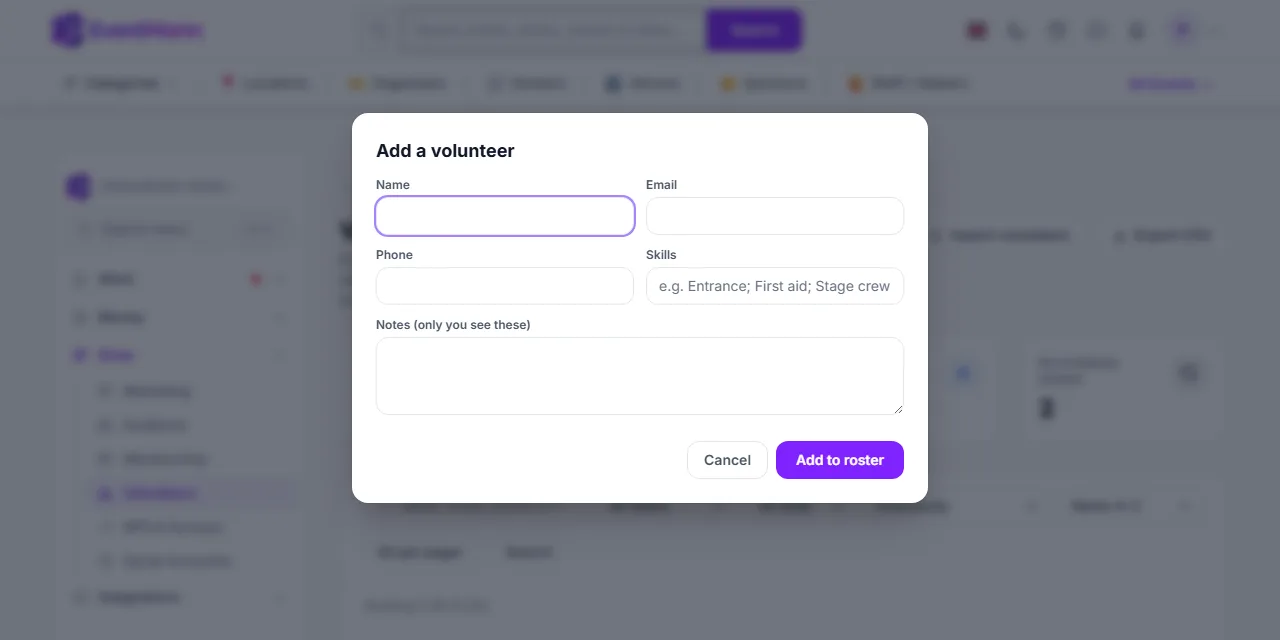
Add a volunteer

  1. Click Add a volunteer.
  2. Type the person’s Name ① and Email ②. These two are required; the email must be unique on your roster, and capital letters do not matter.
  3. Add Skills ③ separated by semicolons, for example Entrance; First aid; Stage crew. Up to 20 skills are kept, and they become a filter on the roster.
  4. Optionally write Notes; they are for you only.
  5. Click Add to roster ④. Nobody is emailed.
The Add a volunteer dialog

Read the table

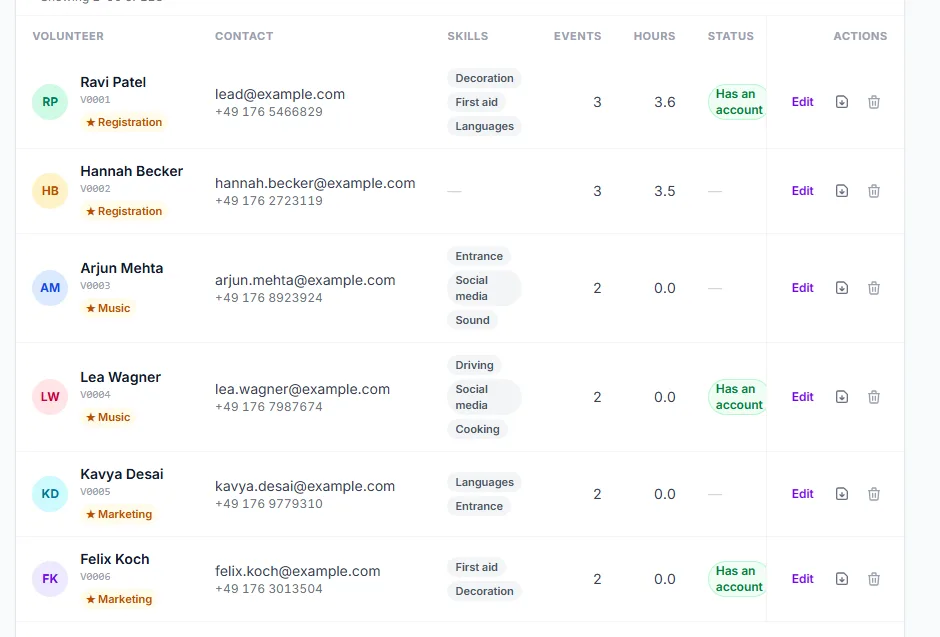
Each row starts with the person’s volunteer number ① and the teams they belong to ②, with a star for the teams they lead. The Events column counts events where they were confirmed, Hours adds up the time between check-in and check-out of every shift that was checked out. A green badge ③ Has an account means a confirmed EventMann account uses this email address, and No invitations wanted means the person opted out of your invitations. Edit ④ opens the same fields as the add dialog. The download icon ⑤ gives the person’s hours statement as a PDF, and the bin deletes them.
Roster rows showing the number, team badges, account badge and actions

Import a list from a spreadsheet

Under Import volunteers you load the list you already keep. Importing adds people to your roster only. It sends no email and it never changes anyone who is already there.

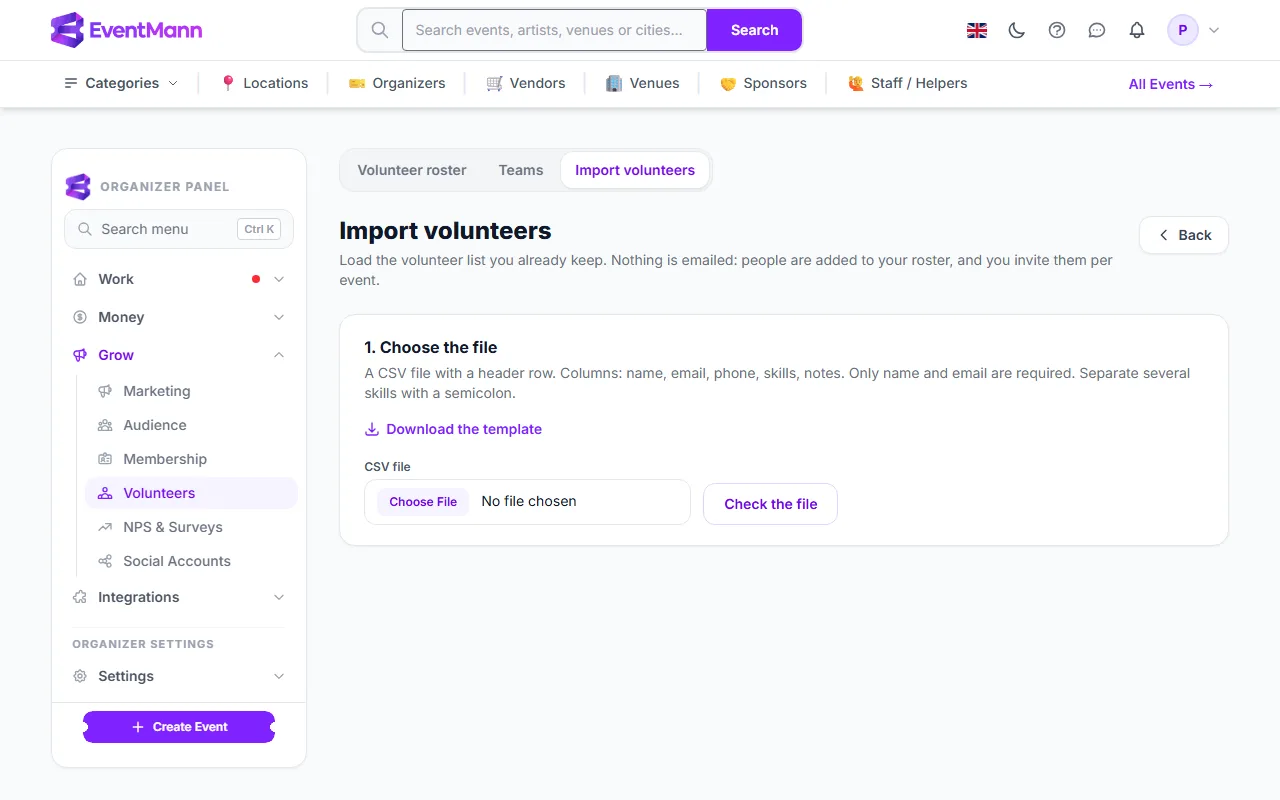
  1. Click Download the template ① to see the exact column names, or save your spreadsheet as CSV.
  2. The first row must name the columns: name, email, phone, skills and notes. Only name and email are required. Separate several skills with a semicolon. Files saved by Excel, including German Excel with semicolons as separators, are read as they are.
  3. Choose the file ② — up to 5 MB and 5,000 rows — and click Check the file ③.
The Import volunteers page with the template link, the file field and Check the file

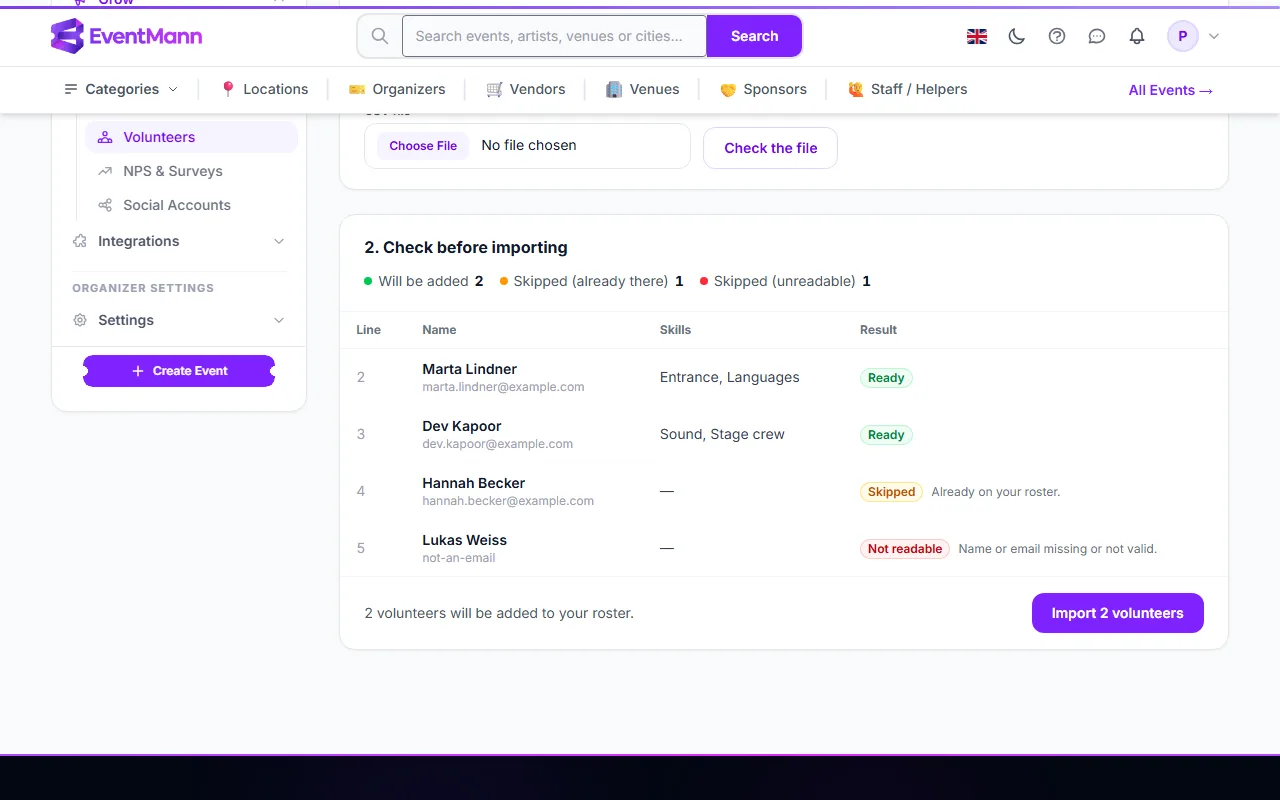
You then see a preview with the counts Will be added, Skipped (already there) and Skipped (unreadable). Rows marked Ready ① will be added. A row is Skipped ② when the email is already on your roster or appears twice in the file, and Not readable ③ when the name or the email is missing or not valid. Nothing has been written yet. Click Import ④ to add the ready rows.

The preview after checking a file, with one ready row, one skipped and one unreadable

Settings explained

  • Volunteer number — assigned automatically from your own sequence (V0001, V0002 and so on) and never reused.
  • Skills — free text, separated by semicolons. The skill filter reads the skills actually on the roster.
  • Notes (only you see these) — never shown to the volunteer or to team leads.
  • Rows per page — 25, 50, 100 or 200; Sort by name, volunteer number, most events or most recently added.

Good to know

  • If you change a person’s email address, the link to their account is cut. It is re-attached automatically when somebody signs in to a confirmed account on the new address.
  • A person may opt out of your invitations from the link in any invitation email. You cannot send them an invitation until they sign up again themselves.
  • Delete from roster removes the person together with their invitations, shifts and hours on every one of your events. It cannot be undone; this is what a deletion request asks for.
  • The Export CSV file contains contact details, skills, your notes and hours. Treat it as personal data. See Volunteer hours and privacy.
  • A volunteer coordinator who holds only one event reaches the same roster under that event’s Roster tab. A team lead sees it read-only, to recruit from.
  • The import preview waits for you for 30 minutes. After that, choose the file again.

Troubleshooting

  • The import says a column is missing — the first row must name the columns, at least name and email. Use the template for the exact spelling.
  • The import says the file is no longer available — the checked file was kept for 30 minutes. Choose it again and check it again.
  • A person I added is not offered when I invite to an event — they are already on that event in some status, or they opted out. See Inviting volunteers to an event.
  • The email is refused as already used — each email address can appear once on your roster. Search for it; the person may already be there.

Related

1.3 Standing teams, leads and the core team

Teams are the departments of your association — Registration, Music, Marketing, Sponsors, Hall management, Kitchen — that exist from event to event. A team has leads, members and a core, and it is what lets a lead run their own part of an event without touching anyone else’s. You set them up under Grow → Volunteers → Teams. Only you, the organizer, can create or change teams.

What you can do here

  • Create the teams you run events with and choose what their leads and members may open at an event.
  • Add people from your roster to a team, as members, as leads and as core members.
  • Rename a team, change its access, take people out of it or delete the team.

Lead, core and member

  • Member — belongs to the team. At an event, the person is placed in a team when you invite them or when they join through a team’s link.
  • Lead — runs the team at every event they help at. A lead recruits people into the team, confirms them, plans the team’s shifts and tasks and writes to the team. A lead sees the whole People list and the roster, but changes only their own teams. See Volunteer roles and team leads.
  • Core — is on every event automatically, and sees the team’s whole picture: on My Volunteering, under Your teams, every task of the team at the events they are confirmed for, and a read-only view of the team’s stock and packing lists. A lead is always core.

The same person can be in several teams. At an event, their main team is a team they lead, otherwise the first team they are core in.

Add a team

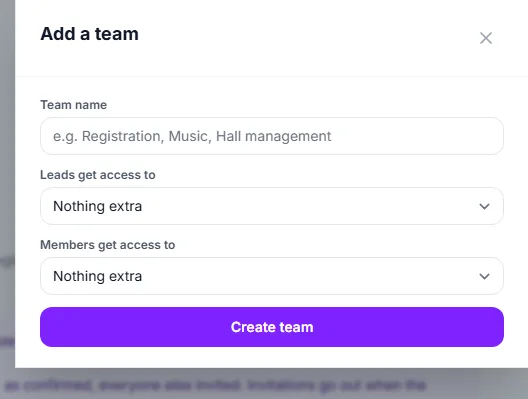
  1. Open Teams and click Add a team.
  2. Type the Team name ①. Each name can be used once.
  3. Under Leads get access to ② choose what a lead of this team may open at every event they help at, for example Box office for the Registration leads. Nothing extra leaves them with their volunteer tools only.
  4. Under Members get access to ③ choose the same for ordinary members, for example Door / check-in. Members get it only at events where this is their team.
  5. Click Create team ④.
The Add a team form with the two access dropdowns

The choices are the roles you can give volunteers at an event — Volunteer coordinator, Box office, Door / check-in, Venue manager, Marketing, Finance — and any custom role you have made. What each opens is explained in Volunteer roles and team leads. The access works only at the events a person helps at, and for 30 days after they end.

Put people in a team

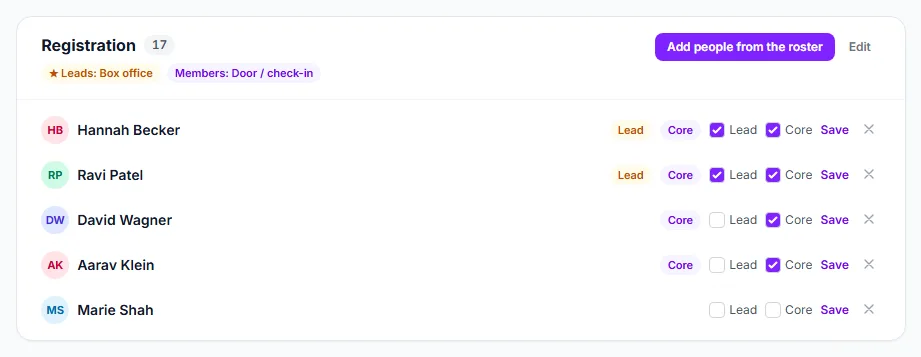
Each team has its own card with its people. Leads come first. On a person’s row, a Lead badge ① and a Core badge show their standing. Tick Lead ② or Core ③ and click Save to change it, or click the cross ④ to take them out of the team. At the top of the card are Add people from the roster ⑤ and Edit ⑥, which renames the team and changes its access.

The Registration team card with its leads and core members
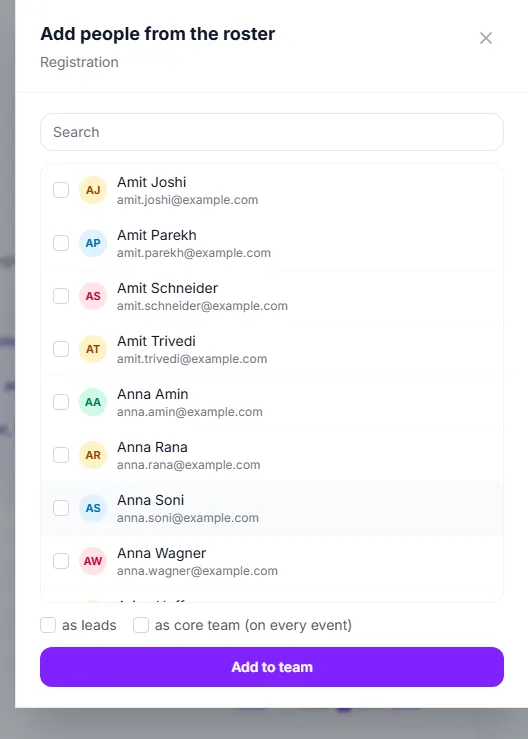
  1. Click Add people from the roster to open the list beside the page.
  2. Use the search box ① to find people by name, email or volunteer number and tick them ②.
  3. Tick as leads ③ if they run the team, or as core team (on every event) ④ if they should be on every event.
  4. Click Add to team ⑤. Up to 500 people can be added at once.
The roster list for a team, with the lead and core options

The core team is on every event

Core members and leads are added to every one of your events that has not ended, so you do not invite the same fifty people again each time.

  • A lead is added as confirmed, because they run the team. They can still step back.
  • Any other core member is added as invited and answers Yes or No from their email.
  • Nobody is emailed while the event is a draft. The invitations go out when the event is first published, so a draft you delete never reaches anyone.
  • When you make somebody core or a lead, they are added to all your upcoming events at once.
  • Somebody who is already on an event in any status — declined, removed — is never added again. Their answer stands.

What a core member can do

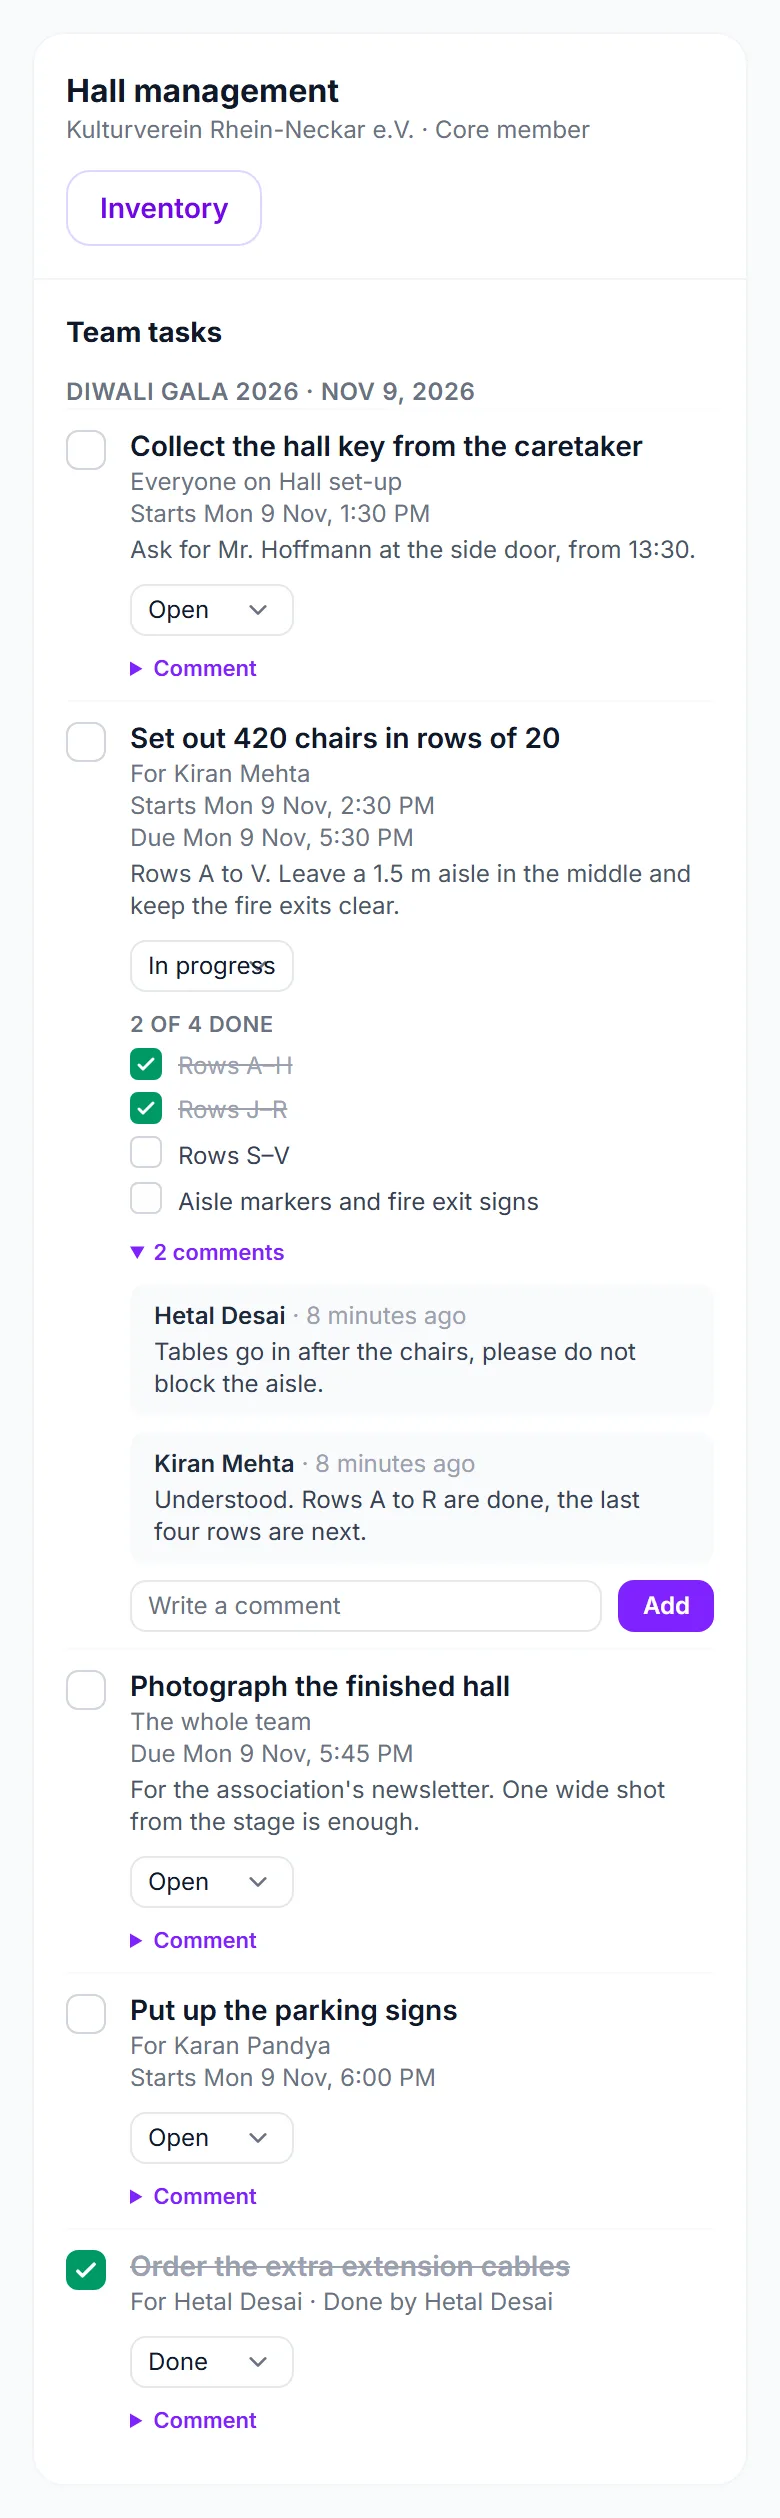
  • Team tasks — every task you or a lead gave the team, not only their own: they move a task along (Open, In progress, Blocked, Done), tick its checklist and write comments. They cannot add, delete or reassign a task; that stays with you and the team’s leads.
  • Team inventory — the team’s items with quantity, condition, who holds each one or where it is stored, the low-stock warning, and the team’s packing list for their coming events. They cannot edit items, restock or record purchases.
  • Only their own team: a core member of Hall management sees nothing of Registration’s tasks or stock. An ordinary member sees only the tasks given to them, their shift or the whole team.

Good to know

  • Taking a person out of a team, or leaving the core team, does not remove them from events they already agreed to.
  • Deleting a team keeps its people on your roster and on every event. Only the team goes; the team’s shifts and tasks become “no team”, and its people show no main team at the events.
  • Only the organizer defines teams. A team’s access reaches every event, so an event coordinator who holds one event cannot set it.
  • People who opted out of your invitations are skipped when the core team is added.
  • Each team can also look after its own stock between events; see Team inventory.

Troubleshooting

  • A core member was not invited to my new event — the event is still a draft (they are invited when you publish), the event is cancelled or over, or the person opted out of your invitations.
  • A lead cannot open the event — a lead needs a confirmed place on the event, and an account on their roster email address with a confirmed email.
  • The team name is refused — you already have a team with that name.

Related

1.4 Inviting volunteers to an event

The People tab of an event’s volunteers is where you decide who helps at this event: invite people from your roster, accept those who signed up, and see who said yes. Open the event, then Team & Partners → Volunteers; People is the first tab. A person can be on your roster without being on an event; being on the event is what lets them have shifts, tasks, roles and the thank-you ticket.

What you can do here

  • Invite people from your roster, one by one or everybody who helped at an earlier event.
  • Add somebody who is not on your roster yet and invite them in one step.
  • Accept or decline people who applied from the event page or a team link.
  • Confirm, remind, move to a team, give a role or remove many people at once.
  • See at a glance how many people each team has against what it needs.

The five statuses

StatusWhat it means
AppliedThe person signed up from the event page or a team’s link. You decide.
InvitedYou asked, and they have not answered yet.
ConfirmedHelping at this event. Only confirmed people can be put on shifts, be given tasks or roles, and buy the thank-you ticket.
DeclinedThey said no, or you declined their application. A person who declined an invitation can still say yes later from the same link.
RemovedYou took a confirmed person off the event. Their shift places are freed and their tasks go back to the team.

Invite people from your roster

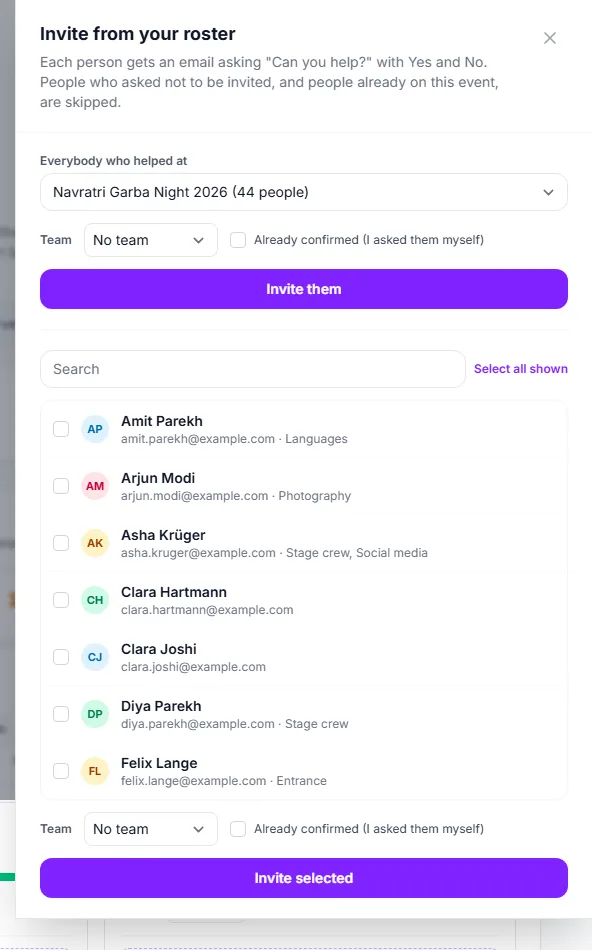
  1. Click Invite from your roster at the top of the page.
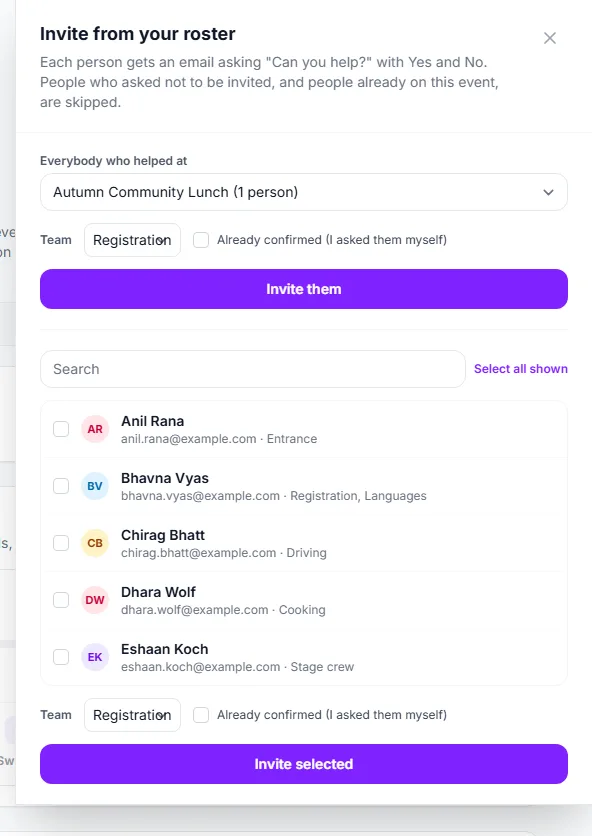
  2. To invite everybody who helped at an earlier event, choose that event under Everybody who helped at ①, choose a team ② if you want them all in one, and click Invite them. Only people who were confirmed there are asked.
  3. To invite particular people, search the list and tick them ③. Select all shown ticks everybody the search currently shows.
  4. Pick the Team ④. A team lead must choose one of their own teams; you may leave it empty.
  5. Click Invite selected ⑤. Each person gets an email asking “Can you help?” with Yes and No. A no is one click. A yes asks them to create a free EventMann account on that address, or to sign in to the one they have; they become Confirmed, and you get the bell notice, only once that is done.

If you have already asked somebody yourself — on the phone, in the group — tick Already confirmed (I asked them myself) before inviting. They are then added as confirmed and get the “You’re on the team” email instead of a question. Somebody without an account on that address is asked in that email to set one up, with a Set up my account button.

Add somebody new

Add somebody new, at the top of the page, adds a person to your roster and invites them to this event in one go. Enter the Name and Email, optionally a phone number and a team, and click Add and invite. If that person is already on this event or opted out of your invitations, nothing is sent and you are told so.

Invite from your roster: everybody from an earlier event, or the people you tick

Read and work the list

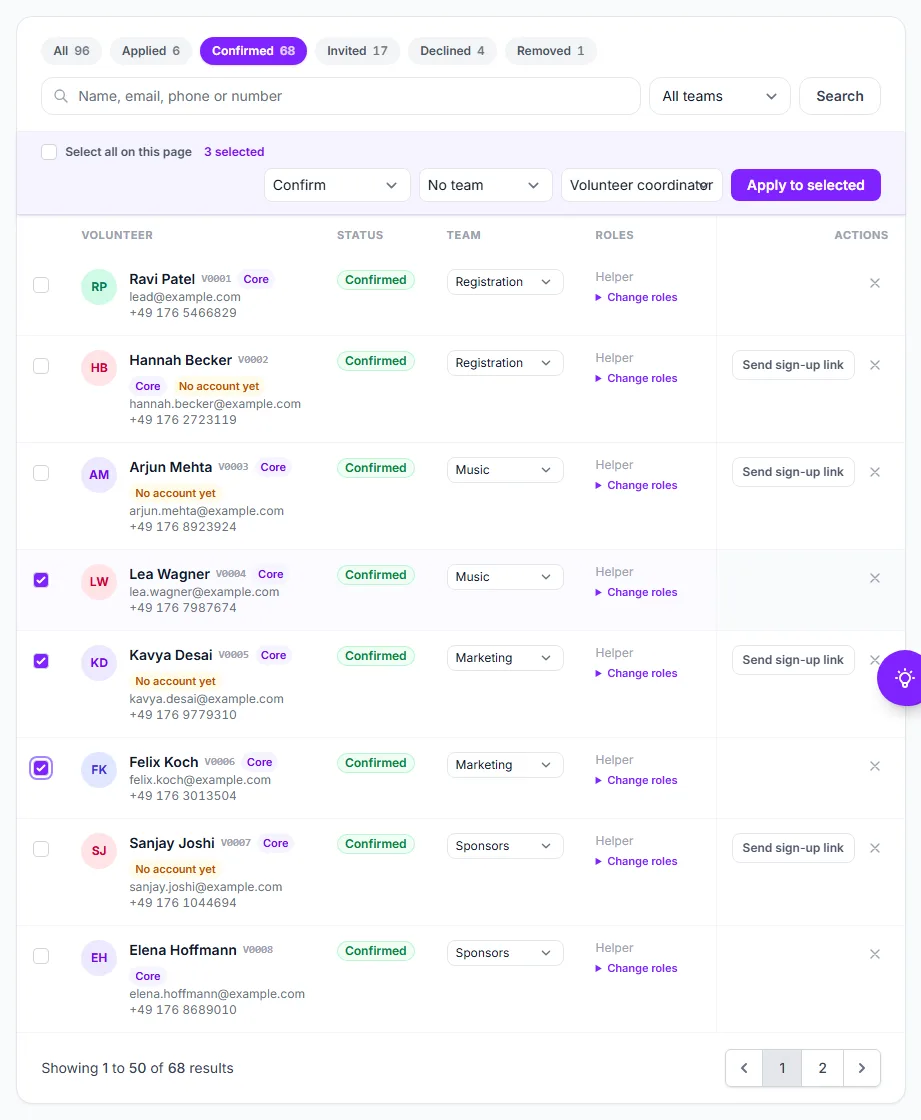
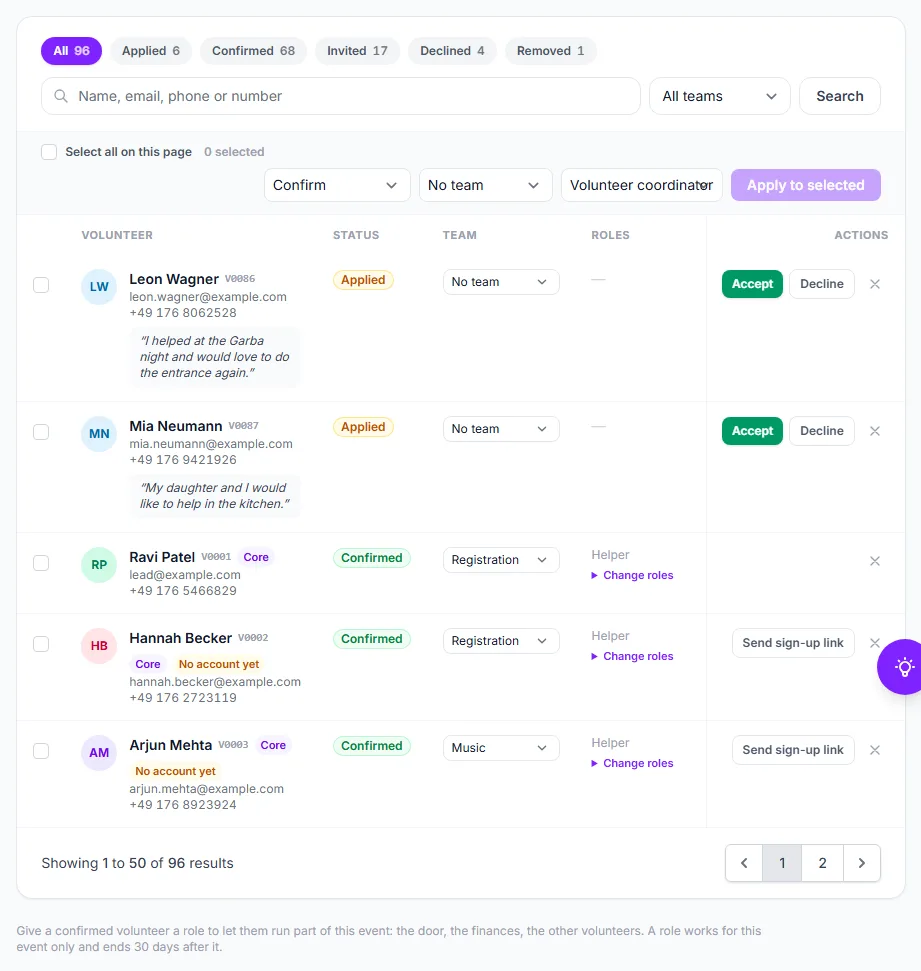
The chips at the top filter the list by status; Confirmed ① shows only those who said yes. Use the search box ② for a name, email, phone number or volunteer number and the team dropdown to see one team. The bar ③ above the table holds the bulk actions. Each row shows the person’s status ④, their team ⑤ (changeable right there), their roles, how many shifts and hours they have, and the buttons that fit their status: Accept ⑥ and Decline ⑦ for an application. A confirmed person whose email address has no EventMann account carries the amber badge No account yet ⑧ and the button Send sign-up link ⑨. Applications show what the person wrote, and anything they put under “When can you help?” on their own page.

The People list with applications, confirmed volunteers and the bulk bar

Volunteers without an account

A volunteer who says yes to an invitation always has an account — the yes is only recorded once they created one or signed in. People you or a team lead confirm yourselves (Mark as confirmed, Accept, the Already confirmed tick, the bulk Confirm) may not have one. They are on the team, but they cannot see their shifts, tasks or team, check in, or buy the thank-you ticket until they do.

  1. Look for the badge No account yet beside the name. It shows on confirmed people whose roster entry is not linked to an account.
  2. Click Send sign-up link on the row, or tick several people and choose Send sign-up link in the bulk bar.
  3. Each of them gets an email “Set up your account for …”. Its button opens their invitation page on the account form; the account is confirmed straight away because the link went to their address. If they already have an account on that address, the page sends them to sign in instead.
  4. The badge disappears once they have set up the account or signed in.

The link goes only to confirmed people without an account; anybody else in a bulk selection is skipped and counted as skipped. Each click sends one email per person.

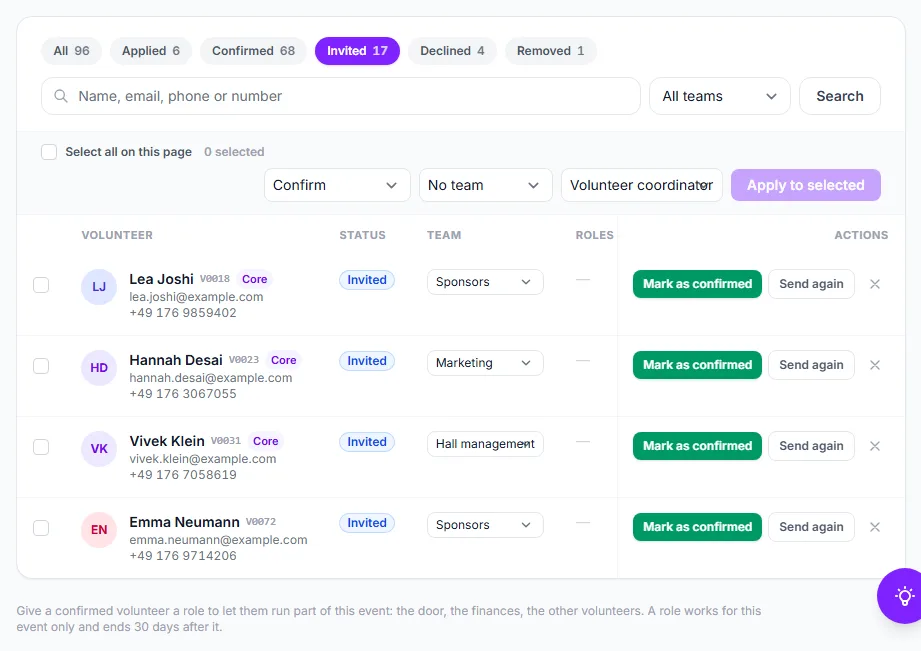
People who have been asked and have not answered are under the Invited chip. Mark as confirmed ② confirms them without waiting for their answer, Send again ③ mails the invitation once more, and the cross ④ removes them.

People who have not answered yet, with Mark as confirmed and Send again

Do something for many people at once

  1. Tick the people, or tick Select all on this page ①. The counter ② shows how many are selected.
  2. Choose the action ③: Confirm, Resend invitation, Send sign-up link, Set team, Give role, Remove role, Decline or Remove from event.
  3. For Set team choose the team ④; for the role actions choose the role beside it.
  4. Click Apply to selected ⑤ and confirm. Confirming and resending send each person an email.

The result tells you how many were done and how many were skipped because the action did not apply to them, for example a confirm on somebody already confirmed. Up to 500 people can be selected at once.

Three volunteers ticked, with the bulk action bar above the table

Good to know

  • Applications from the event page and from a team link stay Applied until you or the team’s lead accept them. Accept sends the volunteer a confirmation email; Decline sends them a short email that they were not taken on this time. Declining an invitation nobody answered yet (for example with the bulk action) sends no email.
  • Invitation and confirmation emails leave at your hourly sending limit (Settings → Email), so a large invitation is spread over the hours rather than sent at once.
  • You get a bell notice when someone answers an invitation or applies. For a yes the notice comes once the volunteer has created their account or signed in, so a person still busy with the account form stays Invited on your list. The leads of a team are told when somebody applies to join their team.
  • A person who is already on this event in any status is skipped when you invite. Removing somebody who has not confirmed deletes their row, so you can invite them again; a confirmed person who was removed cannot be invited again for this event.
  • Stepping back is the volunteer’s right too: from their invitation link they can change a yes into a no. That frees their shifts and hands their tasks back to the team.
  • Team leads see the whole list, but act on their own teams’ rows only. They may also claim somebody who has no team yet into one of theirs.

Troubleshooting

  • “N skipped” after inviting — those people are already on this event, or asked not to be invited.
  • Send again is missing — it only exists for people who have not answered. Declined and confirmed people have no resend; a confirmed person without an account has Send sign-up link instead.
  • Somebody told you yes but is still Invited — they have not finished creating their account or signing in. Ask them to open the invitation again, or confirm them yourself and send the sign-up link.
  • A confirmed volunteer cannot be chosen for a shift or task — check that they are Confirmed, not Invited or Applied.
  • The invitation never arrived — ask them to check spam, and use Send again. Mail leaves at your hourly sending limit, so a large batch can take hours.

Related

1.5 Recruiting with join links, sign-up and copied setups

This article covers the ways people find their way onto an event without you inviting them one by one: a join link for each team, an open sign-up on the event page, and the option to start from last year’s setup. It also explains every option on an event’s Settings tab. You find all of it under Team & Partners → Volunteers in the event’s Manage menu.

What you can do here

  • Say how many people each team needs at this event and watch the count fill up.
  • Give each team a join link that its lead can post in a WhatsApp group.
  • Open the sign-up on the public event page, with your own text.
  • Let confirmed volunteers pick their own shifts.
  • Write the thank-you message volunteers read.
  • Copy team sizes, shifts, team tasks and packing lists from another event.

Team sizes and join links

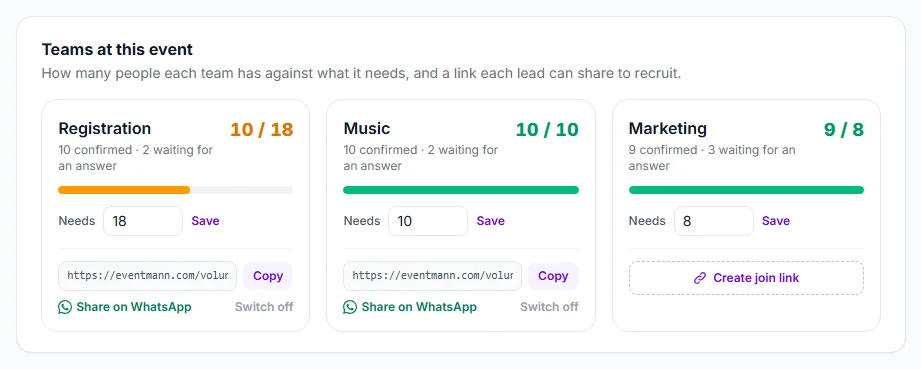
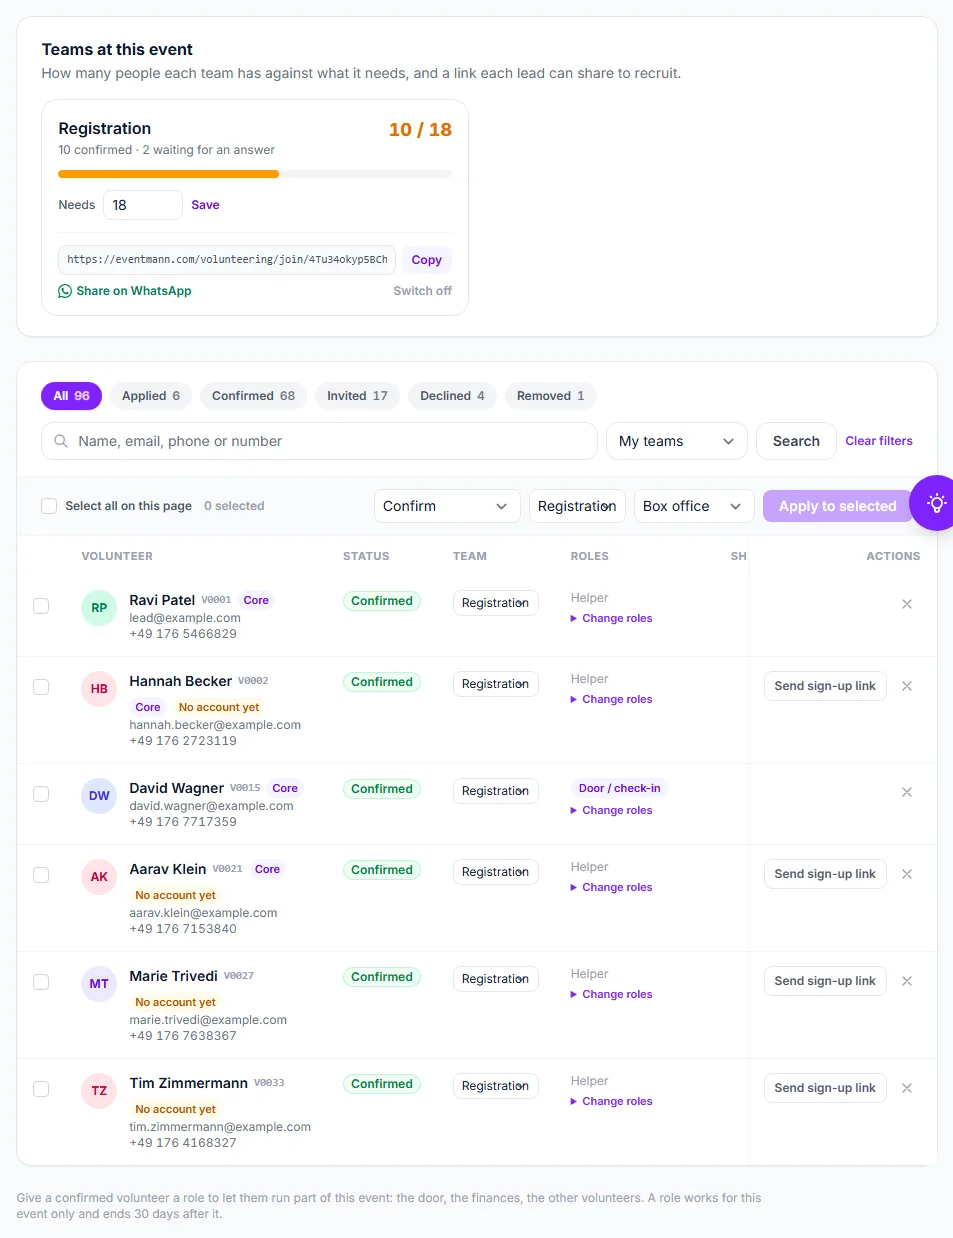
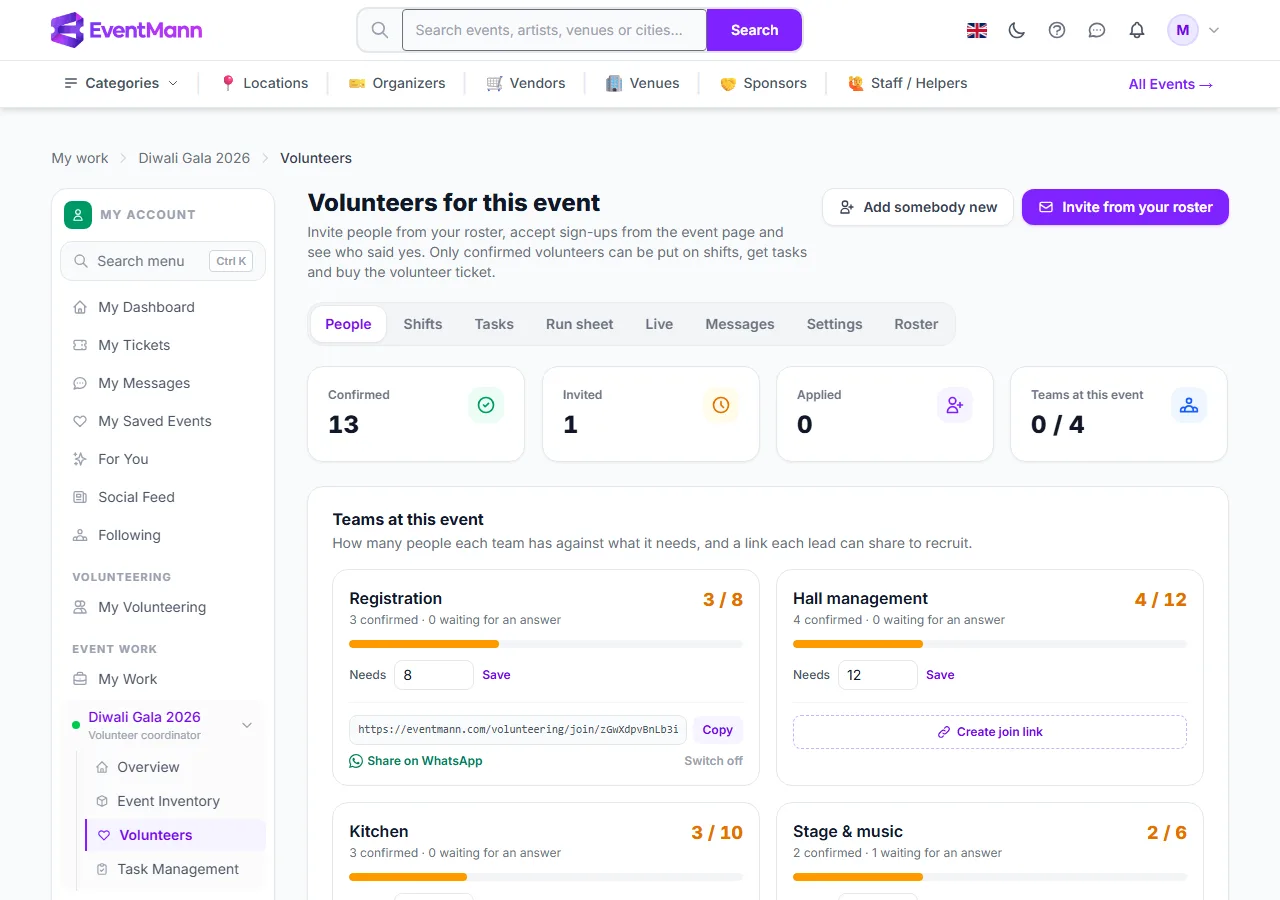
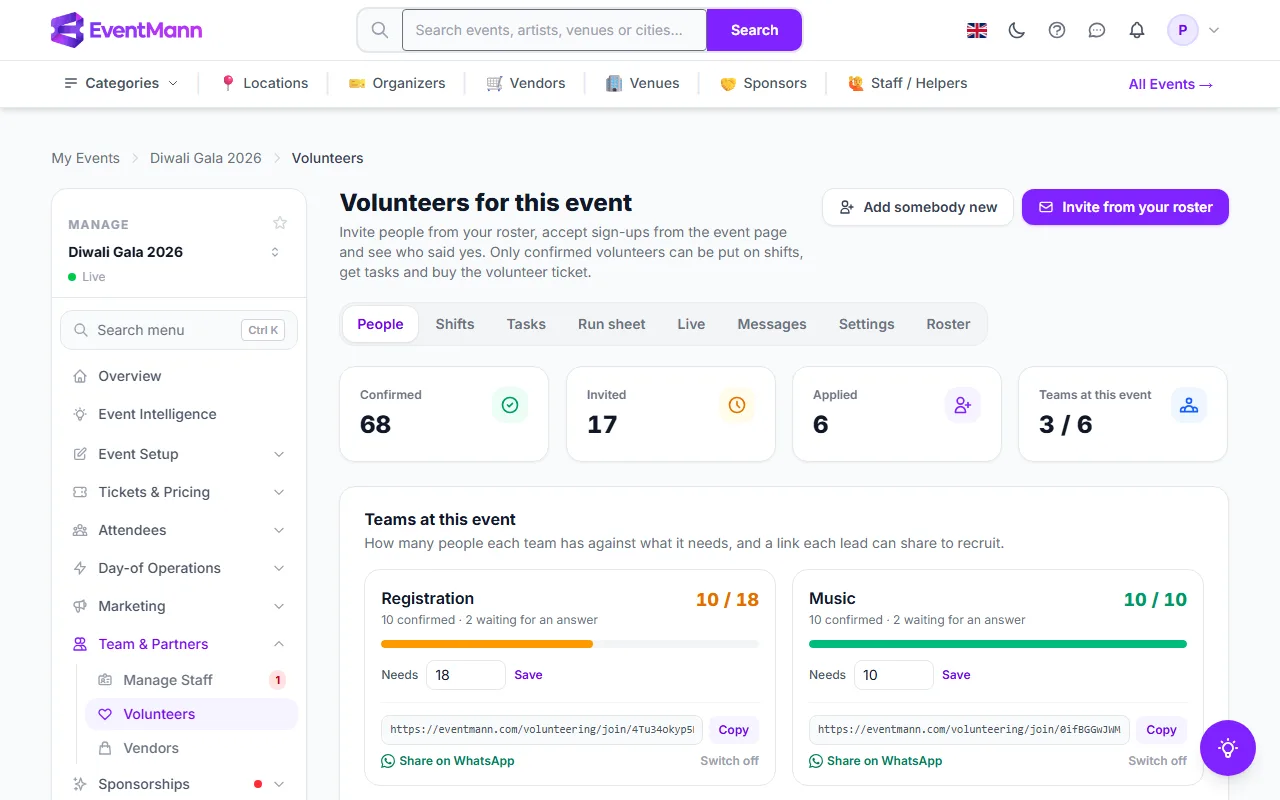
On the People tab, the box Teams at this event has one card per team. The team’s name ① opens the list filtered to that team. The figure ② reads confirmed people against what the team needs, for example 10 / 18; it is amber while the team is short and green once it is full, and without a target it shows the confirmed people only. Below it, 10 confirmed · 2 waiting for an answer counts the people who have been asked but have not answered.

  1. Type the number the team needs in Needs ③ and click Save. Leave it empty or zero for no target.
  2. Click Create join link ⑧. The card now shows the Join link ④.
  3. Click Copy ⑤ to put it on your clipboard, or Share on WhatsApp ⑥ to open WhatsApp with a ready-made message such as “Help with Registration at Diwali Gala 2026? Sign up here:”.
  4. To stop the link working, click Switch off ⑦. Anyone who still has it can no longer join. Creating a link again gives a new address.
Three team cards with targets, counts and join links

Whoever opens a join link signs in (or registers), checks their details and joins. They land as Applied in that team, and the team’s leads and you get a bell notice. Nobody becomes a volunteer without your or the lead’s Accept. A join link works even when the public sign-up below is switched off, and stops working when the event is a draft, cancelled or over. Team leads can set targets and links for the teams they lead; the other teams are not shown to them.

Open sign-up on the event page

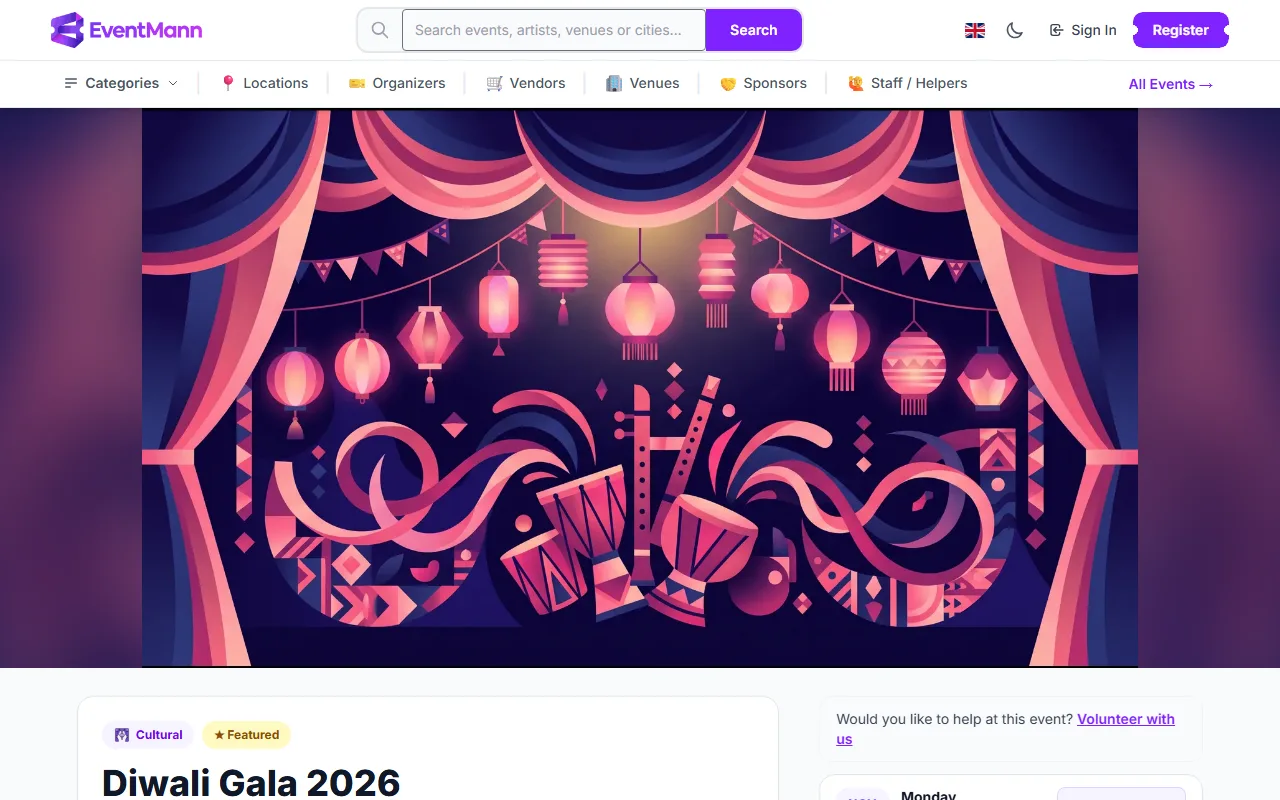
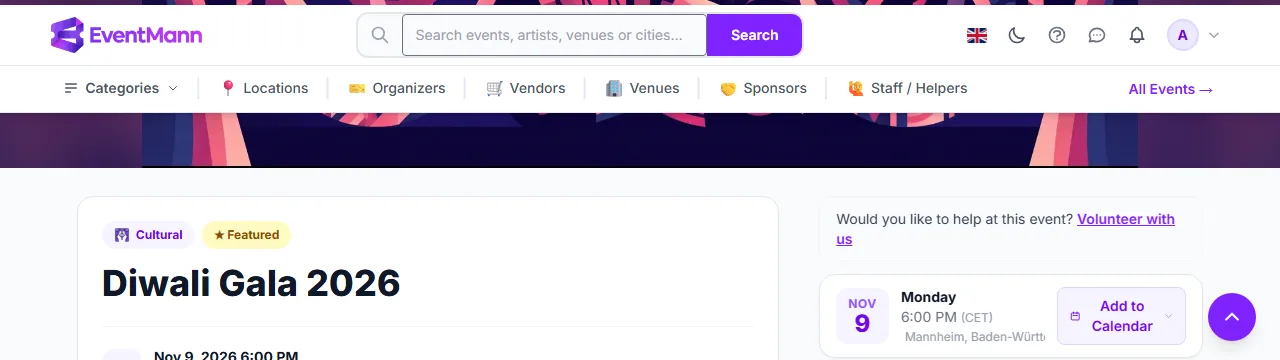
When Volunteer sign-up on the event page is on and the event is live, the public event page shows “Would you like to help at this event? Volunteer with us”. Signed-in visitors with a confirmed email address can apply.

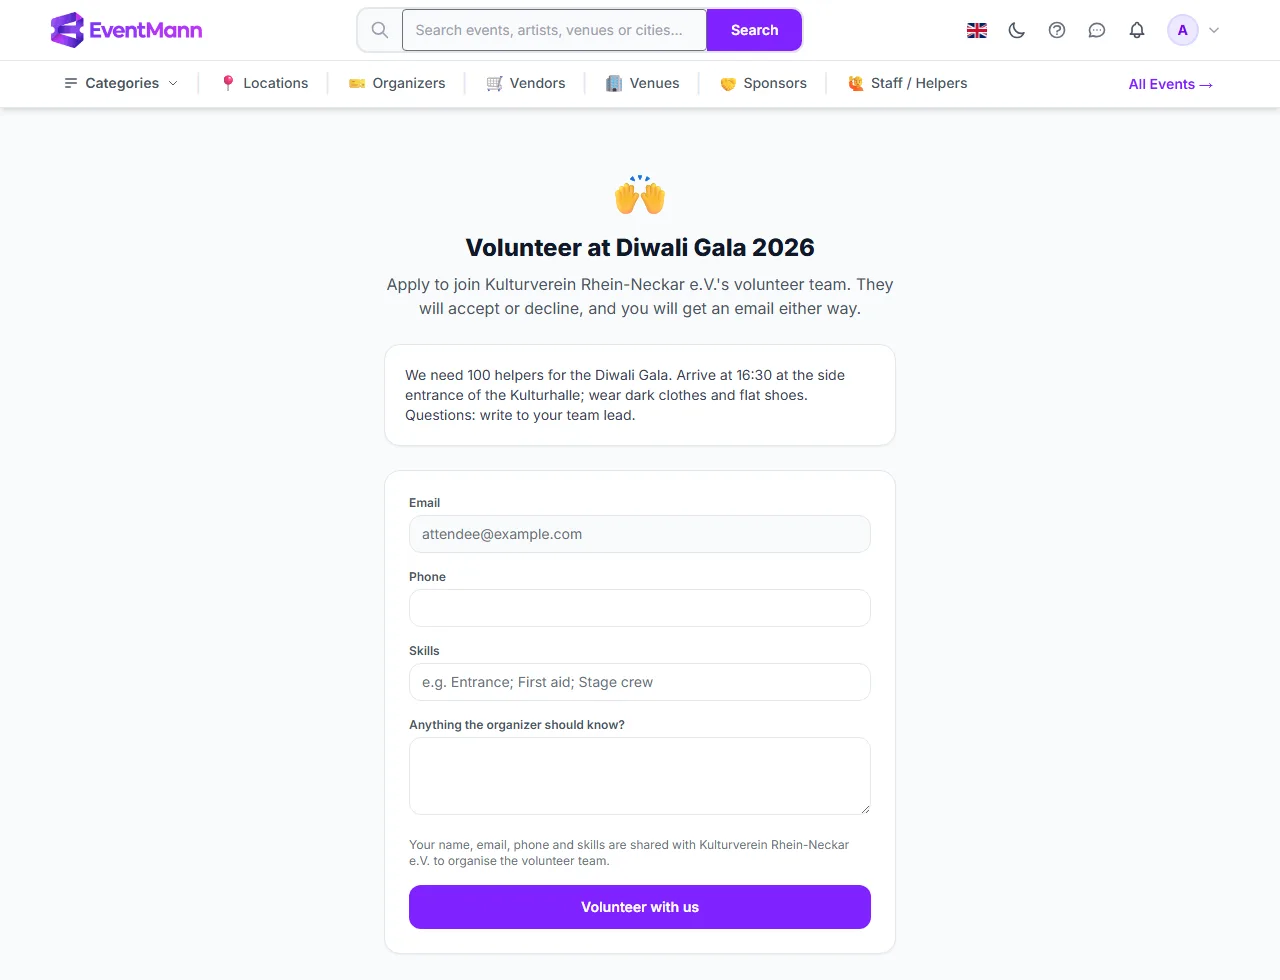
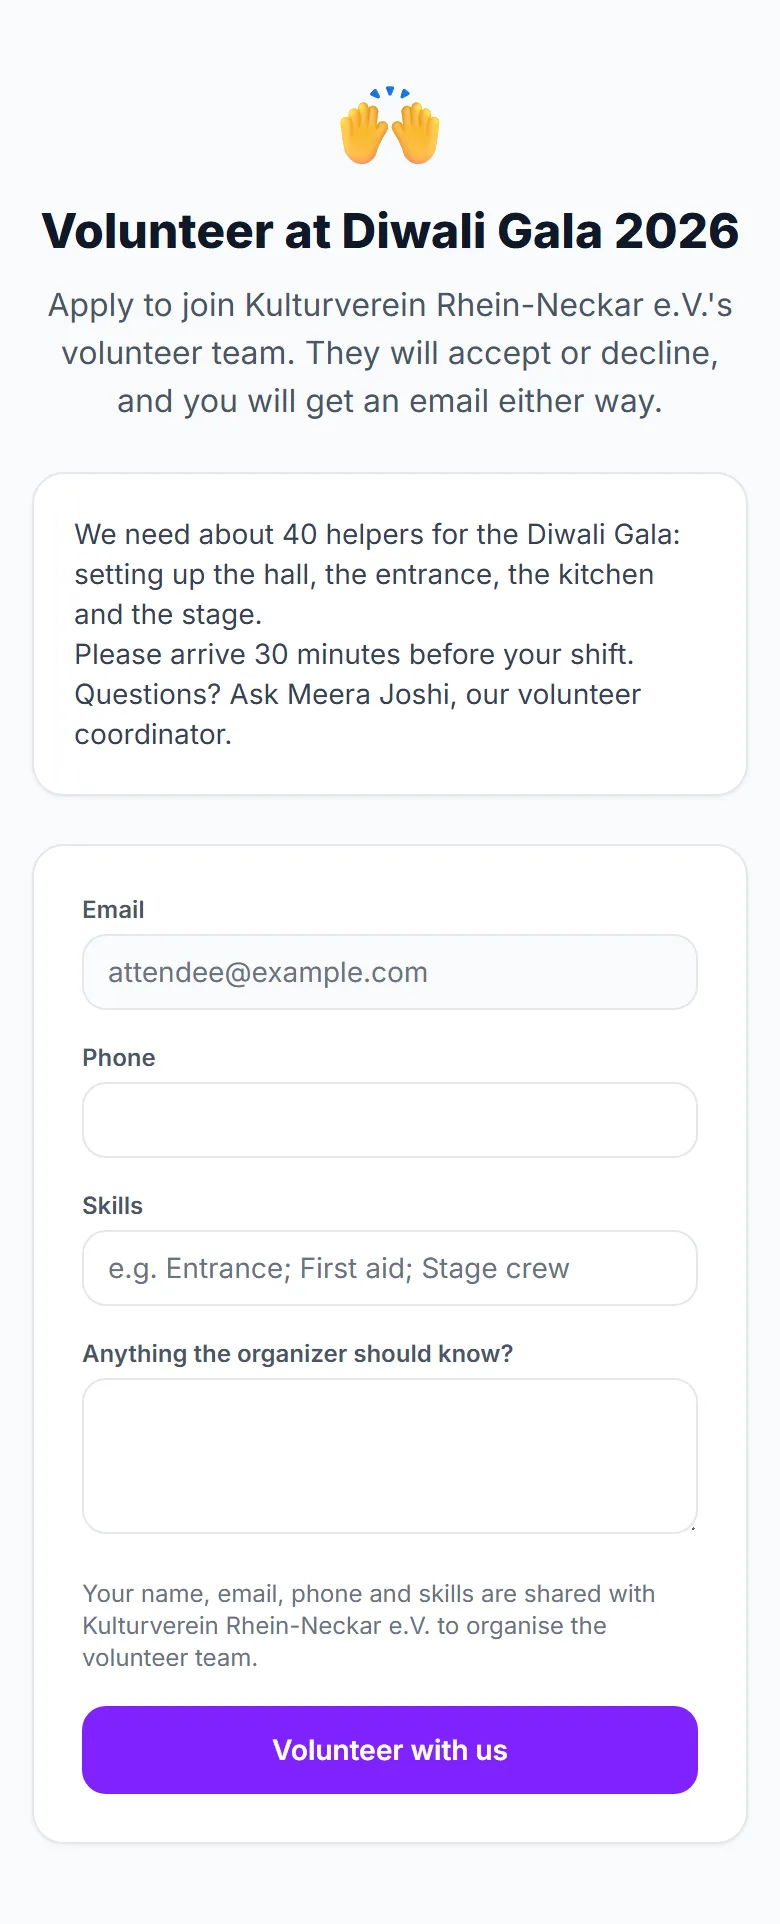
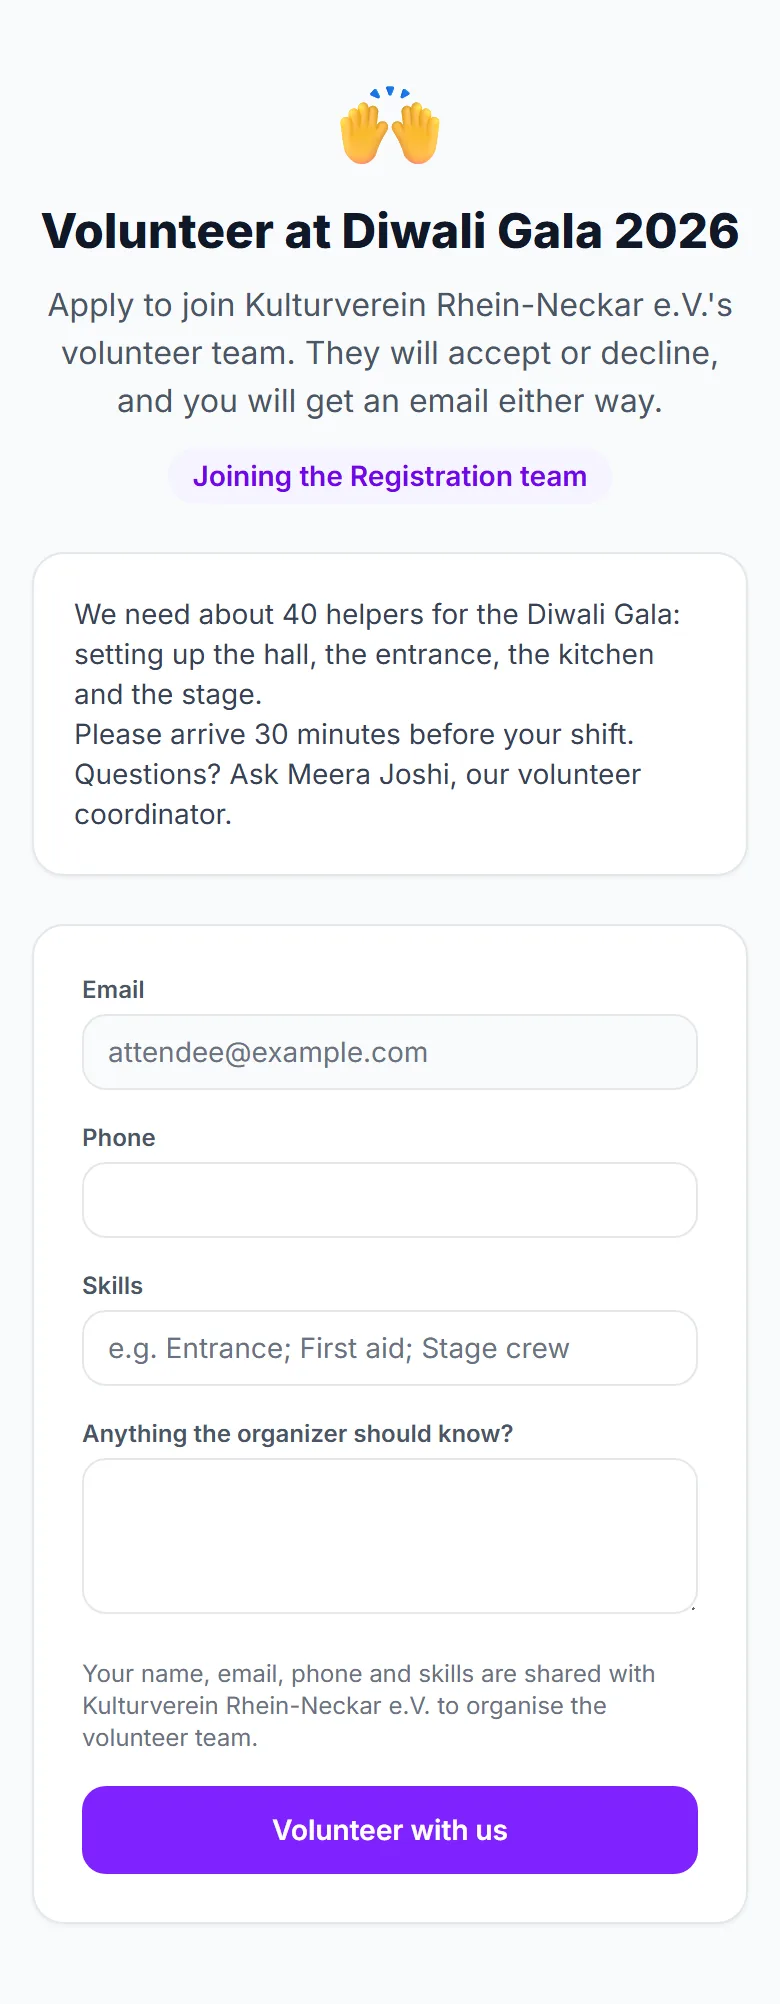
The banner ① links to a short form with a phone number, skills and a message. It starts with the text you wrote.

The event page for a visitor, with the Volunteer with us banner

The visitor adds a phone number ①, skills ②, anything the organizer should know ③ and sends the form ④. They are added to your roster if they were not there yet, and appear on People as Applied. You decide with Accept or Decline; nobody is confirmed automatically, and the applicant gets an email either way. A visitor who was already invited and applies is confirmed straight away.

The sign-up form a visitor fills in

Settings explained

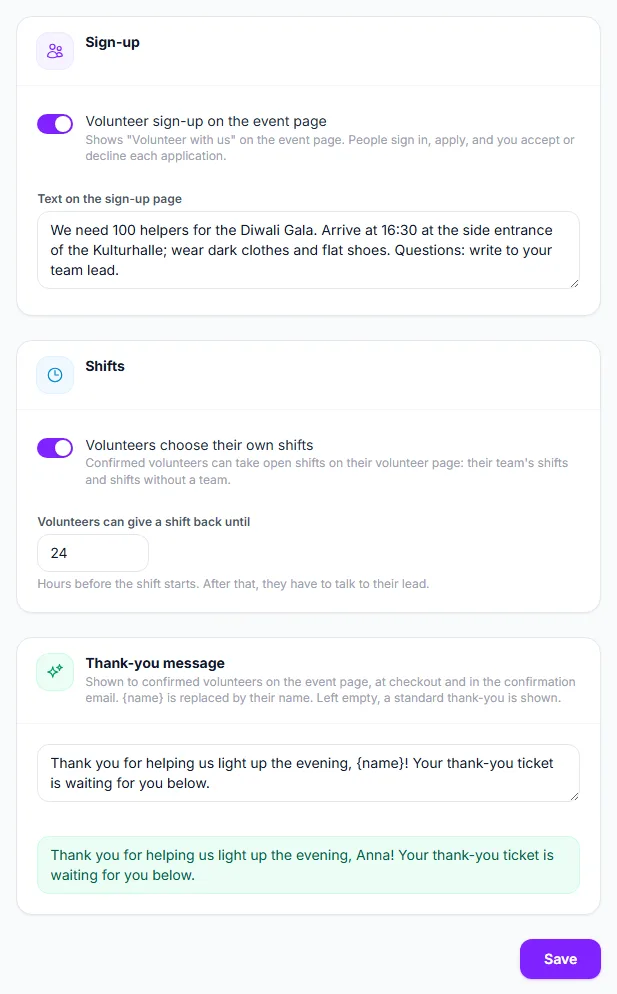
Open the Settings tab.

  1. Volunteer sign-up on the event page ① — off by default. Switches the banner and the form on for visitors. It only works while the event is live.
  2. Volunteers choose their own shifts ② — lets confirmed volunteers take open shifts on their own My Volunteering page. They can take shifts of their own team and shifts without a team, never one that overlaps a shift they already have, and never one that has started.
  3. Volunteers can give a shift back until ③ — hours before the shift starts, 0 to 720, 24 unless you change it. After that they have to talk to their lead. Giving a shift back tells the team’s leads and you.
  4. Text on the sign-up page ④ — up to 1,000 characters: what helping involves, when to arrive, who to ask.
  5. Thank-you message ⑤ — up to 300 characters, shown to confirmed volunteers on the event page, at checkout beside the volunteer ticket and in their confirmation email. {name} is replaced by the volunteer’s name. Empty means a standard thank-you in their language. The green line ⑥ previews it with a sample name.
  6. Click Save ⑦. Clearing a text field and saving removes the text.
The volunteer settings of an event

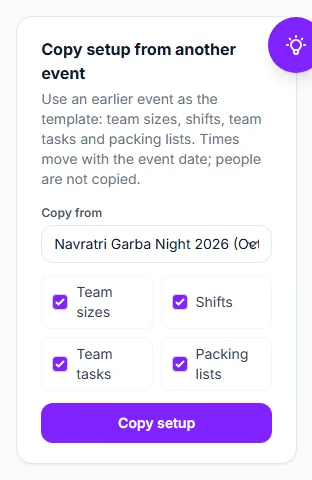
Copy setup from another event

Further down the Settings tab, Copy setup from another event uses an earlier event as a template.

  1. Choose the event under Copy from ①. It lists your other events, newest first.
  2. Tick what to copy: Team sizes ②, Shifts ③, Team tasks and Packing lists.
  3. Click Copy setup ④ and confirm.
The copy setup box with the Navratri night as the source

Times move with the event date: a shift that started two hours before last year’s doors starts two hours before this year’s. Nothing that already exists is replaced and nobody is emailed. People are not copied — the core team arrives by itself and everybody else is invited afresh. Tasks given to one named person, or tied to a shift, are not copied either, because that person may not be helping this time. Packing lines are copied only as far as the stock allows.

Good to know

  • Every way onto an event as a volunteer ends with an account: a join link and the sign-up need one, and a yes to an invitation creates one or signs in. Only people you confirm yourself can be confirmed without one — see Volunteers without an account.
  • Visitors need an account with a confirmed email address to sign up or join. Signing up creates a roster entry with the source “signed up” and sets the opt-out of invitations back to off.
  • The join link is a credential: whoever has it can apply. Posting it in a private group is fine; if it spreads further, switch it off and make a new one.
  • A team’s target is a goal for you and the leads. It does not stop people joining.
  • The Settings tab needs the Volunteers permission; a team lead sees the other tabs but not Settings.

Troubleshooting

  • The banner does not show on the event page — the sign-up setting is off, or the event is not live (a scheduled event has no banner yet; a join link already works).
  • A join link says the page cannot be found — the link was switched off or replaced, or the event is a draft, cancelled or over.
  • Copy setup is not offered — you have no other event to copy from.
  • The copy did not bring any people — by design. Invite them from People.

Related

1.6 Volunteer roles and team leads

A volunteer can be given a role for one event: the right to run part of it — the door, the finances, the other volunteers — without ever becoming a member of your organizer team. A role belongs to one event, starts the moment you give it and ends 30 days after the event. Roles are what make it possible for an association whose whole event team is volunteers to share the work. You set them on the People tab under Team & Partners → Volunteers, or for a whole team on the Teams page.

What you can do here

  • Give a confirmed volunteer one or several roles for this event, and take them away again.
  • Give a role to many people at once with the bulk bar.
  • Let every lead or member of a team hold a role automatically (set on the Teams page).

The roles and what they open

RoleWhat the person can do at this event
Volunteer coordinatorOpen the event overview, work with all volunteers (People, Shifts, Tasks, Run sheet, Live, Messages, Roster) and run the event task board. Cannot edit the event itself, see money or change settings other than volunteer settings.
Box officeScan and check in tickets, see and create orders, answer attendee messages.
Door / check-inScan tickets and see the order list.
Venue managerEdit the event’s details and dates, work with the venue, run the task board, see reports and live check-in figures, and process refunds.
MarketingDiscounts, email campaigns and reports.
FinanceOrders and their export, reports, the payout breakdown and refunds.
Team leadNot given by hand: it comes from leading a standing team. The volunteer pages, limited to the teams they lead. See below.
Your own custom rolesWhatever you ticked in Custom Roles.

These are the same permission sets as the roles of your organizer team, so the person sees the same pages a box office agent or finance manager would, for this event only.

Give a role to one volunteer

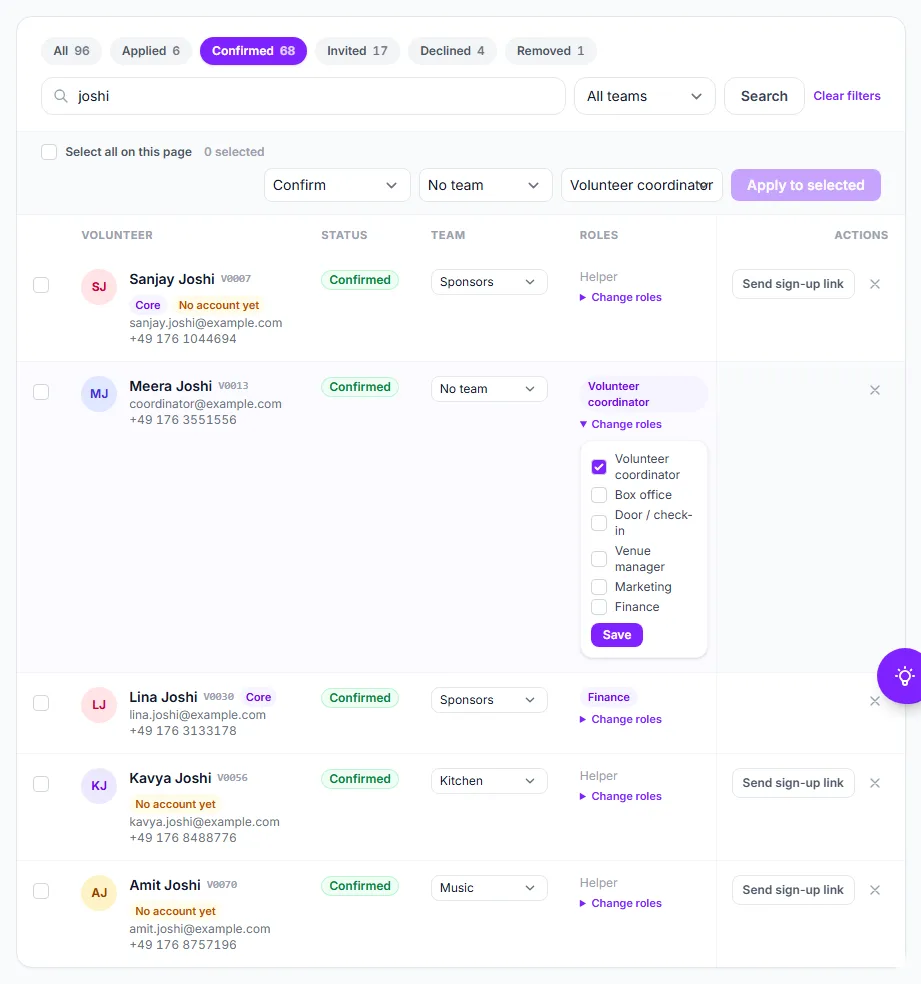
  1. Open the People tab and find the confirmed volunteer. The Roles column shows what they hold — for example Volunteer coordinator ① — or Helper if nothing.
  2. Click Change roles ② under it.
  3. Tick the roles you want ③. A role you cannot give is greyed out; see “Who may give what” below.
  4. Click Save ④. The volunteer gets an email “You can now help run …” that names the role and tells them what to do next.
Meera Joshi with the Volunteer coordinator role and the Change roles list open

For many people at once, tick them on the People list, choose Give role or Remove role in the bulk bar, choose the role beside it and click Apply to selected. See Inviting volunteers to an event.

Roles from a team

On the Teams page, Leads get access to and Members get access to give a role to everyone in a team, without touching each person. A lead holds the team’s lead role at every event they help at; a member holds the member role at events where this is their team. They also hold anything you gave them by hand for that event.

Team leads

Leading a standing team gives the Team lead role automatically. A lead:

  • sees the whole People list and the Roster, read-only, to recruit from;
  • confirms, declines, moves and removes only the people of their own teams, and may claim somebody with no team into one of theirs;
  • chooses, when recruiting, whether a person is invited by email or already confirmed;
  • plans their teams’ shifts and tasks, and writes messages to their own teams and those teams’ shifts only;
  • sees the run sheet and the Live view for their own teams;
  • sets the target and join link of their own teams;
  • may give the people of their own teams any role they hold themselves — see “Who may give what”.

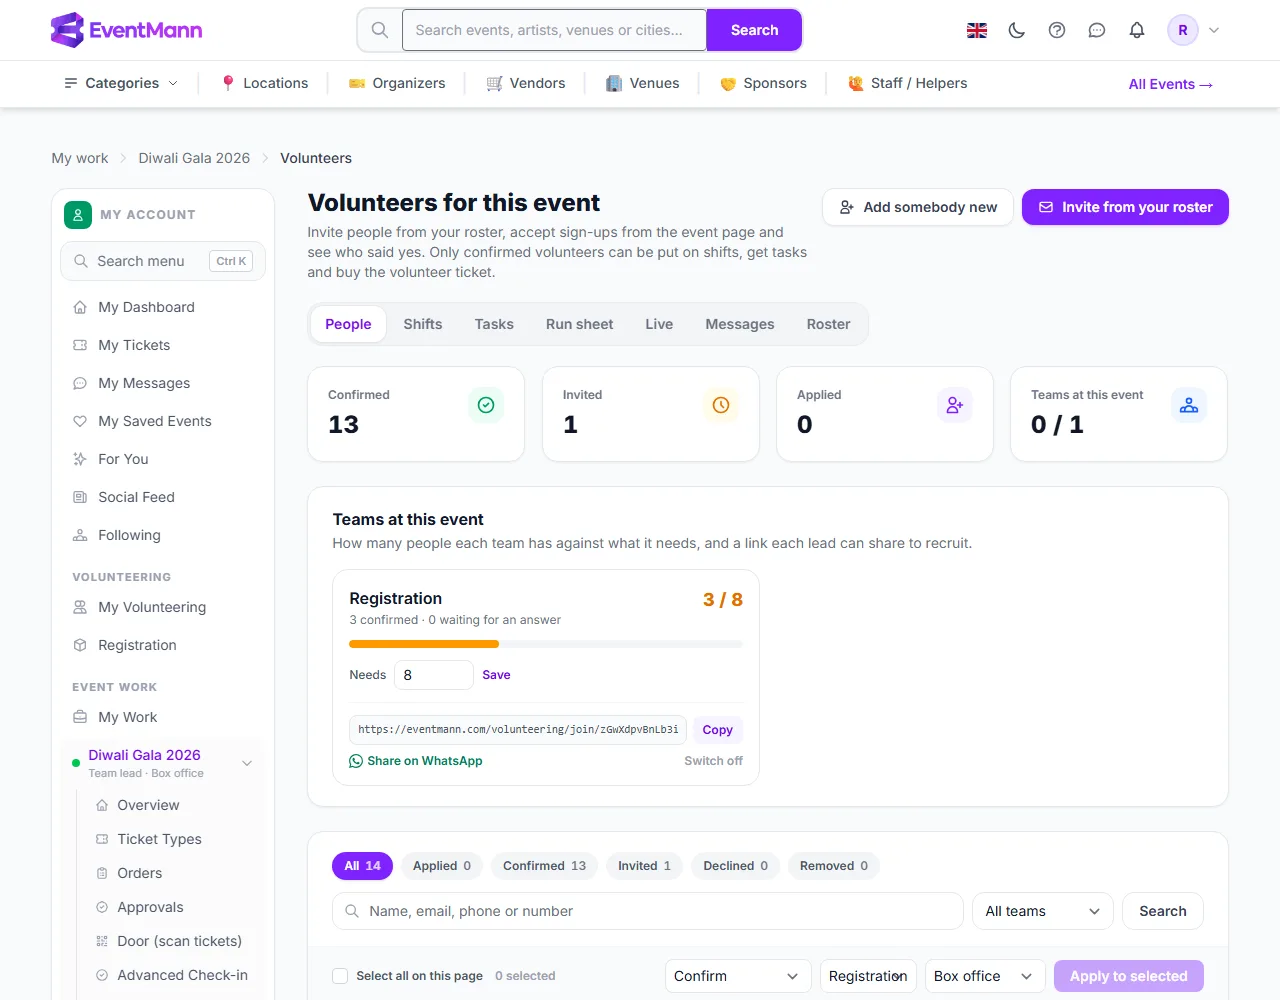
For a lead, the People page is narrowed to their own teams. Here the Registration lead sees only the Registration card ① under Teams at this event, can switch the list to My teams ②, change the team ③ of the rows that are theirs and remove people ④ from their own team.

The People page as the Registration team lead sees it

A lead does not see Settings, cannot message everybody and cannot define teams. The page from the lead’s own point of view is described in the Team lead guide.

Who may give what

Nobody can give a role they do not fully hold themselves. As the organizer you can give every role. A Volunteer coordinator can make another coordinator, but cannot give Finance, because they do not hold it. A Registration lead whose team carries Box office can give Box office and Door / check-in to their team, and nothing more. Roles a person may not touch show greyed out with a note, and when they save a person’s roles, any role they could not change is kept as it was.

What the volunteer needs

  • They must be Confirmed on this event. Taking somebody off the event, or their stepping back, removes their roles.
  • They need an account on the same email address as on your roster, with the address confirmed. Until they have one, the row shows “Needs an account on this email address to use these roles” and the email offers a button to set it up.
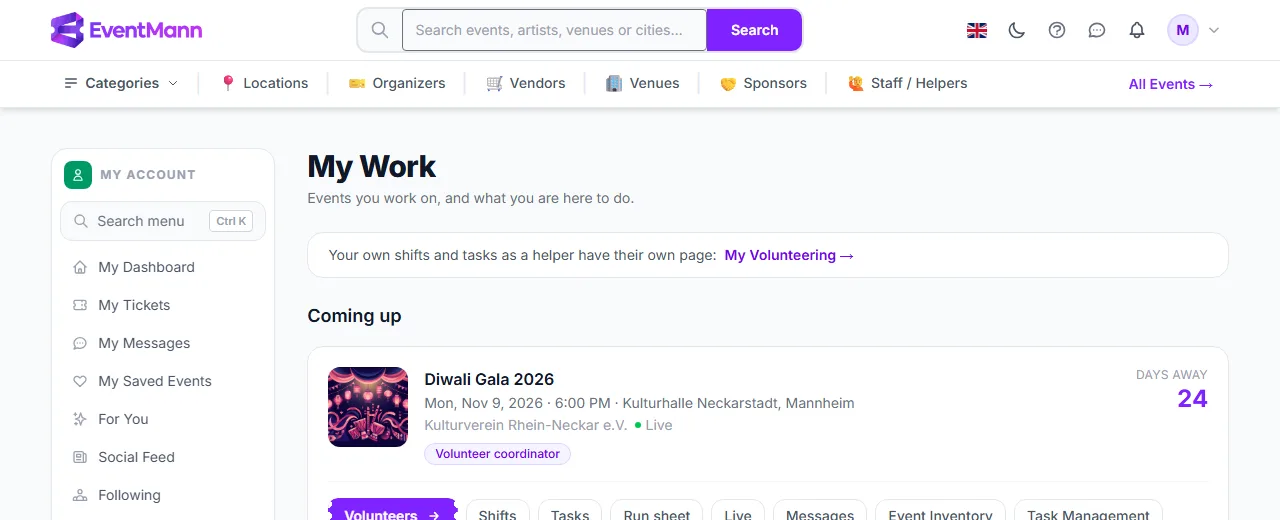
  • Once they have it, they find the event under My work in their account, with the hat they wear and the one action it is for. See Volunteer roles and My work.

Good to know

  • A role ends 30 days after the event, so finance work such as the last refunds can still be finished. Nothing stays on afterwards.
  • Roles are saved per event row. A volunteer who coordinates the gala is not a coordinator of your concert unless you give it there too (or their team does).
  • Use a custom role to hand out a precise mix, for example volunteers who may see orders and nothing else.

Troubleshooting

  • The Change roles link is missing — the person is not confirmed, or you do not hold any role you could give.
  • A volunteer holds a role but cannot open the event — they have no account on the roster email address, the address is not confirmed, or the event ended more than 30 days ago.
  • A role disappeared after the person stepped back — roles are removed when a volunteer steps back or is taken off the event. Give it again once they are confirmed.

Related

1.7 Shifts and the volunteer rota

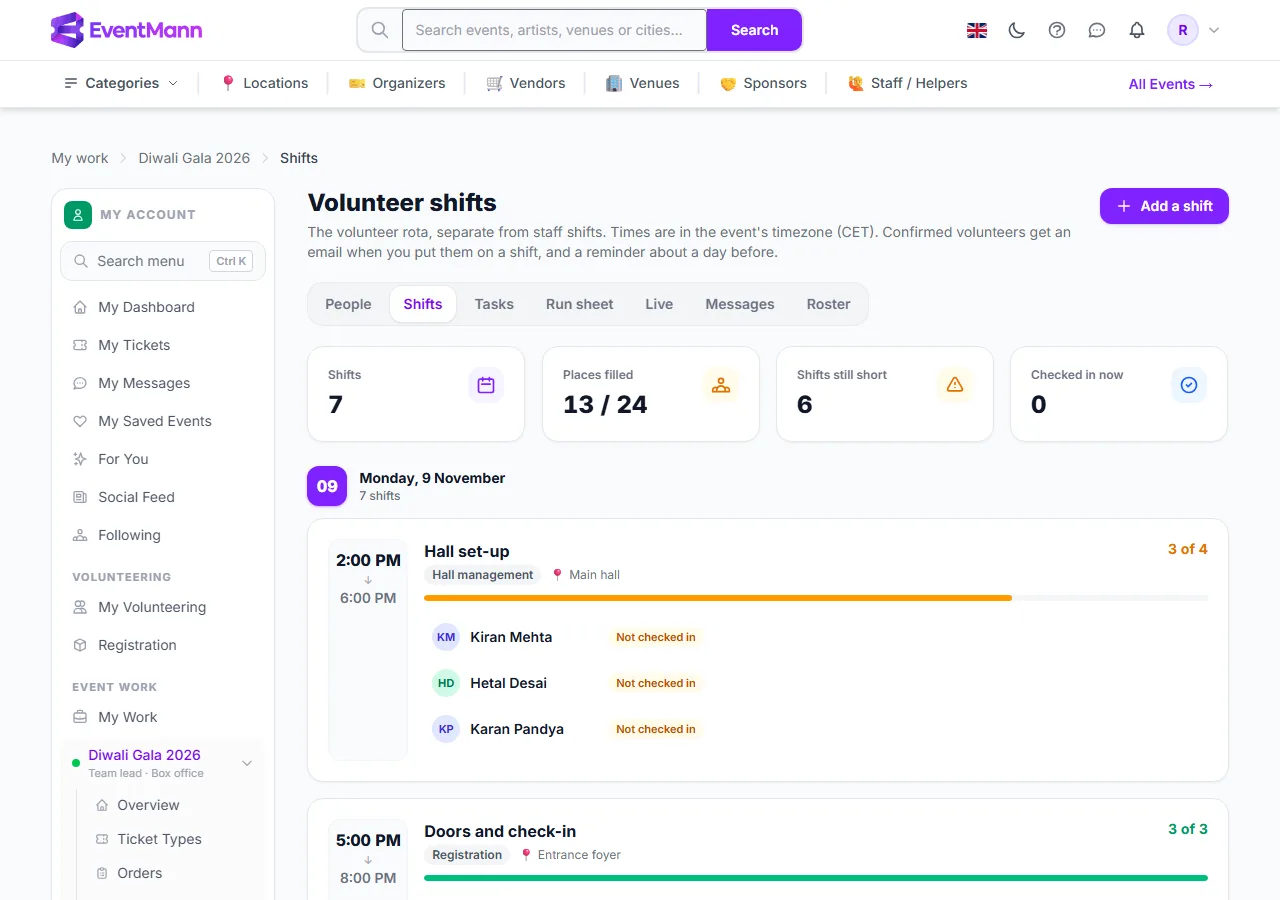
The Shifts tab is the volunteer rota of an event: what has to be done, when, where and by how many people, and who is on it. It is separate from the staff rota under Manage Staff, because volunteers are unpaid and never go through payroll. Open the event, then Team & Partners → Volunteers → Shifts. All times are in the event’s own timezone, which the page names at the top.

What you can do here

  • Add the slots you need people for, with a place and the number of people needed.
  • Put confirmed volunteers on a shift, one or many at a time.
  • Check people in and out from the rota, for the ones who cannot do it themselves.
  • Let volunteers choose and give back shifts themselves.
  • See at a glance which shifts are full: 8 of 8 is green, 2 of 3 is amber.

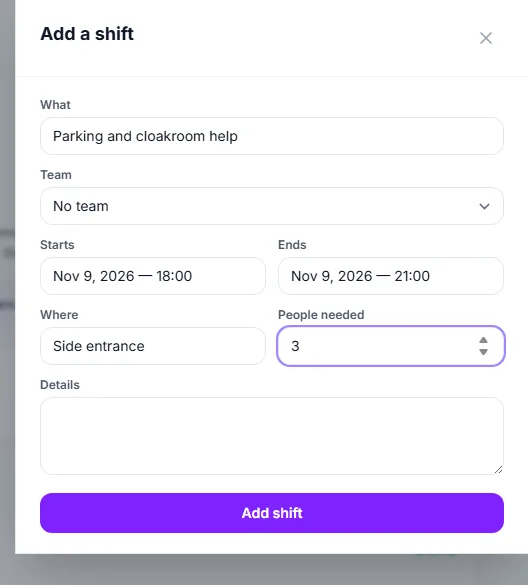
Add a shift

  1. Click Add a shift to open the form.
  2. Type What ① it is, for example “Registration desk”.
  3. Choose the Team ② it belongs to. A team lead has to choose one of their own teams; you may leave it empty, which makes it a shift for anybody.
  4. Set Starts ③ and Ends ④. They start with the event’s start and three hours later; the end must be after the start.
  5. Optionally add Where ⑤ and some Details. Set People needed ⑥, between 1 and 500.
  6. Click Add shift ⑦.
The Add a shift form

Read the rota

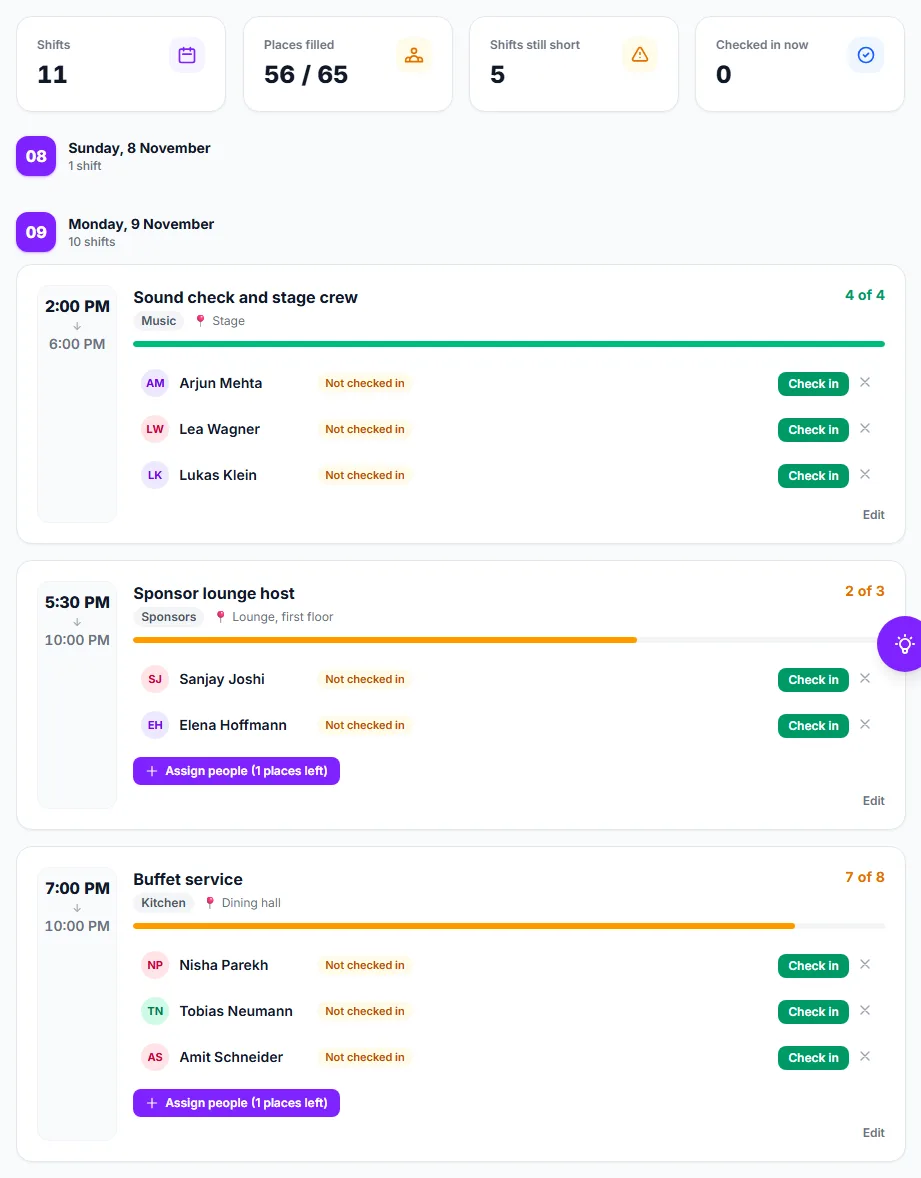
Each shift is a card with its title ① and team badge, how many places are filled ②, and one line per volunteer with their status ③: Not checked in, Checked in 17:02, or the checkout time with the hours worked. Check in ④ marks them present, then the same link reads Check out; a third press says Reopen for the person who was checked out by mistake. Take off ⑤ removes them from the shift. Edit changes the shift or deletes it. Where a shift still has free places, Assign people ⑥ puts more people on it.

Three shifts with their people, the check-in links and the Assign people button

Put people on a shift

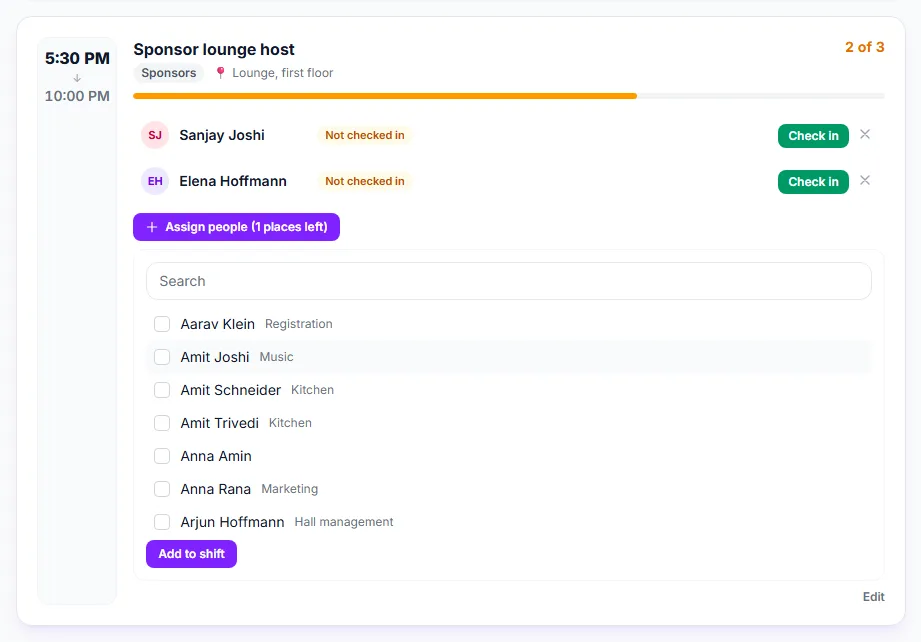
Under the list of people, Assign people (N places left) ② opens a picker of confirmed volunteers. It only appears while the shift has free places.

  1. Click Assign people ② — the button shows how many places are left.
  2. Search ③ by name, team or skill and tick the people ④. A lead sees only the people of their own teams.
  3. Click Add to shift ⑤.

The page tells you how many were added. Somebody is skipped when they are already on the shift, when they are on another shift of this event at an overlapping time, or when the shift is full by then — two coordinators filling the last places at once can never both succeed. Every person who was added gets an email, and about a day before the shift starts they get a reminder, once.

A shift with the assign list open

Settings explained

  • People needed — cannot be set below the number of people already on the shift. Take somebody off first.
  • Team — shows as a badge, decides which lead may change the shift, and which volunteers may take it themselves.
  • Delete shift — in the shift’s Edit panel. The volunteers on it are taken off it.
  • Volunteers choose their own shifts and give a shift back until — on the Settings tab, see Recruiting with join links, sign-up and copied setups.

Good to know

  • Only confirmed volunteers can be put on shifts. If the picker says nobody has confirmed yet, confirm people under People first.
  • Volunteers check themselves in from My Volunteering. Check-in opens an hour before the shift and closes when it ends, so there is no check-in for a shift that is over, and checking out needs a check-in first.
  • Hours are counted from check-in to check-out. A shift checked into but never out counts nothing until you close it with Check out here.
  • Putting somebody on the rota emails them. Moving or deleting a shift does not email them again; tell them with a message.
  • Shifts with a team and tasks with a team are also what a team lead sees on their run sheet and Live view.

Troubleshooting

  • “Is already on another shift at that time” — each person can hold one shift at a time. Shorten one shift or choose another person.
  • Nobody to choose from — everybody who is confirmed is already on the shift, or (for a lead) nobody in your teams is confirmed yet.
  • The count cannot be lowered — the shift already has more people on it; take some off first.
  • The hours are wrong — check the shift for missing check-outs; use Check out or Reopen on the line.

Related

1.8 Volunteer tasks

The Tasks tab is the job list of your volunteer team for one event: things that have to happen, who does them and by when. A task can be for one person, for several named people, for whoever works a given shift, for a whole team, or open to everybody. Volunteers move their tasks on themselves. You find it under Team & Partners → Volunteers → Tasks. For the organizer’s own planning board — deadlines, priorities, dependencies — see The event task board.

What you can do here

  • Write down what has to happen and give it a start time and a due time.
  • Give a task to one or several confirmed volunteers, to a shift, to a team or to everybody.
  • Follow it through four statuses: Open, In progress, Blocked and Done.
  • Break a task into a checklist, and discuss it in comments.

Add a task

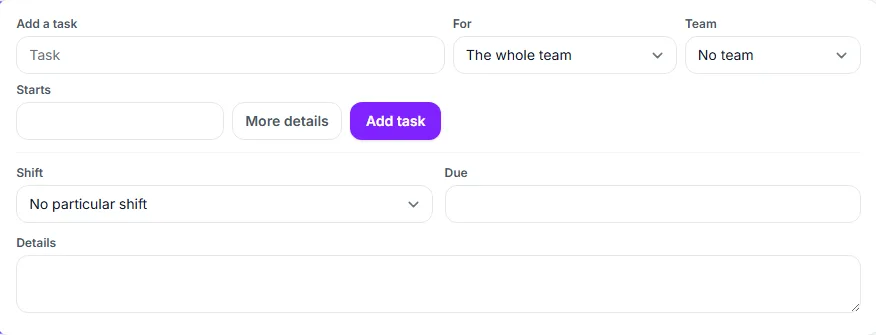
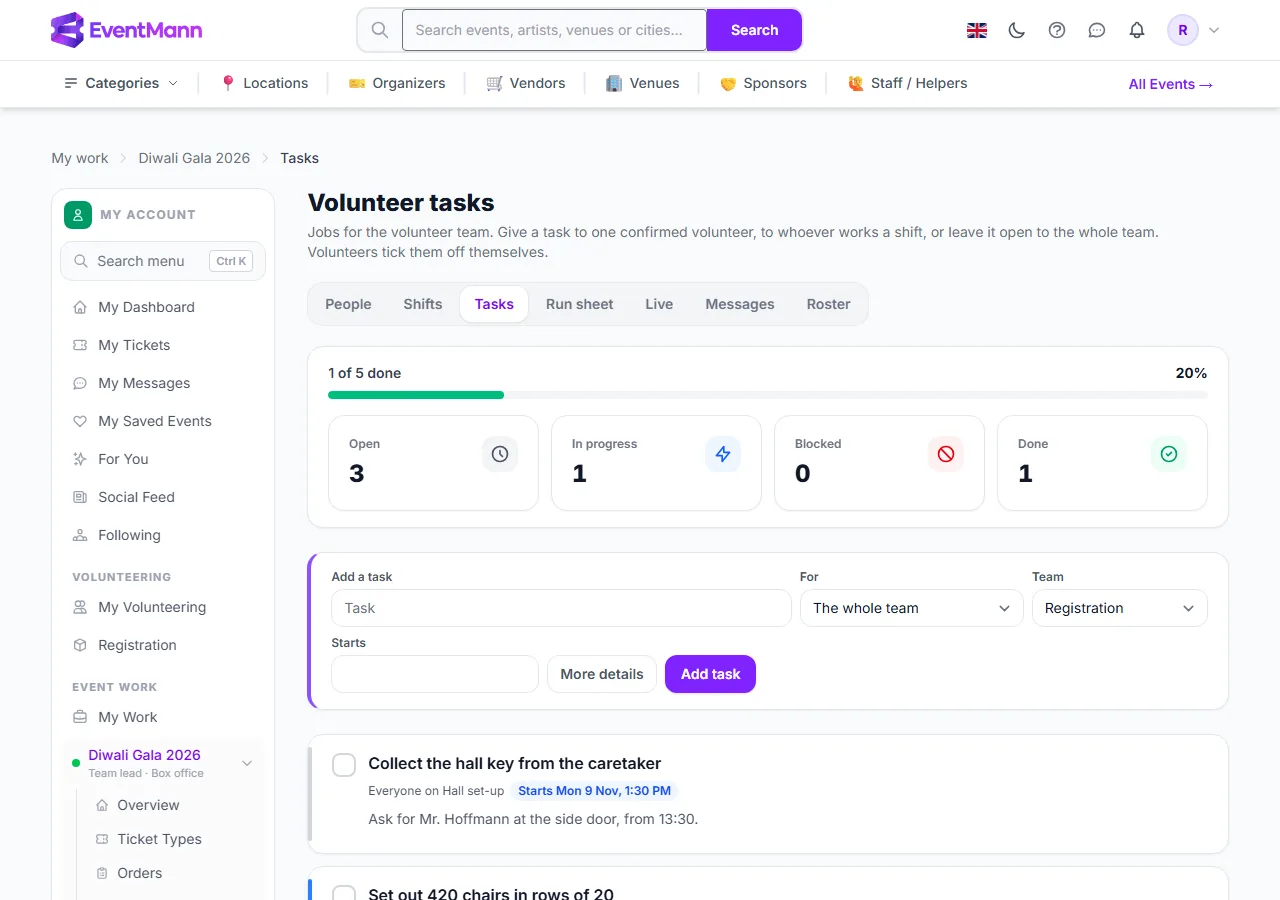
  1. Type what has to be done in the title field ①, for example “Pick up the lanterns from the print shop”.
  2. Under For ② choose one confirmed volunteer, or leave The whole team. People who have only been invited are not listed; the page says how many are still waiting.
  3. Choose the Team ③ the task belongs to. A team lead must choose one of their teams.
  4. Set Starts ④ if it has a time.
  5. Click More details to choose a Shift ⑤ (everybody on that shift gets the task), a Due time ⑥ and a description.
  6. Click Add task ⑦.
The quick-add row of the Tasks tab with More details open

Who gets a task is decided in this order: the named people if there are any, otherwise the shift’s people, otherwise the team, otherwise everybody. People who are named get an email “New volunteer task at …” when they are added. A task that has a start time and is for named people, a shift or a team also sends a single reminder about two hours before it starts; a task for everybody has no reminder.

Work with the list

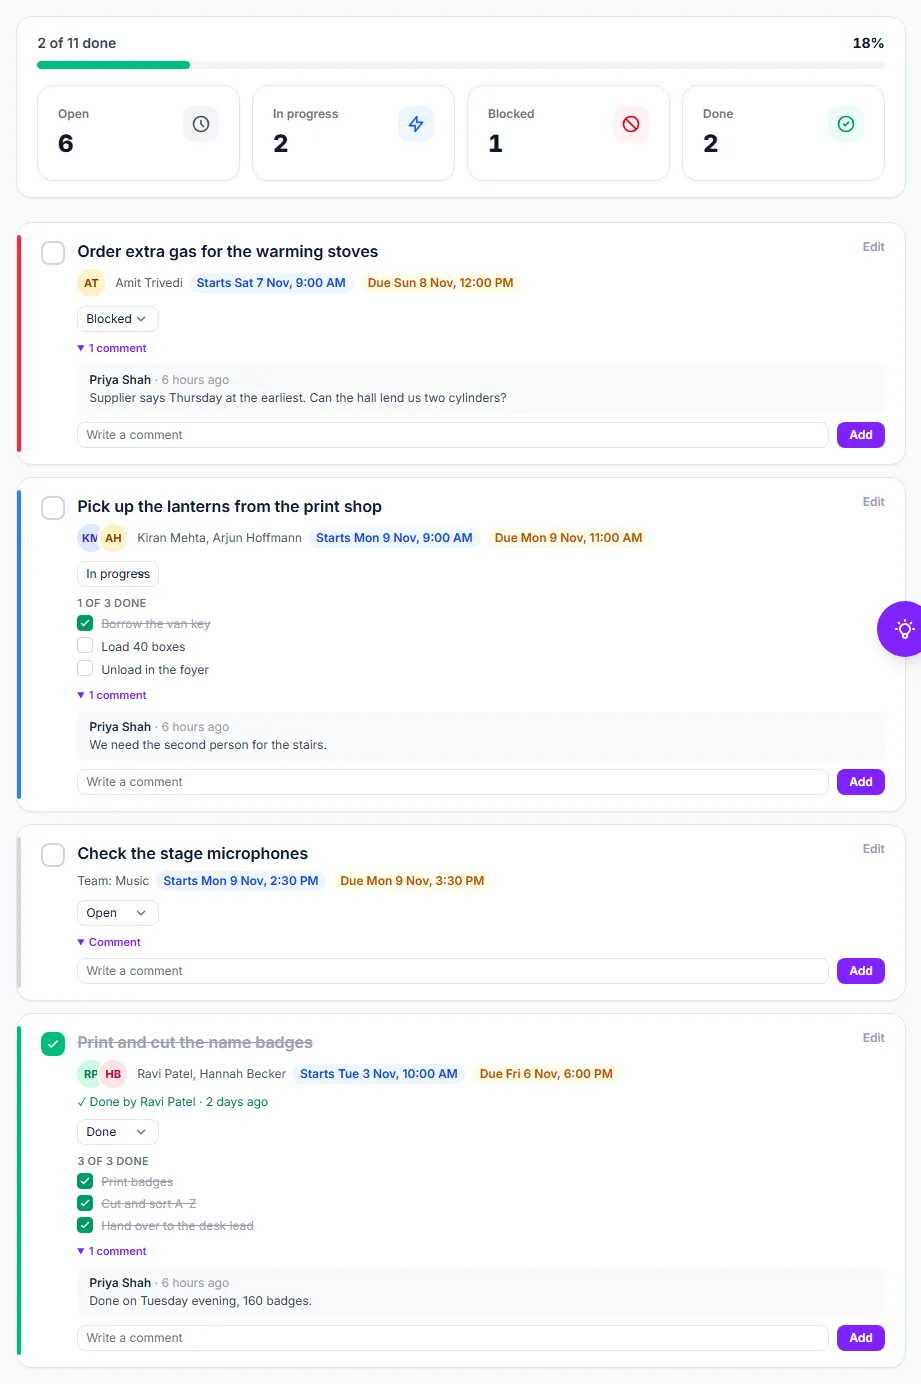
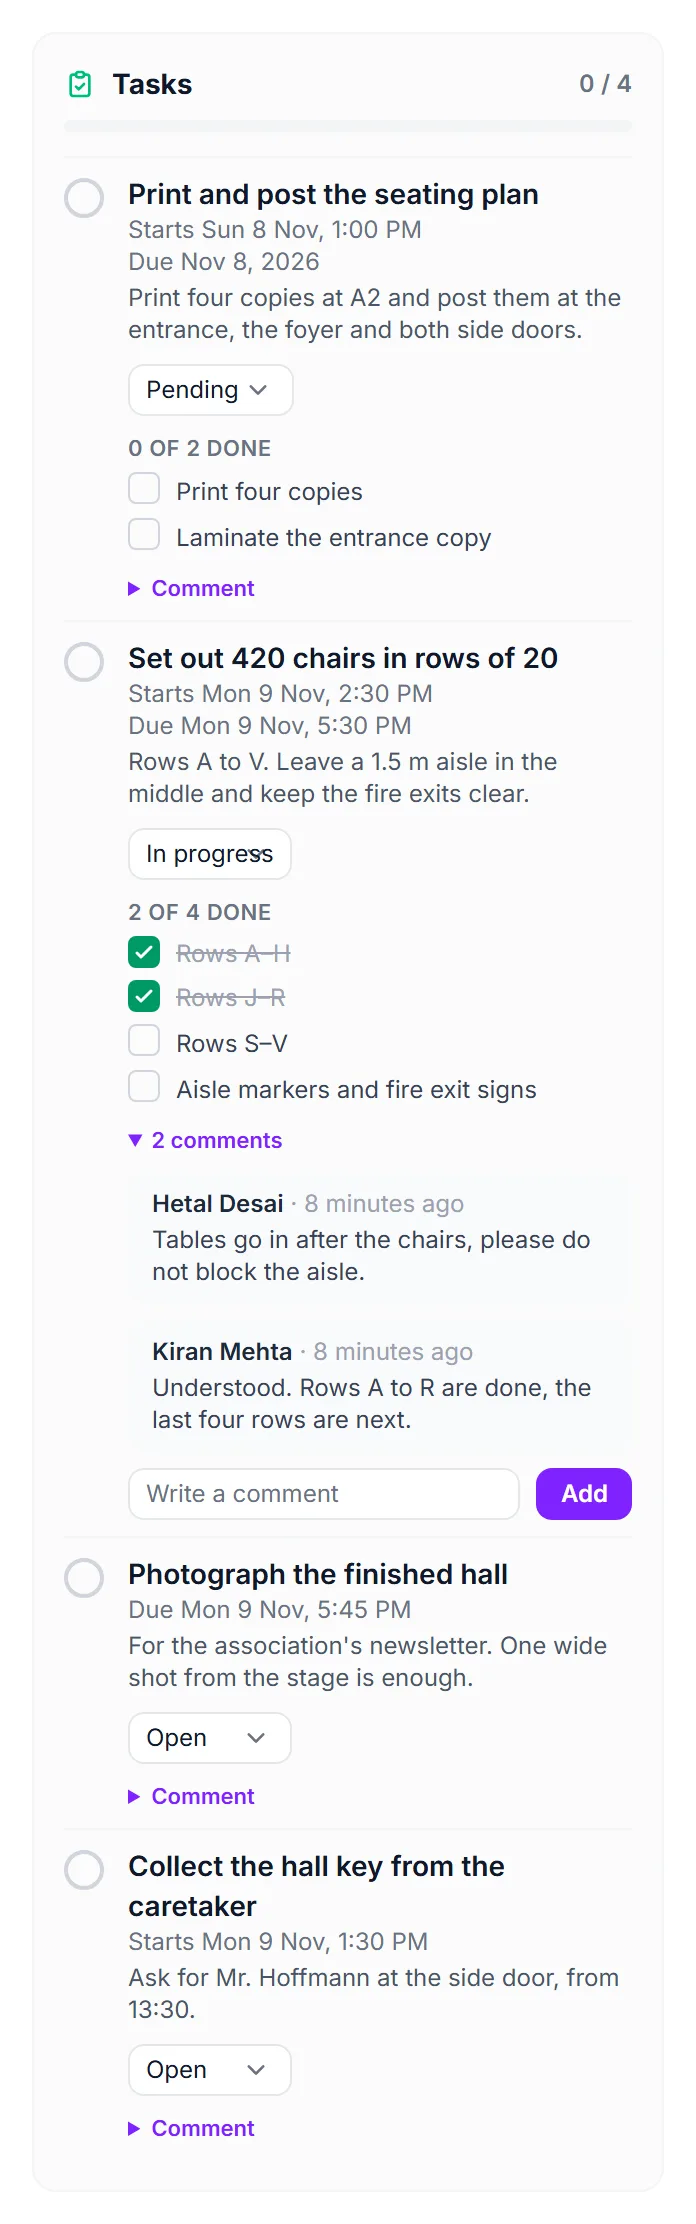
Open tasks come first, then done ones, each in time order. The line under a title says who it is for, its start and its due time, and when it is done, who ticked it — the volunteer, or “Marked done by the organizer”. The round box ① marks a task done or not done. The status menu ② sets Open, In progress, Blocked or Done; use Blocked for a task that waits on something. A checklist ③ shows how many items are done and lets you tick them. Comments ④ keep the discussion with the task. Edit ⑤ changes everything else.

Four tasks: blocked with a comment, in progress with a checklist, open and done

Edit a task

  1. Click Edit beside the task’s title.
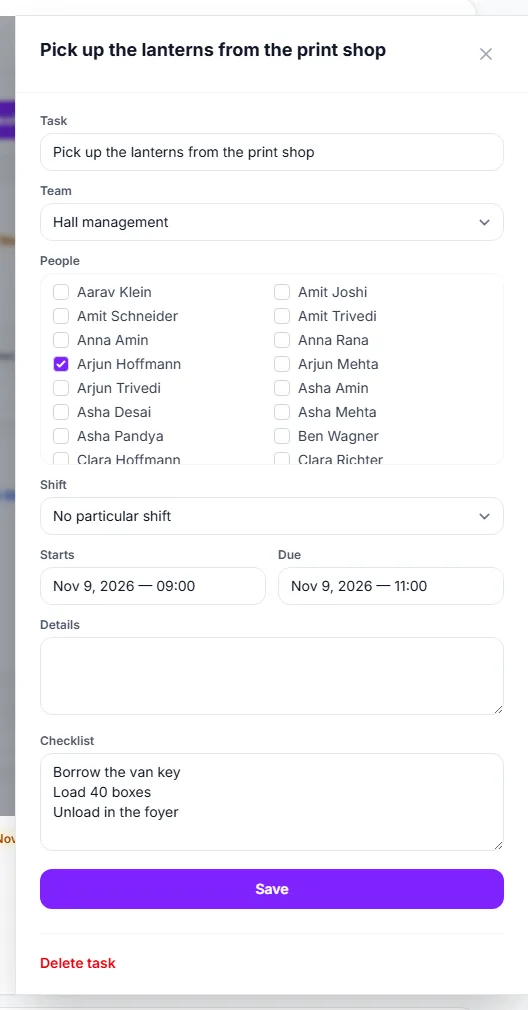
  2. Under People ① tick everybody it is for. Ticking nobody means the shift, the team or everybody.
  3. Change the Shift ②, the Starts ③ and Due ④ times and the details.
  4. Under Checklist ⑤ write one item per line. Items you keep as they were keep their tick, so rewording item three does not untick items one and two.
  5. Click Save ⑥. Delete task removes it.
The edit form of a task with people, shift, times and a checklist

Good to know

  • Times are the event’s own wall-clock times, the same as on shifts.
  • Volunteers see their tasks on My Volunteering. They can change the status, tick checklist items and add comments themselves; the organizer and the team’s lead see it here at once.
  • Giving a person a task who is not confirmed is refused. If somebody steps back or is taken off the event, their tasks go back to the team.
  • Tasks with a start or due time show on the Run sheet; Blocked and overdue ones show on Live.
  • A team lead sees and changes only the tasks of their own teams.
  • Marking a task done sets it to Done; marking it not done sets it back to Open.

Troubleshooting

  • The person I want is not in the list — only confirmed volunteers can be given tasks. Confirm them on People.
  • “That volunteer is no longer confirmed for this event” — the person was removed or stepped back after you opened the form. Choose somebody else.
  • Nobody got the email for my task — emails go to people who are named, at the moment they are added. A task for a shift or a team is not mailed when it is created; it appears on their My Volunteering page, and the reminder before its start time reaches them.

Related

1.9 The event task board

The task board is the organizer’s planning list for one event: everything that has to be done before, on and after the day, with a priority, a deadline, a start time, an owner and, where it matters, another task it has to wait for. Open the event and choose Task Management at the bottom of the Manage menu. It is separate from the volunteer tasks, which are the jobs of the volunteer team; the board is where you plan, and you can hand a board task to a team member or to a confirmed volunteer.

What you can do here

  • Add tasks with a title, a category, a priority, a due date and a start time.
  • Apply ready-made tasks from the template library and let the deadlines fall into place.
  • Assign a task to yourself, to a team member or to a confirmed volunteer.
  • Make a task wait for another one, and keep a checklist and comments on it.
  • Watch the six counters — total, pending, in progress, completed, blocked and overdue — and the overall progress bar.

Add a task

The row near the top is a quick add: a title is enough.

  1. Type the title ④, for example “Confirm catering order”.
  2. Optionally set Starts ⑤ — the date and time the work begins. A task with a start time shows on the volunteer Run sheet, and a volunteer it is assigned to gets a reminder about two hours before.
  3. Choose the Category: Venue & Logistics, Marketing & Promotion, Production & Technical, Vendor Management, Communication, Finance & Budget, Risk Management or Post-Event.
  4. Click More details to set a priority (High, Medium, Low), a due date and a description.
  5. Click Create Task ⑥. The task starts as Pending, with priority Medium unless you chose another.

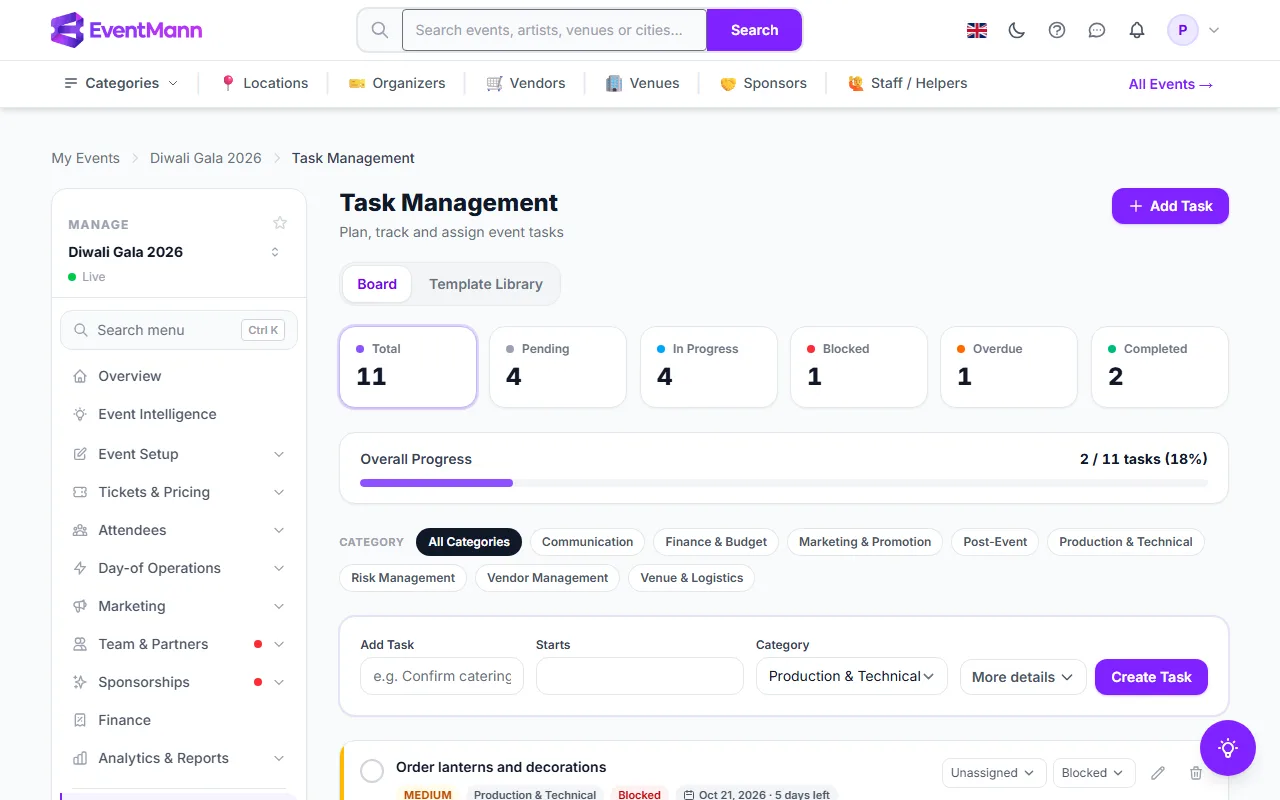
The cards at the top count the tasks by status; click one, such as Blocked ③, to see only those tasks, and the chips under them filter by category. The Template Library tab ① opens the ready-made tasks and Add Task ② jumps to the quick add.

The Task Management page with the counters, the filters and the quick add

Work with a task card

Each card shows its priority, its category, its start time, its due date and its status. The round box ① marks it complete. A grey Waiting for badge ② appears while the task it depends on is not completed. A green badge ③ with a volunteer’s name shows who it is given to. The first dropdown ④ assigns it, the second ⑤ changes its status between Pending, In Progress and Blocked, and the pencil ⑥ opens the edit form. A due date in the past turns the card red and marks it Overdue.

Three task cards: blocked, in progress with a checklist and a volunteer, and one waiting for another task

Edit a task

  1. Click the pencil on the card.
  2. Change the Task Title ①, the Category ②, the Priority ③, the Due Date ④ and Starts ⑤.
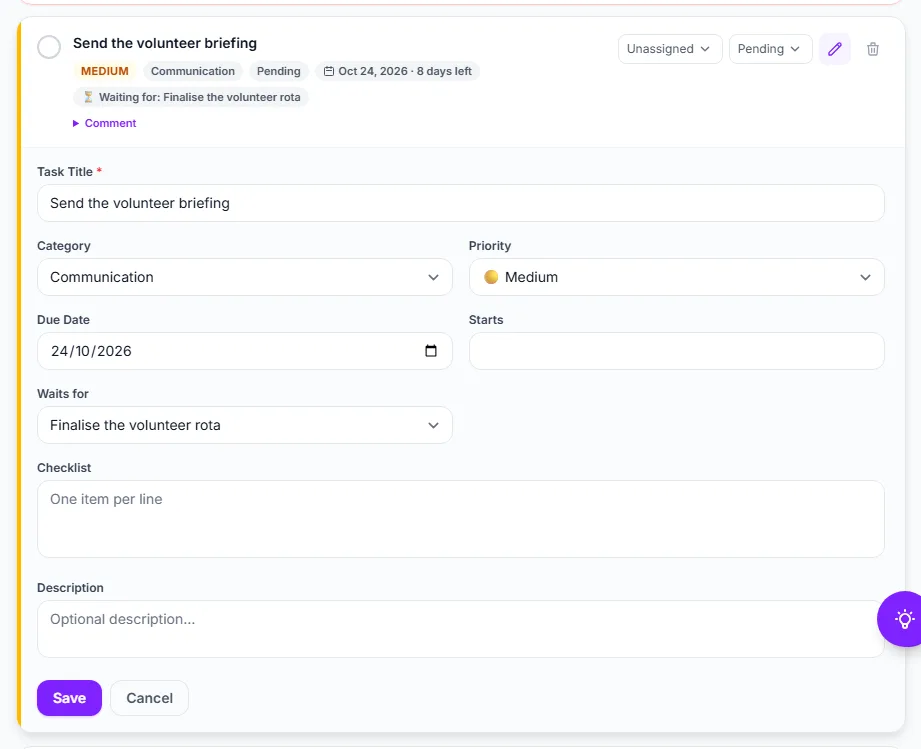
  3. Under Waits for ⑥ choose another task of this event that has to be completed first. The card then shows Waiting for that task until it is done. A task cannot wait for itself, and two tasks cannot wait for each other.
  4. Under Checklist ⑦ write one item per line; items you leave unchanged keep their tick.
  5. Add a description and click Save.
The inline edit form of a task with Waits for and a checklist

Assign a task

The first dropdown on each card has two groups. Team lists you (Me (owner)) and the members of your organizer team. Volunteers lists the volunteers who are confirmed on this event.

  • A team member can take a task only if their role covers it: a venue manager takes Venue and Risk tasks, a finance manager Finance, marketing Marketing and Communication, and the catch-all staff role anything. A task from the template library may name its own role. Otherwise you are told which role to assign instead. You as the owner can take anything.
  • A team member who is assigned a task gets a notification.
  • A volunteer gets the same “New volunteer task” email as for a volunteer task and sees the task on My Volunteering, where they can move its status, tick the checklist and comment. A task has one person at a time; choosing somebody else replaces the first.
  • Choose Unassigned to clear it.

Use the template library

  1. Click Template Library.
  2. Tick the tasks you want ②, one by one or a whole category at a time with Select all ①.
  3. Click Apply Selected Templates ③. The tasks are created for this event.
The Template Library with the Venue and Logistics templates

The library holds ready-made tasks in the eight categories, each with a priority and a typical lead time such as “30 days before”. Due dates are worked out from the event date. If your event is closer than the template’s own lead time, the deadlines are compressed so that none lands in the past, and keep their order. Post-event tasks stay after the event. Templates you already applied show a tick and cannot be applied twice.

Good to know

  • Who may use the board is decided by the Tasks permission: the organizer, venue managers and volunteer coordinators have it, and you can tick it in a custom role. It is a separate permission from editing the event.
  • A completed task shows when it was done. Unticking it sets it back to Pending.
  • Deleting a task asks for confirmation first.
  • Board tasks with a start time appear on the Run sheet, for people who hold the Tasks permission.
  • If volunteers have been invited but nobody has confirmed, the page says so and links to People; only confirmed volunteers appear in the list.

Troubleshooting

  • “… cannot take a … task” — the team member’s role does not cover the category. Choose a member with the right role, a staff member or a volunteer.
  • The volunteer is not in the list — they are not confirmed for this event yet.
  • “That task cannot be waited for” — the task is on another event, or choosing it would make two tasks wait for each other.
  • The deadlines of applied templates look too close together — the event is near, so the lead times were compressed to fit.

Related

1.10 The run sheet and the Live view

Two tabs of an event’s volunteers are made for the days around the event. Run sheet puts every shift and every task with a time into one list, in order, so everybody works from the same plan, on paper if you like. Live shows what is happening right now: who is on shift, who has not turned up, and what is overdue. Open the event, then Team & Partners → Volunteers, and choose the tab. Both are open to the organizer, volunteer coordinators and — for their own teams — team leads.

What you can do here

  • See the whole event as one timeline, per day, with who is doing what and where.
  • Print the run sheet, or open it on a phone at the door.
  • Narrow the plan to one team.
  • On the day, see how many volunteers are checked in, call or message the ones who are missing, and check them in yourself.
  • Spot tasks that are blocked or overdue before they cost you the evening.

The run sheet

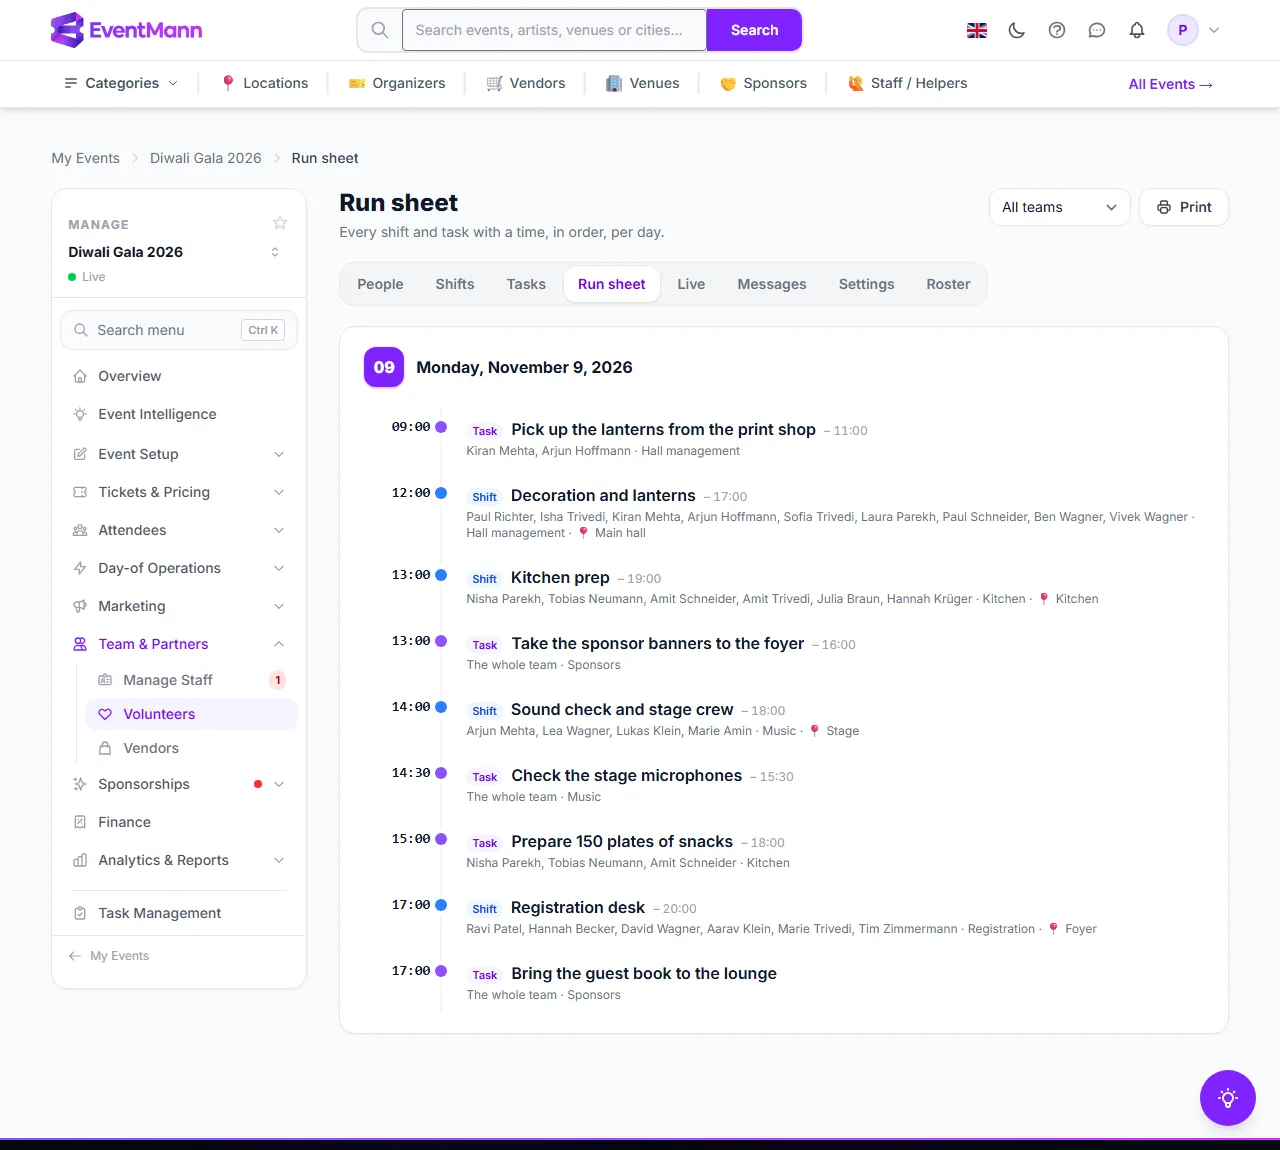
The run sheet has one block per day, each starting with the date ③. Every line shows the time ④, a coloured label for what it is ⑤ and the title, and below it who is doing it and where ⑥. There are three kinds of line:

  • Shift — the volunteer shifts with their time span, their people (or “Nobody yet (3 needed)”), their team and their place.
  • Task — volunteer tasks that have a start or a due time, for their named people or “The whole team”. Done tasks are greyed out and struck through.
  • Task board — tasks of the event task board that have a start time, with their owner. These are shown only to people who hold the Tasks permission.

The dropdown ① narrows the list to one team. Print ② opens a clean version in a new tab without the menus; click its Print button, or use your browser’s print command. Times are the event’s own clock times.

The run sheet for the gala day with shifts and tasks in time order

The Live view

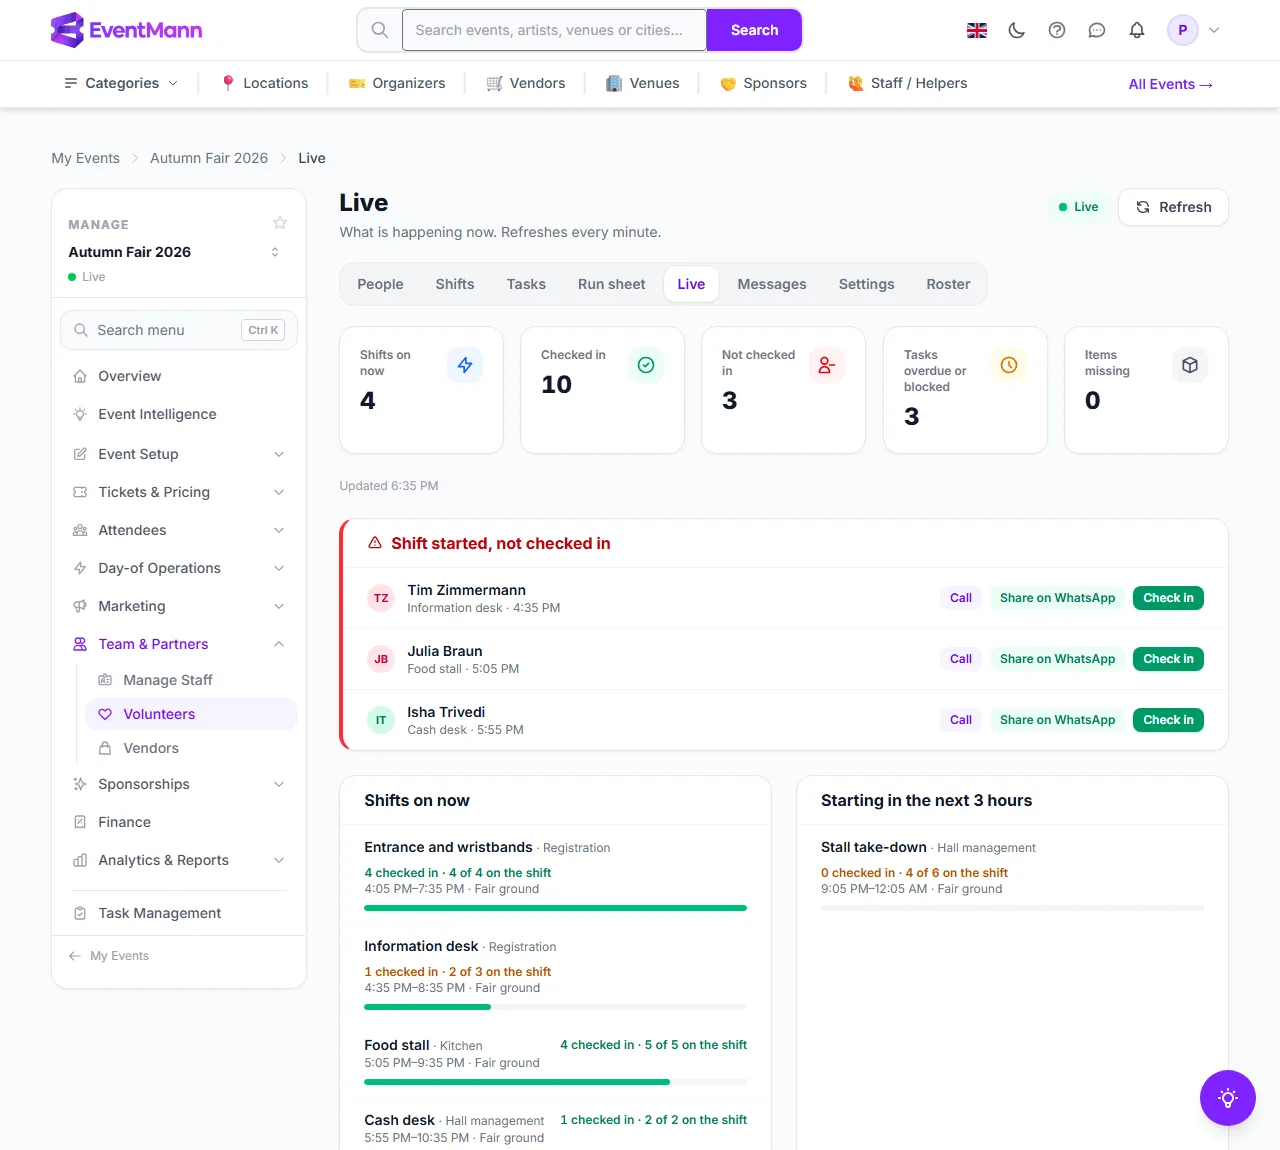
The Live tab refreshes itself every minute, and Refresh ① does it on demand. The cards at the top count the shifts on now, the people checked in, the people Not checked in ②, the tasks overdue or blocked, and the items missing from the packing lists of your teams. Below them:

  • Shift started, not checked in ③ lists people whose shift began more than 15 minutes ago and who have not checked in. Each line has Call ④ (opens the phone dialler), Share on WhatsApp when the number is in international form (starting with + or 00), and Check in ⑤ to mark them present.
  • Two lists of shifts: the ones that are on right now and the ones that start within the next three hours, each with how many are checked in against how many are on the shift and how many it needs ⑥. Amber means the shift is not full.
  • Tasks that need attention ⑦ lists tasks that are Blocked, or whose due time has passed without being done, with who they are for.
The Live view during the Autumn Fair with three people not yet checked in

Good to know

  • The Live view is for the moment. Before the event it shows “Nothing right now” until the first shift starts; use the Run sheet for planning.
  • Checking in from here is the same as Check in on the Shifts tab. Hours are counted from that moment.
  • A team lead sees their own teams’ shifts and tasks, and those without a team. They can check in only the people of their own teams.
  • The page only asks the server for fresh figures in the background. It does not keep you signed in: an unattended screen still signs itself out after your idle timeout.
  • Items missing comes from the team packing lists; see Team inventory.

Troubleshooting

  • A person is missing from the run sheet — shifts always show; tasks only when they have a start or a due time.
  • Share on WhatsApp is missing — the phone number has no international prefix. Edit the number on the roster, for example +49 …, and it appears.
  • Everybody shows as not checked in — volunteers check in from My Volunteering up to an hour before their shift. Check them in here if they cannot.
  • The run sheet is empty — add shifts and tasks with times first.

Related

1.11 Messages to your volunteers

The Messages tab writes to the people who help at one event: everybody who is confirmed, one team, the people on one shift, or the people who have not answered yet. The same words can be copied for your WhatsApp group. Open the event, then Team & Partners → Volunteers → Messages.

What you can do here

  • Send one email to a chosen group of volunteers, with a subject and a message.
  • Copy the same text, ready to paste into WhatsApp.
  • Read what was sent before, to whom and by whom.

Send a message

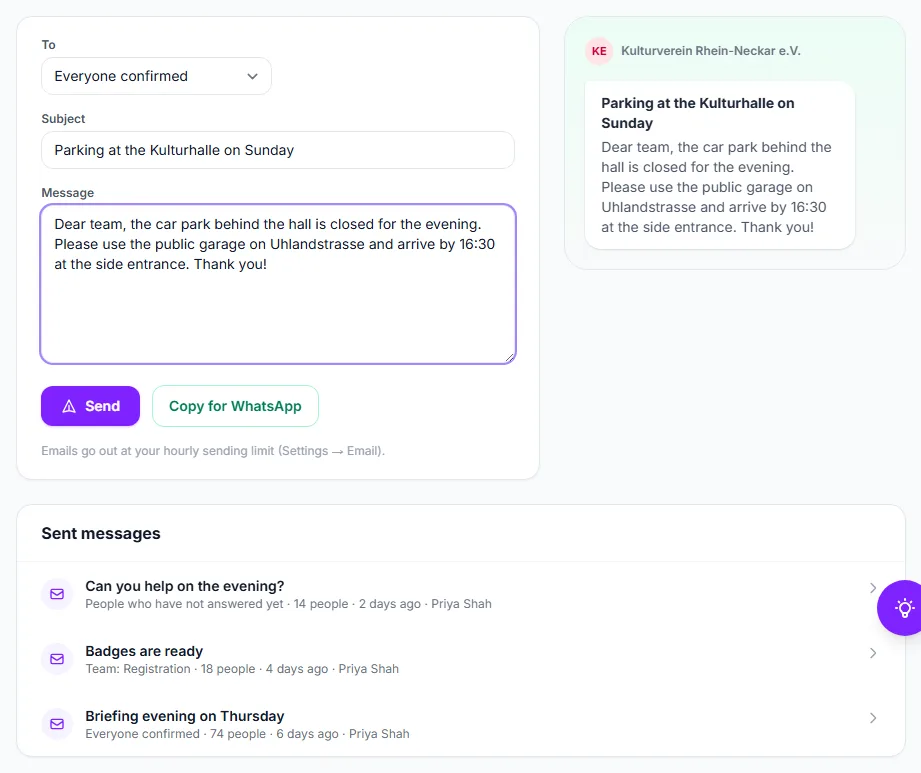
  1. Under To ① choose who receives it:
    • Everyone confirmed — every confirmed volunteer of this event. Only the organizer and volunteer coordinators can pick this.
    • One team — the confirmed people of the team you choose next.
    • One shift — the confirmed people on the shift you choose next.
    • People who have not answered yet — everyone who was invited or applied and is still waiting.
  2. Type a Subject ② of up to 200 characters.
  3. Write the Message ③, up to 5,000 characters. Plain text with line breaks is best.
  4. Click Send ⑤ and confirm that the message goes to everyone in the chosen group. The page tells you how many people it was sent to.

To post the same words in a WhatsApp group, click Copy for WhatsApp ④ before or after sending. It copies the subject in bold followed by the message, ready to paste.

The Messages tab with a message written and the history of earlier ones

Read what was sent

Under Sent messages ⑥ the latest messages are listed with their subject, who they went to, how many people, when and by whom. Click a line to read the message.

Good to know

  • Emails are sent at your own hourly sending limit (Settings → Email), the same limit as invitations and reminders, and they are spread so the last one leaves before the event ends. A large message can therefore take some hours to reach everybody.
  • If nobody is in the chosen group — a team with no confirmed people, a shift that is empty — nothing is sent, and you are told so.
  • A team lead can write only to their own teams and the shifts of those teams, and to people of their teams who have not answered. They do not see Everyone confirmed, and their history shows only their own messages and those to their teams.
  • Messages go to the address on your roster. They are about helping at the event; for tickets and orders use Attendee Messages and Attendee Announcements instead.
  • The message cannot be taken back once it is sent. Read it through before you confirm.

Troubleshooting

  • “Nobody is in that group yet” — the group is empty. Confirm people under People or choose another group.
  • “You can only write to your own teams” — you are a team lead and chose a group outside your teams.
  • Somebody says nothing arrived — the email may still be waiting for your hourly limit, or be in spam. Send them the WhatsApp copy.
  • I cannot choose Everyone confirmed — only people who manage all volunteers (organizer, volunteer coordinator) can write to everybody.

Related

1.12 Volunteer hours and privacy

A volunteer’s roster entry holds what you need to work with them: name, email address, phone number, skills, your own notes, and the hours they worked on your shifts. This article explains who sees what, how the hours statement works and how to delete a volunteer’s data. You find the roster under Grow → Volunteers.

What you can do here

  • Check who on your team sees which details.
  • Download a volunteer’s hours statement as a PDF.
  • Delete a volunteer and everything recorded about them.

Who sees what

  • You and volunteer coordinators see each person’s contact details on the People tab, and everything in the roster.
  • Team leads see the roster to recruit from, but not your notes.
  • The Export CSV of the roster contains contact details, skills, notes and hours. Keep that file safe, and delete it when you are done.

Hours and the statement

Hours are the time between check-in and check-out on a shift. Only shifts that were checked out count, and only for events where the person was confirmed. On the roster the Hours column adds them up. The download icon in a person’s row gives a PDF Volunteer hours statement for a school, an employer or a scholarship application. It lists each event with its date, the number of shifts and the hours, a total, and the date it was issued, and says it is based on the check-ins recorded by you. It is not a snapshot: it states the record on the day it is printed.

Good to know

  • A volunteer can ask not to be invited again with the link in any invitation. They then show as No invitations wanted, and you cannot invite them.
  • Delete from roster removes the person and, with them, their invitations, shifts and hours on every one of your events. This is what a request to delete their data asks for, so it is not softened and cannot be undone.
  • When somebody signs up from the event page they are told that their name, email, phone and skills are shared with you to organise the volunteer team.

Troubleshooting

  • The hours statement is empty — no shift of the person has been checked out yet, or they are not confirmed on any event.
  • The statement shows fewer hours than expected — a shift that was checked into but never out counts nothing. Close it with Check out on the Shifts tab and download the statement again.

Related

1.13 The volunteer thank-you ticket

A thank-you ticket lets your volunteers attend the event they help at, free or at a reduced price. It is an ordinary ticket type with Volunteers only switched on. Everybody can see it on the event page, but only people who are confirmed volunteers of that event can buy it. You create it under Tickets & Pricing → Ticket Types in the event’s Manage menu; the volunteer Settings tab tells you whether the event has one.

What you can do here

  • Offer your volunteers a ticket at no cost, or at a price of your choosing.
  • Limit it to one per volunteer, or allow a plus-one.
  • Show volunteers your own thank-you where they buy it.

Create the ticket

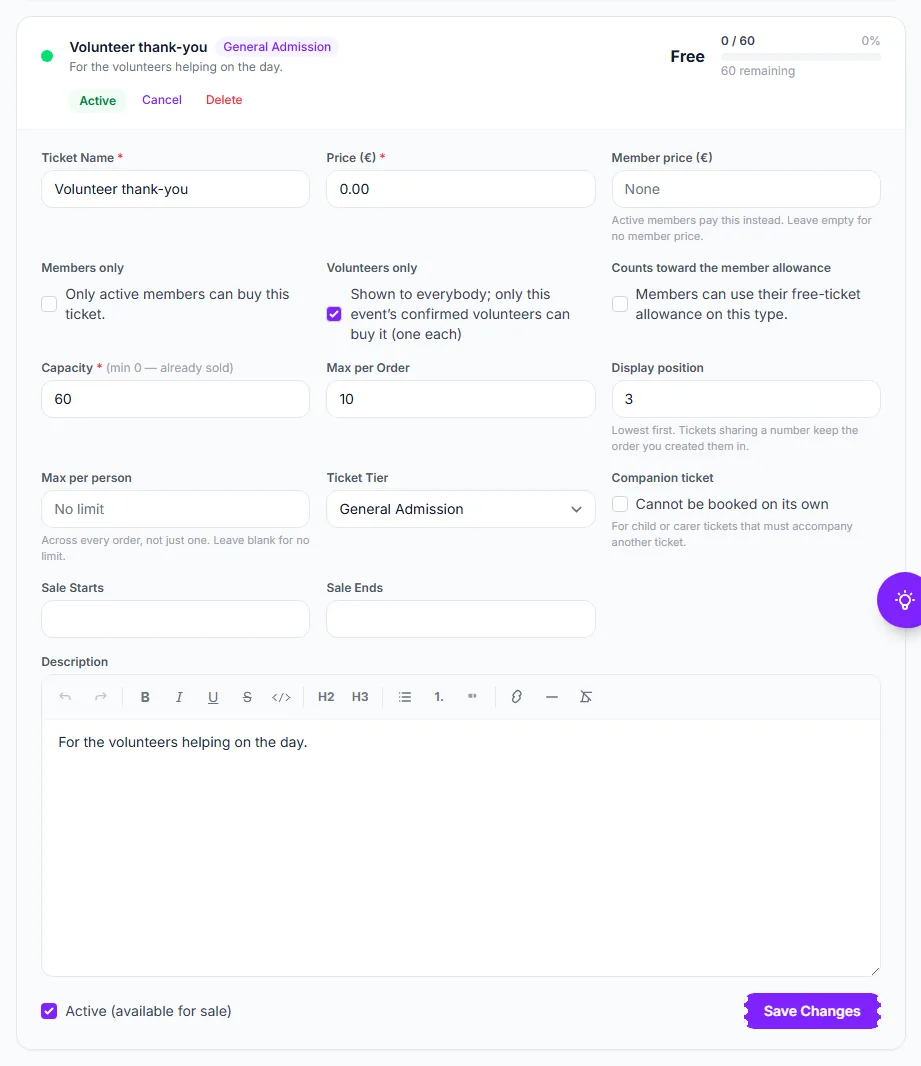
  1. Open Tickets & Pricing → Ticket Types and click Add ticket type, or click Edit on an existing one.
  2. Give it a name such as “Volunteer thank-you” and set the Price ①. Zero makes it free.
  3. Set the Capacity ② to about as many tickets as you have volunteers.
  4. Tick Volunteers only ③: “Shown to everybody; only this event’s confirmed volunteers can buy it (one each)”.
  5. Under Max per person ④ leave the field empty for one ticket per volunteer, or enter a higher number to allow a plus-one.
  6. Click Save Changes, or add the ticket type.
The edit form of the Volunteer thank-you ticket type with Volunteers only ticked

What visitors and volunteers see

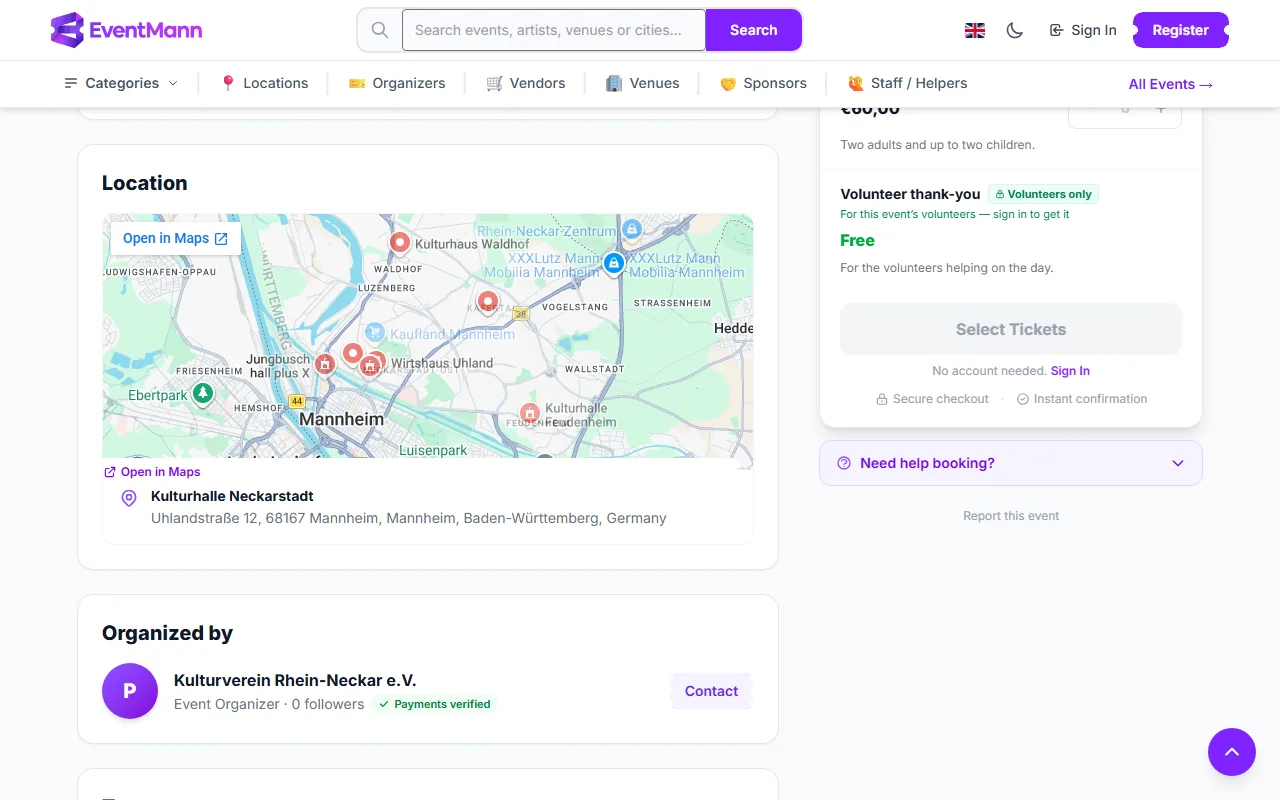
On the public event page the ticket sits in the list with a green Volunteers only label ①, the way members-only tickets show. A visitor who is not signed in reads “For this event’s volunteers — sign in to get it”; a signed-in person who is not a confirmed volunteer reads “For this event’s confirmed volunteers”, with a link to volunteer if you have switched on the sign-up. A confirmed volunteer finds the ticket unlocked, with your thank-you message above the list.

The event page for a visitor, with the locked Volunteers only ticket

The volunteer buys it like any other ticket, signed in, through the normal checkout. For a free ticket no payment is taken. Your thank-you message also appears beside the ticket at checkout and in the confirmation email.

Settings explained

  • Price — zero for a free ticket, or any price for a reduced one.
  • Max per person — counted across all their orders. Empty means one per volunteer.
  • Thank-you message — set on the volunteer Settings tab, up to 300 characters, with {name} for the volunteer’s name. See Recruiting with join links, sign-up and copied setups.

Good to know

  • The ticket does not change the price your event advertises. It is left out of listings, search results, price ranges and feeds, so a free volunteer ticket cannot make a paid event look free.
  • Only confirmed volunteers can buy it. Somebody who was only invited, or who stepped back, cannot. The volunteer must be signed in with the email address on your roster; the invitation email lets them create that account.
  • The ticket is the same as any ticket afterwards: it has a QR code and is scanned at the door.
  • Volunteers also find a Get my ticket button on their My Volunteering page when you have one for them.
  • The ticket counts against the event’s capacity like every other ticket.

Troubleshooting

  • A volunteer cannot see or buy the ticket — they must be Confirmed on this event and signed in with the email address you invited. Accounts are linked to roster entries only on a confirmed email address.
  • The Settings tab says there is no volunteer ticket — no ticket type of this event has Volunteers only ticked. Use Go to tickets to make one.
  • A volunteer needs two tickets — raise Max per person on the ticket type.

Related

1.14 Team inventory: overview

Inventory is the list of everything your association owns, borrows or buys for its events: chairs, speakers, a dhol, lanyards, rice, plates. It lives under Inventory in the Work group of your organizer sidebar. Every item belongs to one volunteer team that looks after it, or to the Shared pool that you and your volunteer coordinators run yourselves.

What you can do here

  • Keep one list for every team. You see all items. Each row shows the team badge, whether the item is Equipment or a Consumable, its category, how many are available out of the total, where it is, and its condition.
  • See who has it. Between events an item is either held by a person from your volunteer roster or kept at a place you name, such as “Kulturhalle store room B”. Borrowed items also say who lent them.
  • Know what to buy. Items that run low show in red and appear on the Shopping list.
  • Record purchases with their receipts and see who still has to be paid back — see Purchases, receipts and the shopping list.
  • Plan each event with one packing list per team — see Event packing lists.
  • Print QR labels to stick on the items — see QR labels.

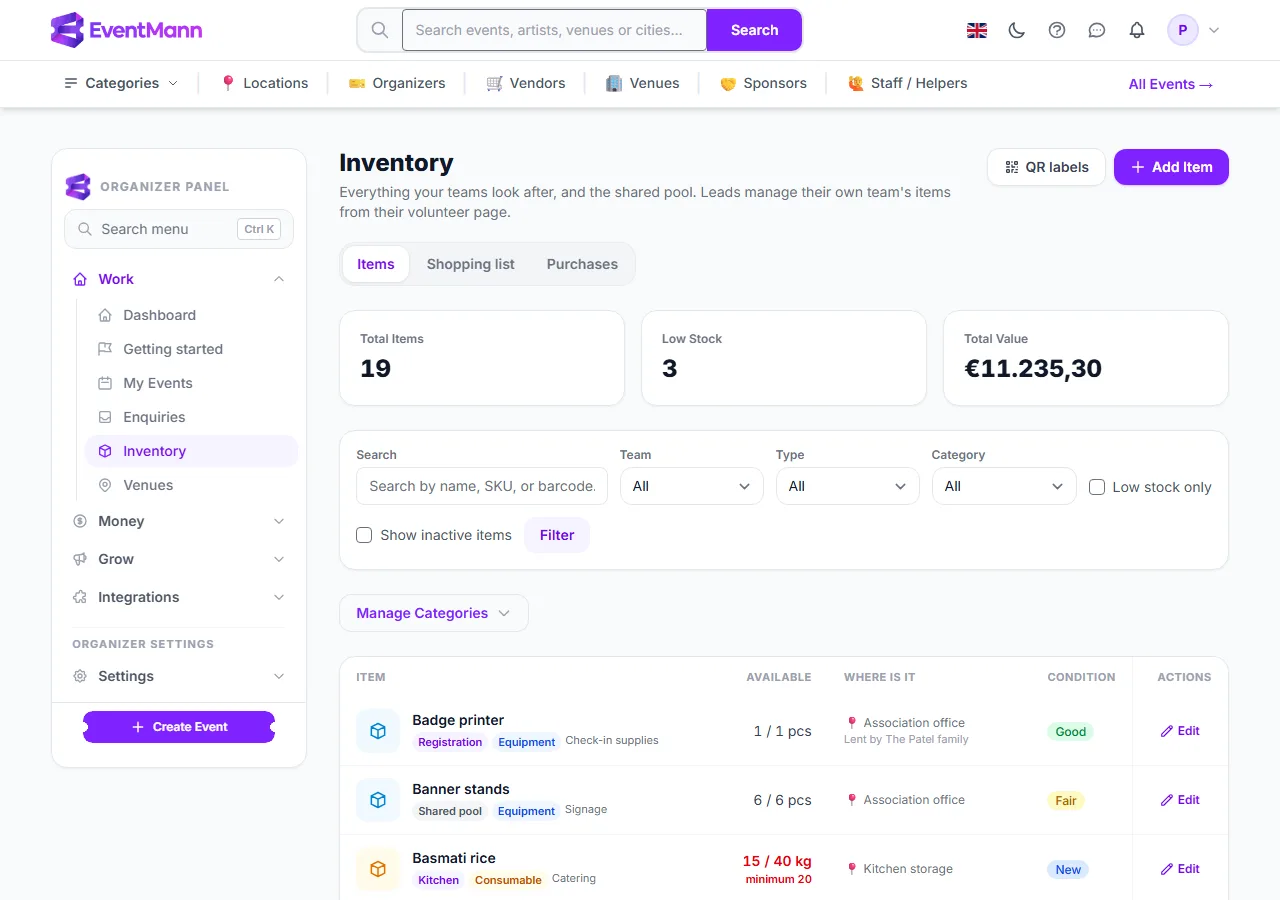
Read the Inventory page

  1. The three tiles at the top show Total Items (active items only), Low Stock and Total Value, which is unit cost times total quantity. Click the Low Stock tile to open the shopping list.
  2. The tabs under the title open the Shopping list ① and Purchases; beside the title are QR labels, which opens a print sheet, and Add Item ④.
  3. Narrow the list with the filters: search by name, SKU or barcode, Team ② (a team, or Shared pool), Type (Equipment or Consumable), Category, Low stock only and Show inactive items. Clear removes them again.
  4. Each row starts with the team badge ③. Click Edit on a row to open the item — see Items: adding, finding and looking after them.
The Inventory page with the totals, the filters and one row per item

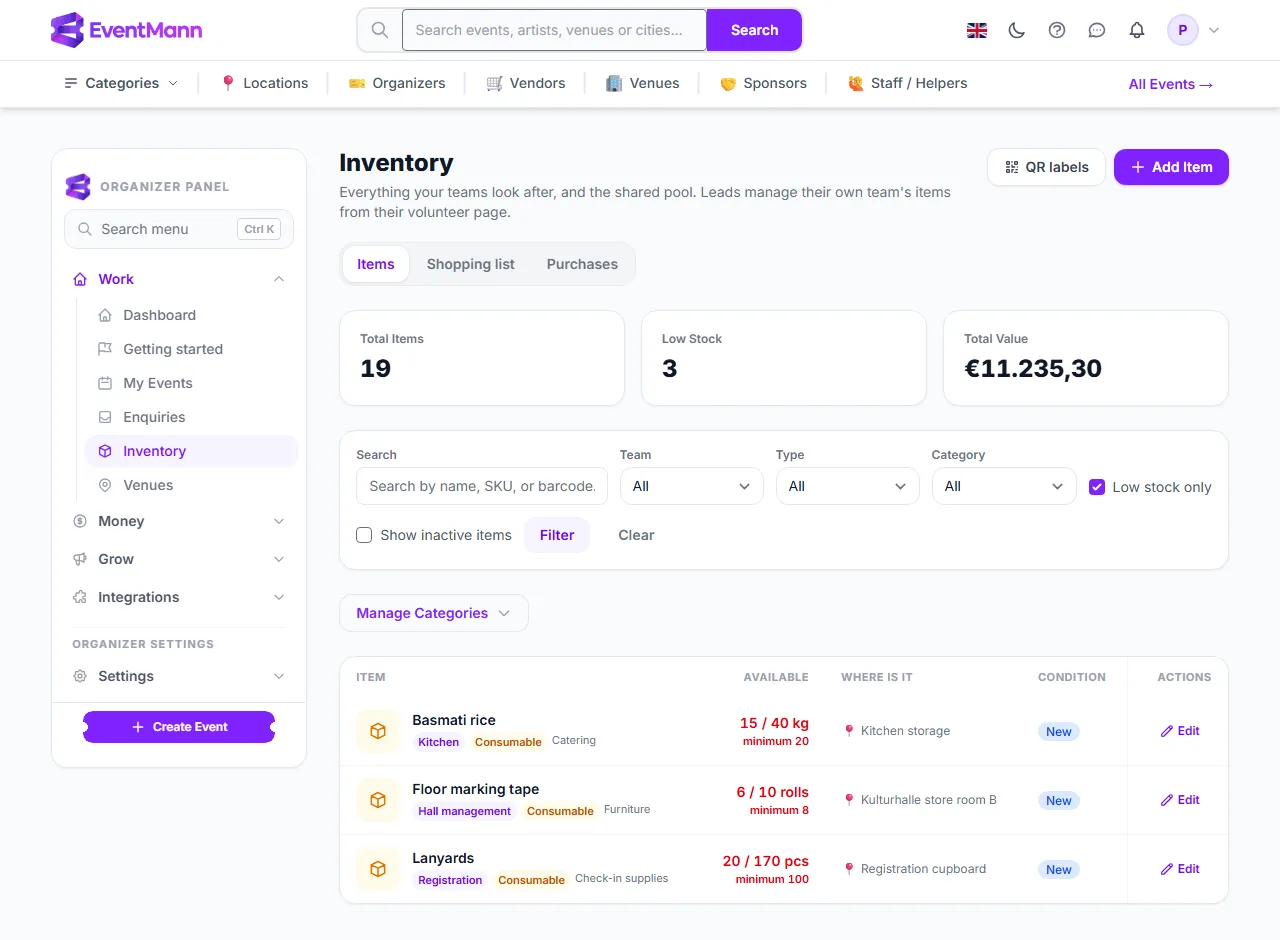
Under Low stock only ① you see what has fallen to its minimum. The available count ② turns red and says “minimum 20”. An item is low when it has a minimum above zero and the number available is at or below it.

The list narrowed to items at or below their minimum stock

Teams, the shared pool and who can see what

  • You see and change every item, including the Shared pool, and you are the only one who manages categories (the Manage Categories button).
  • A team lead sees and changes only the items of the team they lead, from their own page: Your team’s inventory. They never see another team’s stock, and they cannot put an item in the Shared pool.
  • A coordinator or event manager works with the packing lists of an event from Manage → Event Inventory. The Shared pool has no lead, so it is looked after by you and the coordinators.
  • Borrowing between teams is not a function of the platform: teams ask each other outside the system.

Good to know

  • Equipment comes back after an event. Consumables get used up and are bought again; when you record the return of an event you say how many were used up.
  • An item that is checked out to an event cannot be deleted until it is back.
  • Used-up and missing quantities leave the stock for good. Damaged items stay counted in the total but are not available.
  • Items you switch off with the Active checkbox on the item page disappear from the list and from the packing list picker. Tick Show inactive items in the filters to list them again, marked Inactive; open one and tick Active to bring it back.
  • Categories (for example Sound & lighting, Furniture, Catering) are shared by all teams. Add one under Manage Categories.

Troubleshooting

  • An item is missing from the list — check the Team filter, and tick Show inactive items in case the item was switched off. A lead’s own page lists only their team.
  • The Low Stock tile shows zero although something is nearly out — the item has no minimum set. Open it and enter a Min. Stock Threshold.
  • The available count is lower than what is on the shelf — the rest is planned on an event’s packing list or still out. Open the item: the Booked at events panel shows where.

Related

1.15 Items: adding, finding and looking after them

An item is one kind of thing you keep, with a quantity: “Folding chairs, 420”. This article covers adding an item, saying where it is, borrowed items, and the other things you can do on an item’s page. Open Inventory in the Work group and click Add Item, or Edit on an existing row.

Add an item

  1. Click Add Item on the Inventory page and type the Item Name. It is the only text that is required, together with the quantity, condition and ownership.
  2. Choose the Team ② that looks after it. Leave it on Shared pool if nobody in particular does. A team lead adding an item on their own page cannot choose: it is always their team.
  3. Choose the Type ③: Equipment comes back after an event, a Consumable gets used up and is bought again.
  4. Enter the Total Quantity ④ and, if you like, a Unit ⑤ such as pcs, kg or rolls. Put a Min. Stock Threshold ⑥ on anything you buy again; when the stock falls to that number the item appears on the shopping list.
  5. Say where it is under Who has it ⑦ (a person from your volunteer roster) or Storage Location.
  6. Choose the Condition (New, Good, Fair, Poor, Damaged, Retired) and the Ownership ⑧. For Borrowed items a field Lent by ① appears: write whose it is, for example the Patel family. Rented and Owned have no such field.
  7. Optionally add a category, SKU, description, barcode, picture and the Unit Cost (used for the total value), then click Create Item.
The Add Item form, filled in for borrowed folding tables

Settings explained

  • SKU — your own code. It must be unique among your items.
  • Min. Stock Threshold — zero means “do not warn me”. Above zero, the item is low stock when the available number is at or below it.
  • Active (on an existing item) — switch it off for something you no longer keep. It leaves the list, the shopping list, the labels and the packing list picker. Show inactive items on the Inventory page finds it again.
  • Image — JPG, PNG or WebP, up to 2 MB.

Where is it?

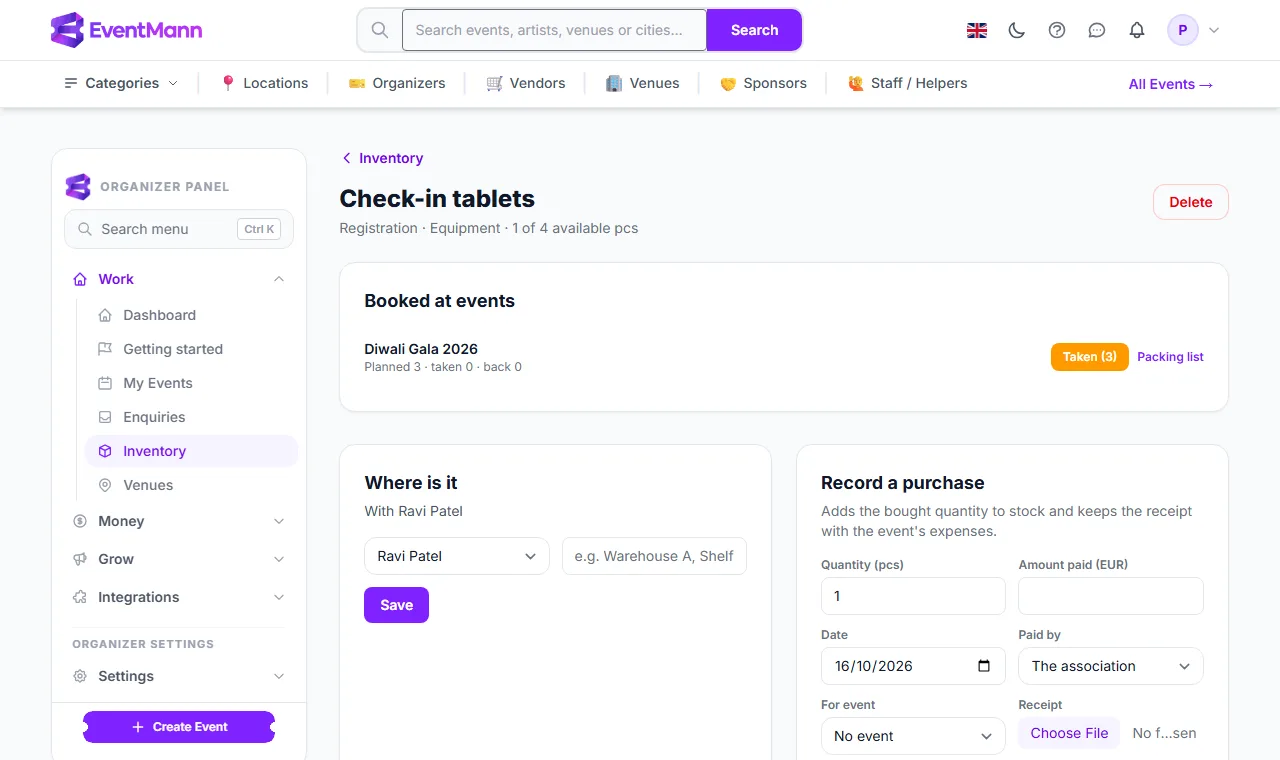
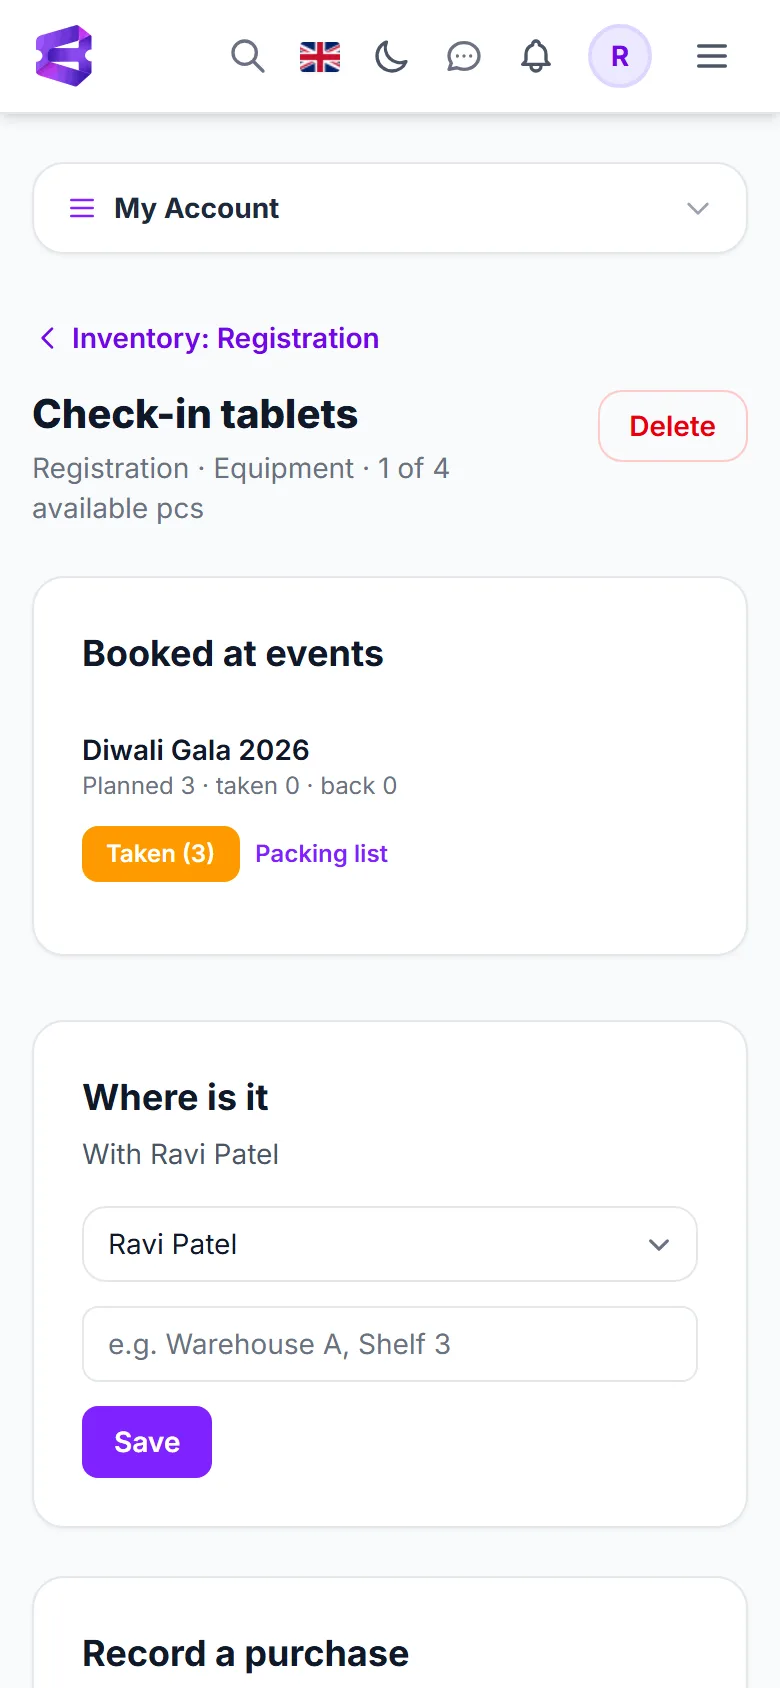
Open an item with Edit. The Where is it panel ① tells you in a sentence: “With Ravi Patel”, “At Association office”, or that nobody has noted where it is, plus who lent it. Change it with the person list ② and the place field ③, then click Save. You can use both: a person and a place.

An item page with the Where is it panel beside Record a purchase

Next to it, Record a purchase ④ adds stock together with the receipt; see Purchases, receipts and the shopping list.

More on the item page

  • Booked at events — appears when the item is on the packing list of a current or coming event. It has quick buttons for Taken and All back; see QR labels.
  • Restock — adds a quantity with an optional note, without a purchase. Use it for stock that was found, donated or counted again.
  • Maintenance — log a Service, Repair or Inspection with a date, a cost and the date of the next service.
  • Transaction history — the latest movements: taken to an event, returned, used up, restocked.
  • Delete — asks for confirmation. It is refused while any quantity is still checked out to an event.

Good to know

  • Changing the team of an item moves it to that team’s list, and its lead can then manage it.
  • Quantities are whole numbers. The available figure is the total minus what is planned or out on event packing lists, minus damaged, used-up and missing items.
  • The per-unit cost is only for the Total Value tile. The money you actually spend is recorded as purchases.

Troubleshooting

  • The SKU is refused — another of your items already uses it.
  • Lent by does not appear — choose Borrowed under Ownership first.
  • I cannot choose a person under Who has it — the list shows your volunteer roster. Add the person under Volunteers first.

Related

1.16 Purchases, receipts and the shopping list

When a team buys something for the inventory, you record it as a purchase: the quantity goes onto the stock, the receipt is kept, and the money appears among the event’s expenses. If a volunteer paid out of their own pocket, the purchase stays open until you mark it paid back. Find the list under Inventory → Purchases, and what to buy under Inventory → Shopping list.

Record a purchase

  1. Open the item you bought on the Inventory page (Edit).
  2. In Record a purchase enter the Quantity bought, the Amount paid, and the Date.
  3. Under Paid by choose The association, or the volunteer who paid. A volunteer’s purchase is marked To pay back until you settle it.
  4. Optionally choose For event and attach the Receipt (PDF, JPG, PNG or WebP, up to 10 MB).
  5. Click Record a purchase. The quantity is added to the item’s stock straight away.

The Purchases page

Every purchase from every team is listed, newest first, with its date, the item, the team, who paid and the amount. A team lead sees the purchases of their own team only.

  1. The yellow notice ① gives the total still to pay back to volunteers. Click Show to list only the open ones.
  2. The Paid by column ② shows the volunteer and To pay back or Paid back. Purchases paid by the association carry no badge.
  3. Click Receipt ③ to open the file you attached. Receipts are private: only you and the team’s lead can open them.
  4. When you have paid the volunteer, click Mark paid back ④. Mark not paid back undoes it. Only you, the organizer, can do this; a lead sees the status but has no button.
The Purchases page with one volunteer purchase still to be paid back

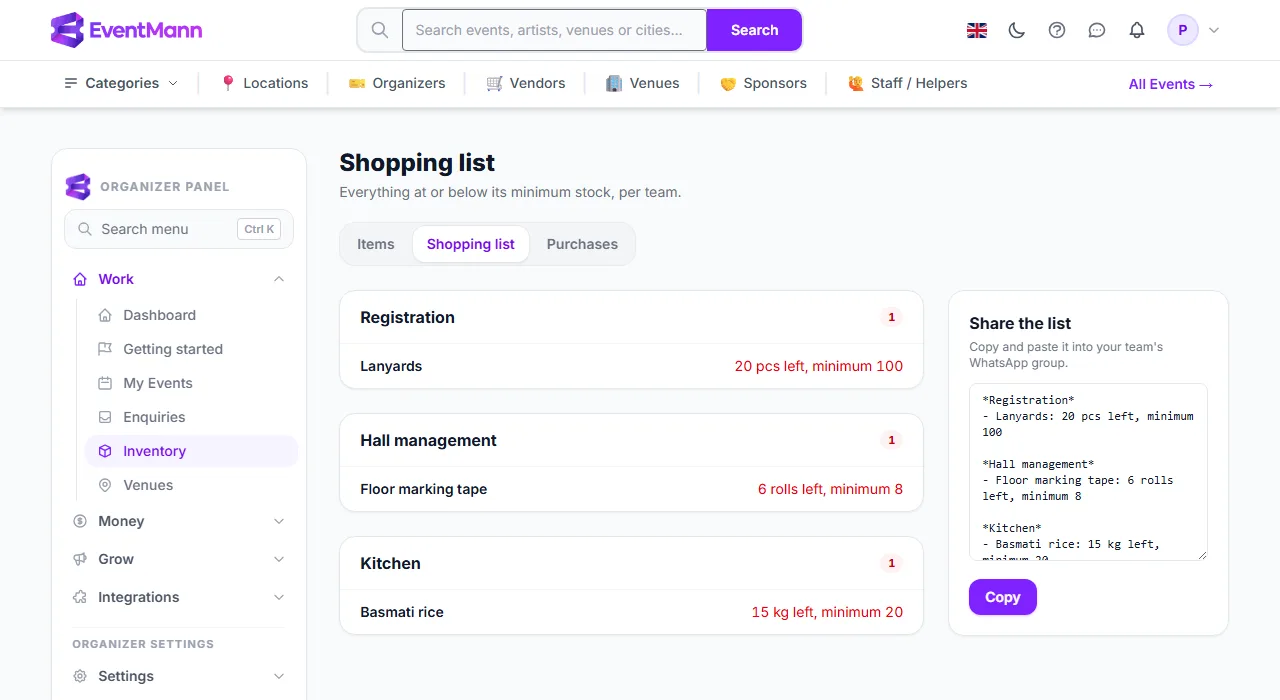
The shopping list

The shopping list shows every active item at or below its minimum stock, grouped by team. Teams without items do not appear, and the Shared pool is a group like any other.

  1. Each team group ① lists its items; the line on the right ② says how many are left and the minimum.
  2. The box Share the list ③ holds the same list as plain text, with the team name in bold for WhatsApp.
  3. Click Copy ④ and paste it into your team’s group.
The shopping list per team, with the text ready to copy into a WhatsApp group

Good to know

  • A purchase is an ordinary expense. It shows in the event’s expenses and its profit and loss; the title reads “40 × Basmati rice”. Equipment is filed under the category equipment, consumables under other. The currency is the item’s, or euro if it has none.
  • If you pick no event, the purchase belongs to your organization rather than to one event.
  • The money is only recorded. The platform does not pay anyone back; you do that yourself and then mark it.
  • Use Restock on the item page instead of a purchase when nothing was bought.

Troubleshooting

  • The item is not on the shopping list — it has no minimum set, or its available quantity is still above it. Quantities planned for an event count as not available.
  • A receipt link says not found — the purchase was recorded without a file.
  • The volunteer is missing under Paid by — only people on your volunteer roster are offered.

Related

1.17 Event packing lists

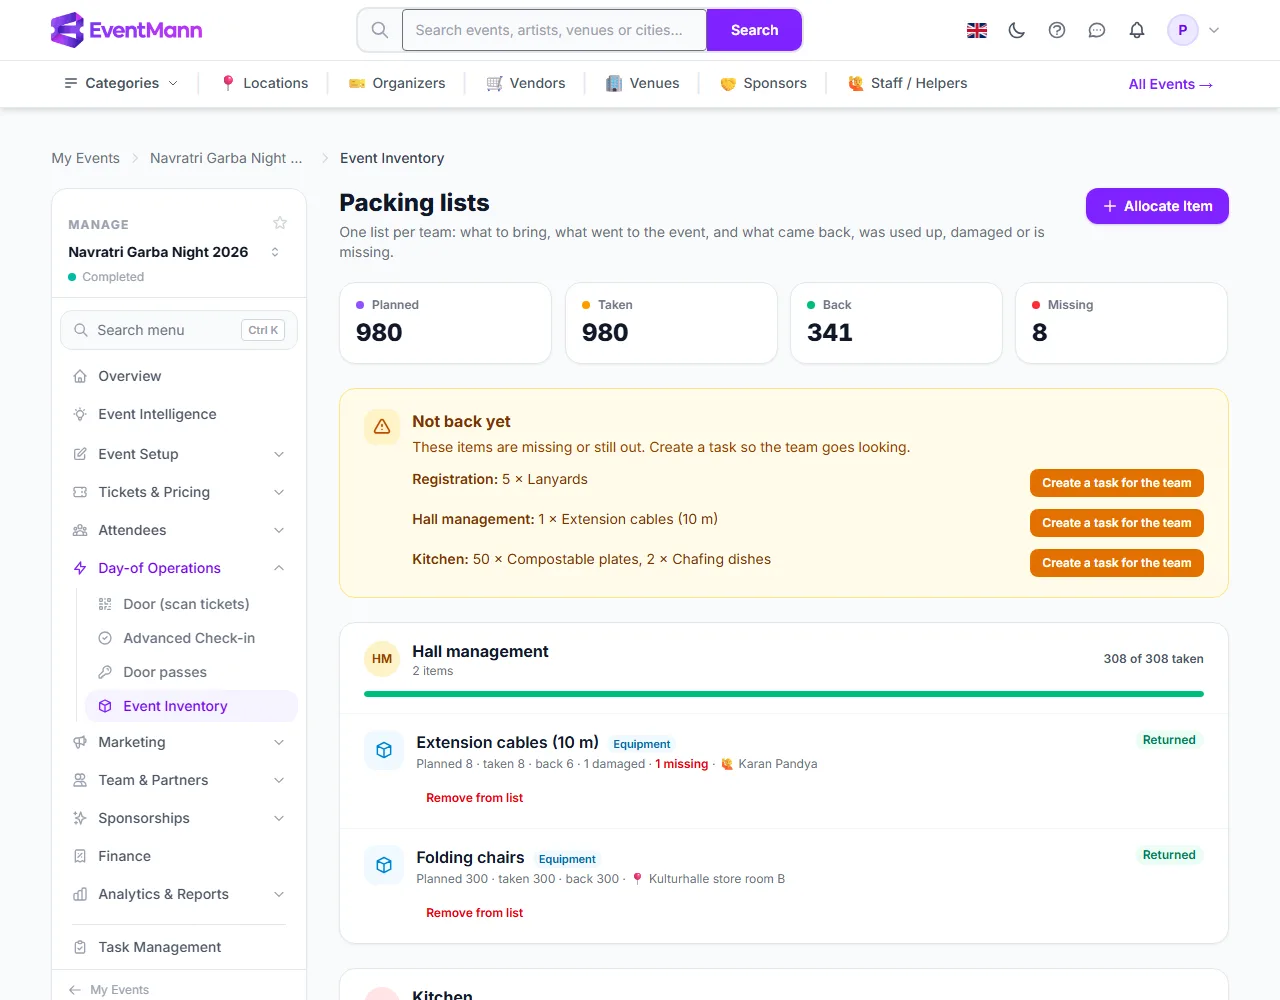
A packing list says which items each team takes to an event, how many, and what came back. Each event has its own lists, one per team plus the Shared pool. Open the event and choose Manage → Day-of Operations → Event Inventory. Event editors and volunteer managers see every team’s list; a team lead sees only the lists of the teams they lead.

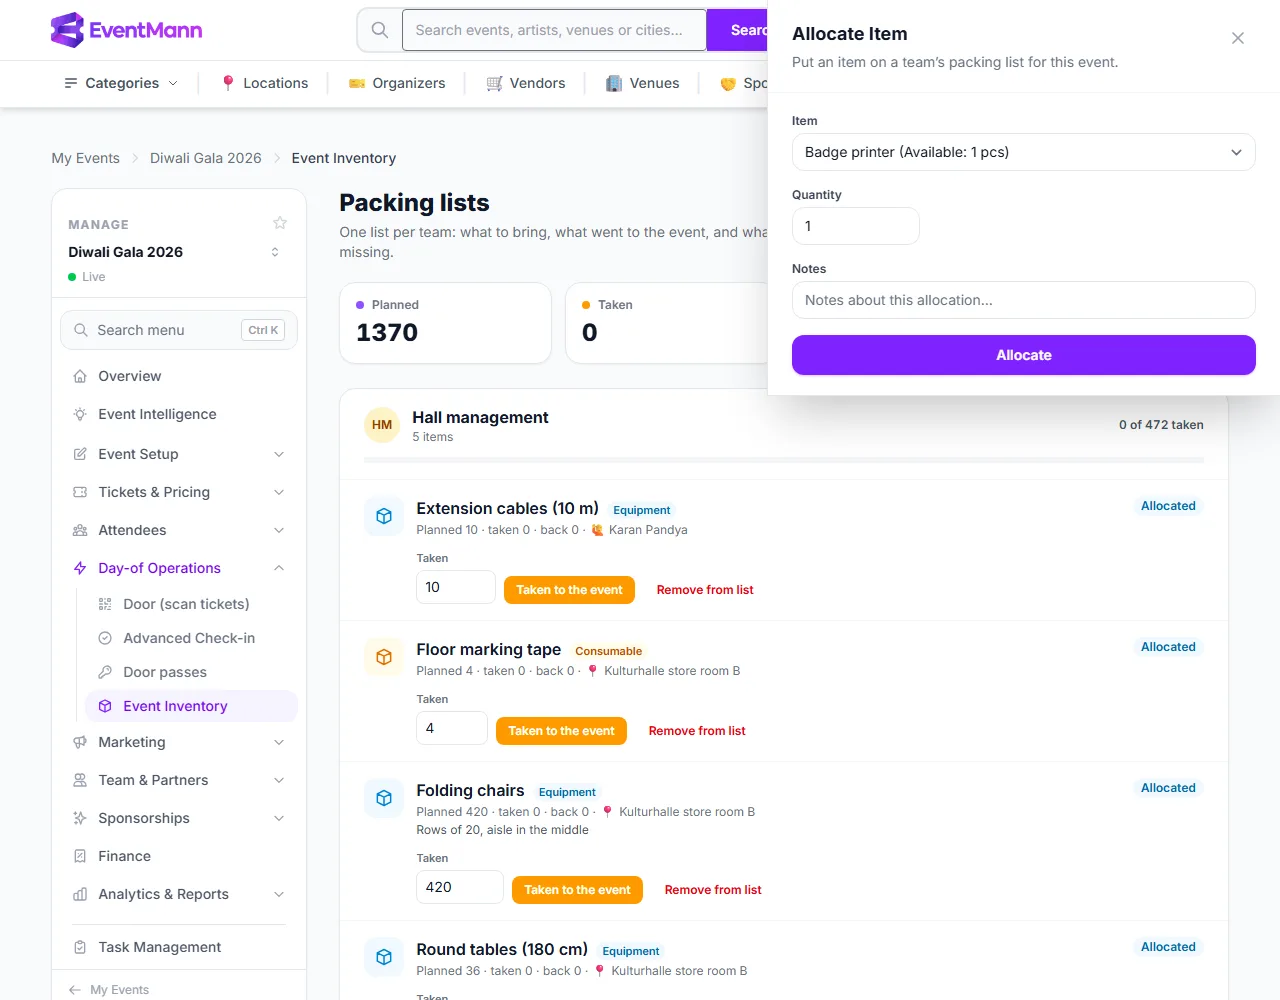
Plan what goes to the event

  1. Click Allocate Item at the top of the page and choose the Item ①. The list is grouped by team and shows how many are available. Items that are already on this event’s list, or that have none left, are not offered.
  2. Enter the Quantity ② and optionally a note, then click Allocate ③. You cannot plan more than what is available.
  3. The line appears in its team’s box ④ with the status Allocated: “Planned 420 · taken 0 · back 0”, and a button Taken to the event ⑤ for the day.
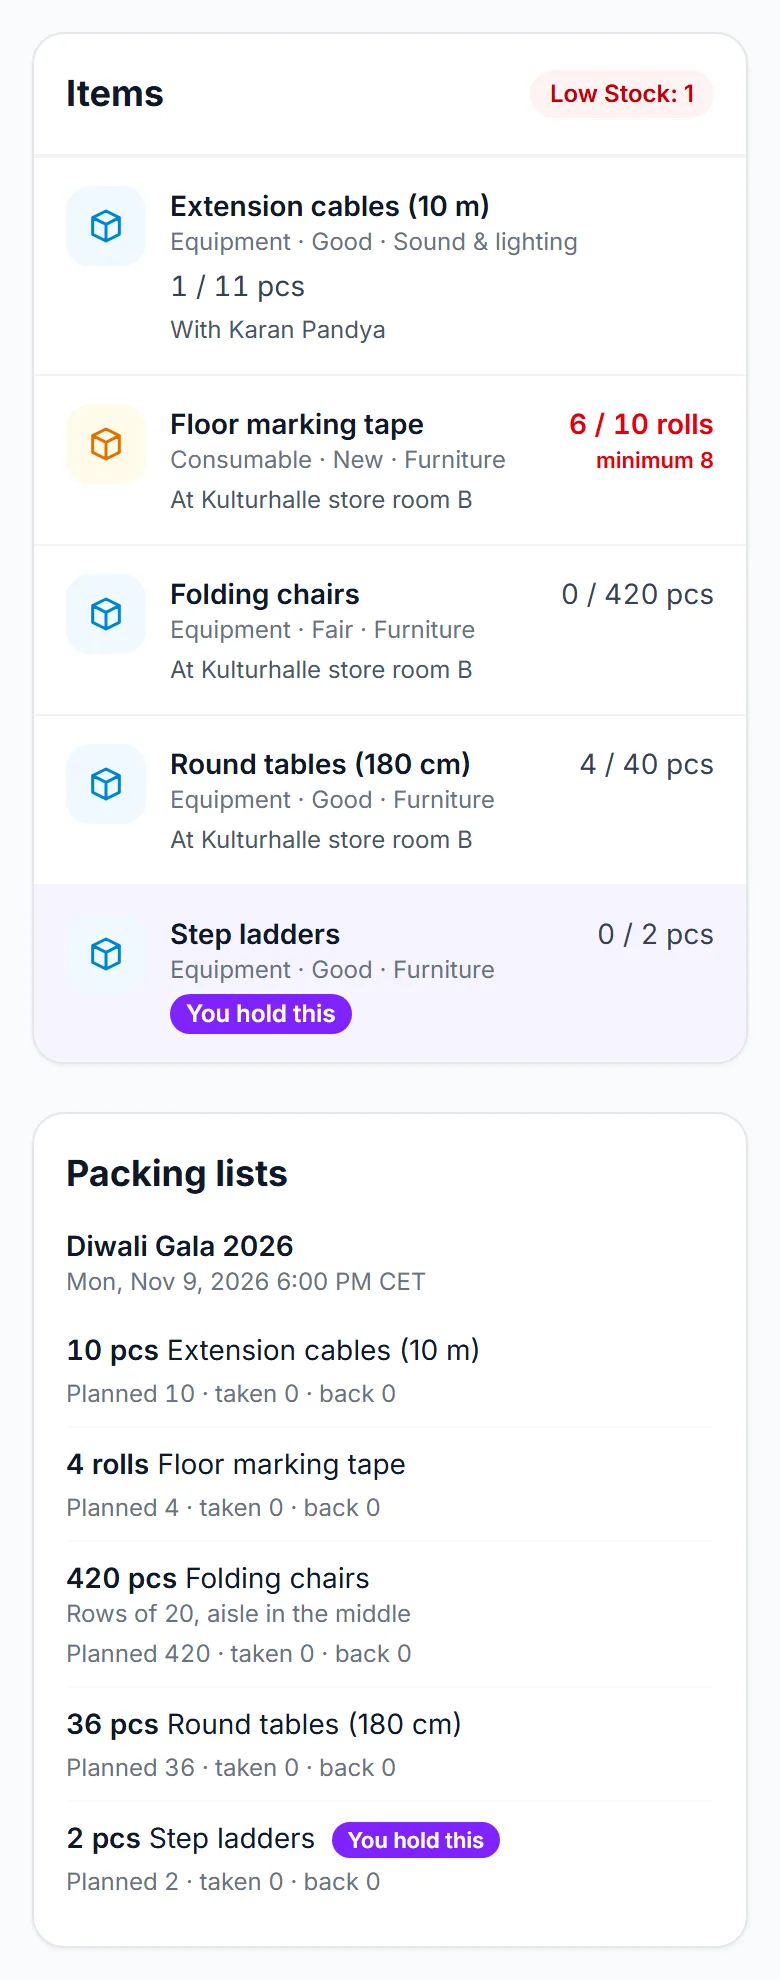
The packing lists of the Diwali Gala, with the Allocate Item panel open

On the day: taken, then back

  1. When the items leave the store, enter the number on the line and click Taken to the event. The status becomes Checked Out.
  2. When they come back, fill in the return form on the same line: Returned ①, Damaged (equipment) or Used up ② (consumables), Missing ③, and a note. Click Save ④. The numbers together cannot exceed what is still out.
  3. When everything is accounted for the line reads Returned.
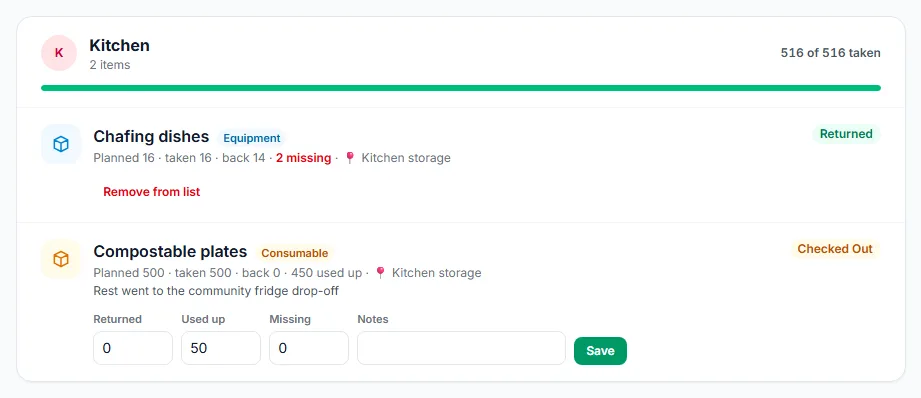
The return form of a consumable: returned, used up and missing

Quantities used up or missing leave the stock for good. A missing item that turns up later can be added again with Restock on its item page.

What is still missing

Once recorded, anything missing — and, after the event has ended, anything still out — is collected in a yellow box Not back yet ①. It lists the team and the items. Click Create a task for the team ② to add one task for that team, “Find missing items”, due in seven days and listing each line. It shows on the members’ My Volunteering page and with their lead.

The return forms ③ ④ sit on every line that still has items out. Lines in the Shared pool have no task button, because the Shared pool has no team to give the task to.

The Not back yet box of the Navratri Garba Night, with a button per team

Good to know

  • Allocating does not move anything: the available figure on the item drops so nobody else plans the same chairs, and recovers when they are returned.
  • You can remove a line (Remove from list) only while nothing has been taken, or once everything is back.
  • On an item’s page the panel Booked at events shows the same line with one-tap buttons Taken and All back — made for use after scanning a label. All back counts everything as returned, not used up.
  • Copying setup from an earlier event (Manage → Volunteers) can carry packing lists over when enough stock is available.

Troubleshooting

  • Only X units available — the rest is planned for another event or still out. Lower the quantity or return the other event’s items first.
  • The item is not in the list — it is already on this event’s list (change the line instead), inactive, or has nothing available.
  • A lead sees an empty page — they see only the teams they lead.

Related

1.18 QR labels

A QR label on an item lets someone open it with a phone: scan it and the item page opens, with its location, its place on the packing list and the buttons to mark it taken or back. Print the labels from Inventory → QR labels.

Print labels

  1. On the Inventory page, optionally filter by Team; the QR labels button keeps your filter, so you print one team’s labels at a time.
  2. Click QR labels. A plain sheet opens with one label per active item: the QR code, the name, the team (or Shared pool) and the SKU.
  3. Click Print ①. The button and the header do not print, only the labels ②.
  4. Cut along the dashed lines and stick each label on its item or box.
The label sheet for the Registration team

Each label shows the item name ③ under the code.

Scan a label

  1. Point a phone camera at the code and open the link. You need to be signed in.
  2. If you are the organizer, the item opens on your Inventory page. If you lead the team the item belongs to, it opens on your own team inventory page.
  3. If the item is on the packing list of a current or coming event, the top panel Booked at events shows the figures and two buttons: Taken marks all that are still to be taken, All back marks all that are out as returned. Use the full packing list for used-up, damaged or missing items.

The panel heading ① introduces the events; Taken ② records the whole planned quantity as taken, and Packing list ③ opens the event’s list. Events that ended more than seven days ago are no longer shown.

An item page with the Booked at events panel and its one-tap buttons

Good to know

  • The code contains a random token, never an id, and nothing about the item itself. Anyone who finds a label without permission is refused, and sees nothing about the item or who holds it.
  • Shared pool items open only for the organizer, because they have no team lead.
  • The label of an item you deactivate is no longer printed. Printing again never changes an existing code, so old labels keep working.

Troubleshooting

  • The scan says access denied — you are signed in with an account that neither owns the inventory nor leads that team.
  • The scan asks me to sign in — that is expected; sign in and open the label again.
  • The sheet is empty — the chosen team has no active items.

Related

Chapter 2

Volunteering

2.1 Volunteering at an event

Organizers on EventMann can ask you to help at their events for free, and some events let you offer your help from the event page. Everything about it — your invitations, your shifts, your tasks, your details and your thank-you ticket — is under My Volunteering in your account. This article is the map; each part has its own article.

My Volunteering on a phone: today’s event with a finished shift, a shift ready for check-in and your tasks

What you can do here

  • Answer an invitation — the organizer’s email asks “Can you help?”. Open it and choose Yes or No. A no needs nothing; a yes needs a free EventMann account on that address, which you create or sign in to right there. See Answering an invitation.
  • Offer your help — when an event page says “Would you like to help at this event?”, or a team leader sends you a join link. See Sign up or join a team.
  • See your shifts, check in and out, take or give back a shift — see My Volunteering: shifts and check-in.
  • Work through your tasks — status, checklist and comments. See Your volunteer tasks.
  • Run part of an event — if the organizer gave you a role, such as volunteer coordinator or box office, or you lead a team. See Volunteer roles and My work and Team lead guide.
  • Get your volunteer ticket — if the organizer offers one, My Volunteering shows a Get my ticket button that opens the event page. Only confirmed volunteers can buy it, signed in. It is free or reduced, usually one each.

Where to find it

  • Sign in and choose My Volunteering in the menu of your account. The entry appears once an organizer has your email address on a volunteer roster, or you have signed up.
  • The page needs a confirmed email address. Organizers invite you by email; invitations are linked to your account only when that address is confirmed.

Good to know

  • You can change your answer: say yes after an earlier no, or step back if you can no longer come. Stepping back frees your shifts and hands your tasks back to the team.
  • You get an email when you are put on a shift or given a task, and a reminder about a day before each shift. A task with a start time sends a reminder shortly before it.
  • Volunteering is unpaid. Your name, email, phone number and skills are shared with the organizer so they can organise the team.
  • Every invitation carries a link to stop that organizer’s invitations. Other organizers are not affected.
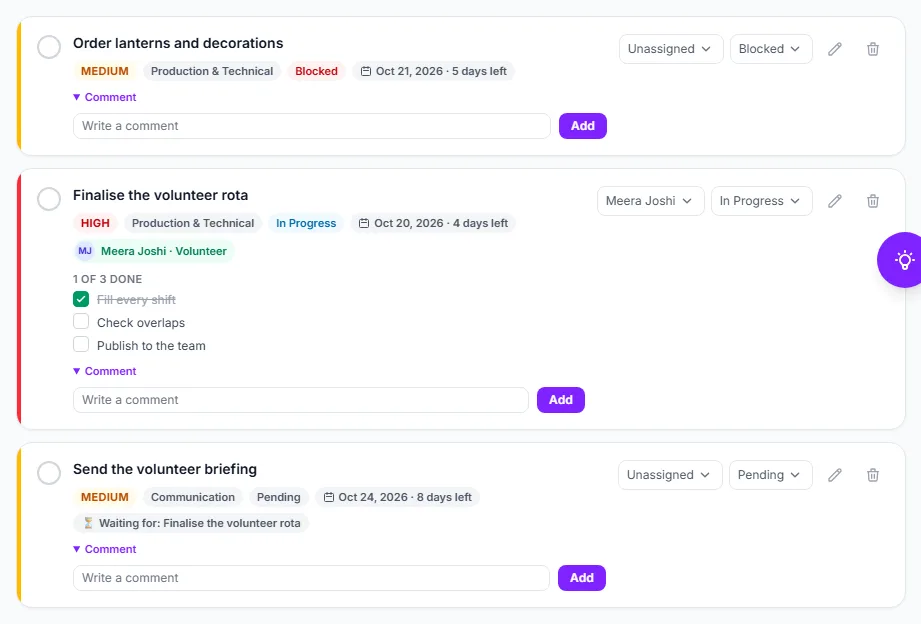
  • Times on shifts and tasks are in the event’s own time zone.

Troubleshooting

  • My Volunteering is empty — sign in with the address the invitation was sent to, and make sure it is confirmed.
  • I cannot check in — check-in opens an hour before the shift starts and closes when it ends. Ask your lead or the organizer to check you in from their rota if you arrive outside that time.
  • I cannot see the volunteer ticket — it appears once you are confirmed for that event and signed in. If the event has none, the organizer has not set one up.

Related

2.2 Answering an invitation

When an organizer invites you to help at an event, you get an email “Can you help at …?” with a button Answer the invitation. The button opens a page just for you. Saying no takes one click and needs nothing else. Saying yes means having a free EventMann account on the address the invitation was sent to: that account is where you see your shifts, your tasks and the team. The link is personal: do not forward it.

The invitation page on a phone, with the answer buttons, the account note and the opt-out link

Answer the invitation

  1. Open the link in the email. The page shows the event, when and where it is, and your current answer (Invited).
  2. Tap Yes, I’ll help ① to join the team, or No, not this time ② to decline. The line under the buttons ③ tells you what a yes needs from you.
  3. What happens after Yes depends on your account:
    • No account on that address yet — the page opens a short account form, described below.
    • You already have an account — you are taken to the sign-in page with your address filled in. After signing in you come straight back to the invitation, and your yes is recorded.
    • You are already signed in with that address — your yes is recorded at once.
    • Your address is not confirmed yet — you are asked to confirm it first. Your yes is recorded when you come back to the invitation.
    • You are signed in as somebody else — the page says so and offers Sign out and continue. A yes is never recorded for a different account.
  4. Once your yes is recorded you see a thank-you, the organizer is told, and you receive an email “You’re on the team”. The organizer then puts you on shifts and gives you tasks, and you are told by email each time.

Create your account and say yes

The account form that completes a yes, on a phone
  1. Under Create your free account to say yes check your name ①; the email address is fixed to the one the invitation was sent to.
  2. Choose a password ② and repeat it.
  3. Tap Create account and say yes ③.
  4. You are signed in and land on My Volunteering, already on the team. The account is confirmed straight away, because you reached it through the link sent to that address.

A link can never set a new password for an account that already exists: if somebody already has an account on that address, the page sends them to sign in instead.

Confirmed by the organizer

Sometimes the organizer or a team lead confirms you without waiting for your answer, because you already said yes on the phone. If you have no account yet, your “You’re on the team” email says so and its button Set up my account opens the same account form. The organizer can also send you that link again with Send sign-up link. Until you set up the account you are on the team, but you cannot see your shifts and tasks.

Change your mind

  • Open the same link again. After a yes the button reads I can’t make it after all; you are asked to confirm and your shifts are freed for somebody else.
  • After a no that you gave yourself, you can still choose Yes — with your account, as above. A sign-up the organizer declined cannot be reopened by you, and neither can an invitation that was removed.
  • Once the event is over or cancelled the page takes no more answers.

Stop receiving invitations

The line Don’t invite me to …’s events again ④ at the bottom stops volunteer invitations from this organizer, after you confirm. It needs no account. An invitation still open is declined. It does not affect other organizers. If you later sign up yourself on one of their event pages, that lifts the opt-out again.

Good to know

  • The organizer is told about your yes only once it is recorded — after you have created your account or signed in. Until then you are still Invited on their list.
  • The account is an ordinary, free EventMann account. You can use it to book tickets too.
  • The link works from any device. Saying no or opting out needs no sign-in.
  • My Volunteering lists the same invitation with the same two buttons while you have not answered.

Troubleshooting

  • “That answer is no longer possible here” — the organizer already changed your status, for example removed you. Contact them.
  • No Yes button — you already said yes, the sign-up was declined, the event is over, or you are signed in as somebody else (sign out first).
  • I signed in but my answer is still Invited — you signed in with a different address. Sign out and sign in with the address the invitation was sent to, then open the link again.
  • I forgot the password of my existing account — use Forgot your password? on the sign-in page, then open the invitation link again.
  • The link says not found — the event was deleted, or you opened a shortened or altered link. Use the button in the email.

Related

2.3 My Volunteering: shifts and check-in

My Volunteering is your page for everything you do as a volunteer. Sign in and choose My Volunteering in the menu of your account. There is one card per event, coming events first and finished events after them. Each card shows the event, the date, the organizer, your team and your status.

If you are a core member of one of the organizer’s standing teams, the page starts with a block Your teams: one card per team with all of the team’s tasks and a link to the team’s Inventory. See Your volunteer tasks and Your team’s inventory. If you lead a team, the block is called Teams you lead instead.

What a card tells you

  • Invited — the card asks you to answer with Yes, I’ll help or No, not this time.
  • Applied — your sign-up is with the organizer. You get an email when they decide.
  • Confirmed — you are on the team. The card shows the organizer’s thank-you, your shifts and tasks, open shifts you may take, your availability and your hours.

On an invited card, tap Yes, I’ll help ① or No, not this time ②.

A card for an event you were invited to, with the two answer buttons

Check in and out

Your hours count from check-in to check-out, so do both.

  1. Open the card of today’s event; its title ① names the event. Each shift lists its title, time and place.
  2. Under Shifts find the shift ② and tap Check in ③ when you arrive. The button is available from an hour before the shift starts until it ends.
  3. When you finish, tap Check out. The shift then shows the hours you worked.
  4. Your total for the event is at the bottom of the card.
Today’s event: a finished shift with its hours, and a shift ready for check-in

A shift never checked out counts nothing until you or the organizer closes it.

Give a shift back

When the organizer lets volunteers choose their own shifts, you see Give back ② next to each of your shifts.

Two shifts of the Diwali Gala, each with a Give back link
  1. Tap Give back beside the shift ① and confirm.
  2. Your team’s leads and the organizer are told that the shift has a gap again.

You can give back until the cutoff the organizer set, 24 hours before the shift by default, and never after you have checked in. After that, talk to your lead; the button is gone on purpose.

Take an open shift

If the organizer switched on Volunteers choose their own shifts, the card has the block Open shifts you can take.

  1. Read the block ① — it says how long before the start you can still give the shift back.
  2. Tap Take ② on the shift you want.
Open shifts you can take, with the places that are left

You see your own team’s shifts and shifts that belong to no team, only those that have not started and still have places. A shift is refused if it overlaps one of yours, is full by the time you tap, or belongs to another team.

Say when you can help

The field When can you help? on each card is free text for the organizer or your lead, for example “Saturday afternoons”. Type it and tap Save.

Enter your text ① and tap Save ②. It holds up to 500 characters.

The availability field on an event card

Good to know

  • Change my answer at the bottom of a card opens your invitation page, while the event still takes answers.
  • The volunteer ticket appears as a note with Get my ticket while the event has not ended.
  • You get a reminder email about a day before each shift, with the tasks for that shift.

Troubleshooting

  • No Check in button — it opens one hour before the shift. Outside that window ask your lead to check you in.
  • No Give back button — the event does not allow it, the cutoff has passed, or you have already checked in.
  • No open shifts — the organizer has not switched self-service on, or nothing is left for your team.
  • No Your teams block — you are not a core member of a team, or you lead it (then you see Teams you lead). Ask the organizer.

Related

2.4 Your volunteer tasks

Tasks are the jobs you are asked to do for an event, such as “Set out 420 chairs”. They are on your card in My Volunteering under Tasks. You can tick them off, move them along, work through a checklist and write comments, all from your phone.

Which tasks are yours

  • Tasks given to you by name, alone or together with others.
  • Tasks for a shift you work: everyone on that shift sees it.
  • Tasks for your team at that event, when your team is set.
  • Tasks left open to the whole volunteer team.
  • Tasks from the organizer’s own task board, when the organizer handed one to you by name.
  • If you are a core member of a team: every task of that team, under Your teams at the top of the page.

Work on a task

  1. Read the title, the start and due time and the description under it.
  2. When you are done, tap the square ① in front of the task. Tap it again to reopen the task.
  3. To show how far you are, change the status ②. Your own list offers Open, In progress, Blocked and Done; choose Blocked when you are waiting for something. The change saves by itself.
  4. If the task has a checklist, tap each line ③ as you finish it. The heading says “2 of 4 done”.
  5. Open comments ④ to read what the team wrote and add your own. The list opens by itself when somebody wrote in the last day.
The tasks of the Diwali Gala: a board task, a task with a checklist and comments, and two team tasks

Tasks from the organizer’s task board

A task the organizer gave you on their own task board looks the same, with its own statuses: Pending, In Progress, Blocked and Completed.

Tick it ①, or move it along with the status ②.

A task from the organizer’s board, with its status and checklist

Your team’s tasks (core members)

A core member of a standing team sees the whole team’s work, not only their own. At the top of My Volunteering, the block Your teams has one card per team you are core in, with the tasks of that team at the events you are confirmed for, grouped by event. Coming events come first; an event stays there for 30 days after it ends, so a follow-up such as finding missing items is still in reach.

  1. Find the card of your team ①. Inventory ② opens the team’s stock.
  2. Under each task you see who it is for ③: named people, everyone on a shift, or the whole team.
  3. Tick a task, change its status ④, work through its checklist or comment, exactly as on your own tasks. You can do this on any task of your team, for example to help a teammate who is stuck.
The Hall management card under Your teams: all of the team’s tasks at the Diwali Gala

Adding, deleting and handing tasks to people stays with the team lead and the organizer. A task that is also yours appears both here and on the event card; a change in one place shows in the other.

Good to know

  • A task shared by a shift or a team is a single task for many people. The organizer sees who ticked it.
  • You can only touch tasks that are yours, or tasks of a team you are a core member of. Everything you do on a task is checked against your confirmed place on that event.
  • If you step back from an event, tasks that were given to you by name go back to the team.
  • Tasks with a start time send you an email shortly before it begins; tasks for a shift appear in the shift reminder.

Troubleshooting

  • “No tasks yet” — nothing has been given to you or your team. Ask your lead.
  • A comment does not save — it must not be empty, and is at most 2,000 characters.
  • I ticked a task by mistake — tap the square again.

Related

2.5 Sign up or join a team

There are two ways to offer your help yourself instead of waiting for an invitation: the sign-up on an event page, and a join link that a team leader shares in their group chat. Both need an account with a confirmed email address.

Sign up from the event page

If the organizer switched on volunteer sign-up for a live event, its page shows “Would you like to help at this event?” with the link Volunteer with us. The link is also shown at the volunteer-only ticket.

The volunteer sign-up note on an event page
  1. Sign in and click Volunteer with us ①.
  2. Read the organizer’s text above the form: what helping involves, when to arrive, who to ask.
  3. Check the form. Your email address is fixed. Optionally add a Phone number ①, your Skills ② separated by semicolons or commas, and a message under Anything the organizer should know? ③.
  4. Tap Volunteer with us ④.
The sign-up form with the organizer’s introduction

Your application goes to the organizer, who accepts or declines. You get an email either way, and the application shows as Applied under My Volunteering until then. Nobody is accepted automatically. If you had already been invited, signing up counts as your yes.

Join a team with a link

A team lead can post a join link for their team at an event. It works even when public sign-up on the event page is off.

  1. Open the link and sign in if asked.
  2. The page names the team you are joining ①.
  3. Fill in the form as above and tap Volunteer with us ②.
The join page for the Registration team, with the team badge

You land in that team as an applicant, and the team lead accepts you. If you were already on the event without a team, the link puts you in that team.

Good to know

  • Your phone number is added to the organizer’s roster only if it had none; skills are noted only when you are new to that organizer’s roster.
  • Signing up also lifts an earlier “do not invite me” from that organizer.
  • If you are already on the event, the page says so and shows your status.

Troubleshooting

  • The page is not found — sign-up is off, the event is not live, it has ended, or the join link was switched off by the lead.
  • I am sent to sign in — the pages need an account with a confirmed email address.
  • I never heard back — ask the organizer or the team lead; applications wait for their decision.

Related

2.6 Volunteer roles and My work

Some volunteers do more than help: an organizer can give you a role for one event, such as Volunteer coordinator, Box office, Door / check-in, Venue manager, Marketing or Finance, or one of their own custom roles. The role opens the organizer’s screens for that event, and only the ones the role needs.

How you notice a role

  1. On the event’s card in My Volunteering you see a lilac note: You help run this event as: Volunteer coordinator ①, with the button Open My work ②.
  2. In the menu of your avatar, the row Event work lists your roles and links to My work. On a phone it is in the menu as My work.
The note on an event card that tells a coordinator which role they hold

My work

My work lists every event where you hold a role, with the role as a badge and the organizer and date. Each row has one button for the thing that role is for: Scan for the door, Orders, Volunteers, Task Management, Analytics or Overview.

  1. Find the event and read the role badge ①.
  2. Click the button ② to open that event’s screens.
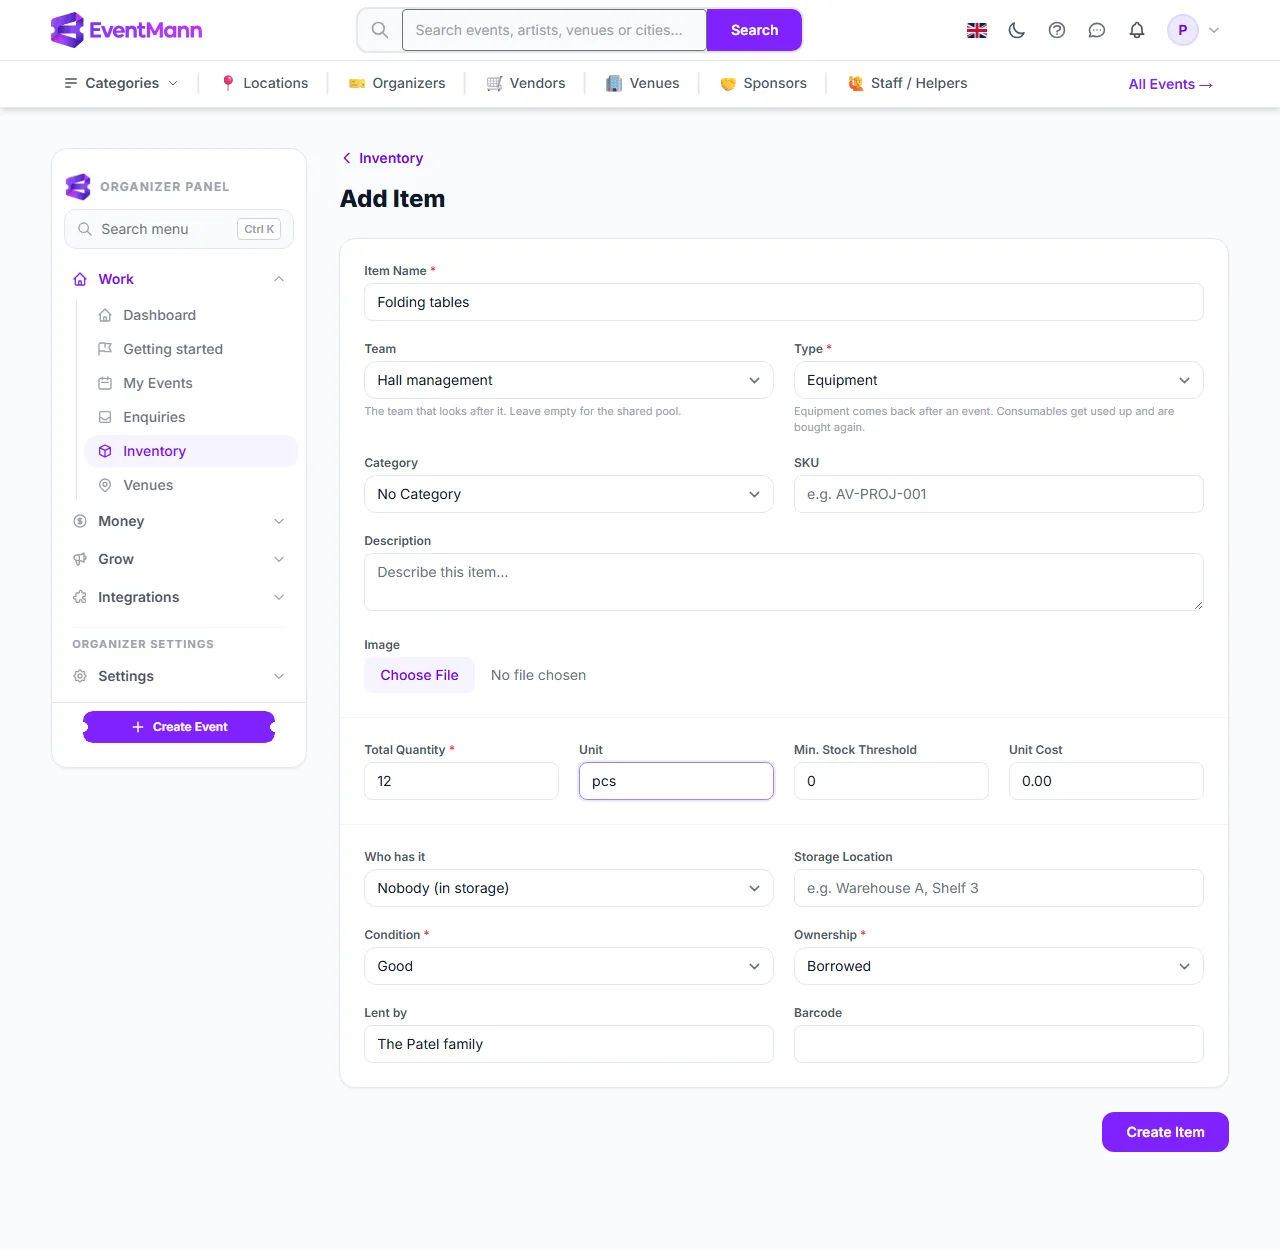
My work for a volunteer coordinator, with the role badge and one button

What a coordinator sees

A volunteer coordinator opens the event’s Volunteers pages with every tab — People, Shifts, Tasks, Run sheet, Live, Messages, Settings and Roster — and the task board. They invite and confirm people, plan shifts and tasks, send messages and, for the roles they hold themselves, hand roles to other volunteers. They also see the event overview and its packing lists. They do not see orders, money or settings that their role does not carry.
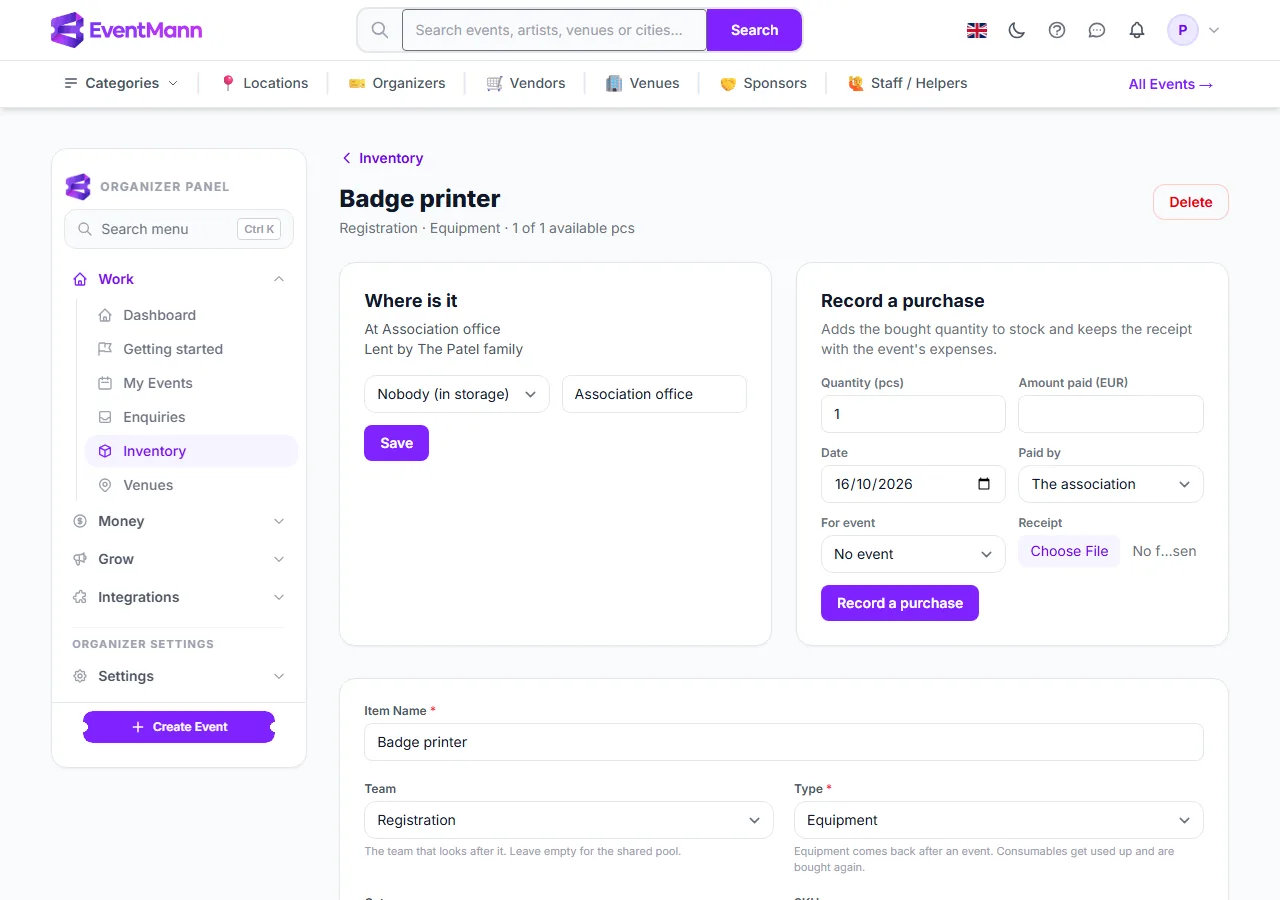
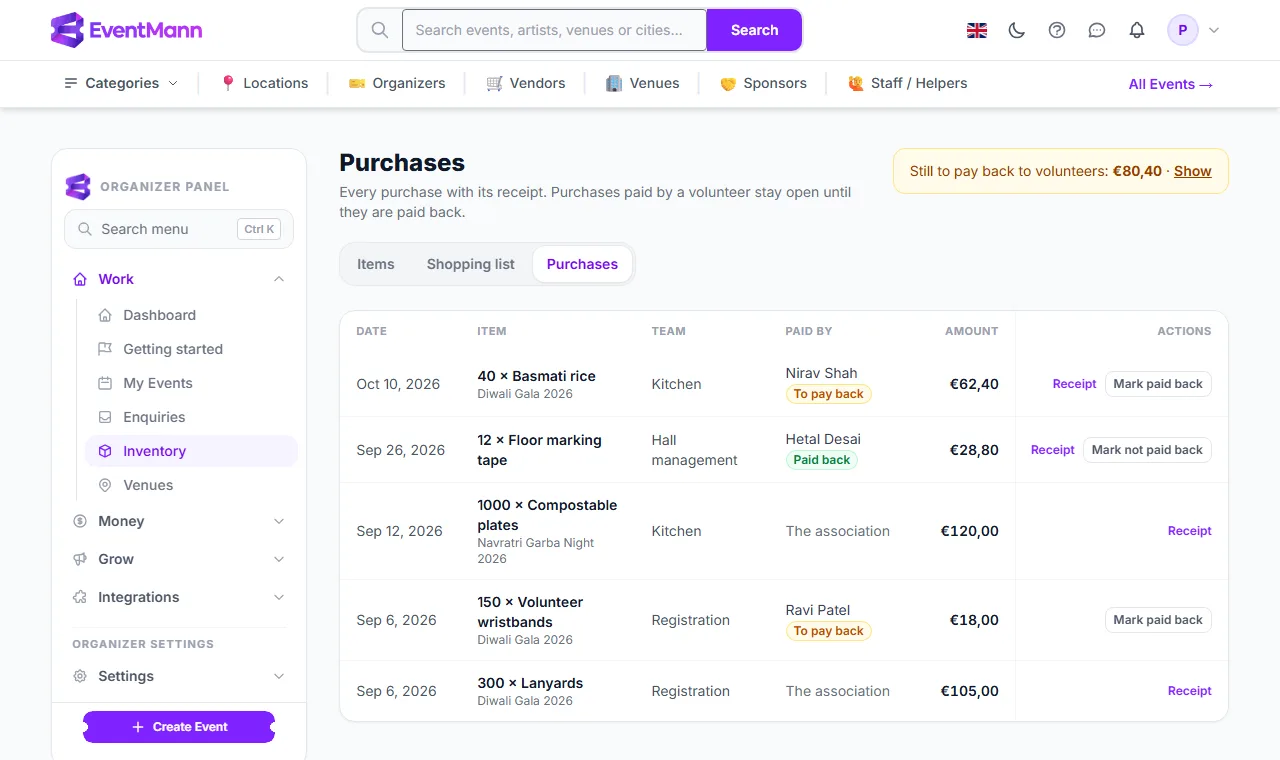
Only this event is open to you ①; the other events of the organizer stay closed.

The Volunteers page as a coordinator sees it: only the event they coordinate

Good to know

  • A role is for one event. It ends 30 days after the event, so finance work can be finished after the doors close.
  • It counts only while you are confirmed for the event and signed in with the confirmed address the organizer has on file. If you step back from the event, the roles end.
  • Nobody can hand out a role they do not fully hold themselves, so a coordinator can make another coordinator but cannot give out Finance.
  • Leads of standing teams also get a role by being a lead, and may get an extra one the organizer attached to the team (for example Box office for the Registration leads). See Team lead guide.
  • An email tells you when a role is given. If you have no account yet for that address, it points you to set one up.

Troubleshooting

  • No My work row — you hold no live role: the event ended more than 30 days ago, you are not confirmed, or you are signed in with another address.
  • A page says access denied — your role does not include it. Ask the organizer to change your role.

Related

2.7 Team lead guide

A team lead runs one standing team of an association, such as Registration or Hall management, at every event. As a lead you recruit people into your team, confirm them, plan the team’s shifts and tasks, write to your people, and look after the team’s stock. You do this from your account, not from an organizer panel of your own. This guide is the overview; each part links to its details.

What you can do here

  • Recruit from the organizer’s roster, with a join link or by adding somebody new.
  • Confirm applicants and decide whether somebody you invite is confirmed at once.
  • Plan shifts and tasks for your team and put your people on them.
  • Follow the day on the run sheet and the live page, and message your team.
  • Look after your team’s inventory: items, shopping list, purchases and receipts. See Your team’s inventory.

Open your events

  1. Open the menu of your avatar. Under Event work, choose your role, or open My work.
  2. Click the button on the event: Volunteers, or another button if your team also carries a role such as Box office.
  3. In the sidebar choose Volunteers. A lead sees the tabs People, Shifts, Tasks, Run sheet, Live, Messages and Roster. There is no Settings tab: event-wide settings stay with the organizer.

Recruit people

On People, the block Teams at this event shows each team you lead: how many are confirmed against what the team needs, and how many have not answered yet.

  1. Set how many people your team needs in Needs and tap Save.
  2. Under Join link ② create a link and use Copy or Share on WhatsApp. People who open it sign in and apply to your team; you accept them. Switch off stops the link; a new link replaces the old one. See Sign up or join a team.
  3. Click Invite from your roster ③ at the top of the page to ask people the organizer already knows.
The People page of a team lead: their team, its target and its join link

Invite from the roster: invite or confirm now

  1. Choose people in the list (search, Select all shown), or — in the first part ① — everybody who helped at one of the organizer’s earlier events.
  2. The Team ② lists only your teams. You must choose one.
  3. Leave Already confirmed (I asked them myself) ③ off to send the normal invitation “Can you help?”; the person answers Yes or No, and a yes asks them to create a free account or sign in before it counts. Tick it when somebody already agreed with you: they are confirmed straight away and receive “You’re on the team” instead of an invitation. If they have no account yet, that email carries a Set up my account button, and on People they show No account yet with a Send sign-up link button until they do.
  4. Click Invite them or Invite selected. A result line says how many were invited and how many skipped (already on the event or asked not to be invited).
Inviting from the roster into the Registration team, with the option to confirm at once

The same choice is on Add somebody new, which adds a person to the roster and invites them in one step. Invitations go out at the organizer’s hourly sending pace, so a large group is mailed over time.

Shifts and tasks

On Shifts you see every shift, but you add, change or fill only those of your teams. A new shift or task must be given to one of your teams.

  1. Open Add a shift ① and fill in what, when, where and how many people you need.
  2. Add confirmed members of your team to it. A person already on another shift at that time is skipped.
  3. On a shift of your team you can check people in or out, or Take off ② someone.
The Shifts page: add a shift, and take people off the shifts of your team

On Tasks, add a task with Add task ①, for one person, a shift or the whole team, with a start time, a due time and a checklist. Tasks ② show their status, checklist and comments, which your people write from My Volunteering.

The Tasks page: add a task for your team, and see its checklist and comments

Read-only and editable

  • You see everything, you change your team. You see the whole People list and the roster — you recruit from it — but you confirm, decline, resend, remove, set a team and message only people in your own teams. You may claim people who have no team yet into your team with the bulk action Set team.
  • Messages can go to your own teams and their shifts only.
  • Roles you can give are limited to those you hold yourself.
  • Copying the setup of an earlier event, and the event settings (sign-up, thank-you text, self-service shifts), stay with the organizer or a coordinator.
  • On the organizer’s own pages you cannot change categories, move an item to another team or mark purchases as paid back.

Good to know

  • Leads are on the core team of their group: at each event a lead is added as confirmed automatically, with the invitations of the other core members sent once the event is published.
  • When one of your people gives a shift back, you and the organizer receive a notice.
  • If the organizer attached a role to your team (the lead role), you hold it at every event you work, for example Box office.

Troubleshooting

  • I see no join link — create one under Teams at this event; there is none until you do.
  • A person is greyed out or skipped — already on this event in some status, or asked the organizer not to invite them.
  • An action is refused — the person or shift belongs to another team.

Related

2.8 Your team's inventory

If you lead a team, you look after that team’s stock between events: what you have, where it is, what to buy and what was bought. It is on My Volunteering in the block Teams you lead, which has links for Inventory, Shopping list and Purchases. If you are a core member of a team, you see the same stock read-only, from the block Your teams; see Core members: see the team’s stock below.

What you can do here

  1. Find the block ① and the team you lead.
  2. Click Inventory ② for the team’s items, Shopping list ③ for what has fallen to its minimum, or Purchases ④ for the team’s purchases with their receipts.
The Teams you lead block on My Volunteering
  • The page title ① is Inventory: Registration. You see only your team’s items, never another team’s or the Shared pool.
  • Add Item ④ creates an item for your team. The team cannot be changed; it is yours.
  • Open an item with Edit to change it, say who holds it or where it is, restock it, log maintenance, record a purchase with its receipt, or delete it. The pages are the same as the organizer’s, see Items and Purchases.
  • The Shopping list ② has the text to copy into your team’s WhatsApp group.
  • QR labels prints labels for your team’s items.
The Registration team’s inventory in a lead’s account

Scan a label

When your phone opens a label of one of your team’s items, you land on the item page. If the item is on a packing list for a current or coming event, the top panel Booked at events shows how many are planned, taken and back.

The panel ① has Taken ② to mark everything planned as taken, and All back when it is out. Below it, Where is it tells who holds the item.

A scanned label opened on a phone: the item and its quick buttons

Core members: see the team’s stock

A core member who does not lead the team gets a read-only page of the team’s items, so you know what exists and who has it before you go and fetch something.

  1. On My Volunteering, under Your teams, click Inventory on your team’s card. The page is called Inventory: Hall management.
  2. Each item shows its type, condition and category, how many are available of the total, and who holds it (With …) or where it is stored (At …). Items you hold yourself are highlighted with You hold this ①.
  3. An item at or below its minimum shows its figures in red with the minimum ②; the heading counts how many items are low.
  4. Below the items, Packing lists ③ shows what the team takes to each coming event you are confirmed for: the planned quantity, how many were taken and how many came back.
The Hall management stock as a core member sees it, with the item they hold and the Gala packing list

Nothing on this page can be changed. Editing an item, saying who holds it, restocking and recording a purchase stay with the team lead and the organizer, so tell your lead when you take or return something.

Packing lists for your events

For an event you work, the packing list of your team is the Event Inventory page in the event’s Manage sidebar. You see and change only the lists of the teams you lead. See Event packing lists. After an event, missing items become a task for your team on My Volunteering.

Good to know

  • The organizer reimburses volunteers who paid out of their own pocket. You see that a purchase is To pay back but you cannot mark it paid back.
  • Receipts are private to the organizer and to you.
  • Categories are the organizer’s; you can pick one for an item but not add or remove them.
  • Items of other teams are not visible, and borrowing between teams happens by asking each other, outside the platform.

Troubleshooting

  • No Teams you lead block — the organizer has not marked you as lead of a team, or your roster entry is not linked to your confirmed email address.
  • No Inventory link under Your teams — you are not a core member of that team. Ordinary members do not see the team’s stock; ask your lead or the organizer.
  • The packing list is empty — nothing is planned for your team at a coming event you are confirmed for yet.
  • A scan is refused — the item belongs to another team or the Shared pool.

Related