← Printable guides
EventMann

Vendor guide

For vendors and suppliers: your profile, your services and working with organizers.

Edition of October 18, 2026

The latest version of every chapter is in the Help Centre: https://eventmann.com/help

Chapter 1

Your vendor profile

1.1 Getting Started as a Vendor

The vendor portal is where caterers, sound and light companies, decorators, photographers and other suppliers present their services to organizers, answer event invitations, sign contracts, do the tasks they are given and send invoices. Everything lives under one sidebar headed Vendor; the first page is the Vendor Portal dashboard.

How it works in one minute

  1. You describe your company in Edit Profile and list what you offer in My Services.
  2. An administrator approves your profile. Only approved vendors appear in the public marketplace and in the list organizers pick from.
  3. An organizer invites you to an event — an assignment. You accept or decline on your dashboard.
  4. Around an accepted assignment you receive contracts to sign and tasks to complete, and you send an invoice when the work is done.
  5. The organizer rates you afterwards; the rating shows on your profile and under Performance.

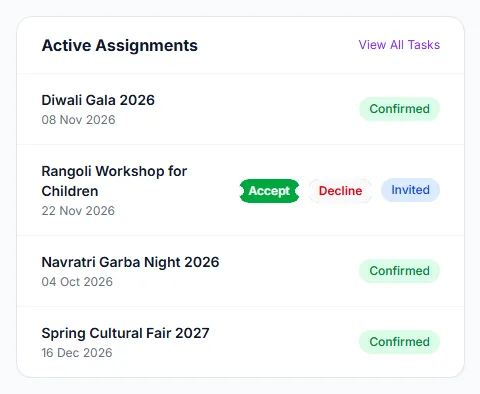
On the dashboard, Active Assignments ① counts your invitations and confirmed jobs; an invitation has Accept ② and Decline buttons; Pending Contracts ③ and Recent Tasks ④ are on the right.
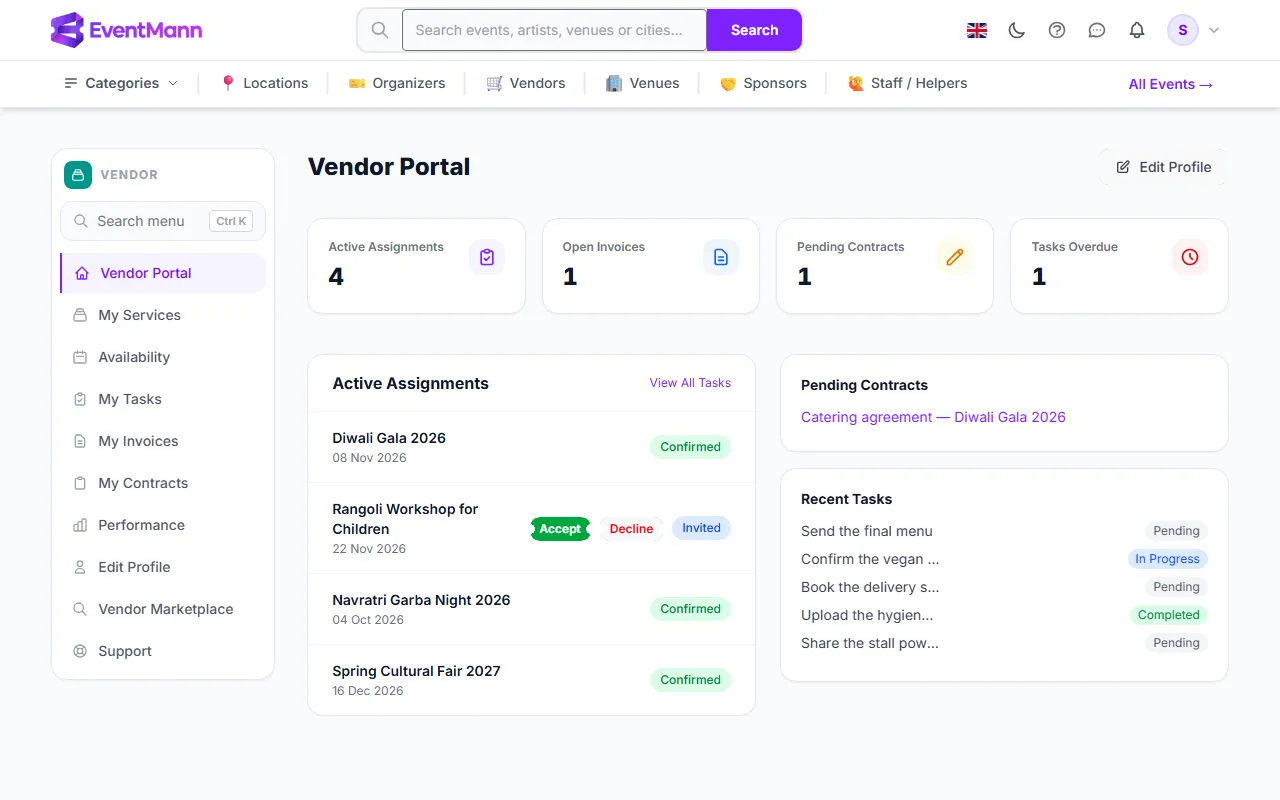
The vendor dashboard: counters, your assignments, pending contracts and recent tasks

Your first steps

  1. Open Edit Profile and complete it. See Vendor Profile.
  2. Open My Services and add every service you sell, with a price or “Quote”. See Service Catalog.
  3. Wait for approval. A line on the dashboard reads Your account is pending admin approval. Complete your profile while you wait. until an administrator has approved you. You are not sent a message when this happens — the line disappears.
  4. Watch for invitations. When an organizer assigns you, you receive a bell notification and an email; the assignment is on the dashboard. See Responding to Event Requests.

The sidebar

RowUse it to
Vendor PortalSee what needs you today.
My ServicesKeep your catalogue.
AvailabilityBlock the days you cannot work. See Managing Your Availability.
My TasksOpen all your tasks.
My InvoicesSend and follow invoices.
My ContractsRead and sign contracts.
PerformanceYour figures and rating.
Edit ProfileCompany details.
Vendor MarketplaceThe public vendor listing, as organizers see it.
SupportHelp from the EventMann team.

Good to know

  • EventMann does not pay vendors. You invoice the organizer; the organizer marks the invoice approved and paid. The payment itself happens between you and the organizer. See Invoices.
  • Vendors are not hired by bidding. There is no pitch stage: organizers invite you directly, and sending a quote request is something an organizer does from your public profile.
  • Contracts, tasks and invoice decisions do not trigger emails to you today. Check the dashboard counters.
Related

1.2 Vendor Dashboard

The Vendor Portal (sidebar → Vendor Portal) is your dashboard: four counters on top and three panels underneath. It is where you answer new invitations and see what is waiting for you.

The four counters

CounterWhat it counts
Active Assignments ①Assignments that are Invited or Confirmed. Declined and cancelled ones are not counted.
Open InvoicesInvoices you sent that are Submitted or Approved — not yet paid. Click it to open My Invoices.
Pending ContractsContracts waiting for your signature. Click to open My Contracts.
Tasks OverdueTasks past their due date that are not completed. Click to open My Tasks.

The panels

  • Active Assignments — your six most recent assignments, with event title, date and a status badge (Invited, Confirmed, Declined or Cancelled). An Invited one shows Accept ② and Decline buttons. View All Tasks opens your task list.
  • Pending Contracts ③ — up to three contracts to sign, each a link to the contract.
  • Recent Tasks ④ — your five newest tasks with their status.
The dashboard: four counters on top, assignments on the left, contracts and tasks on the right

What you can do here

  1. Answer an invitation with Accept or Decline — see Responding to Event Requests.
  2. Open a pending contract and sign it — see Signing Contracts.
  3. Jump to your tasks and invoices through the counters.
  4. Use Edit Profile at the top right to change your company details.

Good to know

  • The dashboard shows the event and its date, not the agreed fee or the organizer’s notes. Those are in the invitation email, and the fee also appears when you create an invoice.
  • If your profile is waiting for approval, a yellow line says so at the top.
  • The Tasks Overdue counter and the sidebar row My Tasks open the same page, with all your tasks.

Troubleshooting

  • An assignment I expected is missing. The organizer has not assigned you yet, or the panel is showing only the six most recent — open My Tasks or My Invoices for the rest.
  • The counter and the list disagree. The counter counts Invited and Confirmed only; the list also shows declined and cancelled ones.

Related

1.3 Service Catalog

My Services (sidebar → My Services) is the catalogue of what you sell. Organizers see your active services on your public profile and can attach one to an event when they invite you. Keep it short, specific and priced.

What you can do here

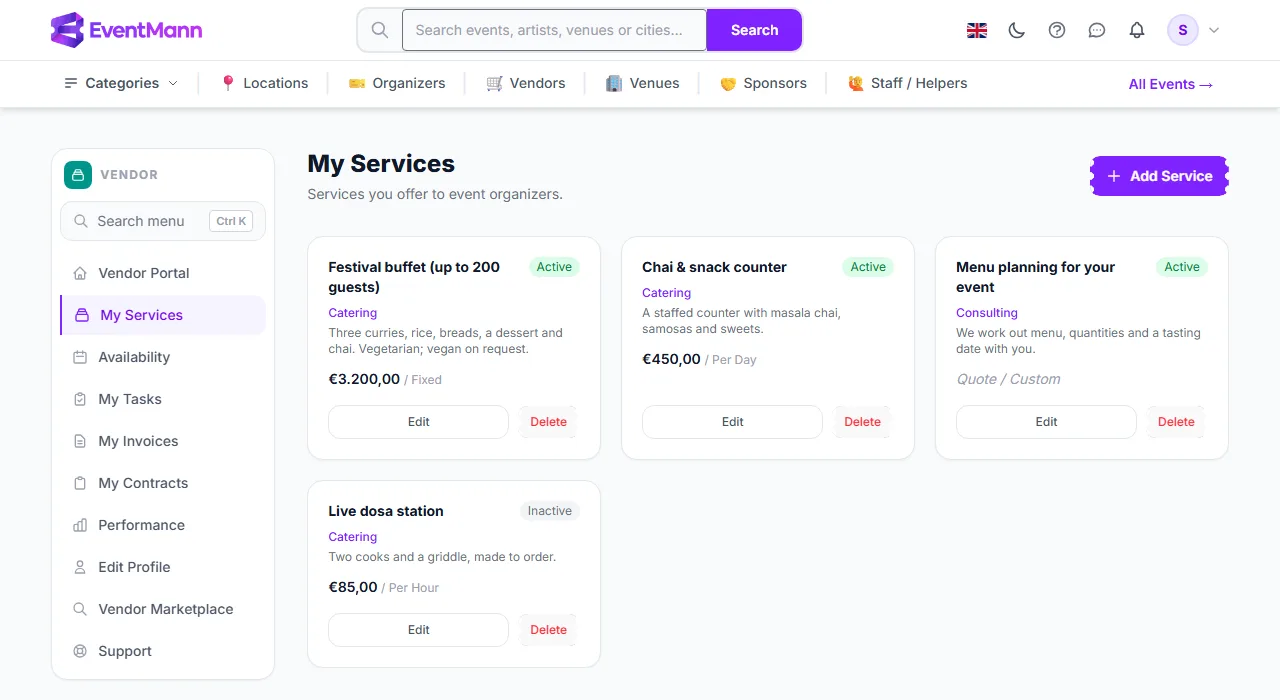
  • Add a service with Add Service ①.
  • Read the list ②: name, an Active or Inactive label ③, the category line, the description and the price with its unit (for example “€450,00 / Per Day”) or Quote.
  • Edit ④ or Delete a service (you are asked to confirm the delete).
My Services with active and inactive services and their prices

Add or change a service

  1. Click Add Service, or Edit on an existing one.
  2. Fill in the form (see below) and press Save Service.

Settings explained

FieldWhat it does
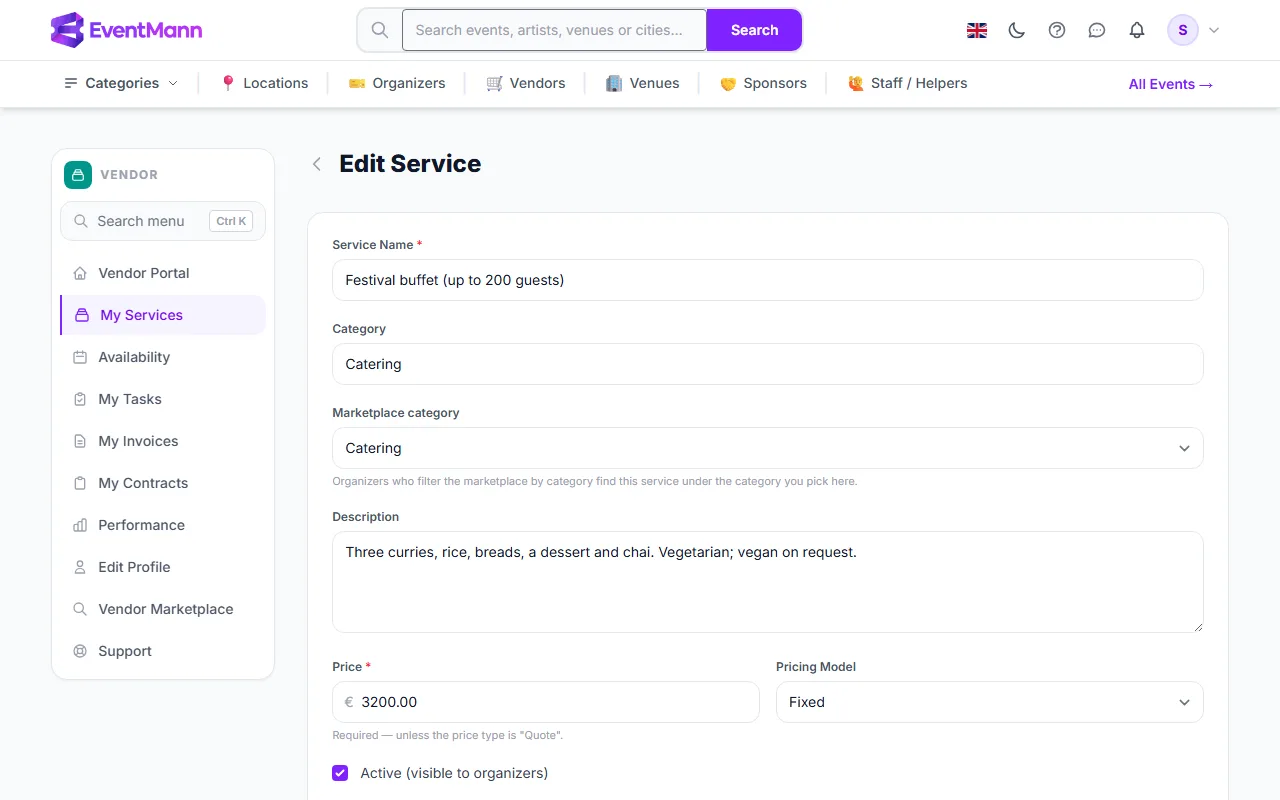
Service Name ①Required, up to 255 characters. Must be different from your other services (case does not matter).
Category ②Free text up to 100 characters, such as “Catering” or “AV Equipment”. It is a label on the listing. Below it, Marketplace category picks one of the platform’s categories: organizers who filter the marketplace by category find the service there.
DescriptionWhat is included. Plain text.
Price ③A number up to two decimals. Required, unless the pricing model is Quote. Prices are shown in the platform’s default currency (euro); there is no currency selector.
Pricing Model ④Fixed, Per Hour, Per Day or Quote / Custom (no price shown; organizers ask you).
Active (visible to organizers) ⑤Untick to hide the service without deleting it.

Press Save Service ⑥ to store the service.

The service form: name, category, description, price, pricing model and the Active switch

Good to know

  • Only active services appear on your public profile and in the organizers’ vendor assignment list. Turning one off does not change assignments you already have.
  • The price on a service is a list price. The agreed fee for an event is set by the organizer on the assignment and is what your invoice may not exceed. See How to Submit an Invoice.
  • The marketplace’s price filter looks at your active services’ prices, so a service with a price is easier to find than a quote-only one.
  • Services are listed newest first. There is no manual sort order.

Troubleshooting

  • “You already have a service with this name.” Rename one of them.
  • “Required — unless the price type is Quote.” Enter a price or change the pricing model to Quote / Custom.
  • A service is not visible to organizers. Check it is Active and that your profile has been approved.

Related

1.4 Vendor Profile

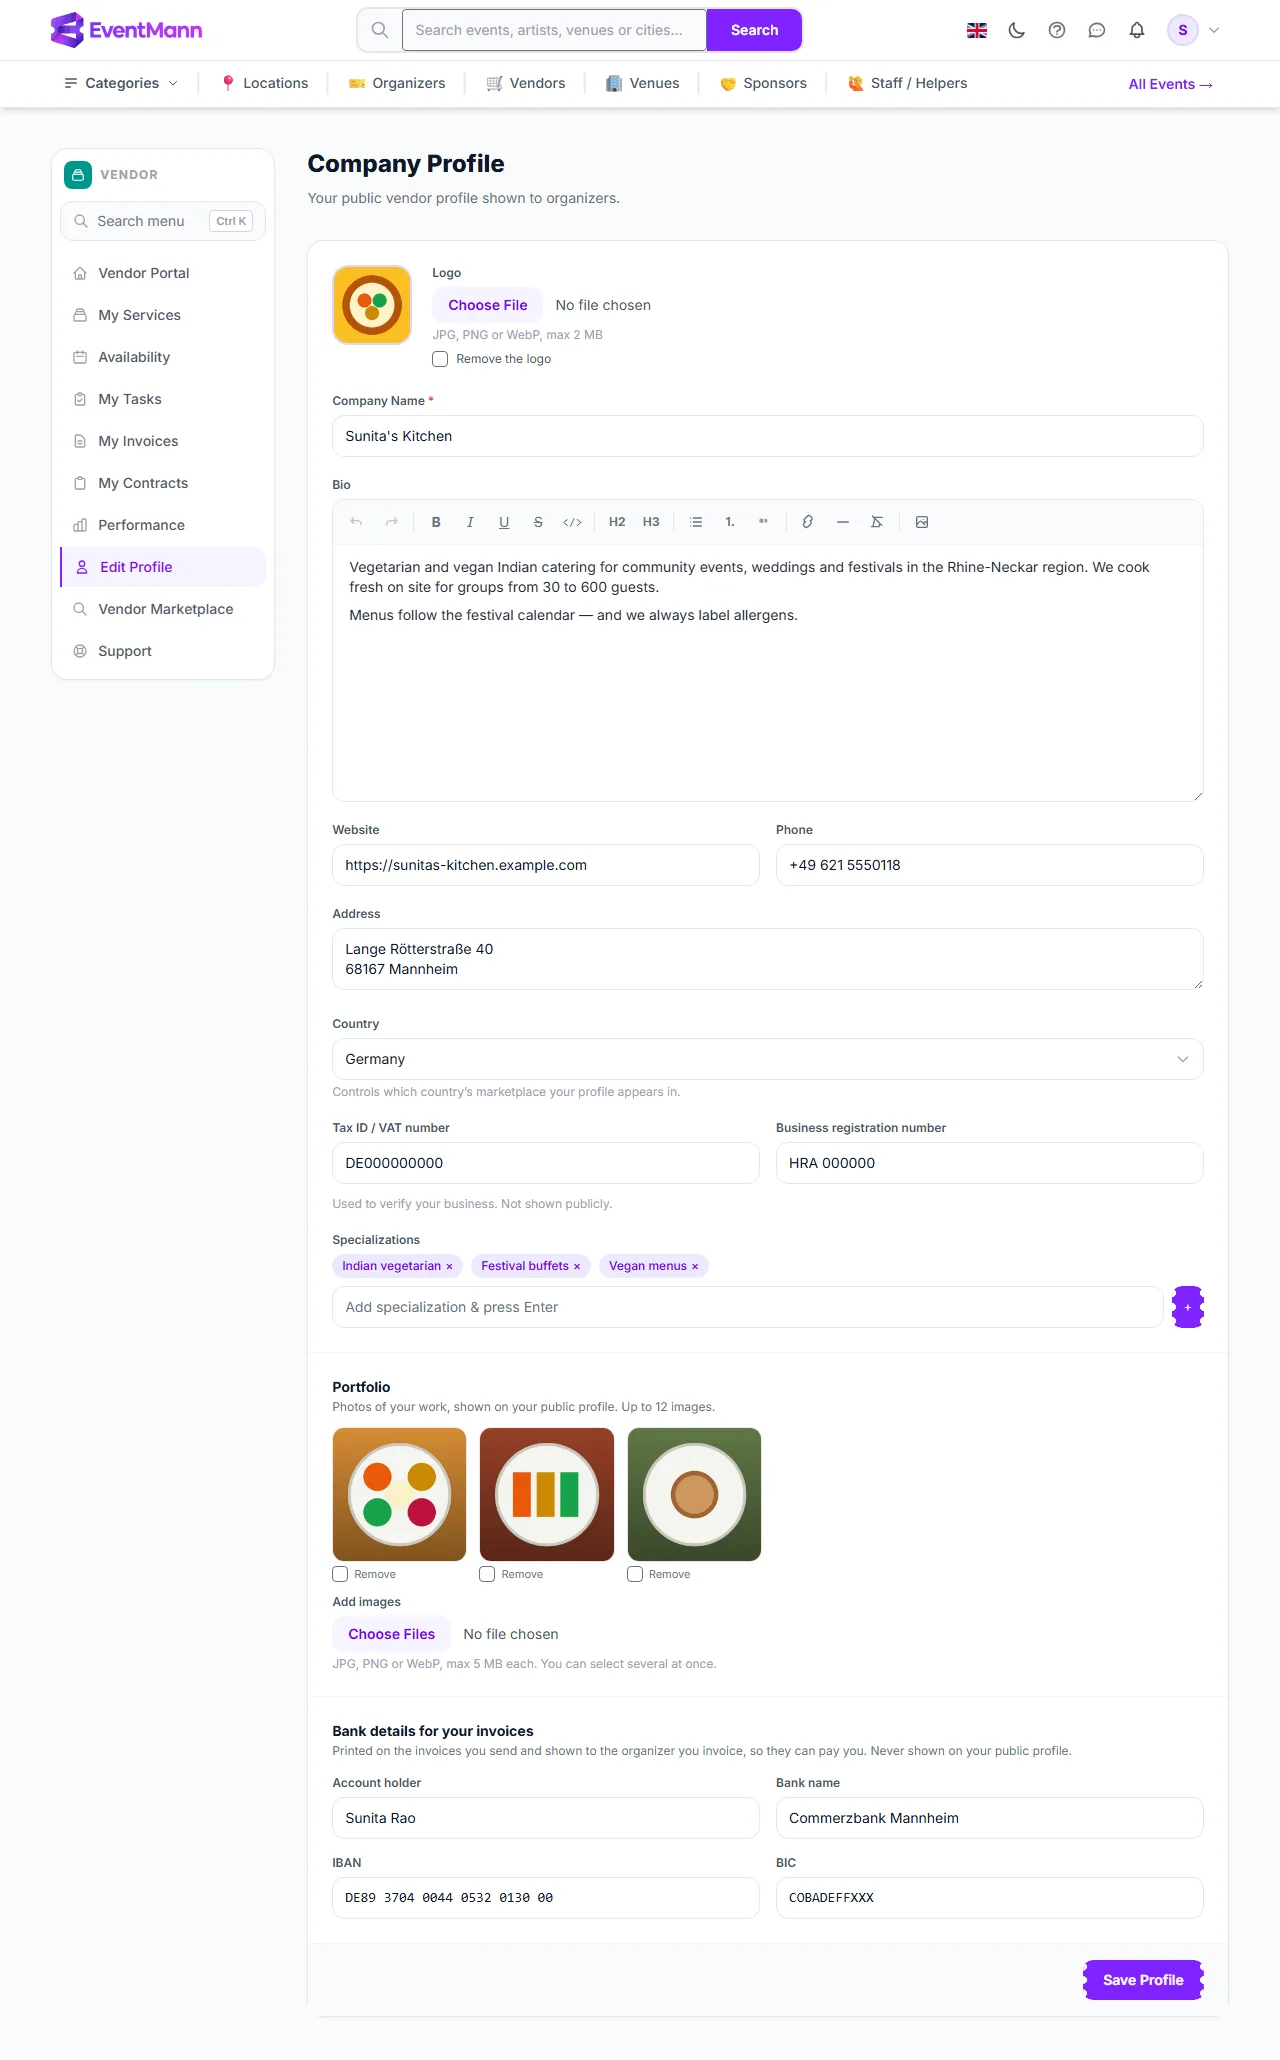
Edit Profile (sidebar → Edit Profile, or the button on the dashboard) holds your company details. It opens as Company Profile with the line “Your public vendor profile shown to organizers.” Most of it is public once an administrator approves you, so write it for the organizers who will read it.

Settings explained

FieldWhat to enterPublic?
Logo ①A JPG, PNG or WebP image of up to 2 MB. After choosing the file you can drag and zoom it into the square. Tick Remove the logo to go back to your initial.Yes, in the marketplace and on your page
Company Name ②Required. The name organizers see in lists and on your page.Yes
BioA rich-text description: what you do, where, for how many guests. The editor has bold, italic, headings, lists, links and an image button.Yes
Website ③A full address starting with https://.Yes, as a Visit Website link
PhoneDigits, spaces and + - ( ) only.Yes
AddressWhere you are based, free text.Yes
CountryControls which country’s marketplace your profile appears in.Used for listing
Tax ID / VAT number ④ and Business registration numberUsed to verify your business.No — “Not shown publicly.”
Specializations ⑤Short tags, one at a time: type and press Enter or +. Duplicates are removed.Yes; searchable
Portfolio ⑥Photos of your work: JPG, PNG or WebP, up to 5 MB each and up to 12 in all. Choose several files at once under Add images; tick Remove under a photo to take it out.Yes, as a gallery on your page
Bank details for your invoices ⑦Account holder, IBAN, BIC and Bank name. Spaces and lower case are fine; the IBAN is checked for its shape (two letters, two digits, then 11 to 30 letters or digits) and the BIC must have 8 or 11 characters.No — printed on your invoices and shown to the organizer you invoice

Press Save Profile ⑧ to store the changes.

The Company Profile form with the logo, portfolio and bank details

Approval

  • The first time you save, your profile is created as Pending and the administrators are told to review it. Until then a yellow notice Pending — Your account is pending admin approval. Complete your profile while you wait. shows on this page and on the dashboard.
  • An administrator approves (or suspends) you. Only approved vendors are listed in the marketplace and can be assigned to events by organizers.
  • Editing a profile later does not send it back to pending.
  • If an administrator granted you the vendor role directly, your profile may already be approved; fill in the details anyway.

Good to know

  • Your phone, website, address and your account name (the name on your login) appear under “Contact Info” on the public page. Do not enter anything you would not publish. Your email is not shown.
  • Without a logo the public page shows your initial in a tile. Logos and portfolio photos are resized when you save, so a large photo straight from a camera is fine as long as it is under the size limit.
  • The IBAN is stored encrypted. It appears on your invoice PDF and, once you have sent an invoice, next to it on the organizer’s vendor page — nowhere else. The shape check does not prove the IBAN is yours or correct: read it back on your first invoice.
  • The profile is separate from Service Catalog: your profile says who you are, the catalogue says what you sell.

Troubleshooting

  • “Phone number may contain only digits and + - ( ) characters.” Remove letters; only digits, spaces and + - ( ) are accepted.
  • The website is rejected. Include https:// at the start.
  • “This does not look like an IBAN” or “A BIC has 8 or 11 letters and digits”. Copy the number from your bank statement; spaces are removed for you.
  • “Your portfolio can hold at most 12 images.” Tick Remove under some photos in the same save, or upload fewer.
  • The logo or a photo is refused. Only JPG, PNG and WebP are accepted (no SVG or GIF), up to 2 MB for the logo and 5 MB for each photo.
  • I am not in the marketplace. Your profile is still pending, or the marketplace the visitor sees is a different country from the one you chose.

Related

1.5 Marketplace Visibility

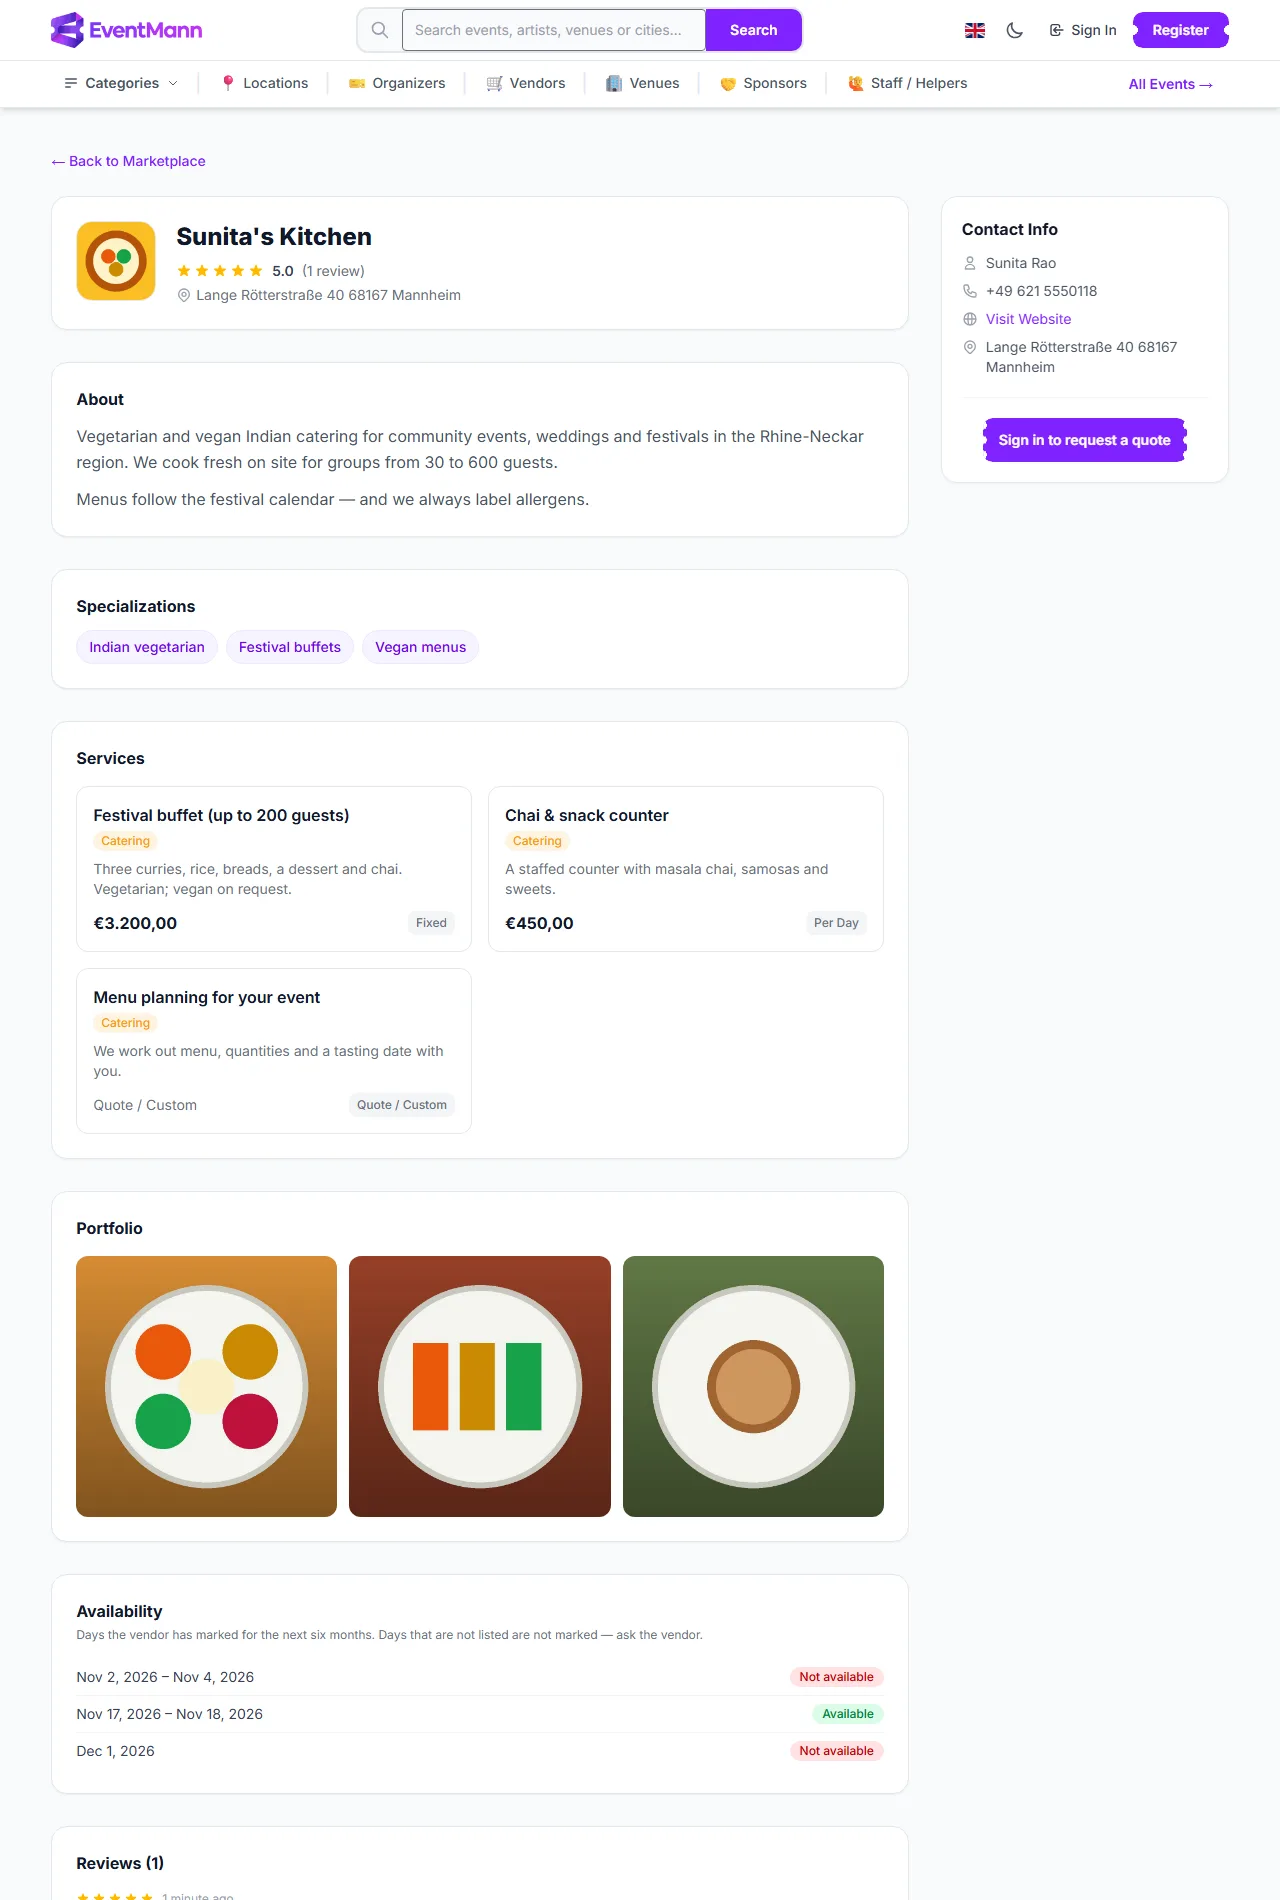
The Vendor Marketplace is the public list of approved vendors. The sidebar row Vendor Marketplace opens it; each vendor has a public profile page. This article explains who sees your page, what it shows and how to make it work for you.

What a visitor sees on your page

  • Your logo, company name, average rating and the number of reviews, and your address ①.
  • About — your bio, and Specializations as tags.
  • Services ② — your active services with category, description and price or Quote.
  • Portfolio — the photos you uploaded in Edit Profile.
  • Availability — the periods you marked for the next six months, without your notes. A signed-in organizer also sees which of their own upcoming events fall on a day you blocked. See Managing Your Availability.
  • Reviews ③ — every review organizers wrote about you.
  • Contact Info ④ — your account name, phone, a Visit Website link and your address.
  • A request form: an organizer or administrator who is signed in can press Send Quote Request; a visitor who is not signed in is asked to sign in first.
The public profile of a vendor as an organizer sees it

Who can find you

  • Only approved profiles are listed.
  • The listing is filtered by the visitor’s country: a visitor sees vendors whose profile Country matches theirs. Your direct page address works for anyone.
  • Visitors can search words (matched against company name, bio and specializations), filter by specialization tag, price range (from your active services’ prices) and minimum rating, sort the results, and compare up to three vendors side by side.
  • Administrators can mark a vendor as Featured; featured vendors get a highlighted section at the top of the unfiltered listing. You cannot buy or request this from the portal.

Make your page work

  1. Complete the profile. A bio with real detail (what, where, how many guests) is searched; an empty one is not. Add your logo and a few portfolio photos: they are the first thing a visitor sees.
  2. Use specializations. Add the words people search for: “Indian vegetarian”, “PA hire”, “wedding photography”.
  3. Publish active, priced services. The price filter only sees services with a price; “Quote” services are easy to skip.
  4. Choose the right country in your profile.
  5. Earn reviews. Organizers can rate you after an event; see Understanding Your Ratings.
  6. Keep your availability current. Block the days you are booked, so organizers who find you can see at once whether their date works.

Quote requests

When an organizer presses Send Quote Request you get a bell notification “New Quote Request — … has requested a quote from you” that opens your dashboard. The Quote Requests panel at the bottom of the dashboard shows the last ten: the organizer’s name, when they wrote, their message and a Reply by email link with their address. Answer them by email; the real engagement starts when the organizer invites you to an event.

Good to know

  • The marketplace’s category filter uses the Marketplace category you pick on each service. Your own Category text is a label only — set the marketplace category too, or the filter will not find you.
  • Your public page shows your phone number and address. Keep them current or leave them out.
  • A suspended vendor disappears from the marketplace.

Related

1.6 Understanding Your Ratings

After an event, the organizer who worked with you can rate you from one to five stars and add a comment. Ratings are the only public feedback on a vendor profile. You see the result on your public page and on Performance; there is no separate ratings page in the portal.

How a review comes about

  1. The organizer opens the event’s Manage → Vendors page and finds your assignment.
  2. They give a rating from 1 to 5 and, optionally, a comment, and save.
  3. The review is published immediately — there is no moderation step and no delay.

There is one review per assignment. If the organizer saves again, the existing review is edited in place; the count does not go up.

Where it shows

  • On your public profile: the star average, the number of reviews and every comment under Reviews.
  • On Performance: Avg Rating (one decimal) and Total Reviews.
  • In the marketplace: visitors can filter vendors by minimum rating, and compare ratings side by side.

On the public page the rating and review count ① sit under the company name, the Services ② are listed below, the Reviews section ③ shows the comments and Contact Info ④ is on the right.

Reviews on the public profile: the average, the review count and the written comments

Good to know

  • The average is a plain average of all the review ratings; there is no weighting and no time window.
  • You cannot reply to, hide, dispute or delete a review from the portal. If you believe a review is wrong or abusive, use Support.
  • You are not notified when a review is posted. Look at Performance now and then.
  • An organizer can only review vendors they have worked with, one review per event.

What gets good reviews

  • Accept or decline promptly. An invitation left unanswered does not look good.
  • Complete your tasks before their due date.
  • Stay within the agreed fee, and say early when something changes.

Troubleshooting

  • The average looks different from what I expect. It rounds to one decimal and counts every review ever left.
  • A review is missing. The organizer may not have saved one. Reviews cannot be requested from the portal.

Related

1.7 Performance

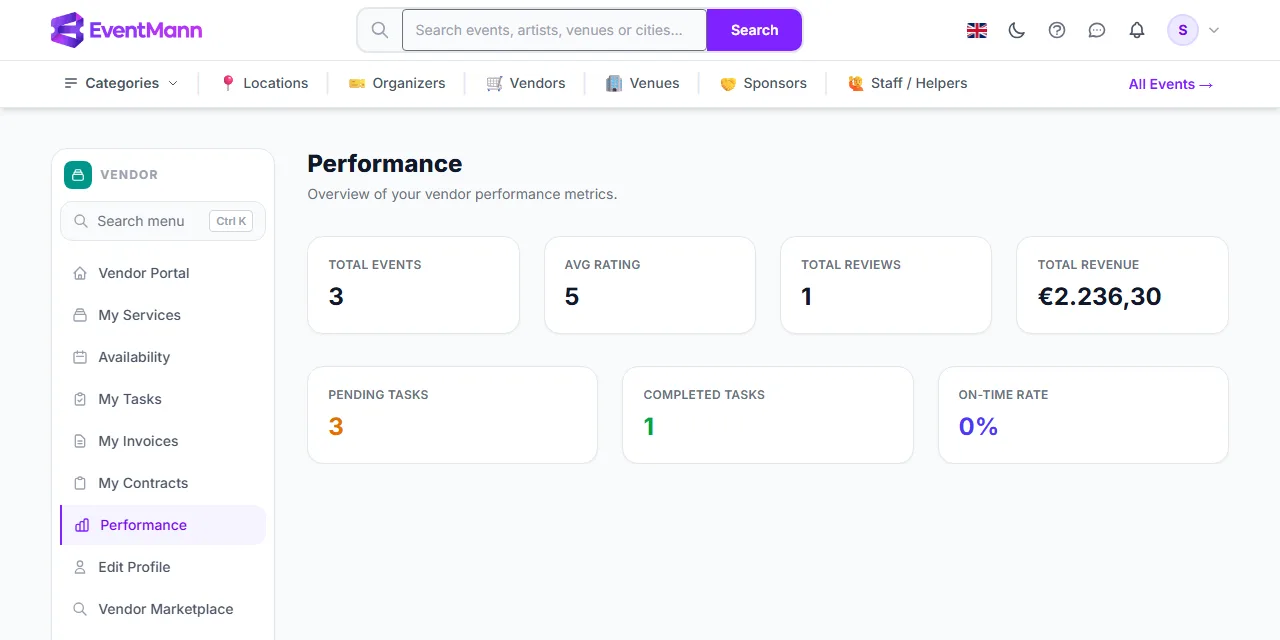
Performance (sidebar → Performance) shows seven figures about your work on the platform, with the line “Overview of your vendor performance metrics.” It is a snapshot of today: there is no date range, chart or export.

What each figure means

FigureHow it is calculated
Total Events ①The number of assignments you have confirmed, all time.
Avg Rating ②The average of the organizers’ star ratings, to one decimal. 0 when there are none. See Understanding Your Ratings.
Total ReviewsHow many reviews you have.
Total RevenueThe sum of the totals (tax included) of your invoices that the organizer has marked Paid, in the event’s currency. If you have been paid in more than one currency, there is one line per currency.
Pending TasksTasks with the status Pending. Tasks you have started (In Progress) are not in this count.
Completed TasksTasks with the status Completed.
On-Time Rate ③Tasks done on time divided by all tasks that are done or overdue, as a percentage. A task is on time when you completed it on or before its due date (or it has no due date); it is late when you completed it after the due date, or the date has passed and it is still open. It is 100% when there is nothing to count.
The performance page with its seven figures

Good to know

  • The due date is inclusive: a task completed on its due day is on time. A task completed late stays late — completing an overdue task stops it counting as open, but it still counts as late.
  • Revenue counts only invoices the organizer has marked Paid; approved or submitted invoices are not included. It is a record of what organizers marked as paid, not a bank statement.
  • Organizers do not see this page. They see your public profile.
  • Without a saved profile the page asks you to complete it and shows zeros.

Troubleshooting

  • Total Events is lower than my invitations. Only confirmed assignments count; invited and declined ones do not.
  • Revenue is 0 although I invoiced. No invoice has been marked Paid by the organizer yet.

Related

Chapter 2

Working with organizers

2.1 Responding to Event Requests

An event request is an organizer inviting you to work their event. It arrives as an Invited assignment on your dashboard (sidebar → Vendor Portal, panel Active Assignments). There is no pitch or shortlist stage first: the organizer picks you from the approved vendors and assigns you directly. Everything else — contracts, tasks, invoices — hangs off this assignment.

How you are told

  • A bell notification “New event assignment” and an email (setting Vendor updates) when the organizer assigns you.
  • The email carries what the portal does not: the event with date, time and venue, the service the organizer attached, the agreed fee if they entered one, and their notes. The dashboard only shows the event title, its date and the status, so keep the email.

Respond to an invitation

  1. Open the Vendor Portal and find the event under Active Assignments. The badge says Invited.
  2. Check the date and, from the email, the fee and notes.
  3. Click Accept ① to take the job, or Decline ② to turn it down. The buttons exist only while the assignment is Invited.
  4. The badge changes to Confirmed ③ or Declined. The organizer is told your answer (bell and email).
An invitation with Accept and Decline, beside a confirmed assignment

What a confirmed assignment unlocks

  • The organizer can issue you contracts and give you tasks.
  • You can send an invoice. Invoicing is only possible on a Confirmed assignment.
  • The assignment counts towards Total Events on Performance and the organizer can rate you.

Good to know

  • An organizer can also mark an invitation Confirmed or Declined on their side. Check the badge before you assume nothing has happened.
  • You cannot take back a decline. An assignment you declined stays on file, and the platform will not let the organizer assign you to the same event a second time until they remove it — ask them to.
  • Declining does not change your rating.
  • Accepting does not agree a price by itself. The agreed fee is the cap your invoice must stay under; any other terms belong in a contract.

Troubleshooting

  • I got no email. Look at the dashboard, and check Vendor updates in your notification preferences.
  • The buttons are gone. The organizer already confirmed or declined for you, or you have answered once.
  • I accepted the wrong event. Contact the organizer; only they can remove the assignment.

Related

2.2 Managing Your Availability

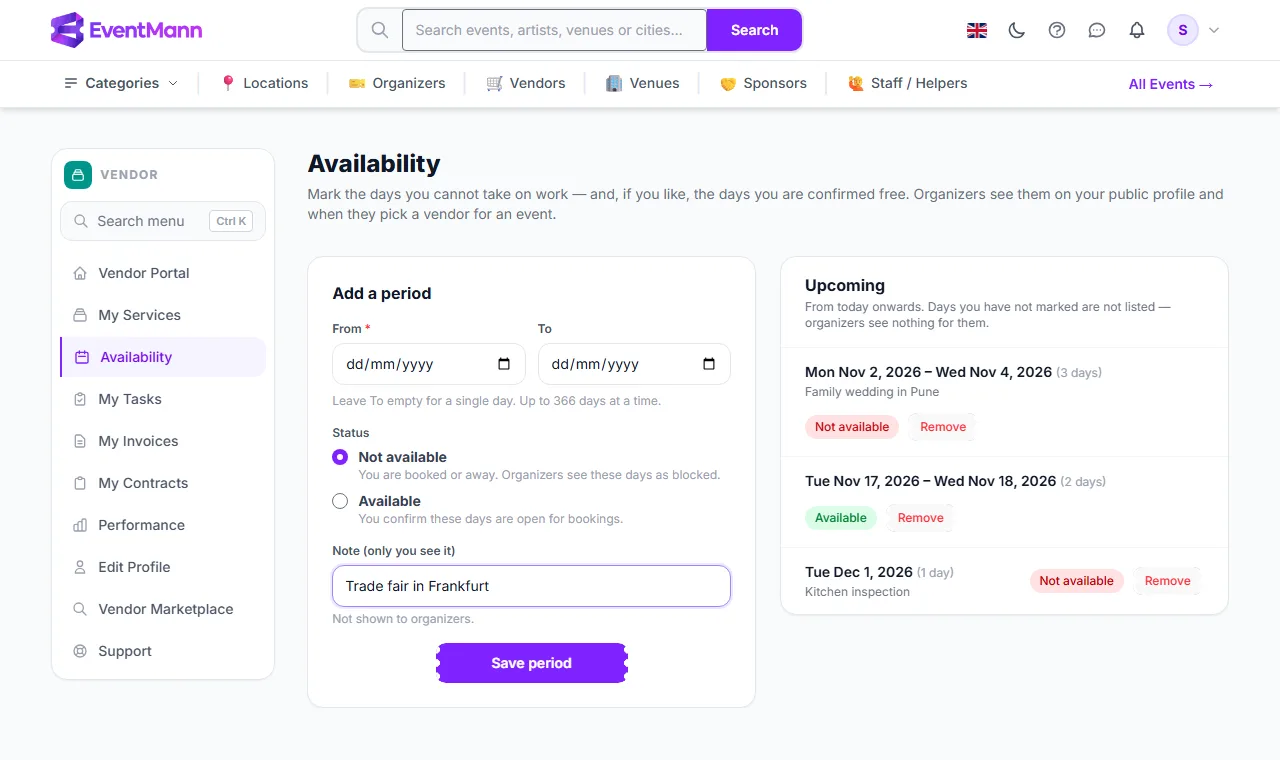
Availability (sidebar → Availability) is your calendar of the days you cannot take on work — and, if you like, the days you have confirmed you are free. Organizers see it on your public profile and in the list they pick a vendor from when they assign one to an event, so a blocked day saves both of you an invitation you would only decline.

What you can do here

  • Add a period of one or more days with Add a period ①: a From date, an optional To date, a status and a private note.
  • Read your Upcoming periods ③ from today onwards, each with its number of days, its note and a Not available or Available badge.
  • Take a period off again with Remove ④.
The Availability page: the form on the left, two upcoming periods on the right

Block a period

  1. Open Availability in the sidebar.
  2. Choose the From date. For more than one day choose the To date too; leave it empty for a single day.
  3. Keep Not available ② selected. Choose Available instead to confirm that days are open for bookings.
  4. Optionally write a Note (only you see it), such as “Wedding in Heidelberg”.
  5. Press Save period. The period appears under Upcoming.

What organizers see

  • On your public profile, an Availability section lists the periods you marked for the next six months, each as Not available or Available. Your notes are never shown. A signed-in organizer also sees their own upcoming events there, each with “Not available on …” when it falls on a day you blocked.
  • When an organizer assigns a vendor to an event, your name in the vendor list carries “Not available on …” with the dates if you blocked any day of that event. The same line appears on your row once you are assigned.

Settings explained

FieldWhat it does
FromRequired. Today or later.
ToOptional; the same day or later. One period covers at most 366 days.
Not available / AvailableNot available blocks the days. Available confirms them as open.
Note (only you see it)Up to 255 characters, for your own reference. Not shown to organizers.

Good to know

  • A day you have not marked says nothing either way. It is not listed anywhere and is not shown as available.
  • Saving a period over days you had already marked replaces their status and note.
  • Remove takes away the whole period as listed. To shorten a period, remove it and add the days you still need.
  • A blocked day does not stop an organizer from inviting you — it warns them. If you are invited anyway, decline (see Responding to Event Requests) or talk to the organizer.
  • Your calendar belongs to your company profile: until you have saved Edit Profile once, the page asks you to do that first.
  • To pause a whole service for a while instead, untick Active (visible to organizers) on it in My Services. See Service Catalog.

Troubleshooting

  • “The from field must be a date after or equal to …” Past days cannot be marked; start from today.
  • “A period can cover at most 366 days.” Split the period in two.
  • A period is missing from Upcoming. It has ended — the list starts today.
  • An organizer says they did not see my block. They see it only for the days of their event; check the dates under Upcoming.

Related

2.3 Contracts

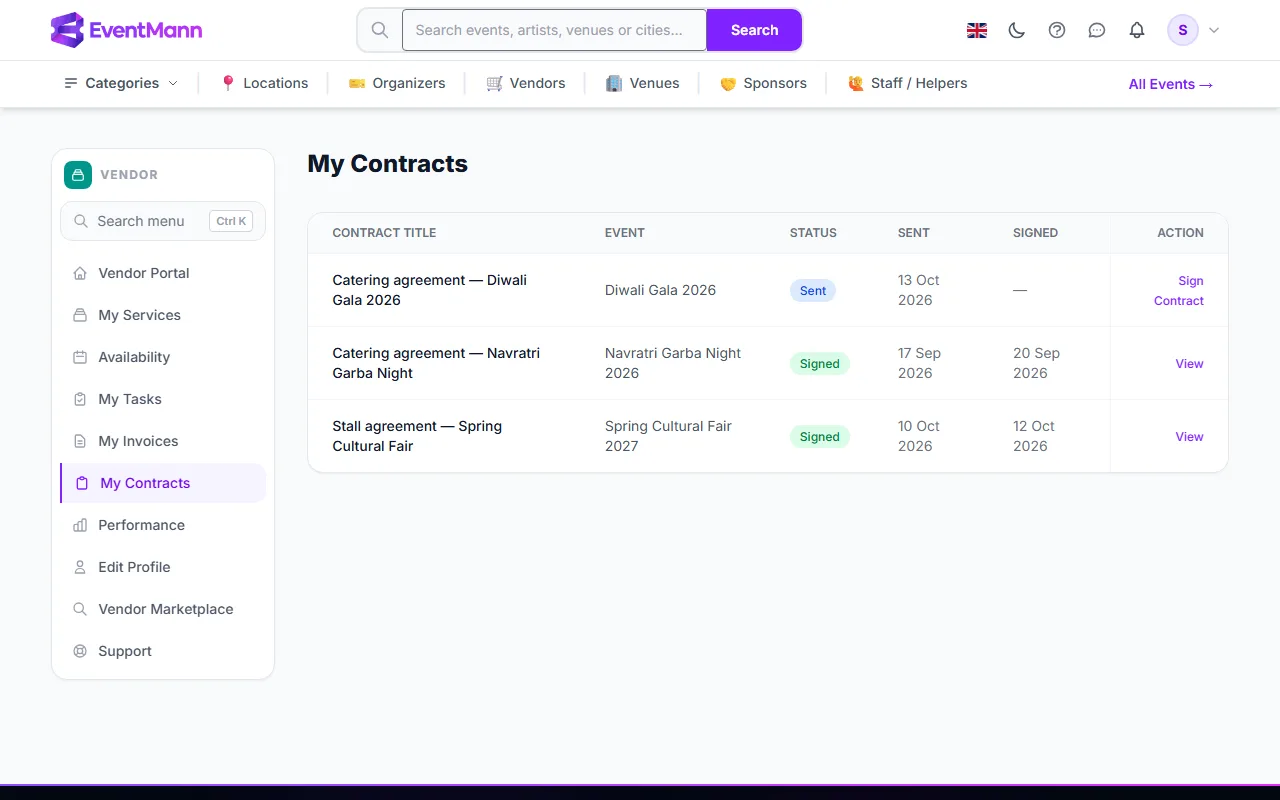
A contract is a written agreement the organizer sends you for one of your assignments — scope, fee, timing, cancellation and so on. My Contracts (sidebar → My Contracts) lists every contract you have been sent, newest first.

The list

ColumnMeaning
Contract TitleThe title the organizer gave it.
EventThe event it belongs to.
Status ①See the table below.
Sent / SignedThe dates it was sent and signed.
ActionSign Contract ② while it waits for you, otherwise View ③.
My Contracts with one contract waiting for a signature and two signed

The statuses

StatusWhat it means
SentWaiting for your signature. The organizer creates contracts as Sent — there is no draft you could see.
SignedYou signed. The organizer cannot cancel a signed contract.
ExpiredThe organizer set an expiry date and it passed before you signed. It can no longer be signed.
CancelledThe organizer withdrew it before you signed.

How contracts reach you

  1. The organizer writes the contract on the event’s Manage → Vendors page: a title, the full text and optionally an expiry date.
  2. It appears in My Contracts and under Pending Contracts on your dashboard. You are not notified by email or bell, so look at the dashboard counter after you accept an assignment.
  3. Open it and sign — see Signing Contracts.

Good to know

  • The text of a contract is whatever the organizer wrote. EventMann provides no template and no legal review, and is not a party to the contract.
  • The signature is a drawing plus the time and your IP address. The organizer sees all three on their side.
  • There is no countersignature by the organizer and no PDF download of a contract. Copy the text if you need your own record.
  • The expiry day is inclusive: you can still sign all day on the last date.
  • A contract whose expiry date has passed shows Expired in the list and on its page, and no longer counts as pending on the dashboard.

Troubleshooting

  • I see no contract but expected one. The organizer may not have issued it yet.
  • It says expired. Ask the organizer to issue a new one with a later date.
  • I need to change a clause. There is no negotiation in the portal. Agree the change with the organizer and ask for a new contract.

Related

2.4 Signing Contracts

You sign a contract on its own page, by drawing your signature and ticking a box. This article takes you through it. To find a contract first, see Contracts.

Sign a contract

  1. Open My Contracts and click Sign Contract on the row, or click the contract under Pending Contracts on your dashboard.
  2. Read the whole text. The status badge at the top should say Sent.
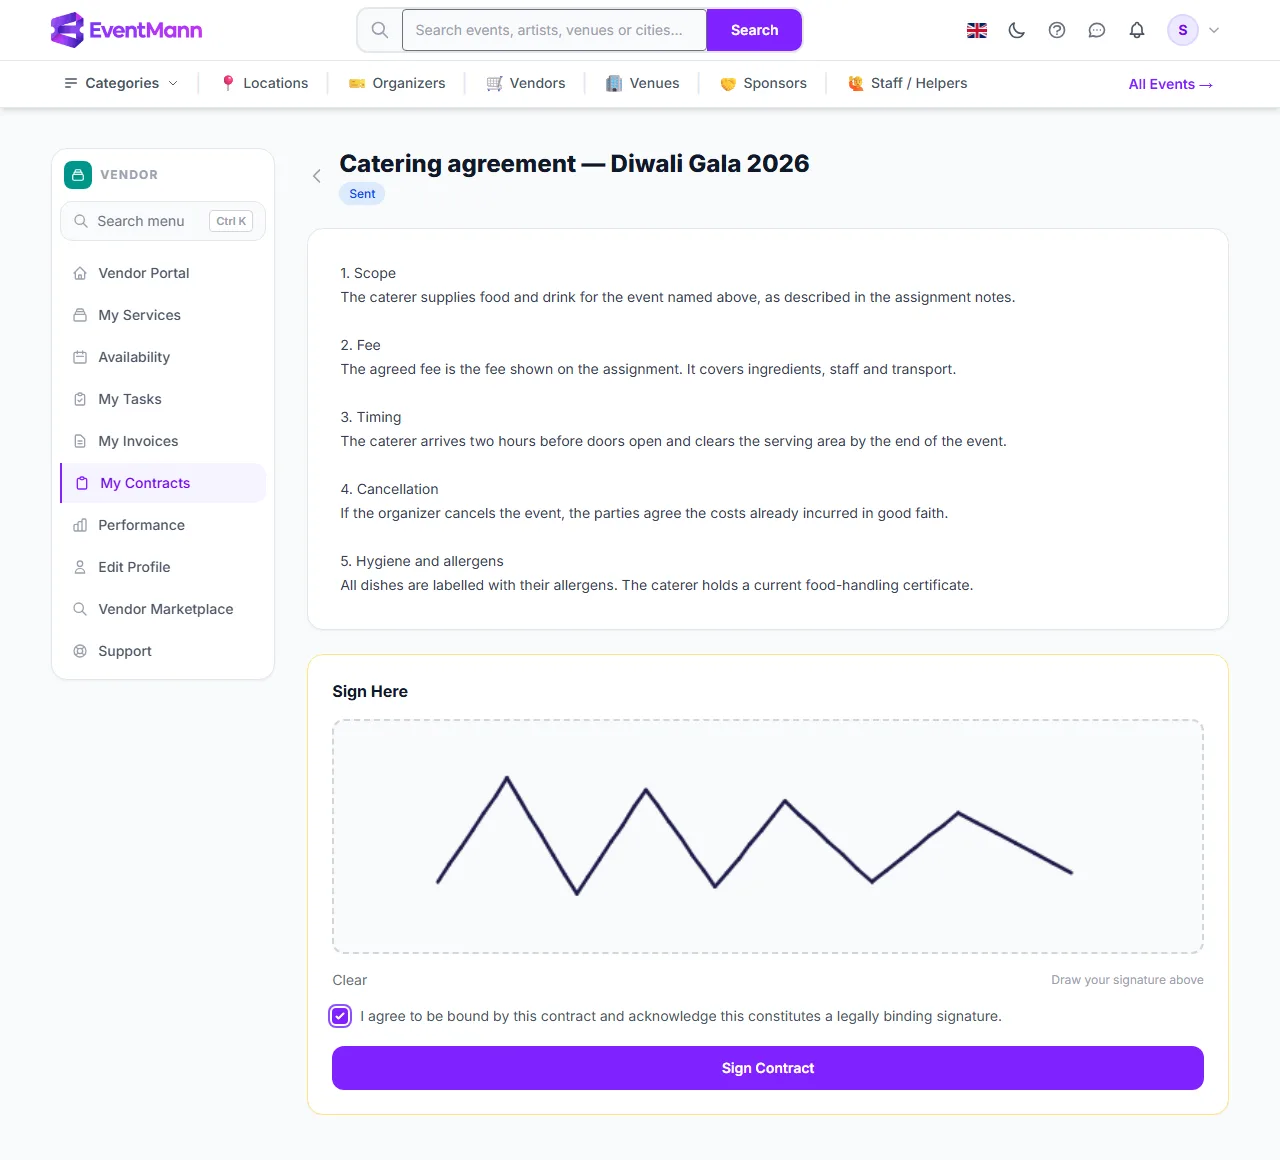
  3. Under Sign Here ①, draw your signature with the mouse, a stylus or your finger in the dashed box ②. It is a free-hand drawing.
  4. If you are not happy with it, press Clear ③ and draw again.
  5. Tick I agree to be bound by this contract and acknowledge this constitutes a legally binding signature. ④
  6. Press Sign Contract ⑤. The button works only once you have both drawn a signature and ticked the box.
A contract ready to sign: the drawn signature, the agreement tick and the Sign Contract button

What is recorded

  • The status changes to Signed.
  • The signing time, the image of your signature and your IP address are stored with the contract. The organizer can see them.
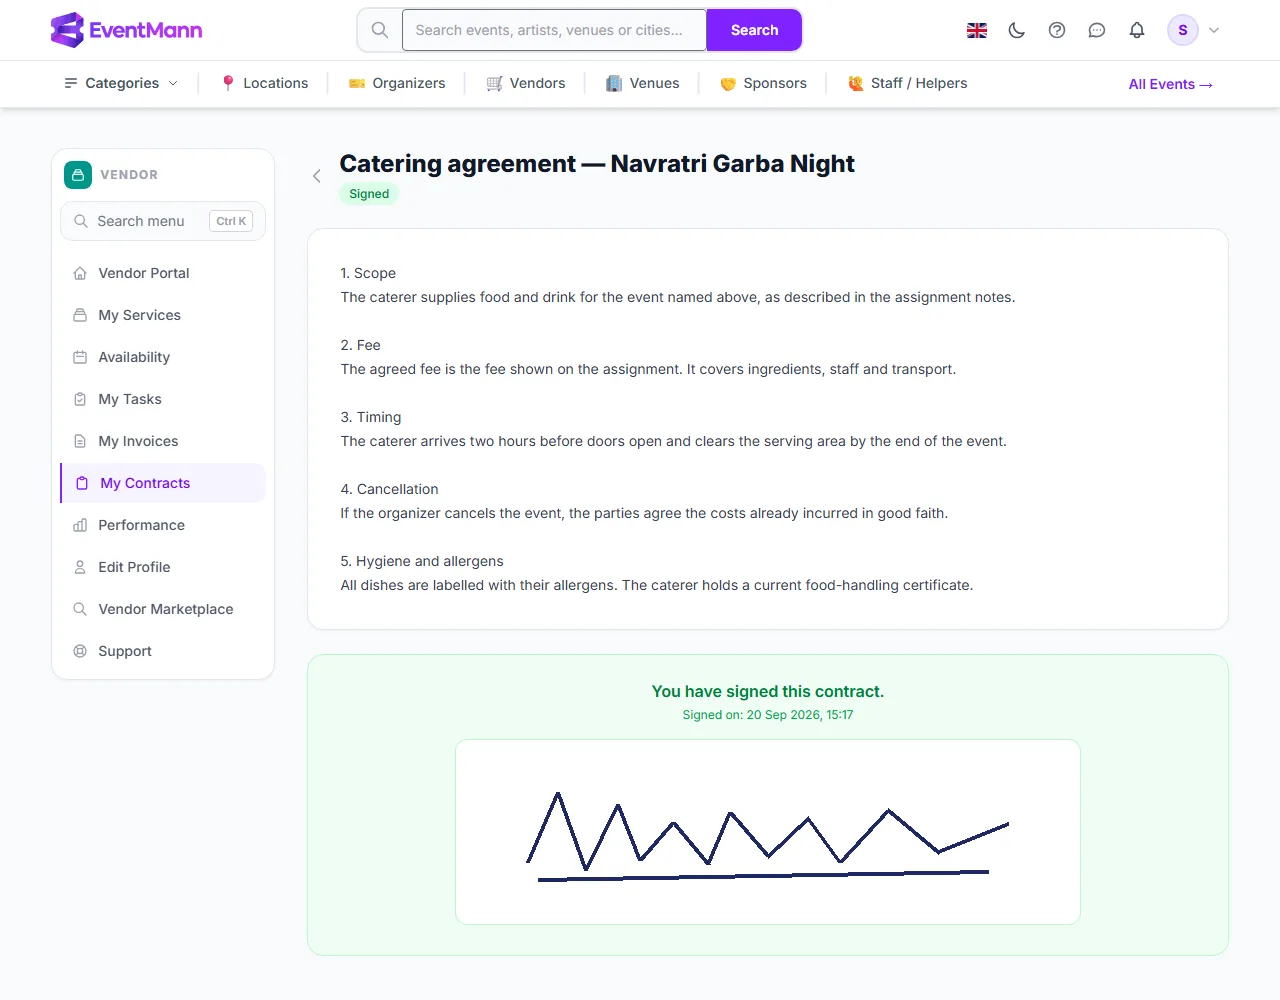
  • Afterwards the page shows You have signed this contract., the date and time, and your signature.

On a signed contract the status badge ① reads Signed and your signature ② is shown.

A signed contract with the date and the stored signature

Good to know

  • You cannot undo, edit or withdraw a signature. Only unsigned contracts can be cancelled by the organizer.
  • If the contract has an expiry date and it has passed, the page says This contract has expired. Contact the organizer. and no signature box is shown.
  • The page states that the signature is legally binding. What that means in your country depends on its law and on the text you sign; EventMann does not provide legal advice. Ask your own adviser when in doubt.
  • Signing on a phone works; use a stylus or fingertip and press Clear if the line is shaky.

Troubleshooting

  • The Sign Contract button does nothing. You have not drawn anything yet, or the checkbox is not ticked.
  • I get an error that it cannot be signed in its current state. It was already signed, expired or cancelled.
  • I signed the wrong contract. Contact the organizer; they decide how to handle it. The portal cannot reverse it.

Related

2.5 Tasks

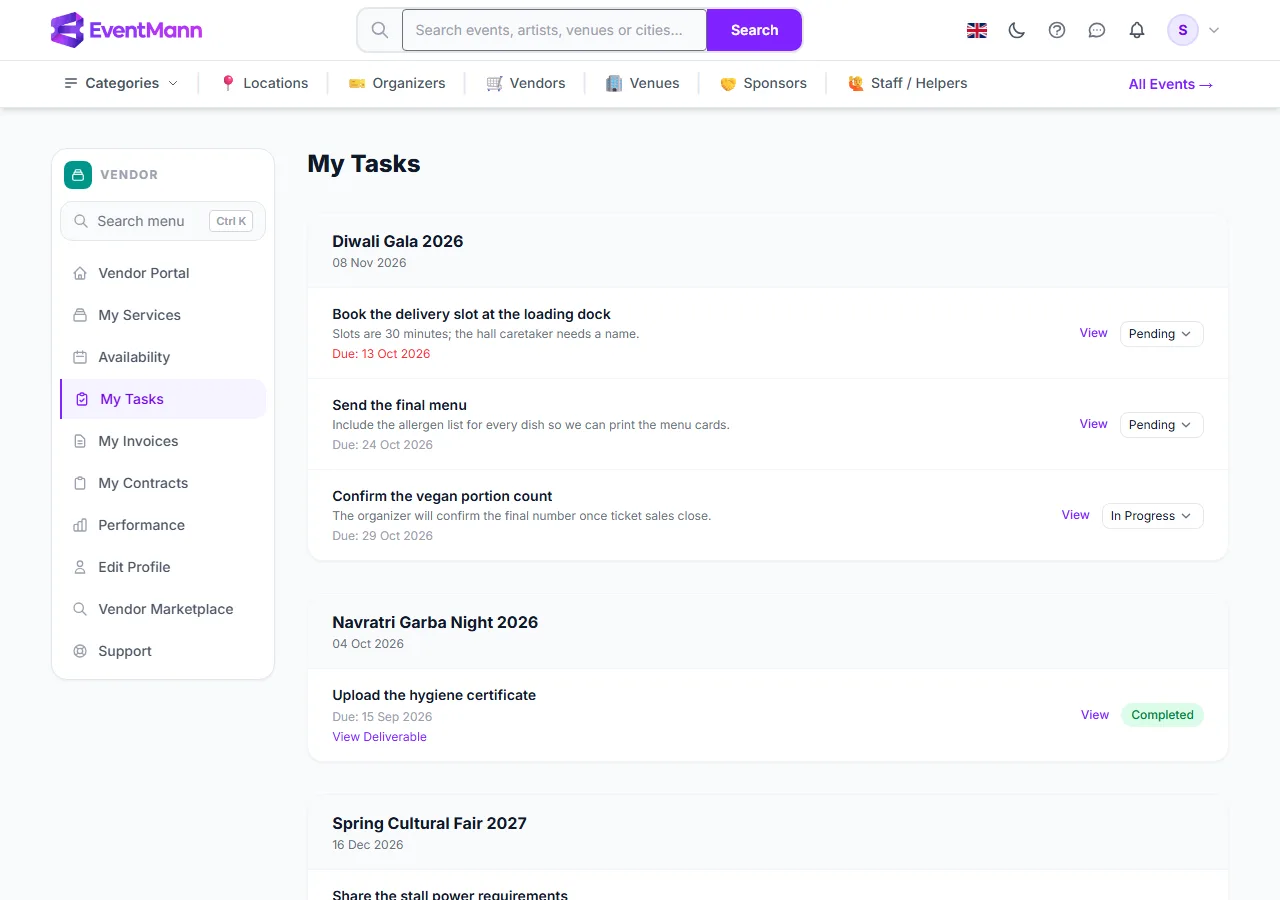
My Tasks (sidebar row My Tasks, or the View All Tasks link on the dashboard) lists the jobs organizers have given you for your assignments, grouped by event. A task is a small deliverable with an optional due date: “Send the final menu”, “Share the stall power requirements”.

What you see

  • The event and its date as the header of each group ①.
  • For each task: the title, the description, and the Due date. An overdue date turns red ②.
  • A status dropdown ③ with Pending, In Progress and Completed, or the green Completed badge once done.
  • View opens the task’s own page. View Deliverable ④ appears when a deliverable link is stored on the task.
My Tasks grouped by event, with an overdue date in red and a task with a deliverable

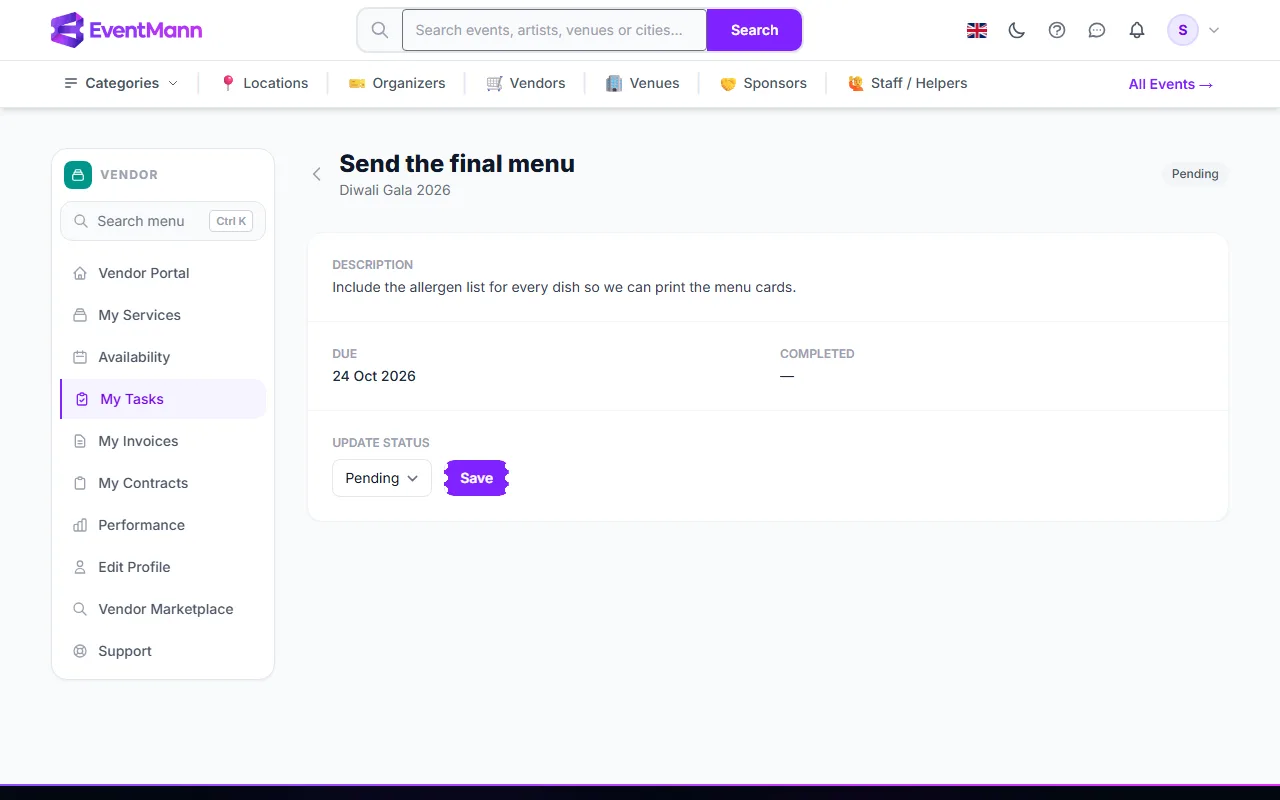
Update a task

  1. Choose a new value in the dropdown on the list — it saves as soon as you pick it.
  2. Or open the task with View, choose the status ① under Update Status and press Save ②.
The task page with its status selector and Save button

When you set Completed, the completion date is stamped on the task. The organizer sees the status on the event’s vendor page.

Good to know

  • Completed is final. Once a task is completed you cannot move it back — the dropdown disappears. Ask the organizer if you completed one by mistake.
  • Only the organizer creates, edits or deletes tasks. You change the status.
  • You are not notified when a task is added, and the organizer is not notified when you change one. Check the list, and tell the organizer when something important is done.
  • There is no upload and no comment box on a task. If a task needs a file, send a link or the file to the organizer yourself.
  • Tasks feed two numbers: the Tasks Overdue counter on the dashboard and the On-Time Rate on Performance.

Troubleshooting

  • The page says no tasks. Tasks exist only on assignments where the organizer added some.
  • A task stays red after I did it. Set it to Completed; overdue means past the due day and not completed.
  • I cannot change the status. It is already completed.

Related

2.6 Invoices

My Invoices (sidebar → My Invoices) is where you send an invoice to an organizer for an assignment and follow what happens to it. This article explains the list and the life of an invoice; How to Submit an Invoice covers the form.

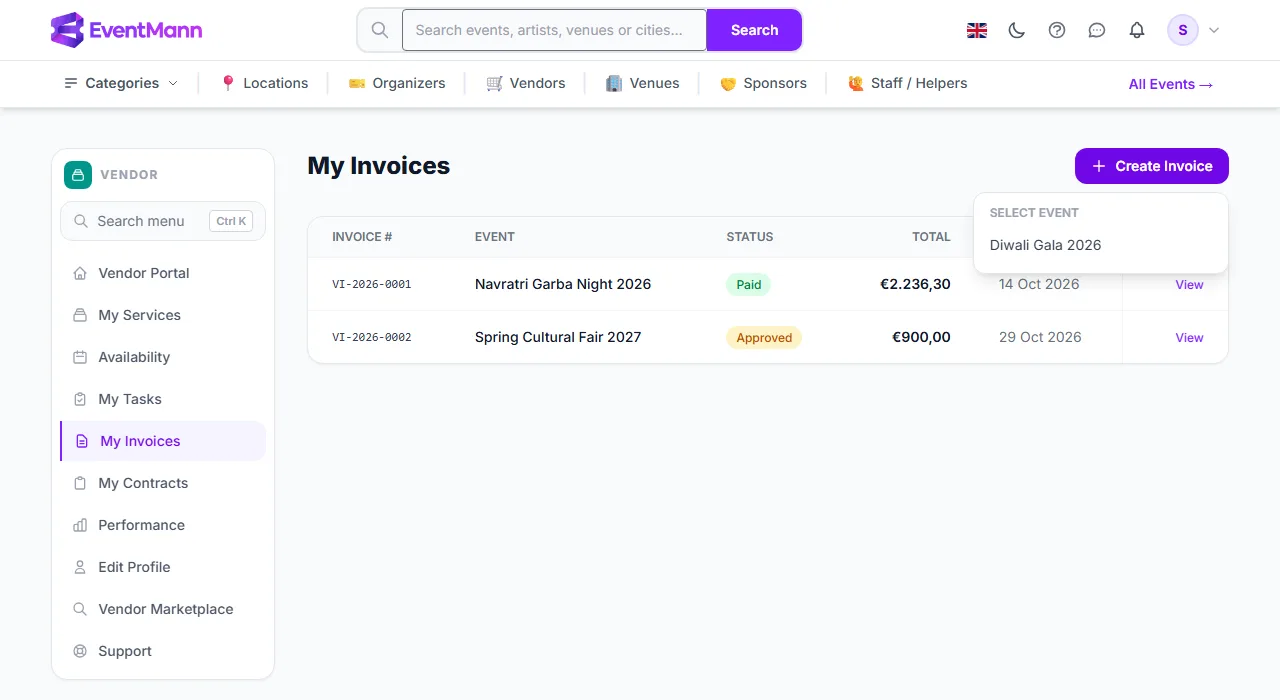
What you can do here

  • Press Create Invoice ① to see Select Event ②: the confirmed assignments you can still invoice. Click one to open the form.
  • Read the table: Invoice #, Event, Status ③, Total, Due Date.
  • Open an invoice with View ④, and download it as a PDF from its page.
My Invoices with the Create Invoice menu open, a paid invoice and an approved one

The life of an invoice

StatusWhat it meansWho moves it
SubmittedYou sent it. It is final — you cannot edit or withdraw it.You
ApprovedThe organizer accepted it for payment.The organizer
PaidThe organizer marked it as paid. The paid date is shown.The organizer

The organizer sees each invoice on the event’s Manage → Vendors page and moves it with an Approve and then a Mark paid button. They need the vendor-invoice permission to do so.

Rules

  • You can invoice only an assignment you have confirmed.
  • One invoice per assignment. While a Submitted, Approved or Paid invoice exists for it, the event is not offered under Select Event.
  • When the organizer entered an agreed fee, your subtotal before tax may not exceed it.
  • Invoice numbers are assigned by EventMann in the form VI-2026-0001.

Good to know

  • EventMann does not pay you. Paid means the organizer clicked the button; the money moves by your own arrangement. If you have not received it, ask the organizer.
  • You are not notified when an invoice is approved or paid. Check this page, or the Open Invoices counter on the dashboard (submitted and approved ones).
  • There is no reject or dispute button. If a figure is wrong, contact the organizer.
  • The PDF shows your company name from your vendor profile as the sender, with the address, email, phone, tax ID and registration number you saved there; the recipient is the organizer’s public name (their company name, when they set one). When you have saved bank details in Edit Profile, the PDF also carries a Payment details block with the account holder, IBAN, BIC and bank name, and asks the organizer to quote the invoice number as the payment reference. See Vendor Profile.
  • The organizer sees the same bank details next to your invoices on their vendor page, so they know where to pay. They are never shown on your public profile.

Troubleshooting

  • Create Invoice is missing. You have no confirmed assignment without an invoice yet.
  • “An invoice for this assignment has already been submitted.” Each assignment gets one.
  • The total is not what we agreed. The amount is the sum of your lines plus the tax rate you typed; the cap only limits the subtotal.

Related

2.7 How to Submit an Invoice

You submit an invoice from My Invoices after you have confirmed an assignment. The form lists your line items, adds tax and sends the invoice to the organizer. Once sent it cannot be changed, so check it first.

Submit an invoice

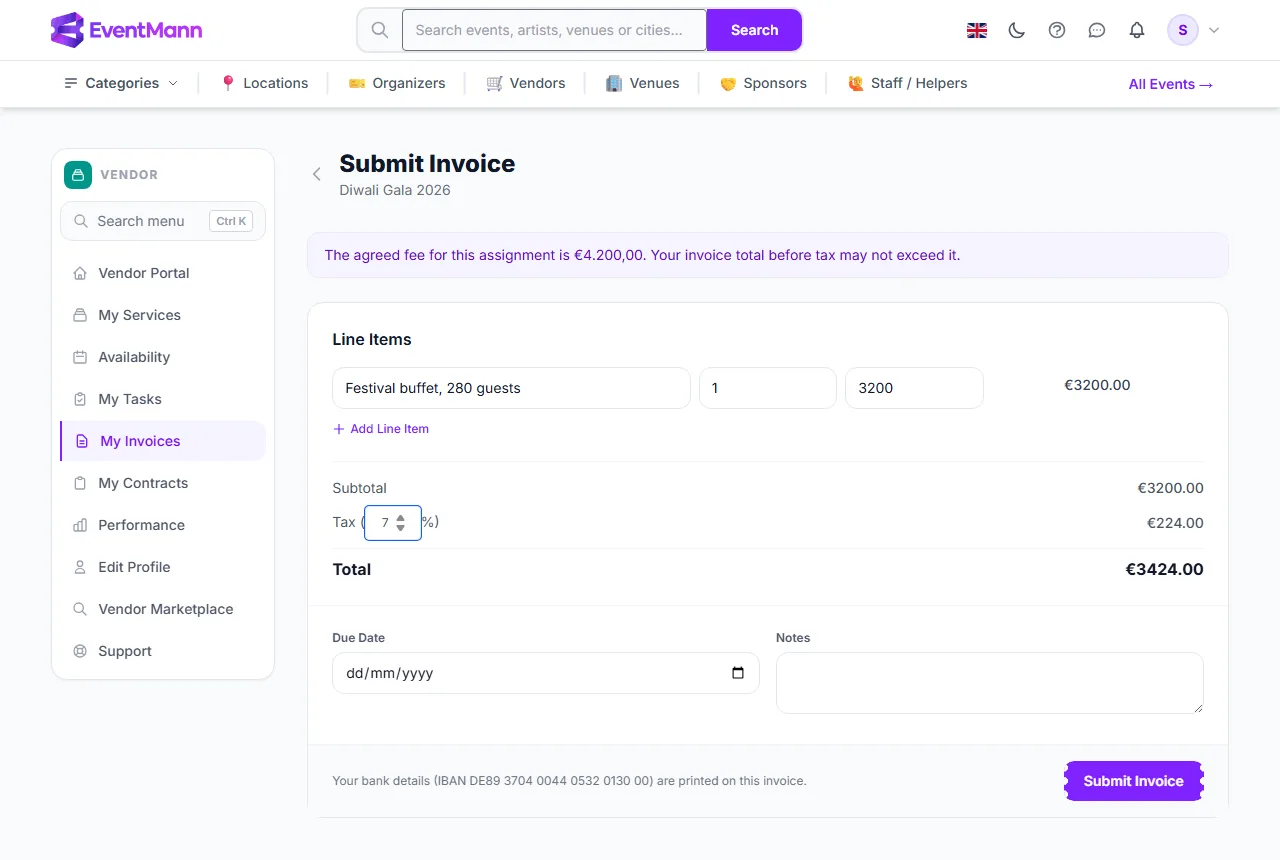
  1. Open My Invoices and press Create Invoice. Under Select Event click the event you worked.
  2. Read the note at the top ①: The agreed fee for this assignment is … Your invoice total before tax may not exceed it. It appears only when the organizer entered a fee.
  3. Under Line Items, fill in a description ②, a quantity and a unit price for each line. The amount of the line and the running totals update as you type.
  4. Press Add Line Item ③ for every extra line. You need at least one.
  5. Type a Tax percentage ④ if you charge tax (0 to 100). It is applied to the subtotal as a whole.
  6. Optionally choose a Due Date ⑤ and write Notes for the organizer.
  7. Check the line next to the button: it shows the IBAN that will be printed on the invoice, or tells you that no bank details will be printed and links to Edit Profile.
  8. Press Submit Invoice ⑥.
The invoice form with one line item, 7% tax and the agreed-fee note

What happens next

  1. You land on the invoice page with the number (for example VI-2026-0002) and the status Submitted.
  2. The organizer sees it on the event’s vendor page, approves it and later marks it paid. See Invoices.
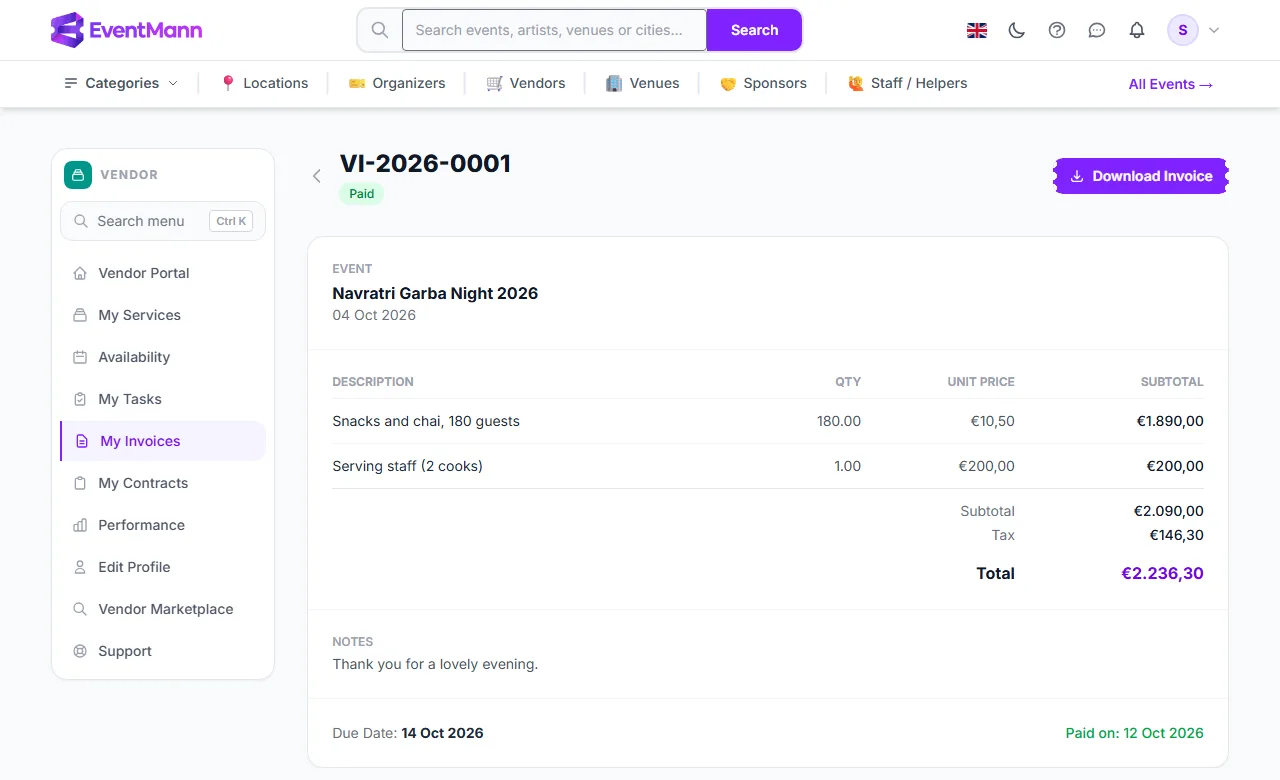
  3. Download the PDF with Download Invoice ① whenever you want a copy. The invoice page lists your lines ② and the total ③.
A paid invoice: lines, subtotal, tax, total, due date and paid date

Settings explained

FieldRule
QuantityA number of at least 0.01; decimals allowed, for example 7.5 hours.
Unit price0 or more.
TaxOptional percentage, 0–100. The tax amount is the subtotal times this percentage.
Due DateOptional. Shown on the invoice and in your list.
NotesOptional free text printed on the invoice.

Good to know

  • You cannot edit, delete or re-send a submitted invoice. If you made a mistake, tell the organizer; they decide whether to approve it.
  • The amounts are shown in the event’s currency.
  • The PDF prints the bank details saved in your profile at the time you download it. Add them before you send the invoice, so the organizer knows where to pay.
  • If the lines add up to more than the agreed fee, the form refuses with a message that names the fee. Lower the lines, or ask the organizer to change the fee before you submit.
  • Remember that Paid is the organizer’s own mark — EventMann does not transfer money.

Troubleshooting

  • You can only invoice a confirmed assignment. Accept the invitation on the dashboard first.
  • “An invoice for this assignment has already been submitted.” One invoice per assignment; check My Invoices.
  • The event is not offered under Select Event. It is not confirmed, or it already has an invoice.

Related

2.8 Communication with Organizers

The vendor portal has no messaging between you and organizers. What it does give you is a small number of automatic notifications and the information inside each assignment. This article lists what you will and will not be told, and how to reach an organizer when you need to.

What EventMann tells you

WhenYou get
An organizer invites you to an eventBell notification and email (setting Vendor updates). The email has the date, venue, service, agreed fee and the organizer’s notes.
An organizer sends a quote request from your public pageBell notification naming them. It opens the Quote Requests panel on your dashboard, with their message.

What you are not told

  • A contract being sent, cancelled or expiring.
  • A task being added or changed.
  • An invoice being approved or paid.
  • A review being posted.
  • Your profile being approved.

For all of these, look at the dashboard counters — Pending Contracts, Tasks Overdue, Open Invoices — and at the lists they open.

What the organizer is told about you

  • When you accept or decline an invitation: bell and email.
  • Nothing when you sign a contract, change a task or submit an invoice. They see it on the event’s Manage → Vendors page when they look, so tell them yourself about important steps.

How to reach an organizer

  1. Use the contact details the organizer gave you in the invitation or the contract.
  2. Use the contact form on the organizer’s public page. Organizers keep their own email address off public pages, so a form is the route.
  3. For platform problems — your profile, a bug, a missing approval — use Support in the sidebar. It goes to the EventMann team, not to the organizer.

Good to know

  • Agree the scope, the fee and the schedule in writing, and put the important terms in a contract.
  • Details of the invitation — notes, service, fee — live in the email. Do not delete it until the event is over.
  • You decide which emails you get under notification preferences in the avatar menu; the bell notification stays on.

Troubleshooting

  • The organizer says they sent a contract and I see nothing. Open My Contracts; it is listed there even without a notification. If it is not, it has not been issued or it was cancelled.
  • I answered an invitation but the organizer did not notice. They were notified. Follow up through their contact form.

Related

Chapter 3

Using EventMann

3.1 Getting Started with EventMann

EventMann is a platform for finding and booking event tickets, and for the organizers, vendors, sponsors, staff and venues that make those events happen. This page is the map: read it first, then follow the link that fits what you want to do. If you only want to look at events, you do not need an account at all.

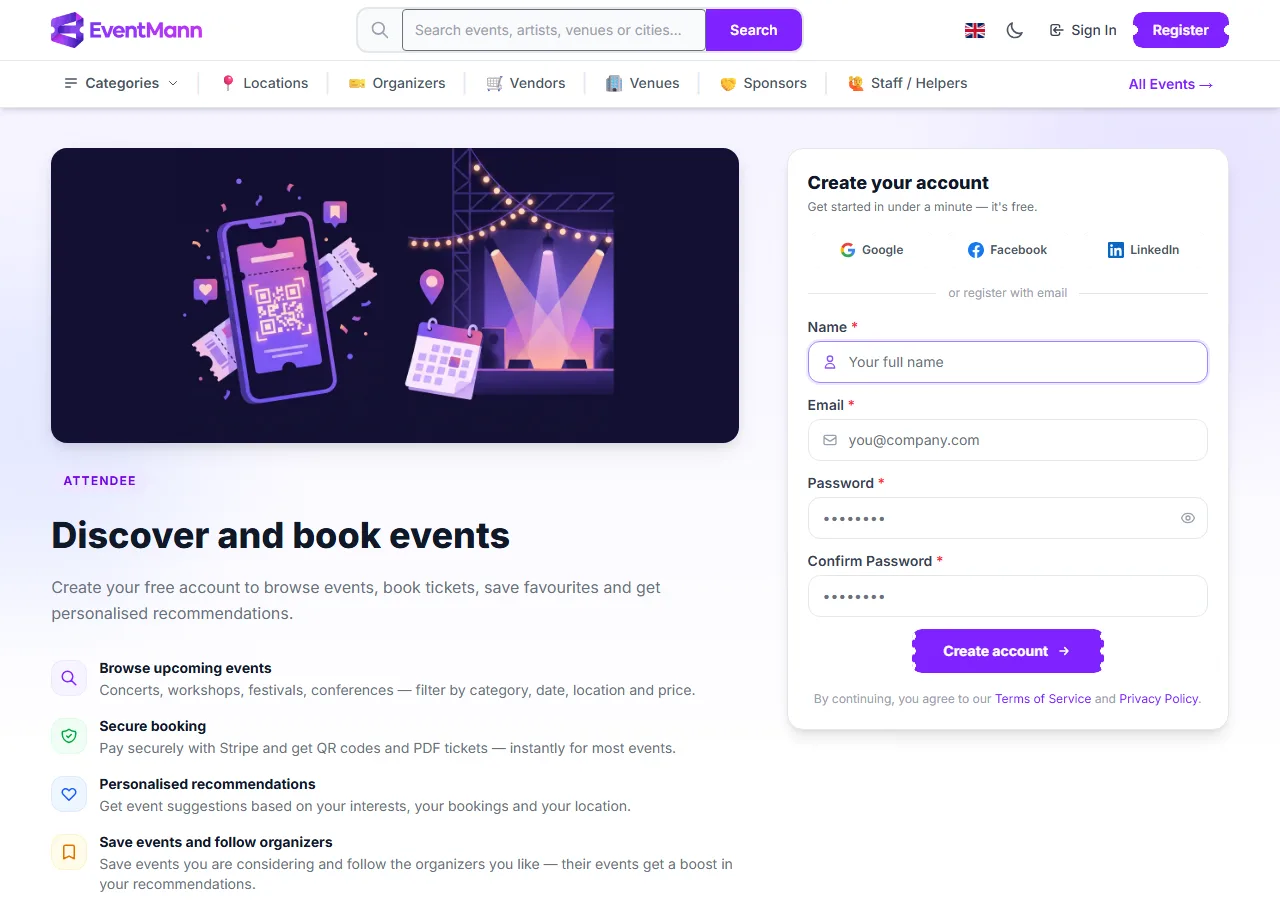
Create an account

The registration page with Google, Facebook and LinkedIn buttons and the email form
  1. Open Register at the top right.
  2. Press Google ①, Facebook or LinkedIn to sign up with that account, which skips choosing a password. Or fill in the form: Name ②, Email, Password and Confirm Password.
  3. Press Create account ③.
  • The ordinary registration page creates an attendee account, the one for browsing and buying tickets. Organizer, vendor, sponsor and venue accounts are created from their own sign-up pages, linked from the footer.
  • You are signed in straight away. We send you an email with a link to verify your address; it is valid for 72 hours. Some things, such as buying a membership, publishing as an organizer or accepting a ticket transfer, need a verified address.
  • A password needs at least 8 characters with an uppercase letter, a lowercase letter, a number and a special character.

Sign in

The sign-in page with social sign-in, email and password, Remember me and Forgot your password?
  1. Open Sign In and enter your email and password, or use one of the social buttons you registered with.
  2. Tick Remember me ③ if you want to stay signed in on this device.
  3. If you turned on two-factor authentication, enter the 6-digit code from your authenticator app (or a recovery code).

Forgot your password? Press Forgot your password? ② and follow the emailed link, valid for 60 minutes. An account you do not use is signed out after a period of inactivity.

Find your way around

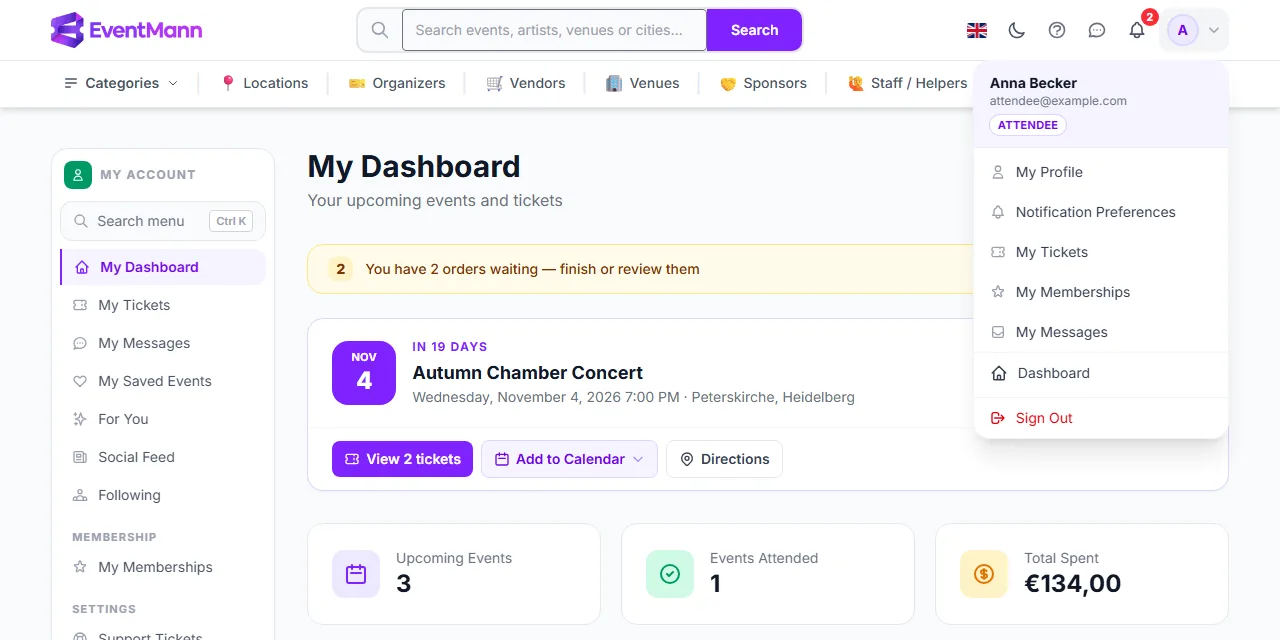
The avatar menu with links to profile, notification preferences, tickets, memberships, messages, dashboard and sign out
  • The top bar — the search box, the language flag, a light/dark switch, the ? button that opens help for the page you are on, a messages icon, the notification bell and your avatar. Under it: Categories, Locations, Organizers, Vendors, Venues, Sponsors, Staff / Helpers and All Events.
  • Your avatar menu — My Profile, Notification Preferences, My Tickets, My Memberships, My Messages, your Dashboard and Sign Out. If your account has more than one role, a role switcher appears here.
  • Your account sidebar — the same places and more, shown on every attendee page, with a Search menu box (press Ctrl+K) that jumps to any page of your account.

Choose your path

You want to…Start here
Attend eventsMy Dashboard and How to Buy Tickets
Run eventsGetting started as an organizer
Offer services to organizersGetting Started as a Vendor
Sponsor eventsGetting Started as a Sponsor
Work shifts at eventsGetting Started as Staff
Manage a venueGetting Started as a Venue Owner

Good to know

  • One account, several roles. You can ask for another role without a second account. An organizer role is granted at once on a verified email; vendor, sponsor and venue requests are reviewed first. Staff members are added by an organizer. Switch between roles you hold from the avatar menu.
  • You can browse and search without an account. A checkout asks you to sign in only if that event’s organizer requires it.
  • EventMann is operated by ChetsApp UG in Fellbach, Germany, and is available in several languages: choose one with the flag in the top bar or in your profile.
  • Everything about your data is in Privacy & Data.

Troubleshooting

  • I signed up but do not see my dashboard — check your email for the verification message, including spam. The Dashboard link opens the dashboard for your current role.
  • I want to become an organizer, vendor, sponsor or venue owner — use the Become an Organizer or Become a Vendor style links in the footer while signed in; you do not need a new account.
  • I was hired to help at someone’s event — the organizer adds you to their team; the invitation email gives you access to that event.
  • I cannot sign in — use Forgot your password?; if you registered with Google, Facebook or LinkedIn, use that button instead.

Related

3.2 Browse Events

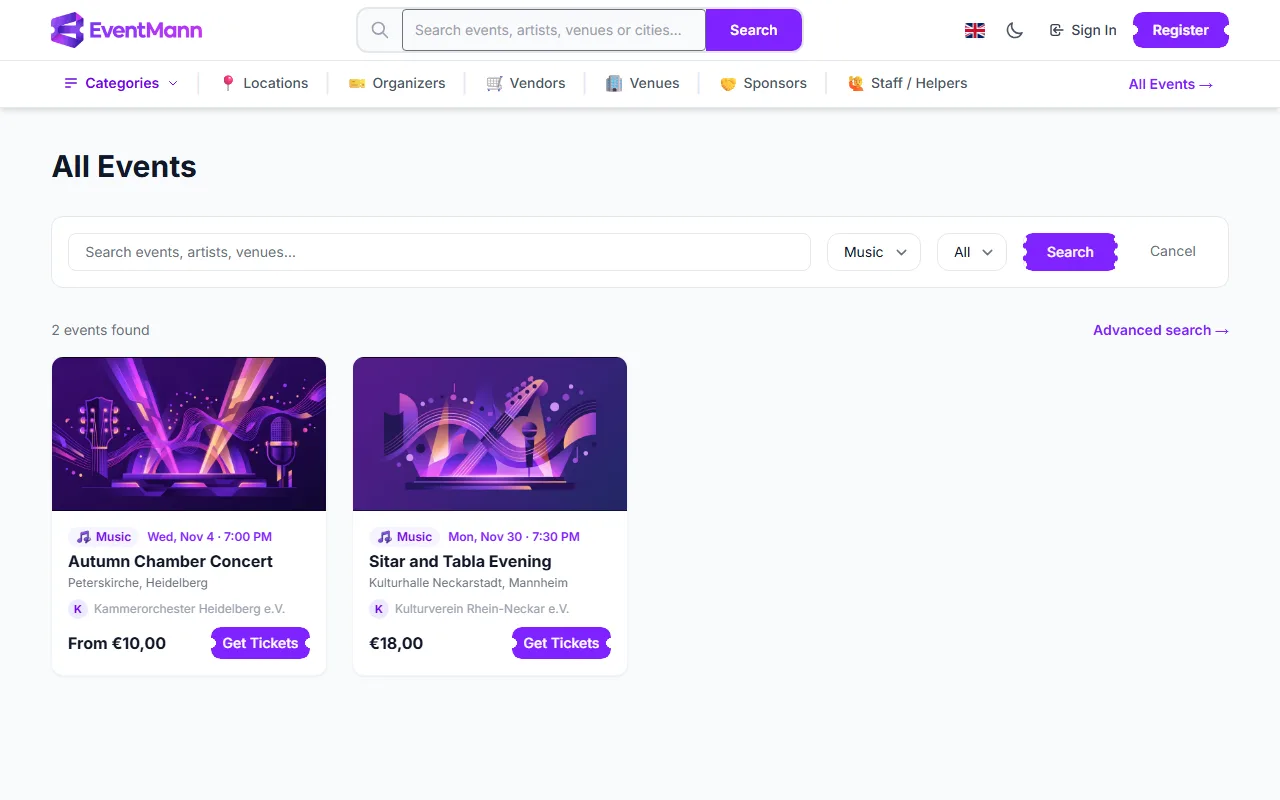
The Events page lists everything currently on sale, soonest first. Use it when you want to look through a category or a time window rather than search for something specific. Open it with All Events at the right end of the top bar, or from the footer. You do not need an account.

The Events page filtered to the Music category, with the category and date lists above the results

What you can do here

  • Filter by category ① — the Category list contains the categories that have at least one upcoming event.
  • Filter by date ② — Today, This Weekend, This Week or This Month narrows the list to events that start in that window.
  • Search within the list — the search box matches the event name, the city and the venue name, not the description. For a fuller search with prices and dates, use Search.
  • Combine them — category, date and words work together. When any filter is active, a link next to the search bar clears it.
  • Open an event — click a card or Get Tickets. Each card shows the date, venue, the organizer and the lowest ticket price.

How results are ordered

  • Soonest start date first.
  • Twelve events per page, with page links under the list.

Which events are listed

  • Only events that are Live and public and have not started yet. A draft, a paused event or an event set to private is not listed. A private event still opens for people who have its link.
  • The list is narrowed to the country your connection appears to be in, because events elsewhere are rarely useful for a purchase. If there are no events for your country, you see all events. This also applies to the home page, Locations and the organizer and vendor directories. It does not apply to Search, and any event link opens from anywhere.
  • If an organizer pauses a live event, it disappears from the list at once, but the direct link still works for people who have it.

Good to know

  • Browsing never needs an account. Signing in adds Save on event pages so that you can keep a shortlist (see Saved Events).
  • The Locations link in the top bar opens a map with popular cities and countries, and a page for each place that has events.

Troubleshooting

  • An event I expected is missing — it may not be live yet, may be paused or private, or its date may fall outside the date window you chose. Clear all filters first. Try Search too, which is not limited to your country.
  • A category I know is missing — categories without upcoming public events are left out of the list.
  • There are no results — broaden the date window or remove the category. The empty page offers a link back to the full list.

Related

3.3 Search

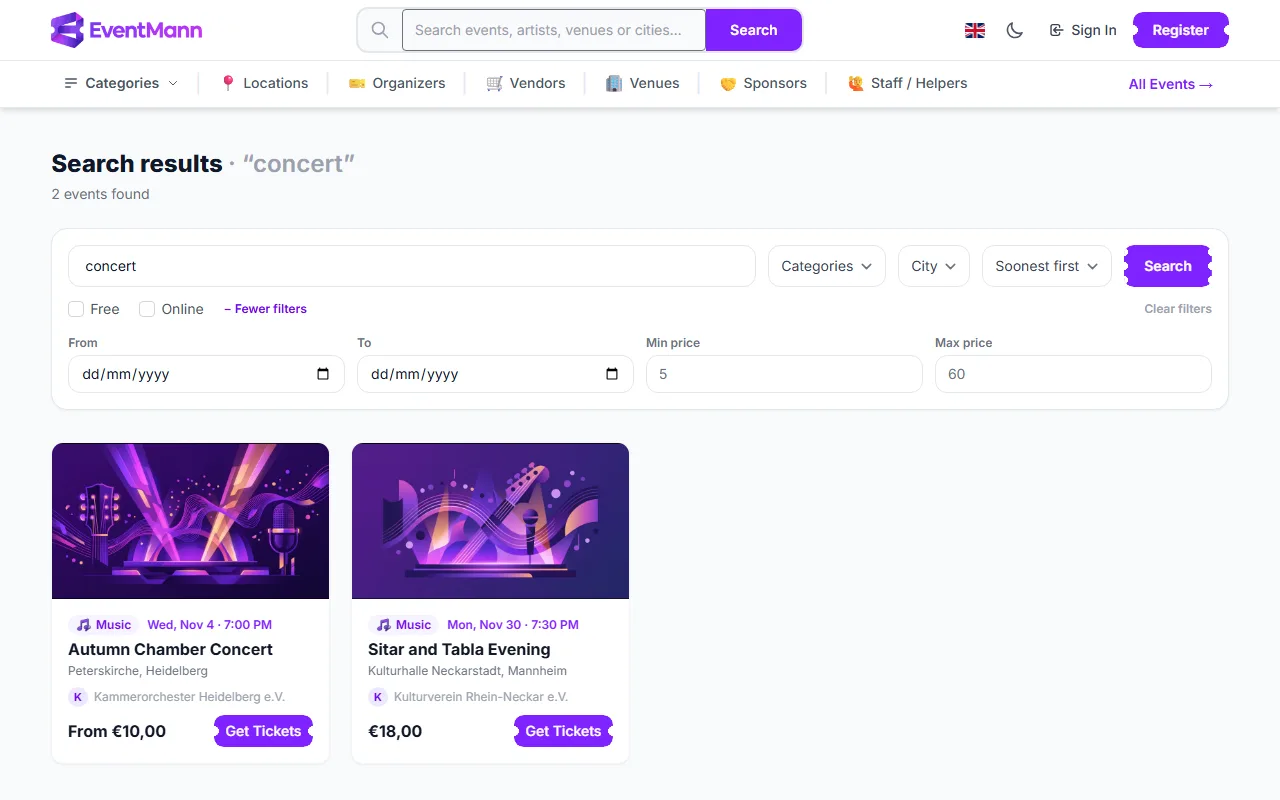
Search is the finder to use when you know roughly what you want: a word, a city, a date range or a budget. It lives at /search: open it with Advanced search next to the result count on the Events page, which carries your search words along. It puts every filter in one place. No account is needed. The search box in the top bar is a lighter tool: it opens the Events page filtered by your words, which match the event name, city and venue only.

Search results for “concert” with the extra filters open: dates and price range

What you can filter by

  • Keyword ① — matches the event title, description, venue and city.
  • Categories and City — two lists that only offer values that currently have upcoming events, with the number of events next to each category.
  • Free ③ and Online — check boxes. Free keeps events that have at least one free ticket type on sale; Online keeps online events.
  • More filters — a From and To date, and a Min price and Max price. The price range keeps events with at least one ticket type on sale inside it.
  • Sort ② — Soonest first, Latest first, Title A–Z, Price: low to high and Price: high to low. Price sorting goes by the cheapest ticket type on sale for each event.

How to search

  1. Type a keyword in the box ① and press Search, or leave it empty and use only the filters.
  2. Set any filters. Press + More filters for dates and prices.
  3. The page shows how many events were found, twelve to a page. Use Clear filters to start again.

Good to know

  • Only events that are live, public and not yet started are found. A private event (direct link only), a draft or a paused event never appears.
  • Search is not narrowed to your country, unlike the Events page. See Browse Events.
  • The filters are kept in the page address, so you can bookmark a search or send it to someone.
  • When a search finds nothing, the page shows a short list of events that have been booked a lot in the last seven days, so you are not left with a blank page.
  • Members-only and volunteer-only ticket types do not influence the price shown or the price filters, so an event is never listed as free only because of a thank-you ticket for volunteers.

Troubleshooting

  • I get no results for a word I know exists — a filter from an earlier search may still be set (price, dates, Free, Online). Press Clear filters.
  • The price filter seems odd for an event with several tiers — an event matches when any ticket type on sale falls in your range; the card then shows its lowest price.
  • An event I can open directly is missing — it is private, not live or already started.
  • The category list lacks a category — categories without upcoming public events are left out.

Related

3.4 Event Details

The event page is where a listing turns into a decision: it has everything you need to know about the event, the organizer’s rules and every ticket type on offer. You get there from any list, a search result, a shared link or the organizer’s page.

A whole event page: summary, description, location, organizer, ticket conditions, reviews and the ticket panel

What is on the page

  • Header — the cover picture (a generated picture for the category when the organizer uploaded none), the category, a Featured badge, an age badge when there is a minimum age, the title, the date and time and the venue address. Times are shown in the event’s own time zone, with the zone shown next to them. An online event says that the link is shared after you book.
  • Save and share ① — Save adds the event to My Saved Events (signed in only). The round buttons share it by Facebook, X, LinkedIn, WhatsApp, email or copy its link.
  • About this event — the organizer’s description, and, where they added one, an agenda by day.
  • Location — the venue and a map with Open in Maps for directions.
  • Organized by ② — the organizer’s name and logo, how many followers they have, Follow or Following and Contact. The organizer’s email address is never printed; Contact opens a form (see How to Contact the Organizer). A Payments verified badge means they finished setting up payments.
  • Ticket conditions ③ — what you may do with a ticket after buying: cancel, what you get back (the cancellation terms), change the attendee details and transfer it. Read this before you buy; see How to Get a Refund.
  • Sponsors — sponsors the organizer chose to show.
  • Reviews ④ — the average score, how many people gave each star count, and written reviews with the organizer’s reply under them. Only confirmed attendees can leave a review after the event.
  • The ticket panel ⑤ — Ticket Types with a quantity chooser, described below.
  • More events like this — other events in the same category. Report this event at the bottom opens the contact page with the event already filled in.

The ticket panel

The panel lists every ticket type you may see, with its price and a status: Available, Selling Fast, Filling Up, Only 3 left! or Sold Out. A price struck through with a smaller one beside it is a discount that applies now, for example a time-limited sale, and the price shown is the price you pay.

  • Set a quantity with + and −. When you choose something, the order total appears; fees are only listed when the organizer passes them on to you.
  • The button under the panel reads Select Tickets until you choose something, then Book Now with the total. It takes you to checkout with your quantities (see Checkout Process).
  • Some rows are locked for you: Members only tickets, and Volunteers only thank-you tickets. See Member Benefits.
  • If members may book earlier than everybody else, the panel says when you can start.
  • For a seated event you choose seats on the checkout page, not here.
  • Where the event has a waitlist and a type is sold out, you can join it at checkout.

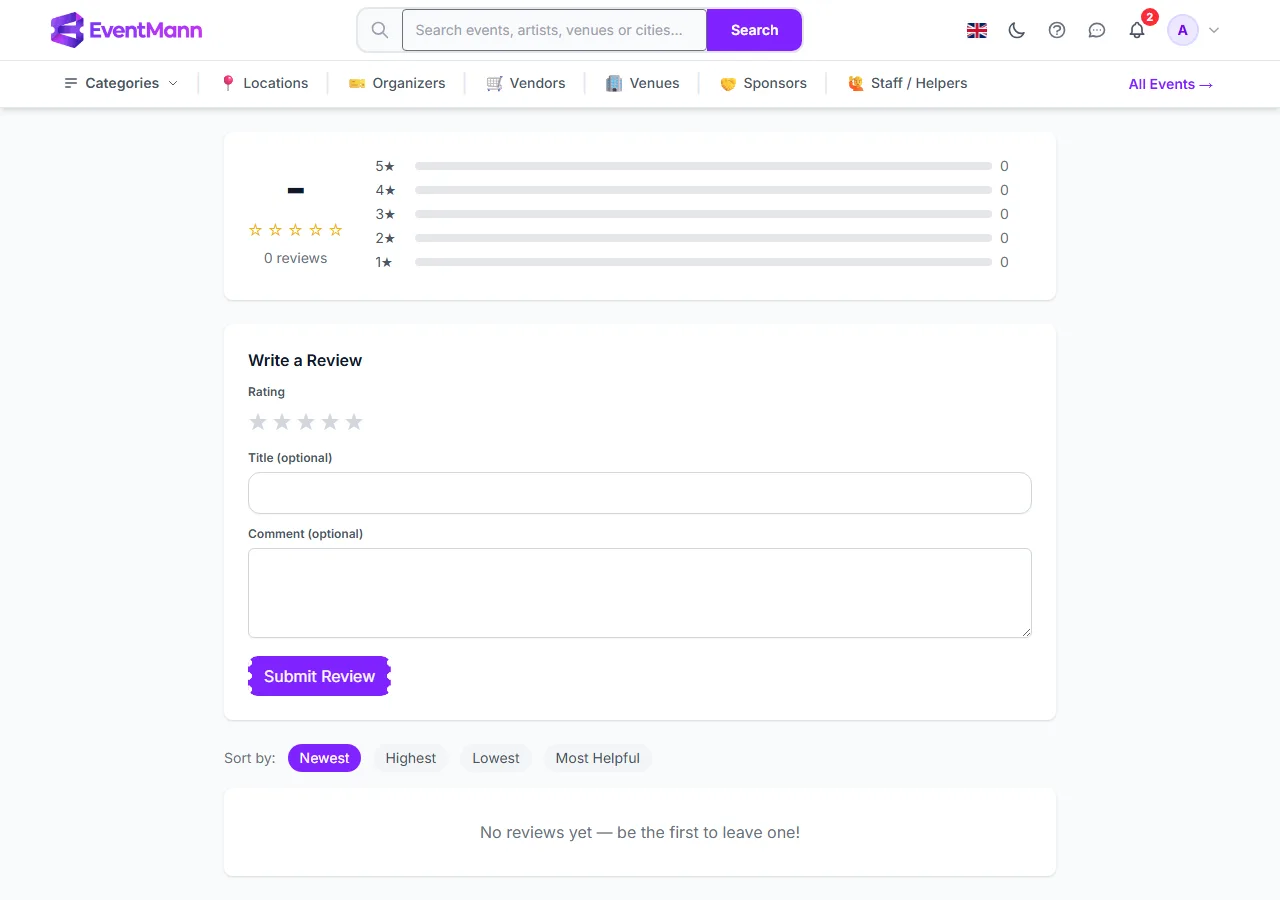
Write a review

After the event has started, open Reviews from the event page, or Leave a review from your order or your dashboard.

The review page with the rating summary, the Write a Review form and the sort options
  1. Choose the stars under Write a Review ①.
  2. Add a Title and a Comment if you like (both optional) and press Submit Review ②.

You can write one review per event, and only if you hold a confirmed booking for it. Reviews can be sorted by Newest, Highest, Lowest and Most Helpful, and the organizer may reply under yours.

Good to know

  • If the ticket button is greyed out or missing, sales have not opened yet or have closed, or everything is sold out. The page tells you which.
  • Prices already include the active discounts. A free ticket for volunteers does not make an event look free in lists or search.
  • You can follow the organizer and write to them without buying anything.
  • You can write a review once the event has started and you hold a confirmed booking for it. You can write one review per event, with a star rating and an optional title and comment, under Reviews or from your order in My Tickets.

Troubleshooting

  • All ticket types say Sold Out — the booking button stays disabled. Check whether the organizer offers a waitlist.
  • The price changed since my last visit — prices follow the organizer’s rules and time-limited sales, and the panel always shows the current price.
  • I cannot find where to review — the form only appears after the event has started and only for people with a confirmed booking.
  • I want to report a problem with the listing — use Report this event.

Related

3.5 Vendor Marketplace

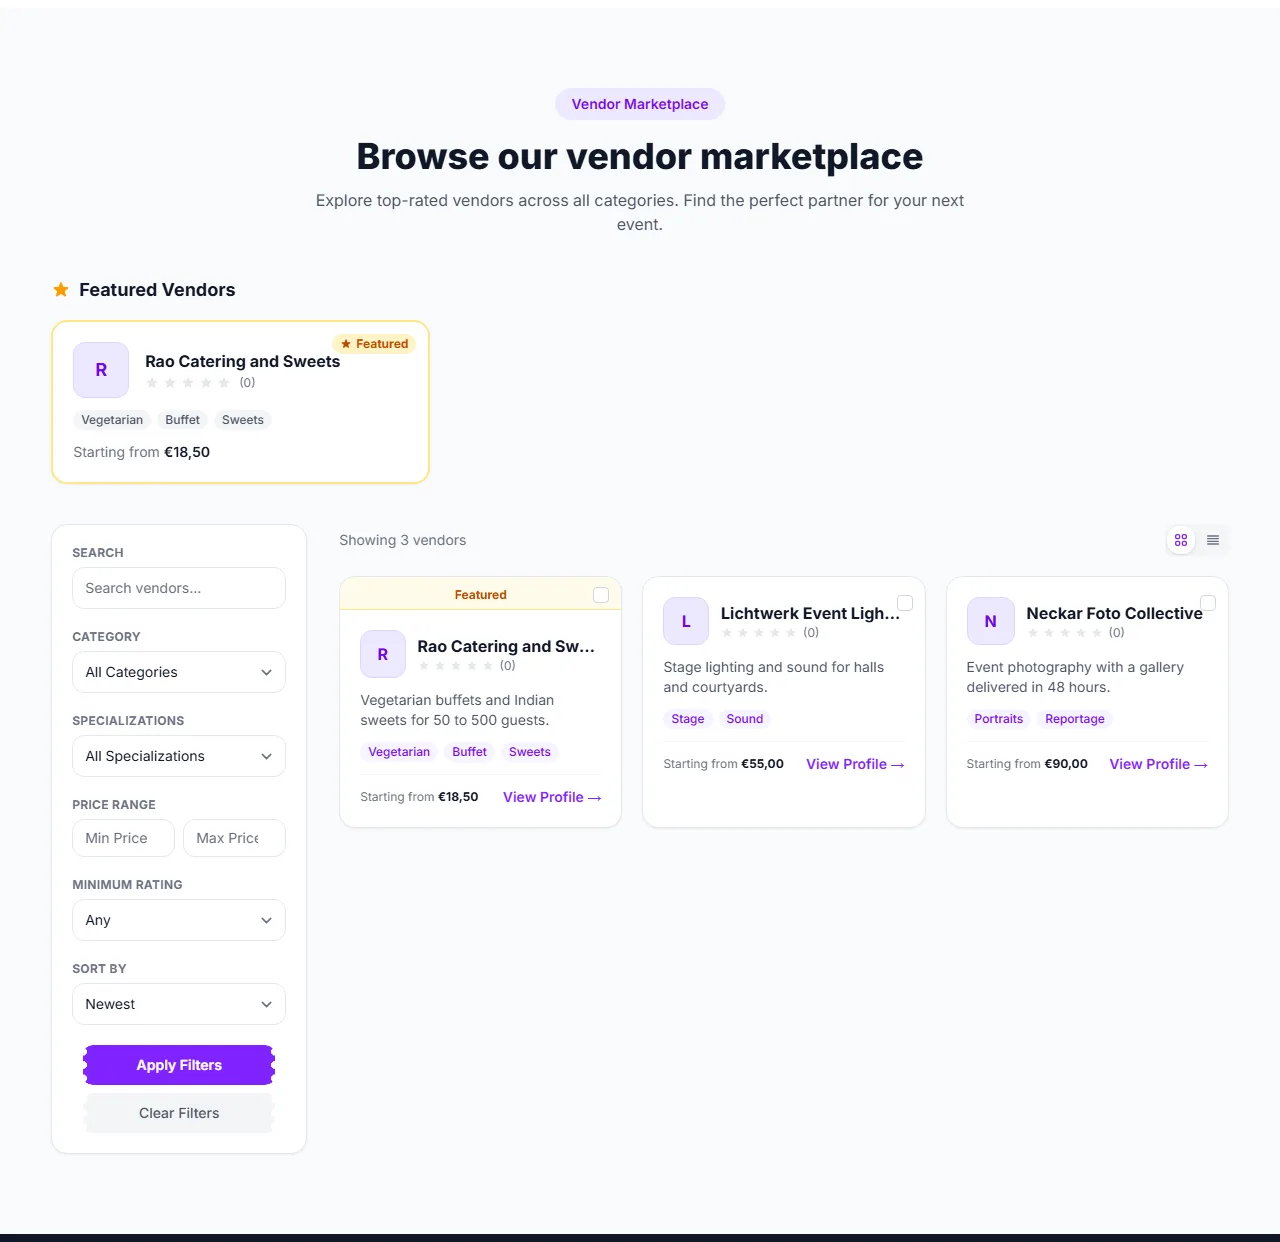
The vendor marketplace is where organizers find the businesses that help run an event — catering, photography, sound and lighting, décor, entertainment, rentals, security and marketing — and where those businesses get discovered. It is not a place to buy or sell tickets: tickets are sold by the organizers on their own event pages. You reach the marketplace with Vendors in the top bar, which opens the vendor page; the marketplace is the section Browse our vendor marketplace lower down.

The vendor marketplace with featured vendors, search and filters, and a list of vendors

Who it is for

  • Vendors build a public profile once: services with prices, specializations and a bio. Organizers find them through search and filters instead of the vendor pitching to each organizer.
  • Organizers (and admins) browse the profiles and send a quote request from a vendor’s page.
  • Anyone can browse. Visitors from other roles see the same listing but not the quote button.

What you can do here

  • See featured vendors ① — up to six vendors highlighted by EventMann appear at the top while no filter is active.
  • Search and filter — by keyword, Category, Specializations tag, Price range and minimum star rating (the rating list’s first entry, Any, is the unfiltered option).
  • Sort ② — Newest, Highest Rated, Name A-Z, Price: Low to High or Price: High to Low. Press Apply Filters ③ to run it, or Clear Filters to reset.
  • Switch the view — the toggle above the results shows vendors as a grid or as a list.
  • Compare — tick the box on up to three vendors, then open Compare Selected to see them side by side: rating, number of reviews and price range.
  • Open a profile with View Profile.

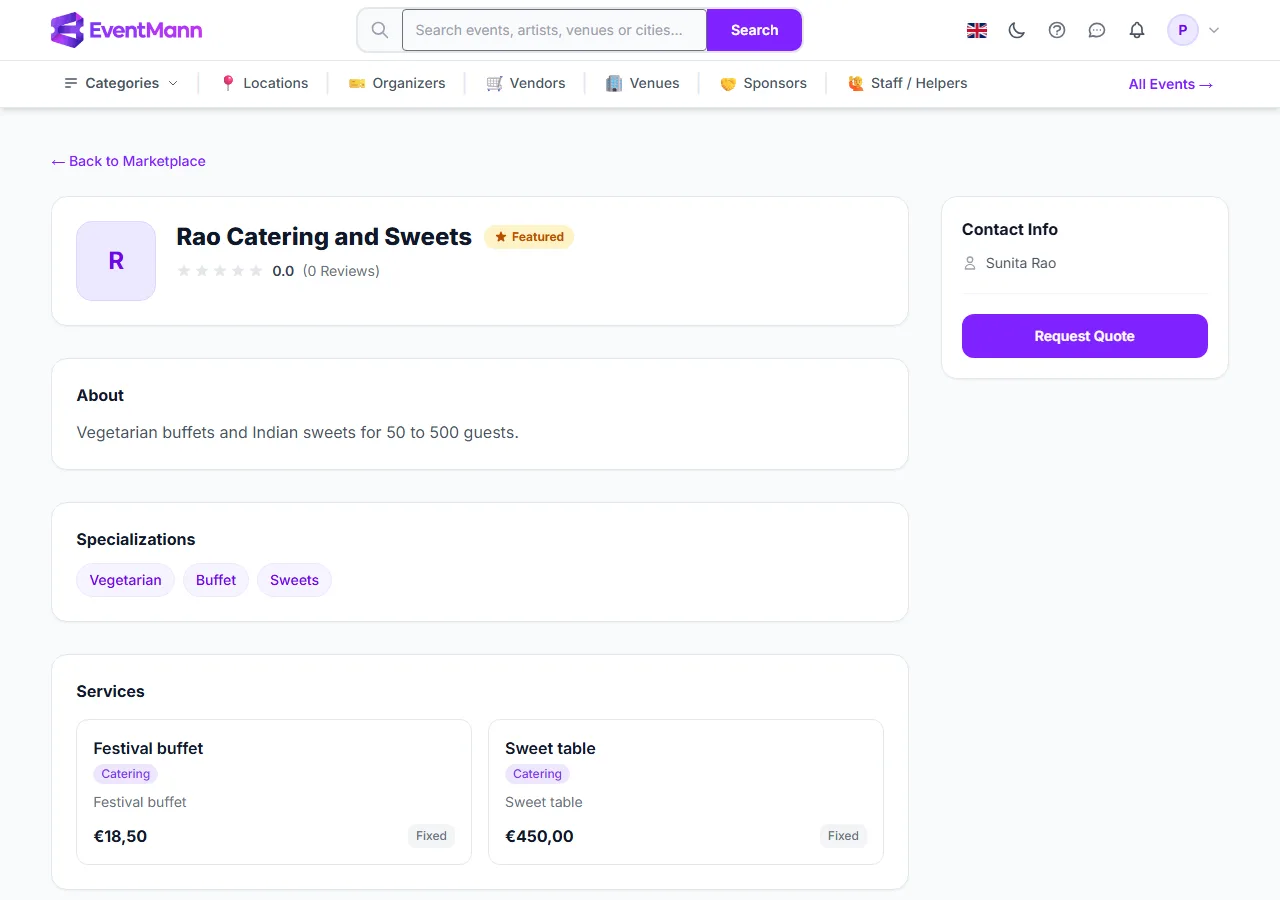
A vendor profile

A vendor profile with its services and prices and the Request Quote button
  • The company name, a Featured badge where it applies, the average rating and review count, the bio and the specializations.
  • Services ① — each with its price and how it is charged: fixed, hourly, daily, or on request. “Starting from” on a vendor card is the lowest active service price, not a quote.
  • Reviews — ratings from organizers the vendor worked for, with comments.
  • Request Quote ② — for signed-in organizers and admins. Write what you need (up to 2,000 characters), optionally name one of your events, and send it. The vendor gets a notification with your message. Pricing, scope and booking are then agreed directly between you; there is no quote or contract workflow on this page.

Good to know

  • Only approved vendors are listed. A new vendor profile appears after it has been reviewed.
  • Like the event lists, the marketplace shows vendors in your country when there are any; a vendor page opens from any link.
  • Signed out, the quote section asks you to sign in. A signed-in attendee does not get a quote button, because quotes are for organizers.
  • If you are a vendor yourself, your profile and services are managed in the vendor portal, not here (see Getting Started as a Vendor).

Troubleshooting

  • I do not see Request Quote — you are signed out or not signed in as an organizer or admin.
  • A vendor I know is missing — the profile may still be waiting for approval, it may be in another country, or your filters (price, rating, specialization) exclude it.
  • The compare box is disabled — three vendors is the limit; untick one first.

Related

Chapter 4

Account and security

4.1 My Profile

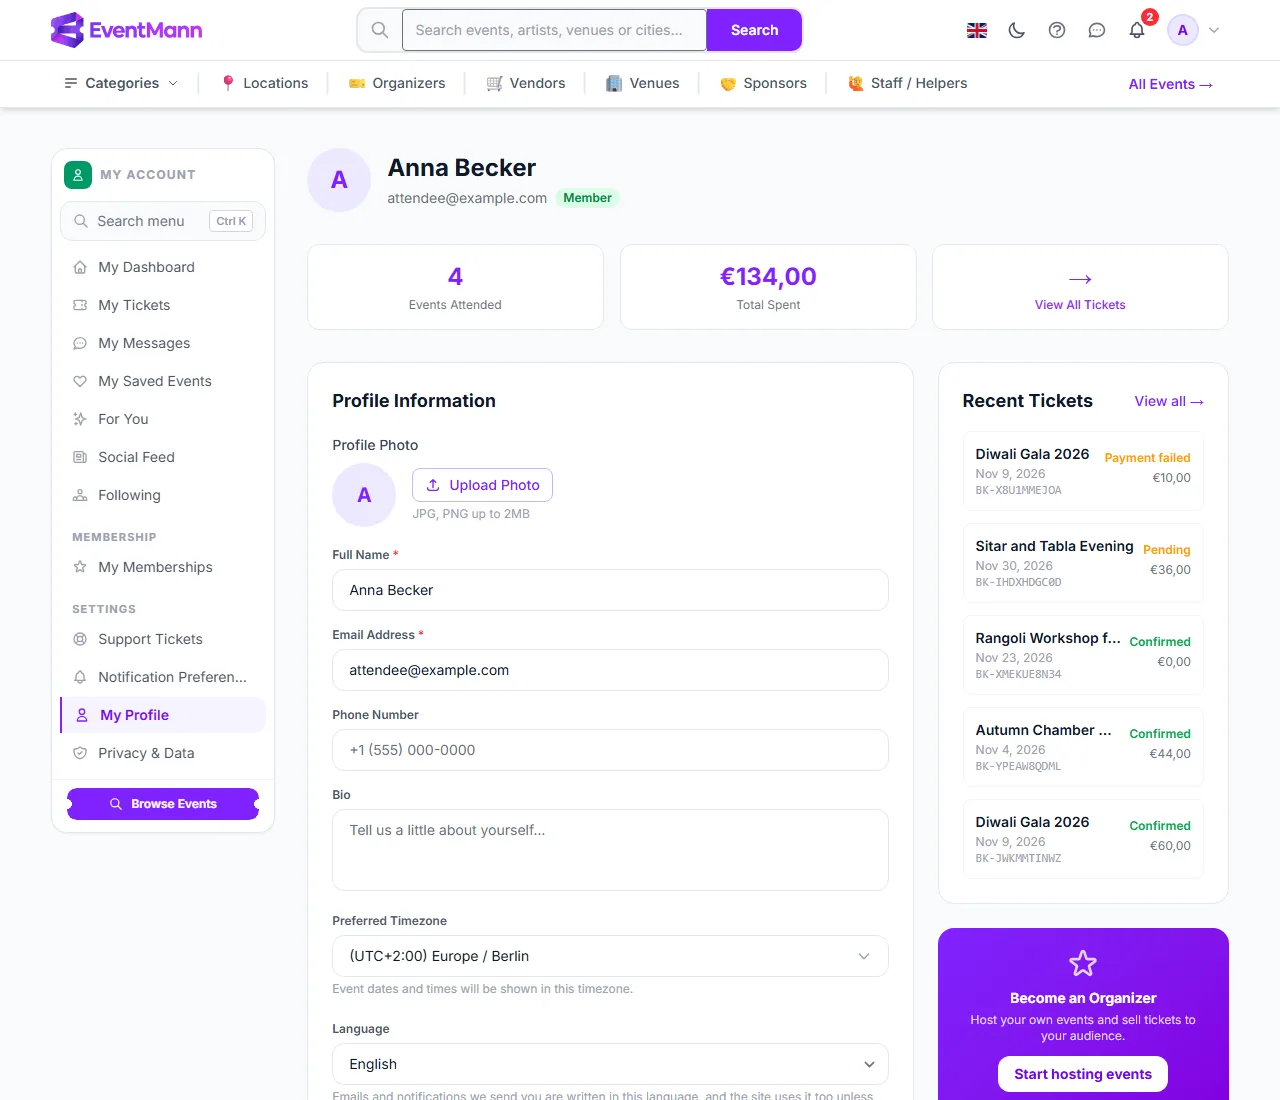
Every account on EventMann, whatever roles it holds, keeps the same core details on one page: My Profile. Open it from your avatar menu in the top right corner, or from My Profile in the sidebar of your portal. This article covers what lives there for everybody. Attendee-specific details are in Account Settings & Password.

The profile form with photo, name, email, language and Save Changes

What you can do here

  • Profile photo ① — upload a JPG or PNG up to 2 MB, or remove your photo to go back to your initial. The old file is deleted when you replace or remove it; there is no undo beyond uploading again.
  • Full Name — required. It appears on your bookings and, for organizers, may appear with the events you publish.
  • Email Address ② — required. Changing it makes your address unverified until you confirm the new one with the emailed link (valid 72 hours); messages and features that need a verified address pause until then.
  • Phone Number and Bio — optional. For organizer accounts the bio may be shown publicly.
  • Preferred Timezone — the zone in which event times are shown to you. It never changes an event’s actual schedule, which always runs on the venue’s own time.
  • Language ③ — the language for the site, the emails and notifications we send you and your ticket PDFs. The flag in the top bar changes the language for the page you are on without saving anything.
  • Save Changes ④ stores the form. The light/dark switch (the moon icon in the top bar) is separate: it saves at once.

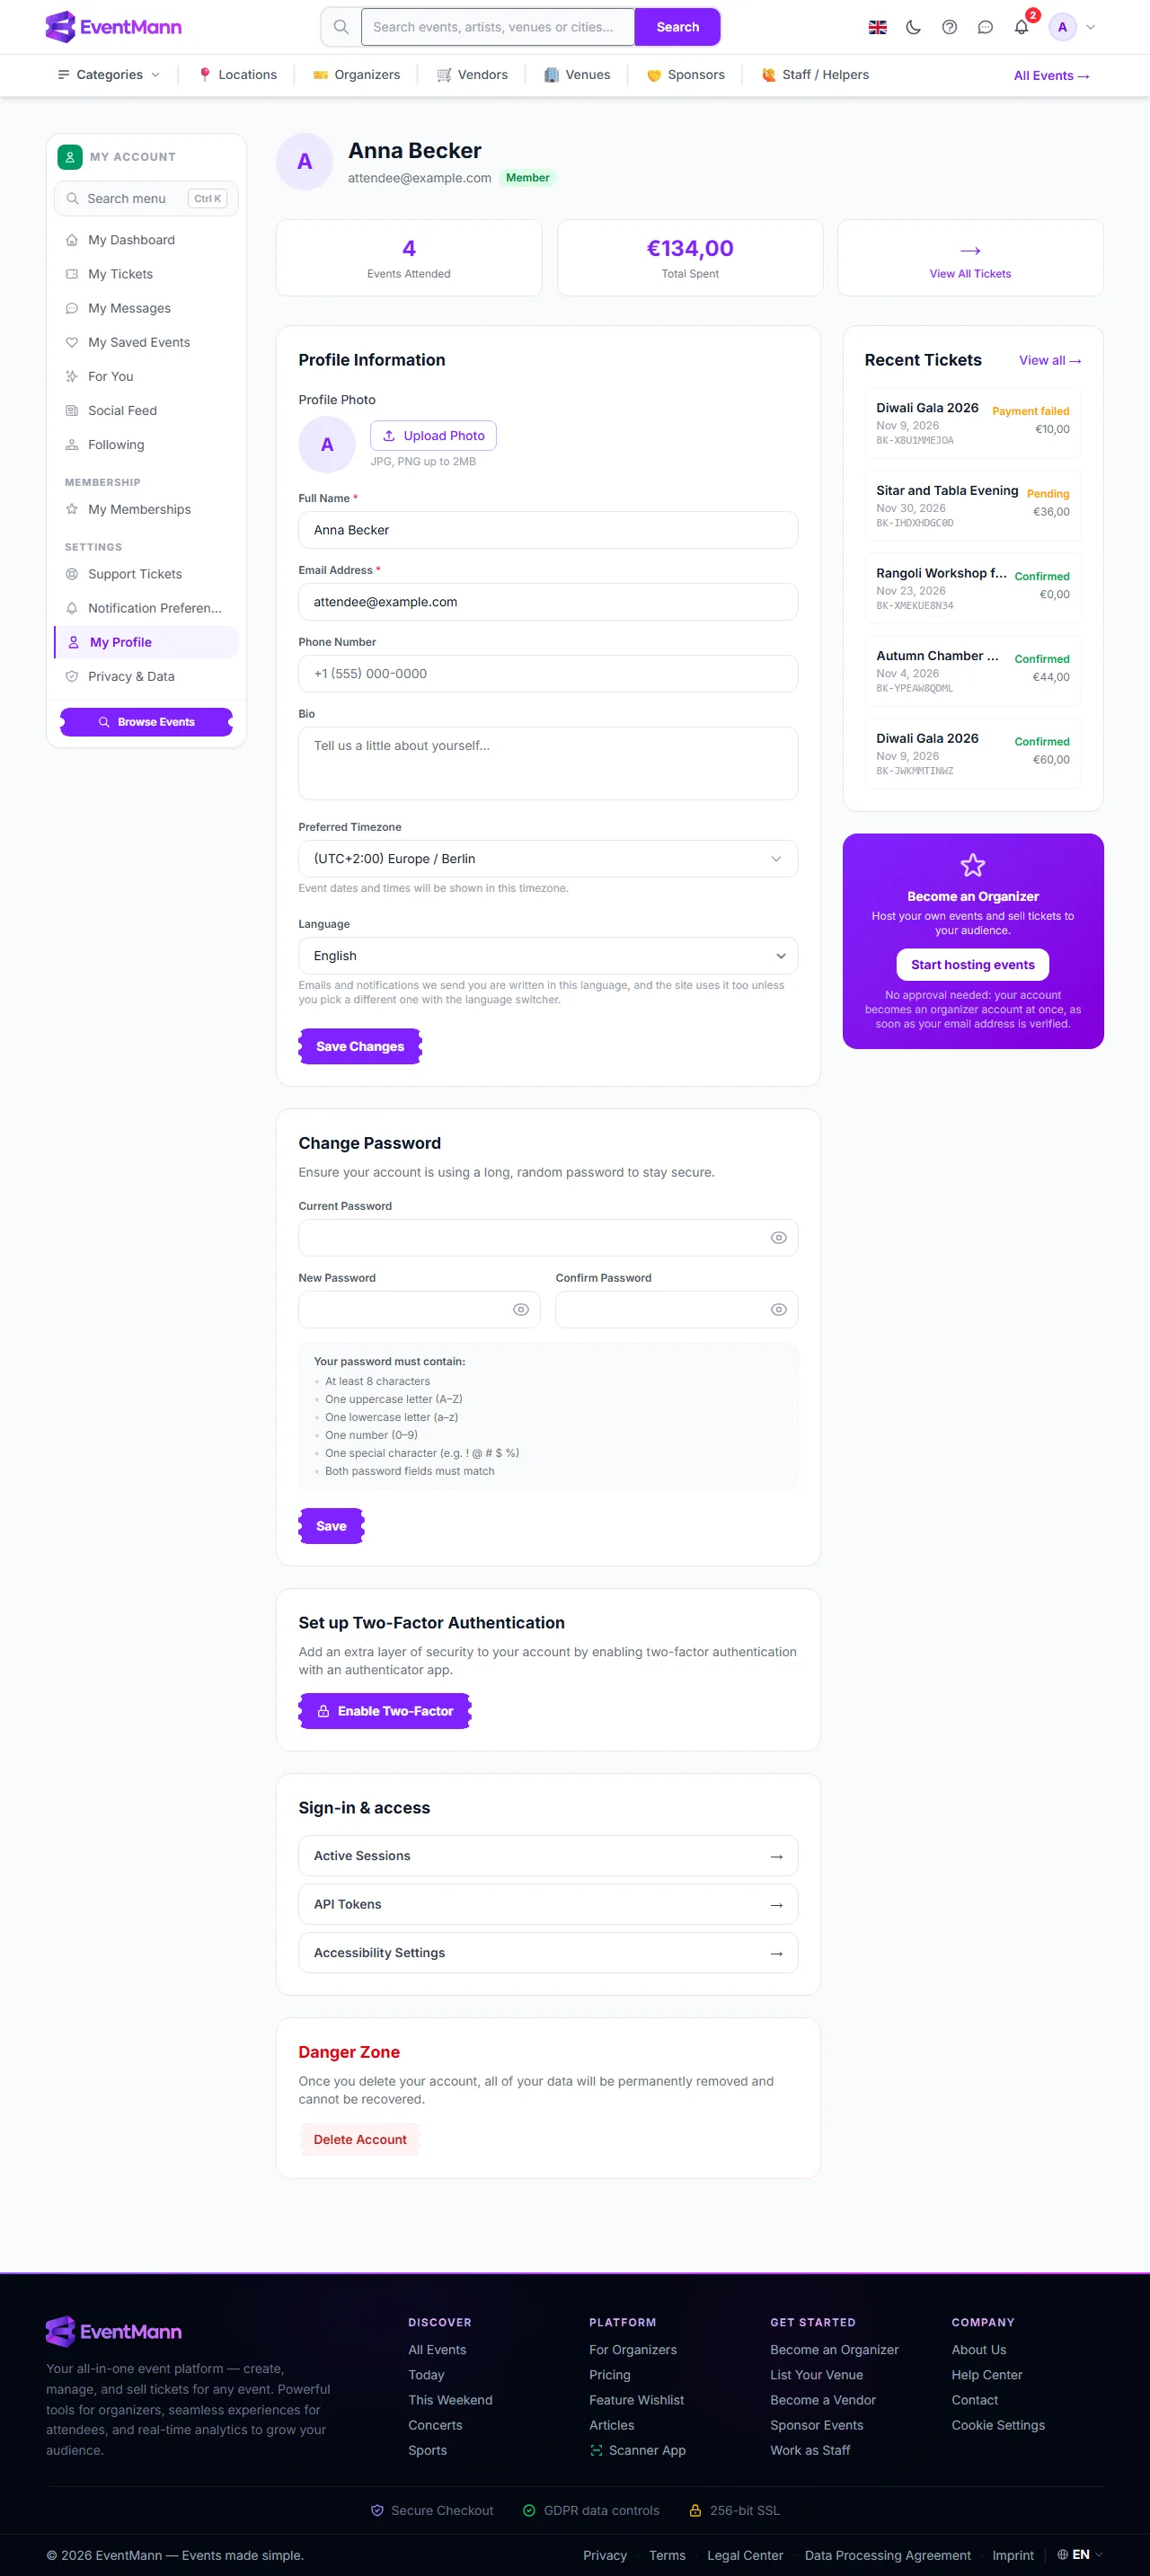
Below the form

  • Change Password, Set up Two-Factor Authentication and the Danger Zone (delete account). See Account Security & Two-Factor Authentication and Privacy & Data.
  • What else the page shows depends on your role: an attendee sees a ticket count, the total spent and recent tickets; an organizer sees event totals; an admin sees platform figures.
  • A card invites attendees to become an organizer. Its Start hosting events button turns your account into an organizer account at once, with no approval, as soon as your email address is verified (see Getting Started).

Other places that belong to your account

  • Notification Preferences — in your avatar menu. See Notification Preferences.
  • Active Sessions — the browsers signed in to your account; linked from the Sign-in & access card on your profile page. See Account Security.
  • API Tokens — personal tokens for scripts or the scanner app, in the same card. A token is shown once when you create it; copy it then.
  • Accessibility Settings — contrast, text size and motion, also in that card. See Accessibility.
  • Role switcher — if you hold more than one role, switch from the avatar menu.

Good to know

  • Your account has one name and one email for every role.
  • Social sign-in accounts (Google, Facebook, LinkedIn) have the same profile page. Their password form does not ask for a current password.

Troubleshooting

  • I changed my email and stopped getting some mail — confirm the new address with the verification email.
  • My timezone change did not move an event — expected: it only changes how times are shown to you.
  • The photo will not upload — use a JPG or PNG under 2 MB.
  • I cannot find Active sessions or API tokens — they are not in the menus; open the addresses above.

Related

4.2 Account Security & Two-Factor Authentication

Your password protects your account, and the settings in this article add layers on top of it. It explains each one: what it does, where to find it and what happens if you lose access. Most of it is on My Profile, reached from your avatar menu.

Password

On My Profile: the Change Password form, the two-factor button and the Danger Zone

Change it under Change Password ① on your profile. You enter your current password and the new one twice; the new one needs at least 8 characters with an uppercase letter, a lowercase letter, a number and a special character. If you registered with Google, Facebook or LinkedIn, you never chose a password, so the form does not ask for the current one.

If you are locked out, press Forgot your password? on the sign-in page. The emailed reset link is valid for 60 minutes; ask for a new one if it ran out.

Email verification

New accounts start unverified. Click the link in the verification email, valid for 72 hours, to confirm your address. It works on any device because it does not need you to be signed in there. Some features need a verified address, for example buying a membership, accepting a ticket transfer or publishing an event. If the link expired or never came, ask for another from the notice on the site or from your profile. Changing your email address makes it unverified again.

Two-factor authentication (2FA)

2FA adds a second step at sign-in: after your password you enter a 6-digit code from an authenticator app such as Google Authenticator or Authy.

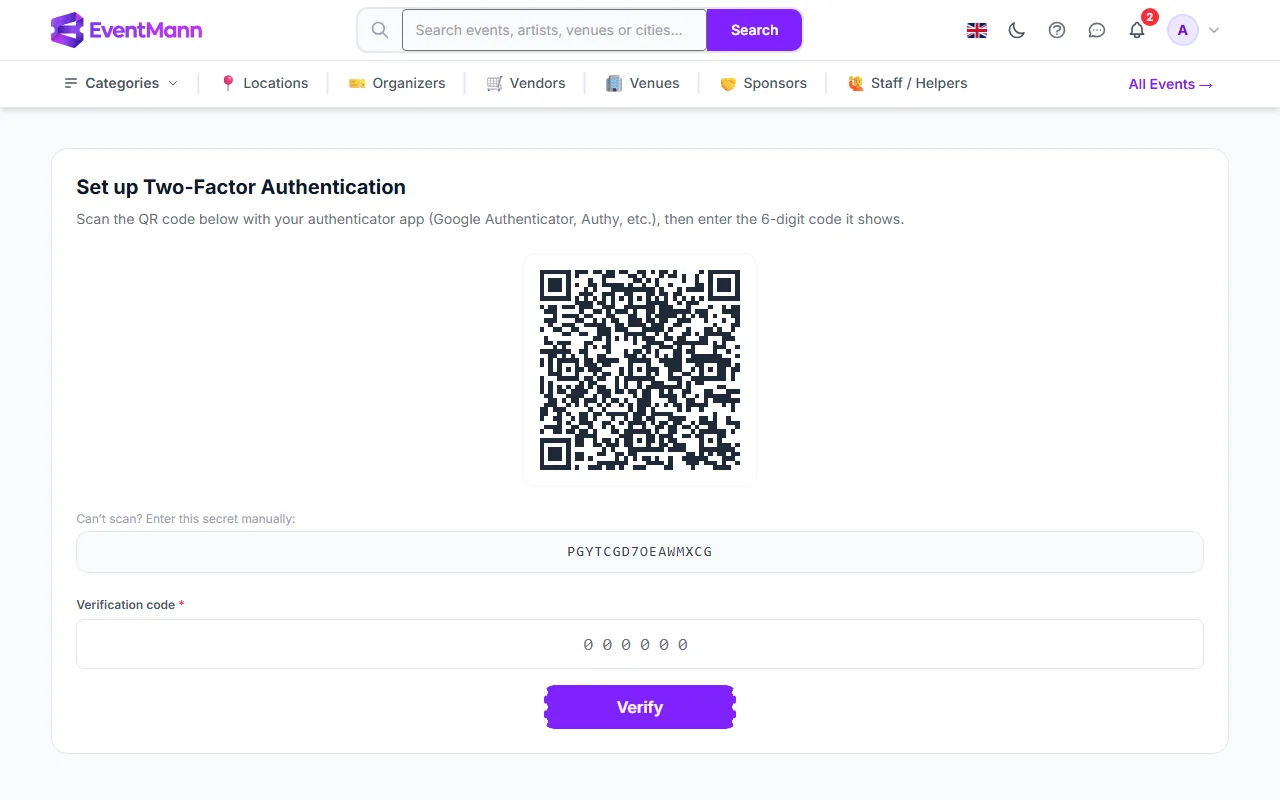
The two-factor setup page with the QR code, the manual secret and the verification code field
  1. On your profile press Enable Two-Factor ②. The setup page opens with a QR code.
  2. Scan the code with your app. If you cannot scan it, type the secret shown under Can’t scan? Enter this secret manually ① into the app.
  3. Enter the 6-digit code that your app now shows in the Verification code field ② and press Verify.
  4. You are given 8 recovery codes, shown once. Save them somewhere other than the phone with your authenticator app, such as a password manager or a printout.
  • From then on every sign-in asks for a code, after your password. At that screen, Use recovery code lets you enter a recovery code instead. Each recovery code works once and is then removed.
  • After 5 wrong codes in a row, 2FA sign-in is locked for 15 minutes.
  • To turn 2FA off, use the same section of your profile and confirm with your current password. The secret and the remaining recovery codes are deleted.
  • If you lose both your authenticator app and your recovery codes, there is no way to get back in yourself: that is the point of a second factor. Contact Support and be ready to prove who you are in another way.

Active sessions

Active Sessions: this browser marked as current and two other devices with a Sign out all others button

Open Active Sessions from the Sign-in & access card on your profile page (or go to /profile/sessions) to see every browser or device signed in to your account, with its IP address, browser and how long ago it was last active. Your current one is marked Current ①. Use the sign-out icon on a row to end that session, or Sign out all others ② to end every session except the one you are using. An account can hold at most 5 sessions; signing in on a sixth device signs out the least recently used one.

New device alerts

The first device you sign in with is trusted automatically. When you later sign in from a device we have not seen, we email you a New sign-in to your EventMann account message with the device and, when available, the location. Press Yes, this was me to confirm it. If it was not you, use the link in the email to secure your account and change your password at once.

Automatic sign-out

A session that has been idle for 30 minutes (the default) is signed out, so an unattended browser does not stay signed in. Background activity such as the notification bell does not count as activity.

Restrictions an administrator can apply

  • IP allow-listing — an administrator can limit an account to certain IP addresses. From another address you get an access-denied message instead of the sign-in screen. Ask whoever manages the account.
  • Suspension — a suspended account is signed out the next time it makes a request and cannot sign in until the suspension is lifted. Contact Support if you think it is a mistake.

Good to know

  • 2FA and your password are independent: changing your password does not turn 2FA off, and 2FA does not change the password rules.
  • Your 2FA secret and recovery codes can only be changed by the enable, confirm and disable steps above.
  • Deleting your account (Danger Zone) asks for your password and cannot be undone; see Privacy & Data.

Troubleshooting

  • My authenticator code is rejected — codes are time based. Set your phone’s clock to automatic and use the next code.
  • I lost my phone — sign in with a saved recovery code, then set 2FA up again on the new phone.
  • I used all my recovery codes and lost my app — contact Support.
  • I get no verification or reset email — check spam and the address on your account, then ask for a new link; old ones expire.
  • I was signed out on one device after signing in on another — you reached the limit of 5 sessions.

Related

4.3 Accessibility

EventMann has four settings you can adjust for yourself, and a set of accessibility features that are built into the pages. This article says what is there today and how to report something that does not work for you. The settings page is linked as Accessibility Settings from the Sign-in & access card on your profile page, and is also at /accessibility/settings, which works without signing in.

Accessibility Settings with High Contrast Mode, Reduce Animations, Screen Reader Optimised, a font size slider and Save Settings

The settings

  • High Contrast Mode ① — increases the contrast between text and background colours.
  • Reduce Animations ② — minimises motion effects and transitions. Nothing stops working; only the movement around it is removed.
  • Screen Reader Optimised — shows clearer focus outlines and keeps the skip links visible when they get keyboard focus.
  • Font Size ③ — a slider from Small to Extra Large (the default is Medium) that changes the text size across the platform.
  1. Open Accessibility Settings from your profile page, or go to /accessibility/settings.
  2. Switch on what you need and move the slider.
  3. Press Save Settings ④. The page confirms and the setting applies on every page.

When you are signed in, your choices are saved to your account and follow you to other devices. When you are signed out, they are kept for your current browser session only. They are separate from the light and dark theme, so you can combine both.

Built into the platform

  • Keyboard use — interactive elements can be reached and used without a mouse, and focus is visible.
  • Structure — semantic page structure and landmarks so screen readers can move through a page.
  • Forms — inputs have labels, and errors are described in text next to the field, not only in colour.
  • Accessible seating — organizers can mark seats and whole sections as wheelchair-accessible. Those seats carry a wheelchair symbol on the seat map and in the seat list, and you can filter to show only accessible seats. The organizer enters this information, so ask them if it matters for your booking.
  • Keyboard seat choice — every seat map has a seat list of real buttons that announce section, row, price, accessibility and availability. The picture of the map itself is pointer-only; the list is the full equivalent.

Known limitations

  • Images and descriptions added by organizers may lack alternative text or structure; that depends on the organizer.
  • PDF tickets contain text but are not optimised for every screen reader. The ticket page in the browser shows the same information.
  • Content from other providers, such as maps and payment forms, is outside our direct control.

Our aim is to conform to the Web Content Accessibility Guidelines (WCAG) 2.1 at level AA. The page Accessibility Statement, linked from the settings page, describes our approach and these limits.

Report a problem

If you meet a barrier, such as a control you cannot reach by keyboard, text that does not resize or something a screen reader mishandles, open a support ticket or use the contact details on the Accessibility Statement. Name the page and describe what happened. Accessibility reports are treated as faults, not as feature requests.

Good to know

  • The settings page works signed out as well, so you can adjust the site before you create an account.
  • Your browser’s own zoom works as usual; the settings here are in addition to it.

Troubleshooting

  • I cannot find the accessibility menu — it is not in the top menu; open it from the Sign-in & access card on your profile page, or go to /accessibility/settings directly.
  • My font size did not stick — press Save Settings. When signed out, the choice lasts only for the browser session.
  • The seat map cannot be used with my keyboard — use the seat list beside it.

Related

4.4 Supported Browsers & Devices

EventMann is a web application built for current browsers, so how well it runs depends mostly on how up to date your browser is. This article says what to expect, what must be switched on, and a limit that matters if you check people in with an iPhone.

Recommended browsers

  • Chrome, Firefox, Safari and Edge — the latest version of each is recommended.

The site uses modern web features, and the interactive parts (ticket quantities, menus, the payment form) rely on JavaScript, which must be enabled. An old browser is far more likely to cause trouble than any particular version number. Updating is the most reliable fix for layout or button problems.

Devices

The site adapts to desktop, tablet and phone screens. There is no EventMann app for attendees: you buy tickets, show them and manage your account in a browser on any device. Your tickets are web pages and PDFs, so a phone with a browser is enough at the door. A separate scanner app and an installable scanner web page exist for the people who check tickets (see below).

What has to be on

  • JavaScript — without it most pages cannot work.
  • Cookies — signing in and checkout use the site’s own cookies. The cookie banner lets you choose what else is allowed; refusing optional cookies does not stop you from buying.
  • Access to Stripe’s payment form — the card and payment form is loaded from our payment provider. If an ad blocker or a strict network prevents it, the page says The payment form could not load. Please disable any ad blocker for this page, or reload it.
  • Location (optional) — only if you ask for events near you on the For You page.
  • Notifications (optional) — only if you turn on browser push in Notification Preferences.

Check-in scanner on iPhone

Organizers and door staff can install the check-in page as a home-screen web app from the check-in page itself. There is no App Store listing, because iOS offers no install prompt for web apps. In Safari press the Share button and choose Add to Home Screen. This needs iOS 16.4 or later: on earlier versions the installed app cannot use the camera, so scan from the Safari tab instead. Android and desktop Chrome show a normal install button.

  • The installed scanner contains only the scanner. Signing in again, if your session ended, opens in your normal browser.
  • An Android scanner app is also offered as a direct download, linked as Scanner App in the site footer.

Good to know

  • Attendees do not need to install anything to show a ticket: open the ticket page or the PDF.
  • The light and dark appearance follows the switch in the top bar; text size and contrast are in the accessibility settings.

Troubleshooting

  • The scanner cannot use the camera after I installed it on my iPhone — check that iOS is 16.4 or later. Otherwise use the Safari tab version.
  • A button does nothing or the layout looks broken — update your browser, then reload. Also try without extensions that block scripts.
  • No page shows interactive content — check that JavaScript is enabled.
  • The payment form does not appear — disable the ad blocker for the page or try another network.

Related

4.5 Support

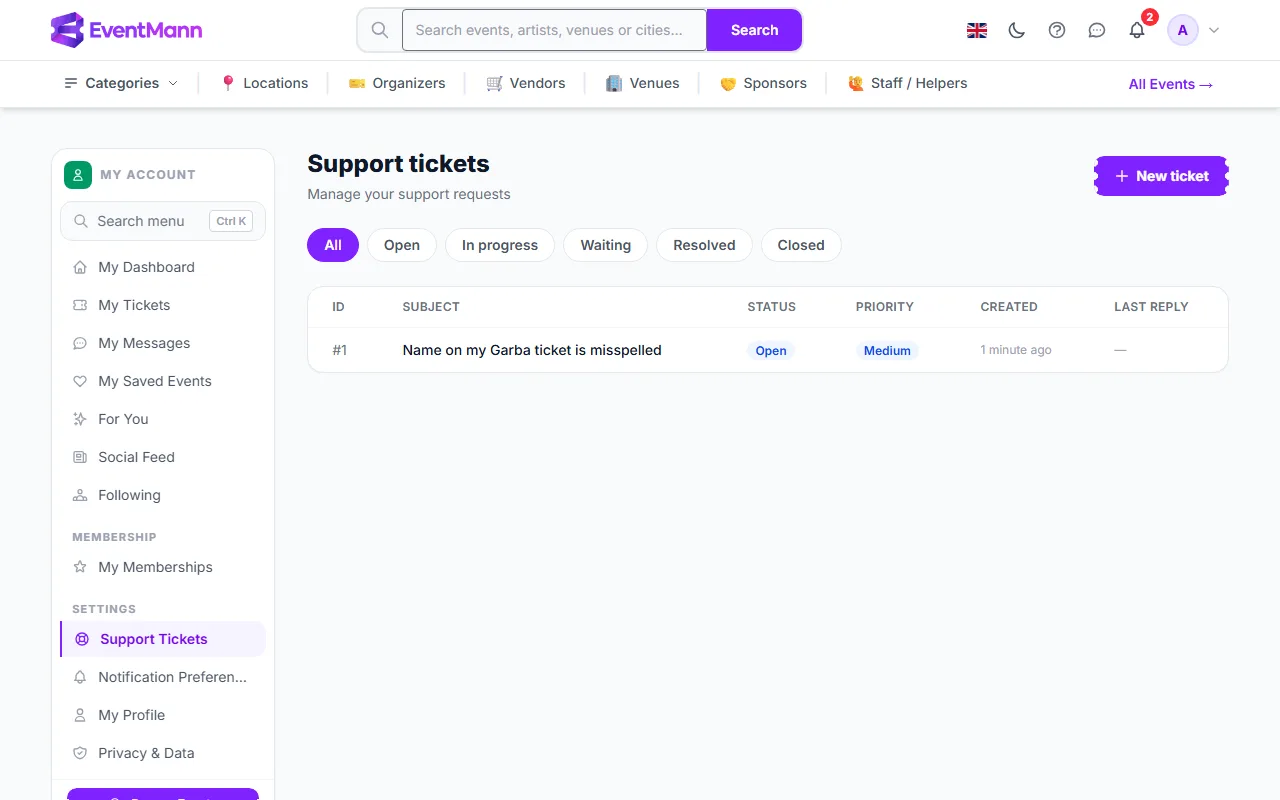
Use Support for anything about the platform itself: your account, a payment, a technical error, or a problem that the organizer cannot solve. Questions about a specific event, such as directions, the programme or what is included, are faster to answer if you ask the organizer (see How to Contact the Organizer). Open Support Tickets in your account sidebar. You need to be signed in; guests can use the Help & Contact page.

Support tickets with a status filter, a New ticket button and one open ticket

Raise a ticket

  1. Open Support Tickets and press New ticket ①.
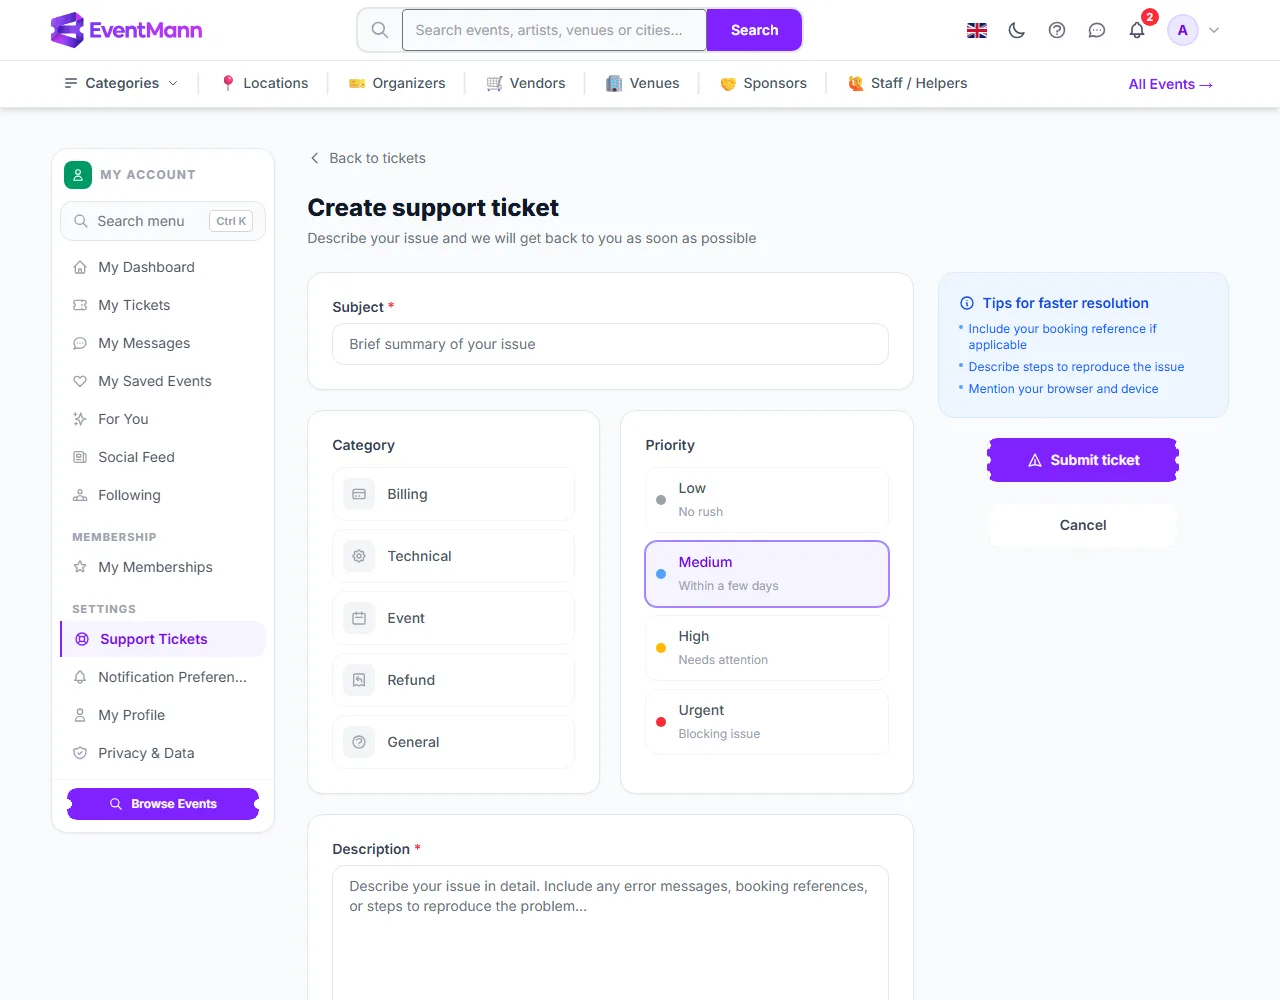
The new support ticket form with subject, category, priority and description
  1. Write a short Subject ①.
  2. Choose a Category ②: Billing, Technical, Event, Refund or General.
  3. Choose a Priority ③: Low (no rush), Medium (within a few days), High (needs attention) or Urgent (blocking issue). Pick honestly: it helps the right things get looked at first.
  4. Describe the problem in the Description (up to 5,000 characters). The tips beside the form suggest what to include: your booking reference, the steps to reproduce the problem, and your browser and device.
  5. Press Submit ticket ④.

Always give the booking reference (it starts with BK-) for anything about a purchase: it is how we find your order. You find it on your confirmation email and on the order in My Tickets.

Follow a ticket

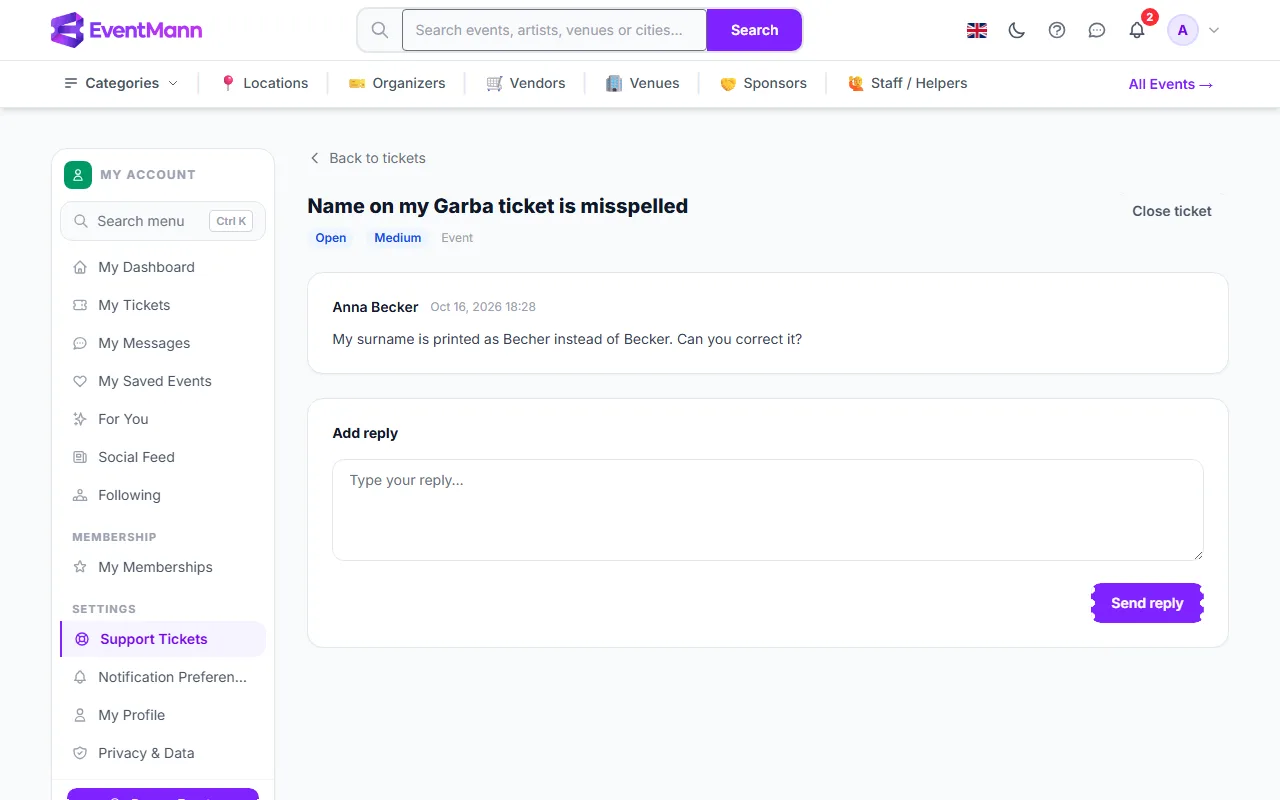
A support ticket with the question, a Close ticket button and a reply box
  • The list shows each ticket’s number, subject, status, priority and last reply. Filter it with All, Open, In progress, Waiting, Resolved or Closed.
  • Open a ticket to read the conversation. Type under Add reply ② and press Send reply. New answers appear in the thread without reloading the page.
  • Close ticket ① ends the conversation when you no longer need help.
  • You are notified of a reply and when a ticket is marked resolved, in the bell and by email, according to your Notification Preferences (Support reply and Ticket resolved).

What the statuses mean

StatusMeaning
OpenYour ticket is in the queue and has not been answered yet.
In progressThe support team has replied and is working on it.
WaitingOn hold while the ticket waits for further information.
ResolvedThe team believes the issue is dealt with. If you reply, the ticket reopens automatically.
ClosedFinished; no more replies are expected.

Good to know

  • Only you, the person handling the ticket and administrators can see a ticket. It is not public.
  • Replying to a resolved ticket reopens it; you do not need to open a new one.
  • There is no fixed response time. A correct priority and a clear description speed things up.
  • Support cannot decide a refund for an organizer’s event: the organizer decides, under their cancellation terms. See How to Get a Refund.

Troubleshooting

  • My ticket has been Open for a while — it moves to In progress when someone replies. Until then it is waiting in the queue.
  • I forgot something — open the ticket and add a reply with the missing information.
  • It says Resolved but it is not — reply on the same ticket and it reopens.
  • I cannot reach the support form — sign in first. If you cannot sign in, use the contact page.

Related