← Printable guides
EventMann

Attendee guide

Finding events, buying tickets, managing your orders and tickets, memberships and your account.

Edition of October 18, 2026

The latest version of every chapter is in the Help Centre: https://eventmann.com/help

Chapter 1

Buying tickets

1.1 How to Find Events

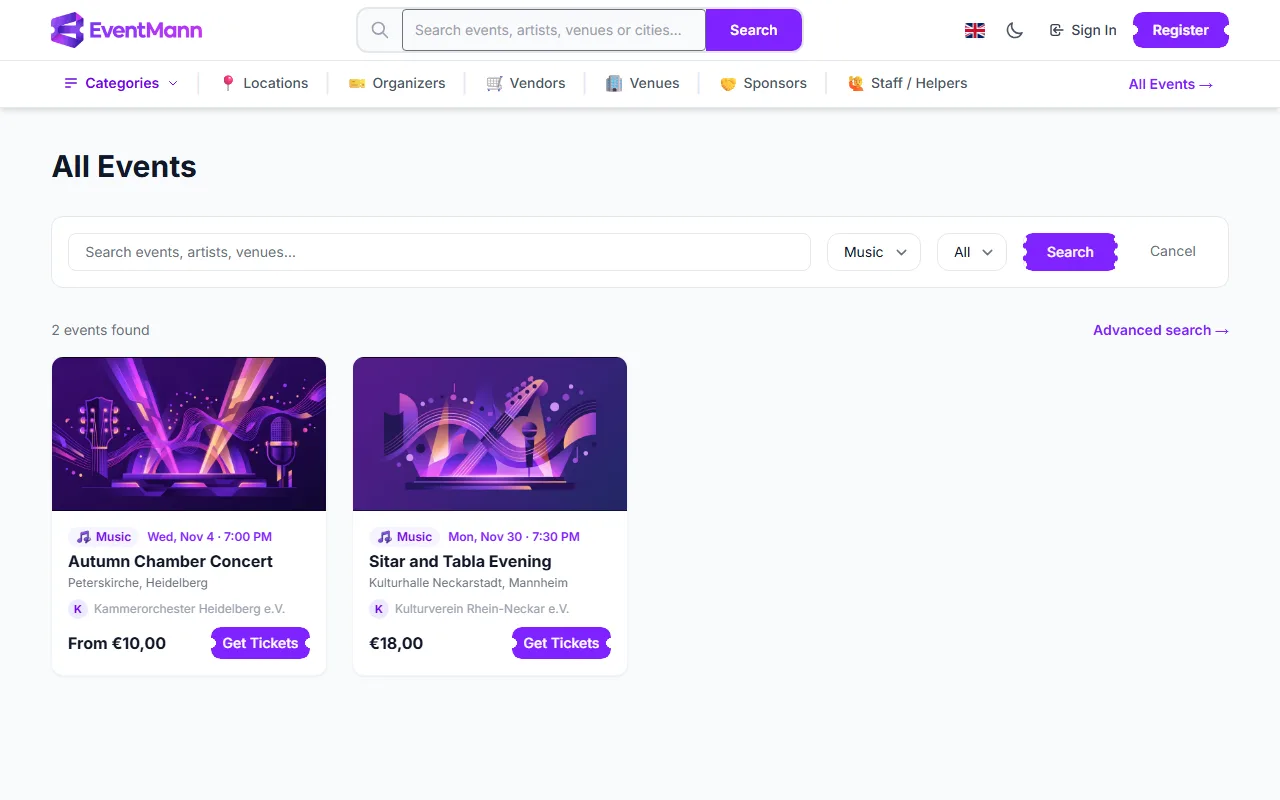
This article lists every way to discover events on EventMann, from a quick look at what is on to a precise search. You do not need an account for any of it. The main list is behind All Events in the top bar.
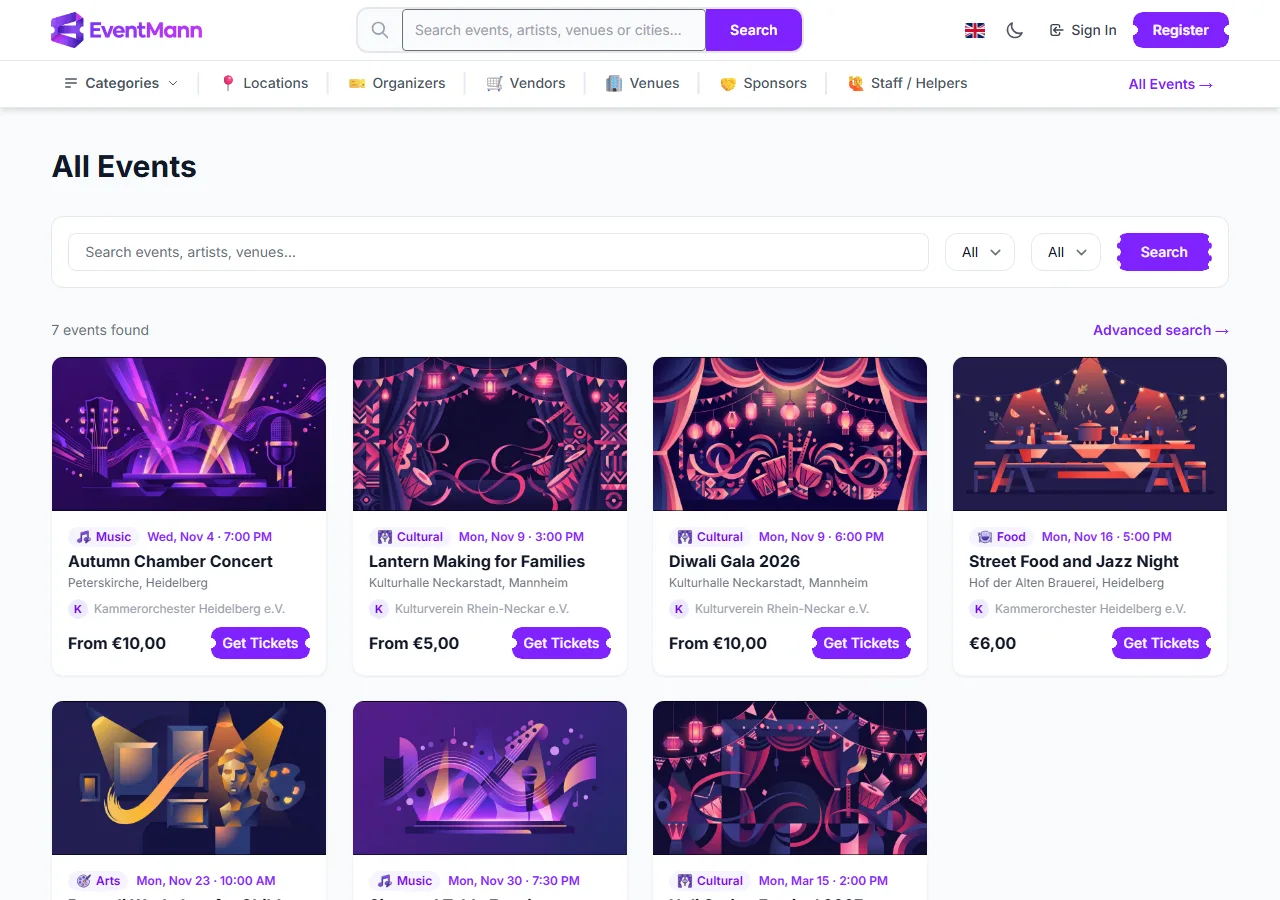
The Events page with a search box, category and date filters and event cards

Ways to look for something

  • The Events page — every event that is on sale, soonest first, twelve to a page. Type a word in the search box ① (it matches the event name, city and venue), choose a Category ② or pick a date window in the Date list ③: Today, This Weekend, This Week or This Month. The filters work together.
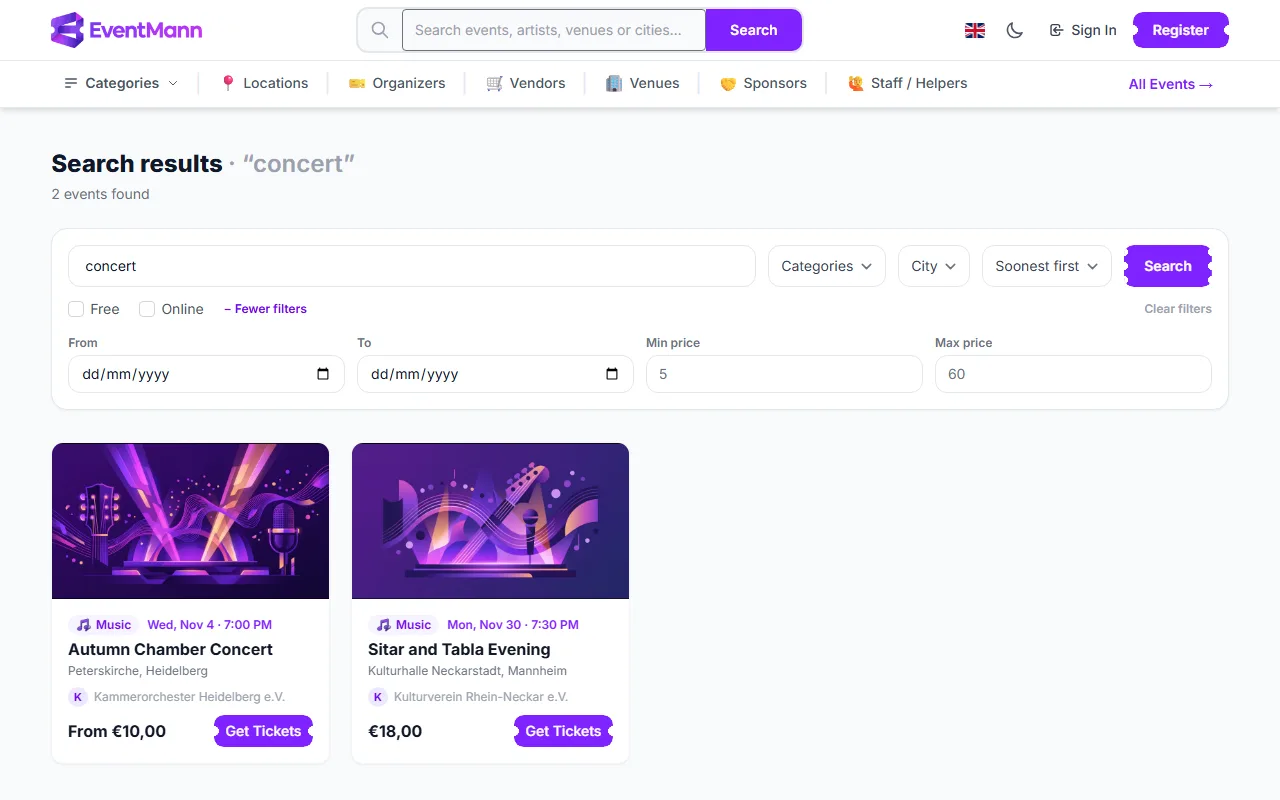
  • Search — the larger finder at /search, with city, price, free, online and date-range filters and sorting. See Search.
  • Locations — the Locations link in the top bar opens a map and lists of popular cities and countries. Open a city to see the events there. A city or country page only exists when it has at least one event.
  • For You — suggestions built around your bookings and preferences, trending events and, if you allow location access, events near you. See For You.
  • Organizers — the page of an organizer you like lists everything they have coming up. Follow them from there (see Following).
  • Saved events — events you bookmarked earlier are in My Saved Events.

Which events are listed

  • Only events that are live, public and not yet over appear in the lists. A draft, a paused or private event does not, although anyone who has the direct link can still open a private one.
  • The Events page, the home page, Locations and the organizer and vendor directories show the events in the country your connection appears to be in. If nothing is listed for your country, you see everything. Search is not limited this way, and a link to any event always opens.

Good to know

  • You only need to sign in to book when the organizer has made sign-in a requirement for that event. The button on the event page tells you.
  • If Select Tickets is missing or greyed out on an event page, sales have not opened yet, have closed, or every ticket type is sold out. The page says which.
  • A members-only or volunteer-only ticket type is shown as a locked row for everyone else. See Event Details.

Troubleshooting

  • I know an event exists but cannot find it — it may be a draft, paused, private or over. Try Search, or ask the organizer for the link. Its date may also fall outside the date window you chose; clear the filters first.
  • Events from another country are missing — the lists are narrowed to your country. Use Search, the Locations page or a direct link.
  • For You looks generic — it improves as you book, follow organizers and set preferences.
  • Events near me shows nothing — allow your browser to share your location on the For You page, and check that events are listed in your city.
Related

1.2 How to Buy Tickets

This is the whole journey from an event page to tickets in your hand. Most events let you check out as a guest, so you do not have to create an account first. Each step has its own article with the details; this one shows how they fit together.

Step by step

  1. Open the event. Check the date, time and venue, and read the Ticket conditions box lower on the page: it says whether you can cancel, change the names, transfer a ticket, and what you get back if you cancel (see How to Get a Refund).
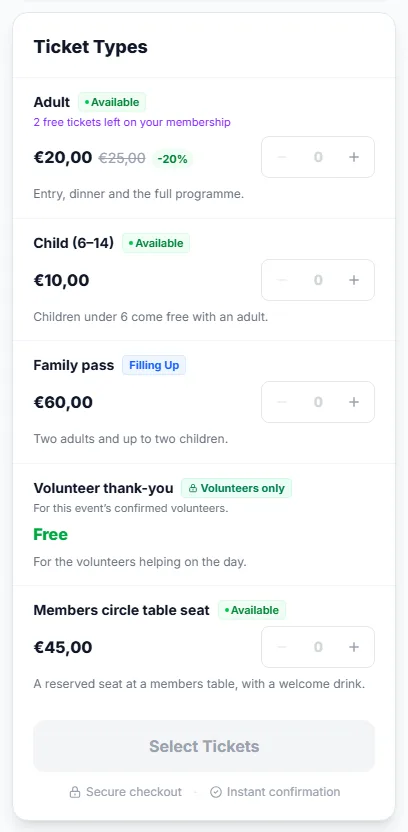
  2. Choose tickets. In the Ticket Types panel set a quantity for each type with the + and − buttons. The button under the panel reads Select Tickets until you choose something, then Book Now with the total; press it. A type that says Sold Out cannot be chosen; a type with a closed sale window says so.
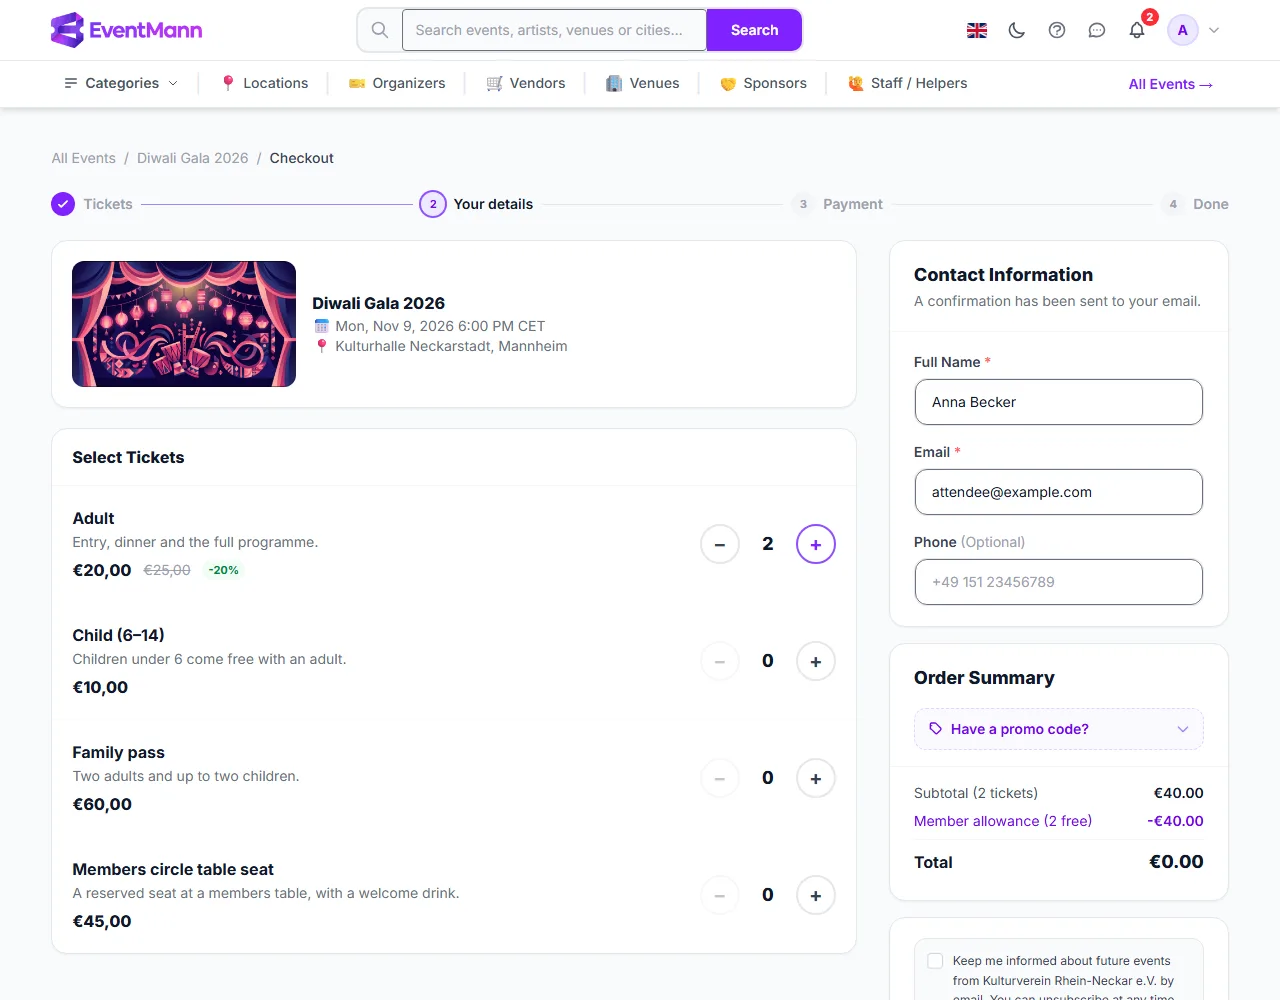
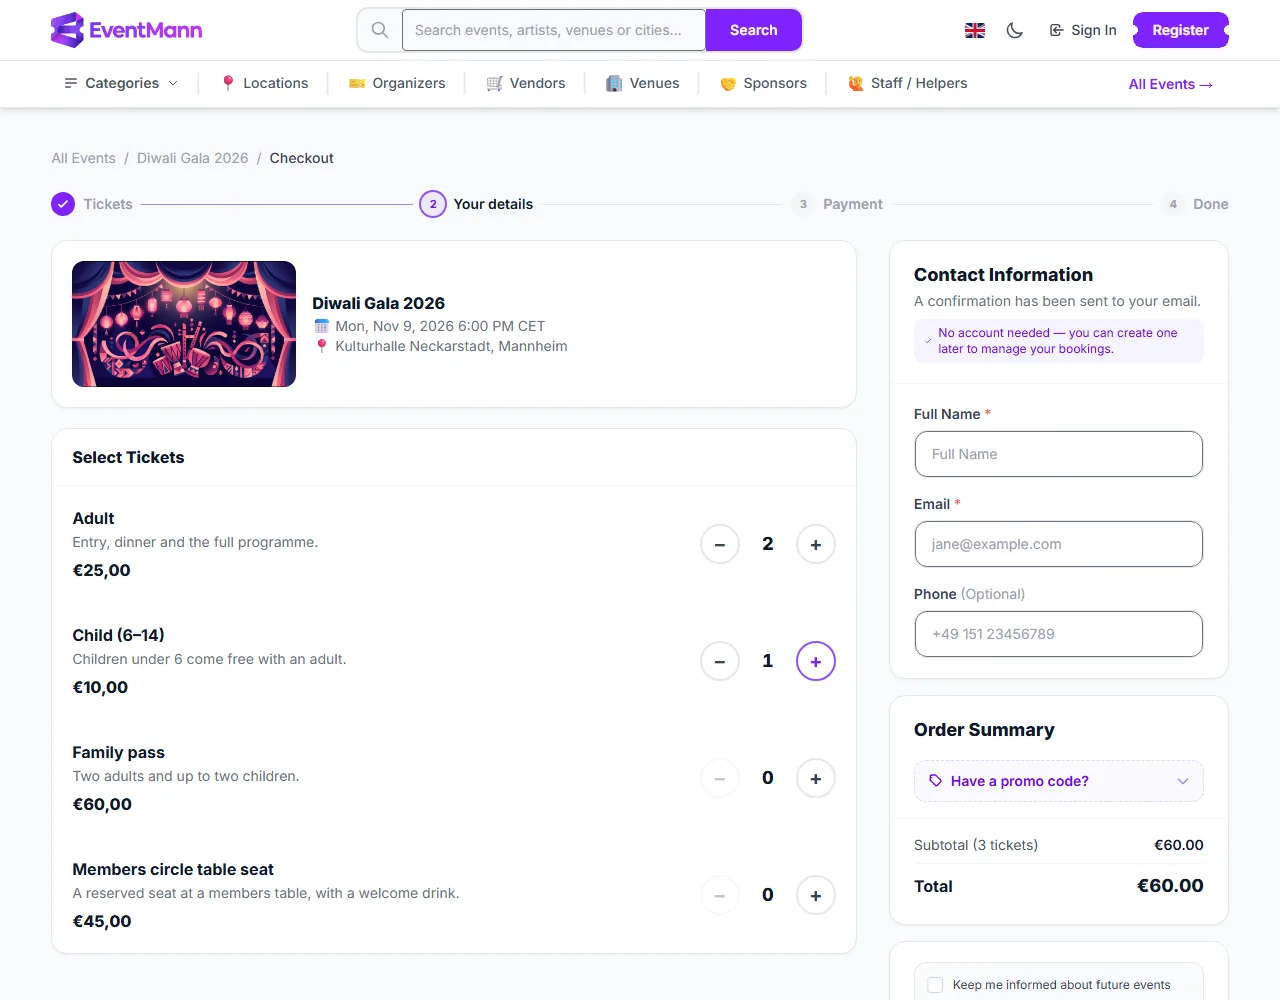
  3. Check out. The checkout page opens with your quantities already filled in (see Checkout Process).
The checkout page for a guest: ticket quantities, contact details, promo code and order summary
  1. Review the tickets ① and change a quantity with the plus button ② if you need to.
  2. Fill in your details ③. A guest enters a name and an email address (phone is optional). The confirmation and the tickets are sent to that email address, so type it carefully. If you are signed in, your details are filled in for you.
  3. Use a promo code ④ if you have one: open Have a promo code?, type it and press Apply.
  4. Decide whether to hear from the organizer. Above the button is an unticked box, “Keep me informed about future events from … by email”, naming the organizer. Tick it only if you want to; you can buy without it.
  5. Check the total ⑤, then press Proceed to Payment (or Complete Booking when there is nothing to pay).
  6. Pay. On the payment page choose how to pay in the secure form provided by Stripe and press Pay (see Checkout Process for the payment methods and what to expect).
  7. Done. You land on the confirmation page with your tickets and receive an email with the tickets attached (see Booking Confirmed).

Different kinds of events

  • Free events — there is no payment page. Complete Booking confirms the booking at once.
  • Events that need approval — the organizer decides on each order. Your card is only authorised, not charged, until they approve. See Pending Bookings.
  • Seated events — you pick your seats on a map during checkout. Seats you click are held for you for 15 minutes.
  • Members-only and volunteer-only tickets — shown as locked rows unless you are a member or a confirmed volunteer of that event. Members may also pay a lower price, get free tickets or book before everyone else (see Memberships).
  • Sold-out events — when the organizer has switched the waitlist on, a sold-out type offers Join Waitlist. You choose every ticket you need in one go — for a family, adults and children together — and you are listed in My Tickets and emailed when you are admitted (see Pending Bookings).

Good to know

  • You do not need an account unless the organizer has turned on “require login” for that event. With an account, the order also appears in My Tickets.
  • Nothing is booked until you pay or, for an approval event, authorise your card. Leaving checkout half way costs nothing and leaves no order behind.
  • You can buy for other people: the email you enter receives the confirmation, and each ticket can carry its own attendee name where the organizer asks for it.
  • There is a limit on how many tickets you may buy per order, and sometimes per person; the checkout tells you when you hit it.

Troubleshooting

  • The ticket I want is greyed out — it is sold out or outside its sale window, or it is members-only or volunteer-only.
  • My card was declined — nothing is charged. Your order is kept for a short time, and My Tickets shows Complete payment so you can try again or use another method.
  • I paid but have no email — open Where Are My Tickets?.
  • The checkout says tickets are no longer available — someone else bought the last ones first. Choose a different quantity or type.

Related

1.3 Checkout Process

Checkout is the page where you confirm your tickets, give your details and, for paid events, move on to payment. You reach it with Book Now on an event page. A progress bar at the top shows the four steps: Tickets, Your details, Payment and Done.

Checkout as a guest with two Adult tickets and one Child ticket selected

What is on the checkout page

  • Select Tickets ① — every ticket type with its price and + / − buttons. A type shows Sold Out or a sales-window message (Ticket sales have not opened yet, Ticket sales have closed) when you cannot buy it.
  • Bundle Deals — if the organizer offers any, choose one instead of picking single tickets. Only one offer applies per order and choosing another replaces it.
  • Seat Map — for seated events, click your seats on the map. They are held for you for 15 minutes.
  • Contact Information ③ — Full Name and Email are required; Phone is optional unless the organizer asks for it. Some events also ask for a postal address, or for a name on every ticket (“exactly as it appears on their ID”).
  • Additional Information — the organizer’s own questions, for example dietary needs. A field marked with a red star is required.
  • Age confirmation — a checkbox for events with a minimum age.
  • Organizer’s terms — where the organizer has added terms, you see the cancellation terms for this event and a checkbox to accept them before you can continue. Read them: they decide what you get back if you cancel.
  • Keep me informed — an optional, unticked box to hear from the organizer about future events by email. See Hearing from the organizer below.
  • Order Summary ⑤ — updates as you change quantities. Have a promo code? ④ opens a field for a discount code; codes are not case sensitive.

What the total is made of

LineMeaning
SubtotalTicket (or bundle) prices multiplied by quantity. If you are a member, member prices already apply here.
DiscountWhat a valid promo code takes off.
Member allowanceFree tickets your membership includes, shown as a negative line. See Memberships.
Platform Fee / Service feeOnly shown when the organizer passes these on to the buyer. By default the organizer pays them and you see no extra line.
TaxShown when the organizer charges tax.
TotalWhat you pay.

Hearing from the organizer

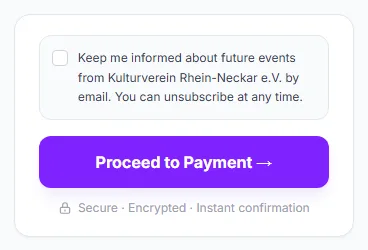
Next to the button that completes your order is a box that reads “Keep me informed about future events from organizer by email. You can unsubscribe at any time.” It names the organizer who sells this event, and it covers that organizer only — not EventMann and not other organizers.

The optional “Keep me informed” box above the Proceed to Payment button
  • The box ① is never ticked for you and it is not required. Leave it empty and you can still buy; press Proceed to Payment ② or Complete Booking as usual.
  • If you tick it, your consent is recorded with this order, with the date. The organizer sees you as Opted in on their audience list.
  • For a paid order your choice is kept while you pay and recorded when the order is created; if you leave without paying, nothing is recorded.
  • Your tickets, the confirmation and messages about the event you booked come whether or not you tick it.
  • Changed your mind? Use the unsubscribe link at the bottom of any marketing email from the organizer, or, if you have an account, switch off Marketing email in Notification Preferences. Either one counts for more than a box you ticked earlier.

Paying

For a paid order, Proceed to Payment opens the payment page. It shows your order and a secure payment form from Stripe, our payment provider. Your card details go to Stripe and never pass through EventMann.

  • Which payment methods you see is decided by Stripe, from your country, the amount, the currency and what the organizer’s Stripe account accepts. Typically that is cards, wallets such as Apple Pay or Google Pay where your device supports them, and local methods such as SEPA direct debit or iDEAL. If a method you expect is missing, it is not available for this order.
  • Press Pay (the button shows the amount). If your bank asks you to confirm in its app or on a bank page, complete that step; you are brought back automatically.
  • Some methods, such as bank debits, confirm days later. You see a message that your payment is being processed. The booking stays pending and the tickets are issued when the money is confirmed; you are emailed.
  • If a payment fails, nothing is charged and your tickets stay reserved for a short time. Try again or use another method.
  • For an event where the organizer approves orders, the button reads Authorise: your card is only reserved. See Pending Bookings.

The payment is made to the organizer, who sells the ticket to you; EventMann only takes a fee from the organizer. If an organizer has not finished setting up payments, the page says Payment temporarily unavailable and nothing can be paid.

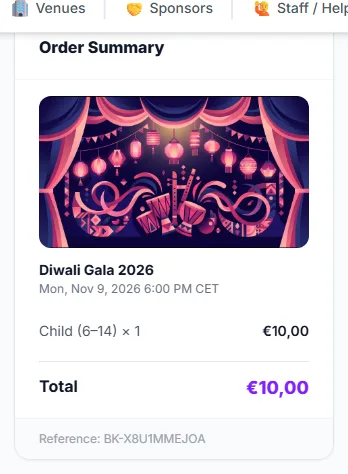
The order summary on the payment page, with the order reference

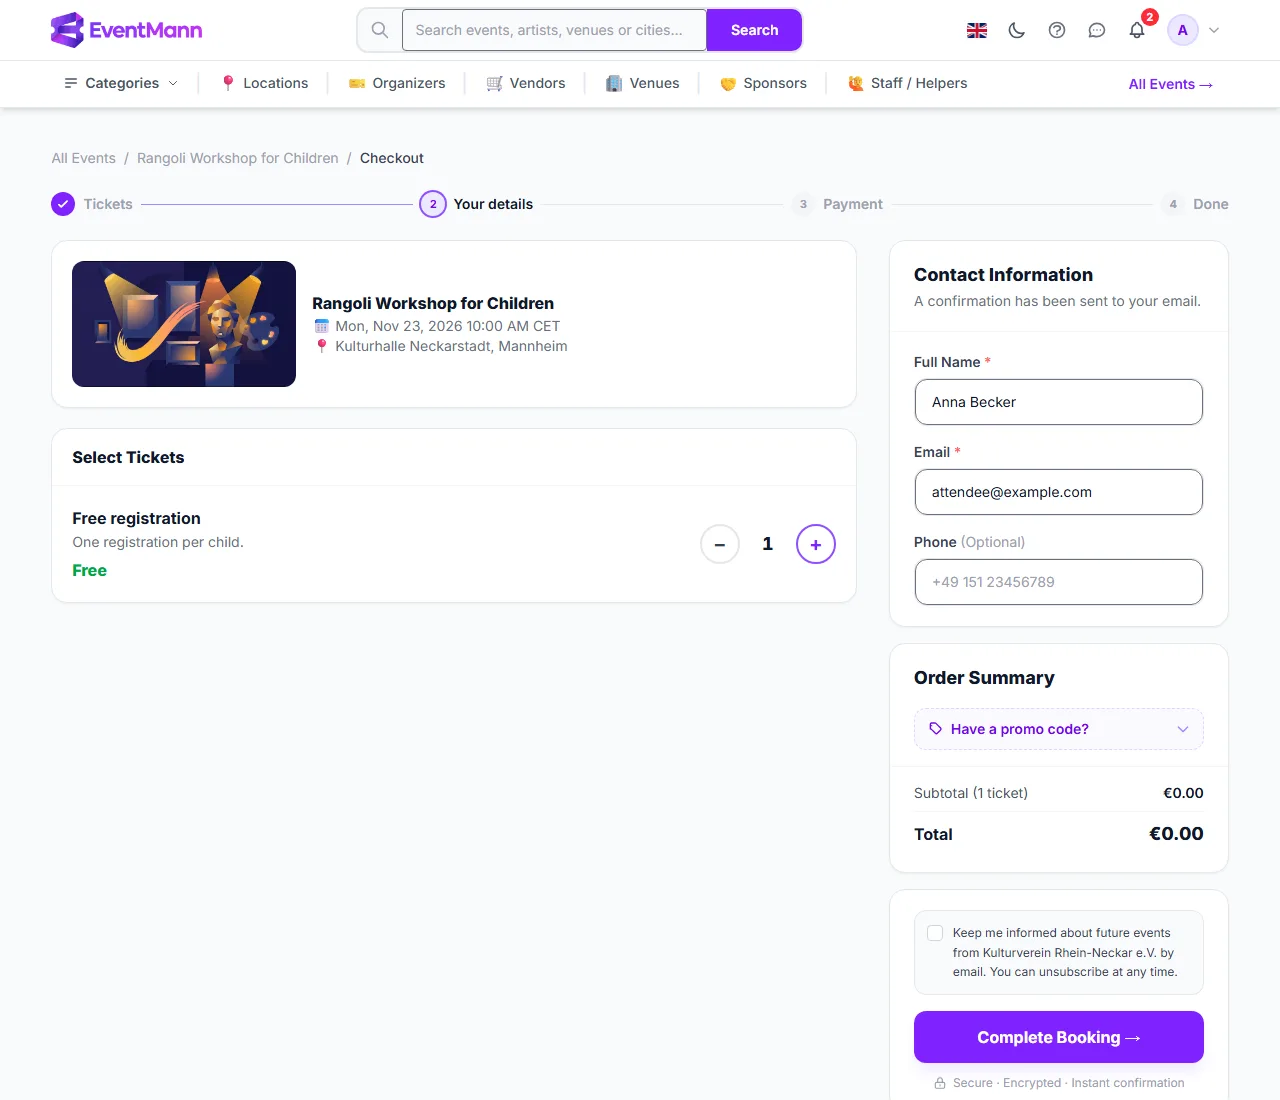
Free events and totals of zero

When there is nothing to pay, because the event is free or your membership covers the tickets, there is no payment page. The button reads Complete Booking and the booking is confirmed straight away.

Checkout for a free event with a Complete Booking button

Good to know

  • Nothing exists as an order until you pay or authorise your card. Your selection is kept while you pay, but only for a short time (about half an hour); a seat you chose stays reserved for that long too.
  • Prices, promo codes and availability are checked again when you pay. If a code ran out or a type sold out in the meantime, you are told before any money moves.
  • Signed in? Your name and email are filled in, member prices apply automatically and the order lands in My Tickets. A guest order is tied to the email you enter.
  • Your order reference starts with BK-. Keep it when you contact the organizer.

Troubleshooting

  • A required question will not let me continue — fill in every field with a red star under Additional Information, and tick the age and terms boxes if they appear.
  • My promo code is invalid — check that it belongs to this event, has not expired or been used up, and matches the event currency for fixed amounts.
  • The payment form does not load — disable any ad blocker for the page or reload it.
  • It says a ticket is no longer available — it sold out first. Choose a different type or quantity.
  • I expected to pay but there is no payment page — the total is zero, or the event needs approval and holds your card.

Related

1.4 Your Selection & Seat Holds

EventMann has no shopping basket that you fill across several events. You pick tickets for one event at a time, on the event page and the checkout page. This article explains what is held for you while you do that, how long it lasts, and the one page called Your Cart that you may still run into.

What is held while you check out

  • Seats on a seat map — the moment you click a seat during checkout it is held for you for 15 minutes. Nobody else can take it while your hold runs. Remove a seat and it is released immediately.
  • General admission tickets — these are not locked to you one by one. Availability is checked when you submit your details and again when you pay, so on a popular event a ticket type can sell out while you fill in the form.
  • Your order once you reach the payment page — your quote is kept for about half an hour, and any seats you chose are kept at least as long, so you can enter a card without losing them.

What happens when time runs out

Seats whose hold ran out go back on sale for anyone to take. You see a message such as Your seat holds have expired. Please select again. Nothing was charged, so there is nothing to refund. Go back to the event, pick again and continue. A seat someone else took in the meantime shows as This seat is no longer available.

Your Cart page

The page called Your Cart (/events/<id>/cart) lists what you have held for that one event, with the line Reserved for and a countdown, a promo code field, Proceed to Checkout and Clear Cart. It is not linked from the menus, because the checkout page does the same job: you choose tickets, enter a promo code and see the total on one page. If your cart is empty it says Your cart is empty and links back to the tickets.

Change your mind

  • Use + and − next to a ticket type on the checkout page up to the moment you pay.
  • Choosing a bundle sets the quantities for you; choosing single tickets afterwards replaces the bundle.
  • Once an order exists you cannot add paid tickets to it. Start a new order instead. For a free extra ticket, such as a child’s place, ask the organizer: they can add one to your existing order.

Promo codes

  1. On the checkout page open Have a promo code? in the order summary.
  2. Type the code and press Apply. The saving appears in the total. Press Remove to take it off again.
  • Codes are not case sensitive. A code can be tied to one event, be a percentage or a fixed amount, and have an expiry date or a limit on uses. A fixed amount only works for events in its own currency.
  • The code is checked again when you pay. If it expired or ran out in the meantime, you are told before any money moves.
  • Discounts also apply to bundle prices.

Good to know

  • You do not need an account to hold seats or use a promo code.
  • Fees and tax, where the organizer charges them, only appear in the total once at least one ticket is selected.
  • Closing the tab does not cancel anything; the hold simply runs out.

Troubleshooting

  • The seat I picked cannot be selected — your hold ran out, or someone else took it. Pick again.
  • My promo code says invalid — check it belongs to this event, has not expired or run out, and fits the event currency.
  • A ticket type disappeared while I was checking out — it sold out. Try another type.

Related

1.5 Pending Bookings

Most orders confirm within seconds. When an order is not confirmed yet, My Tickets and your dashboard show it as Pending or with a Complete payment button. Nothing has gone wrong: one more step has to happen first. This article covers the situations you can be in and what each one needs from you.

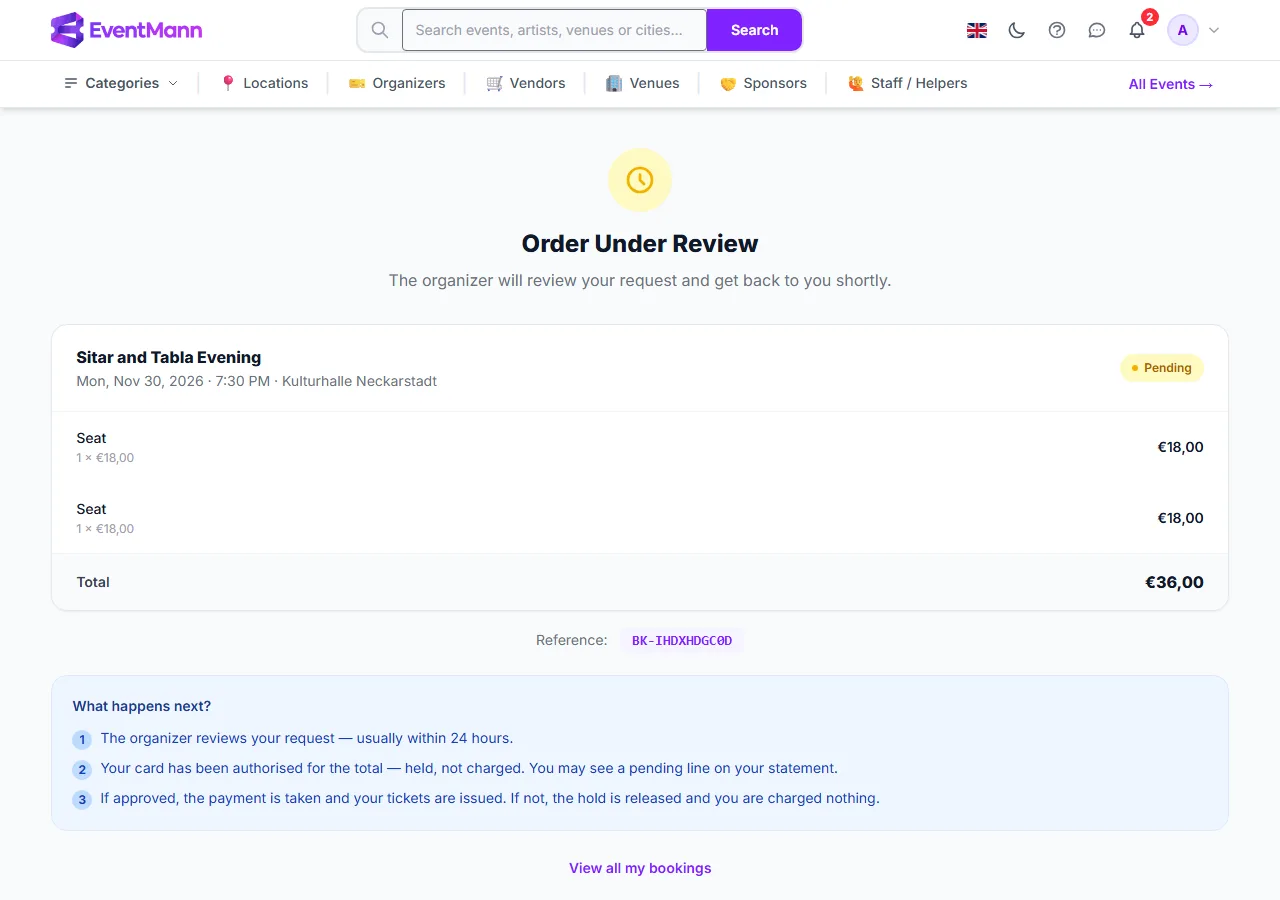
1. The organizer is reviewing your order

The Order Under Review page: the order, a Pending badge and what happens next

Some events approve every order. After checkout you land on the Order Under Review page ①.

  • On the payment page the button reads Authorise instead of Pay. Your card is authorised, not charged: the amount is held, and you may see a pending line on your statement.
  • Under What happens next? ② the page lists the steps. The organizer reviews the request, usually within a day. If they approve, the payment is taken and your tickets are issued. If they decline, or do not reply in time, the hold is released and you are charged nothing.
  • You get an email for each outcome. Nothing is needed from you while you wait. You can write to the organizer from My Tickets once the order is approved (see How to Contact the Organizer).
  • The seats are counted for you while your card is held, so two people cannot both be approved for the last place.

Some older orders on approval events work differently: the organizer approves first and you then get an email with a payment link and a limited time, often 30 minutes, to pay. If you miss it, the approval lapses and the tickets go back on sale.

2. Your payment is still being confirmed

Bank debits and some other methods take a while to clear. The page says Your payment is being processed. You will receive a confirmation once complete. The order stays pending, and the tickets are issued, and emailed, when the money is confirmed. Do not pay a second time.

3. Your payment did not go through

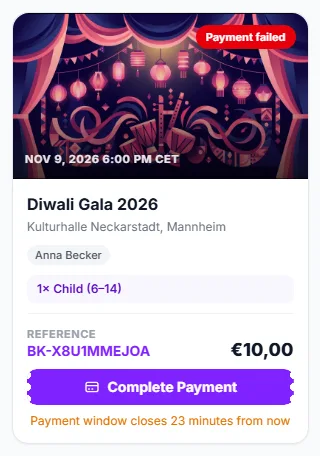
An order with a Complete payment button and the time left to pay
  1. Find the order in My Tickets. It carries a Complete payment button ① and a note with the time left ②.
  2. Press it and try again, or choose a different payment method. The payment page tells you Nothing has been charged and your tickets are still reserved.
  3. If the time ran out, the card says the payment window has expired. Start the order again from the event page.

4. You are on a waitlist

When an event is sold out and the organizer has switched the waitlist on, a sold-out ticket type offers Join Waitlist. You need to be signed in; a guest is asked to sign in first. Joining works like placing an order: you choose how many tickets of each type you need, and they are booked together when you are admitted.

The waitlist form for a sold-out family event, with 2 Adult and 2 Child tickets chosen and one contact
  1. Press Join Waitlist on the sold-out ticket. The form opens with that ticket already at 1.
  2. Set the number of each ticket with the steppers ① ② — for example 2 adults and 2 children. A child ticket can only be added beside an adult ticket in the same entry, as at checkout.
  3. Check the Contact name ③ and, if you like, add a phone number ④. The email is your account’s; that is where the organizer’s answer and any payment link go. Names for each ticket are filled in after you are admitted, on the booking page.
  4. Press Join the waitlist ⑤.

Your waitlist entries are listed under My Waitlists at the bottom of My Tickets, with the tickets you asked for and a Leave waitlist button.

  • Unless the organizer has chosen automatic admission, the organizer decides who is let in as places free up. Your whole entry is admitted together, as one order — never part of it.
  • When you are admitted, you are emailed. Free tickets are confirmed and sent at once. For paid tickets the email has a payment link and a deadline: the places are yours until then. The order also appears in My Tickets with a Complete payment button and the line Admitted from the waiting list — pay by and the time. Complete the payment before it passes, or they go to the next person.
  • The form refuses an entry that is larger than one order may be, a child ticket without an adult, a second entry for a ticket you are already waiting for, and an entry when the organizer’s waiting list for that ticket is full. The message says which.

Good to know

  • The yellow strip on your dashboard counts every order still waiting — pending, approved but not yet paid, or with a failed payment — and links to the Pending filter in My Tickets, which lists the same orders.
  • A pending order has no tickets yet. They appear, with download buttons, once the order is confirmed.
  • An order that never reaches payment does not exist as an order. If you leave checkout before paying, nothing is left behind.

Troubleshooting

  • My order has been pending for days — the organizer probably has not reviewed it yet. Write to them from the order, or raise a support ticket if it has been unusually long.
  • I paid but it still says pending — give your bank a few minutes, or a few days for a direct debit. Check My Tickets again before paying twice.
  • I was approved but missed the payment window — the approval lapsed and the tickets were released. Order again.
  • There is a hold on my card but no tickets — the order is waiting for approval; the hold is released if it is declined.

Related

1.6 Booking Confirmed

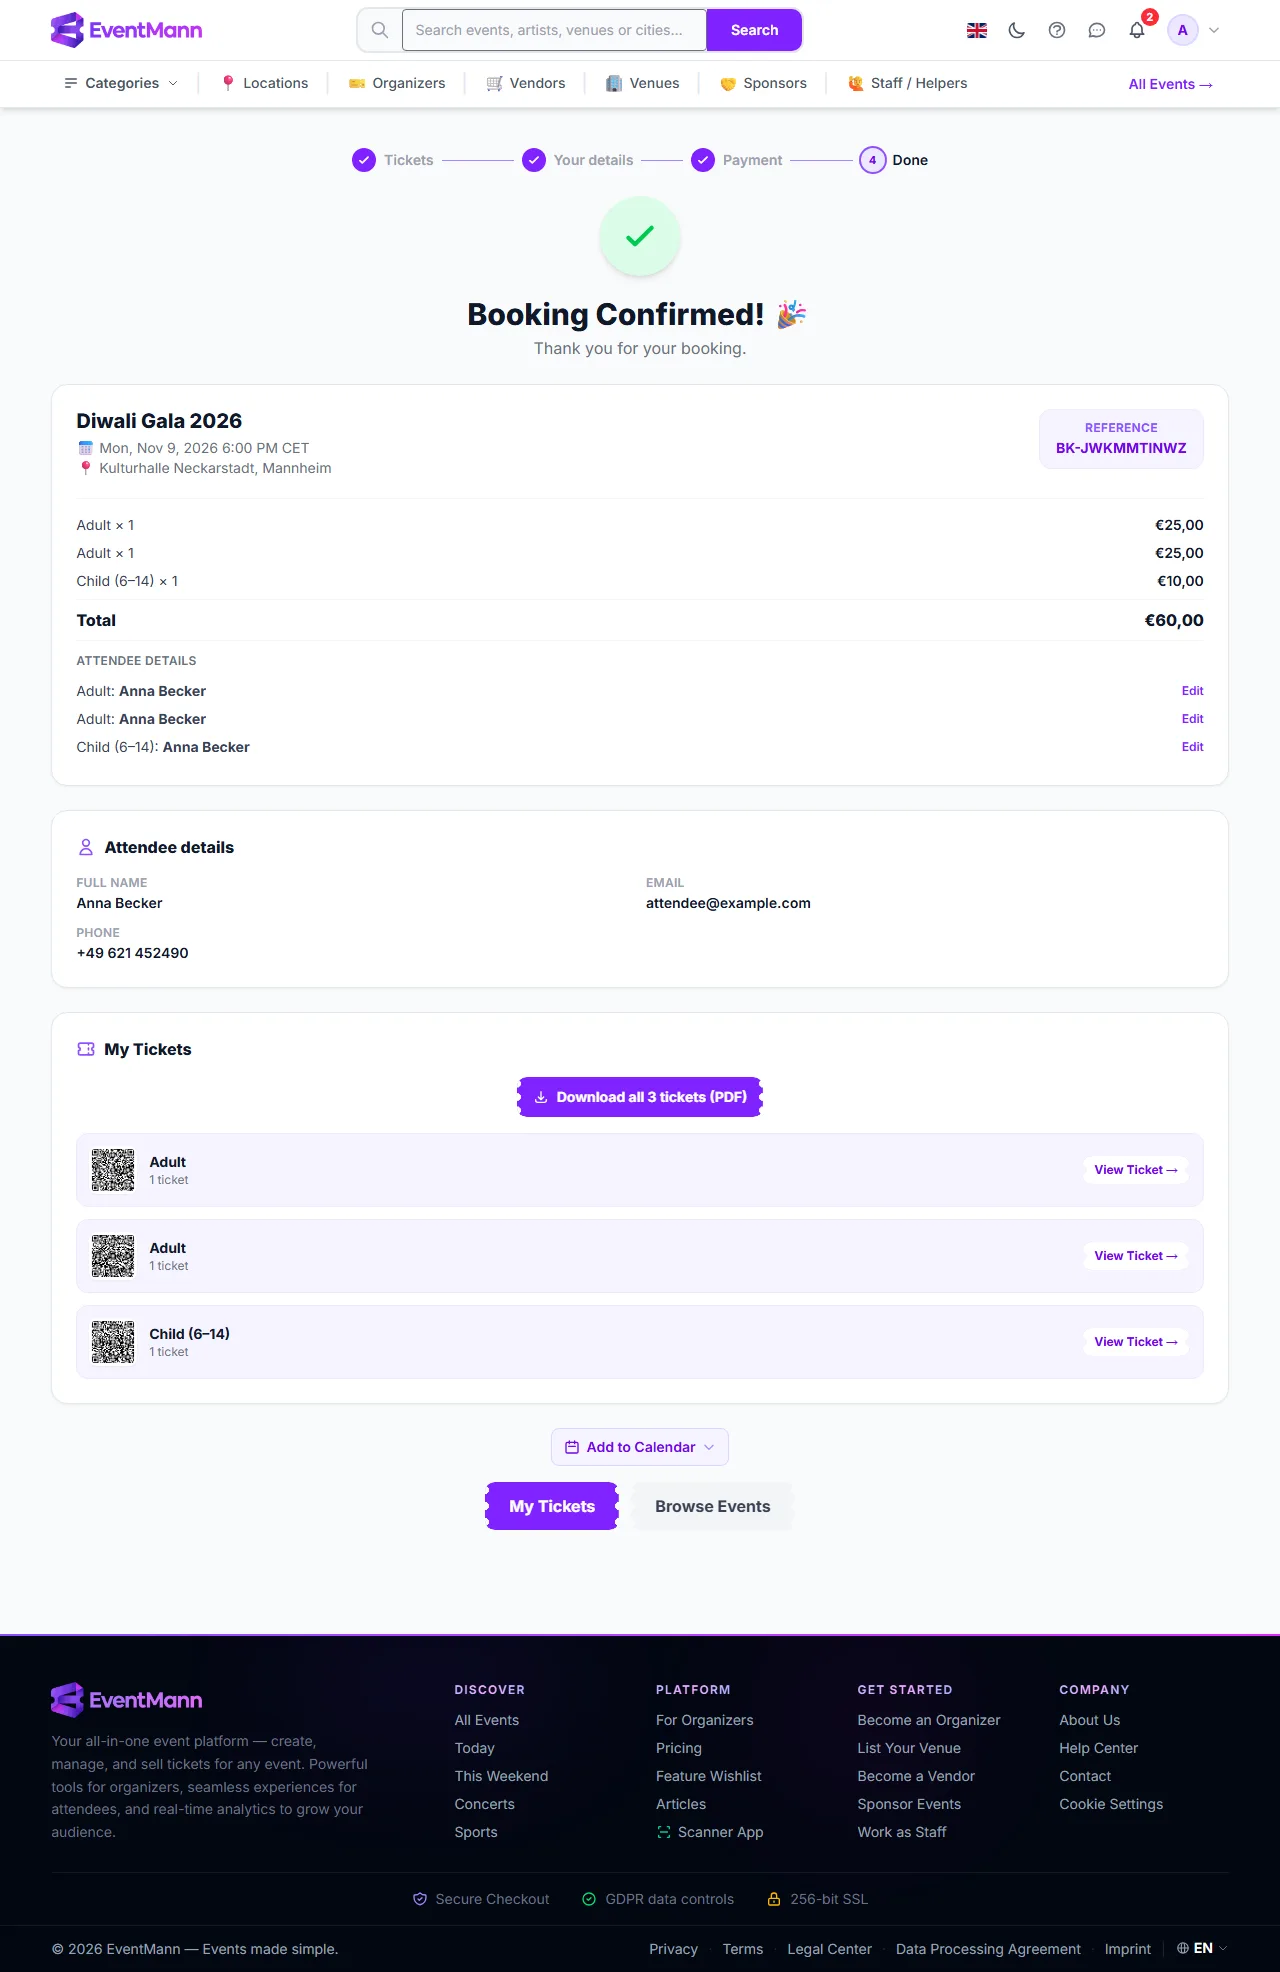
When a booking is confirmed — right after payment, after a free booking, or after the organizer approves your order — you land on the Booking Confirmed page. It brings your order together in one place: what you bought, who the tickets are for, and the tickets themselves.

The Booking Confirmed page with order summary, attendee names, ticket download and calendar button

What you can do here

  • Check the order ① — the event, date and venue, your Reference (it starts with BK-), every ticket with its price and the total. Keep the reference: the organizer, the door staff and Support all use it to find your order.
  • Name the ticket holders ② — Attendee details lists one row per ticket. Click Edit on a row, change the name or email and press Save. This is available while the organizer allows ticket edits and until the event starts. The name appears on the ticket.
  • Download your tickets ③ — Download all 3 tickets gives one PDF with every ticket. Under it each ticket shows its QR code and a View Ticket link. The QR code is what is scanned at the door.
  • Add the event to your calendar ④ — Add to Calendar offers a calendar file or link for your calendar app.
  • Read a message from the organizer — if the organizer wrote a confirmation message (parking, entrance, what to bring), it appears at the top of the page.
  • Create an account — if you checked out as a guest, a box offers Create free account so that this and future bookings are saved under My Tickets.

What happens next

  • A confirmation email goes to the address you booked with, with your tickets attached as a PDF. The PDF is built after the booking confirms, so allow a few minutes. If it has not arrived, look in your spam folder, then see Where Are My Tickets?.
  • If you are signed in, the booking is in My Tickets straight away.
  • A booking made as a guest is reachable with the link in your email. The link stays valid until 90 days after the event.
  • If the organizer later changes the date, venue or format of the event, a box titled This event changed after you booked appears on this page. Your ticket stays valid, and the box tells you how to ask for a refund if the change no longer suits you.

Good to know

  • Nothing more is charged after this page. To cancel or ask for money back, see How to Get a Refund.
  • You can open this page again at any time from My Tickets, or from the link in your email. Opening an order that is cancelled, refunded or still waiting sends you to My Tickets instead.
  • Names are for the organizer’s records and the ticket design. A ticket can still be handed on with the transfer function, which is separate (see How to Transfer Tickets).

Troubleshooting

  • I did not get the confirmation email — check spam, then confirm the email address shown under Attendee details. If you typed it wrongly, use Edit; or open your tickets from My Tickets.
  • The QR code does not load — reload the page, or open the ticket with View Ticket.
  • There is no Edit button next to a name — the organizer has switched off ticket edits, or the event has started.
  • I closed the page — use the link in your email or sign in and open My Tickets.

Related

Chapter 2

Your tickets

2.1 My Tickets

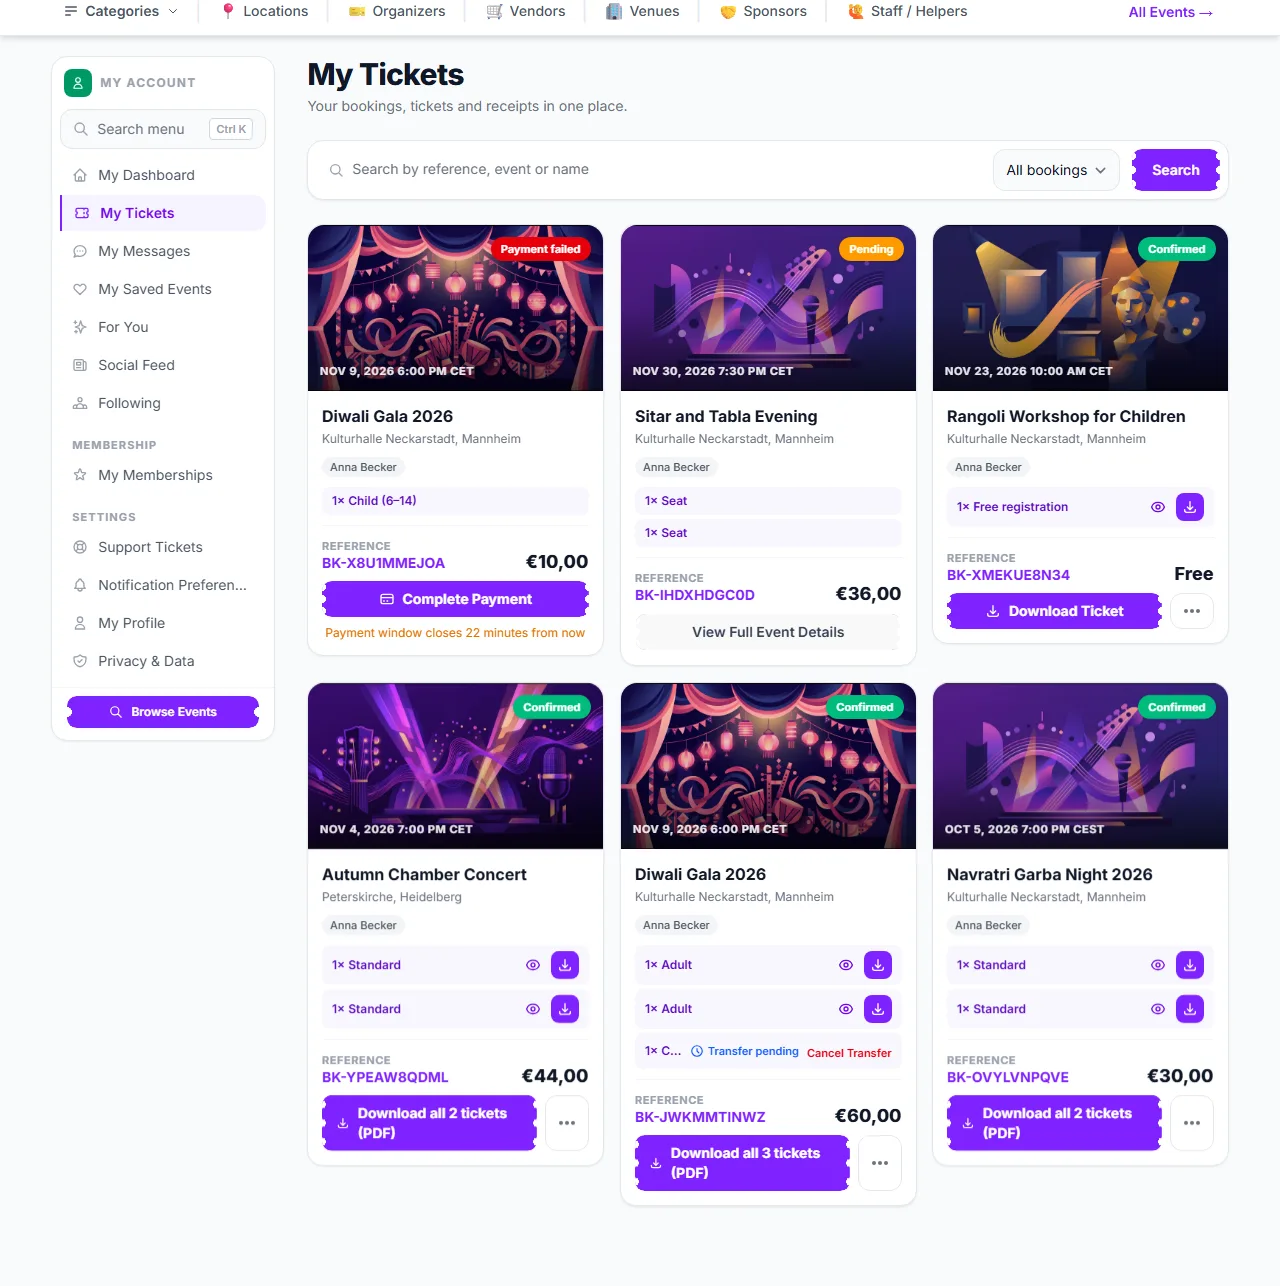
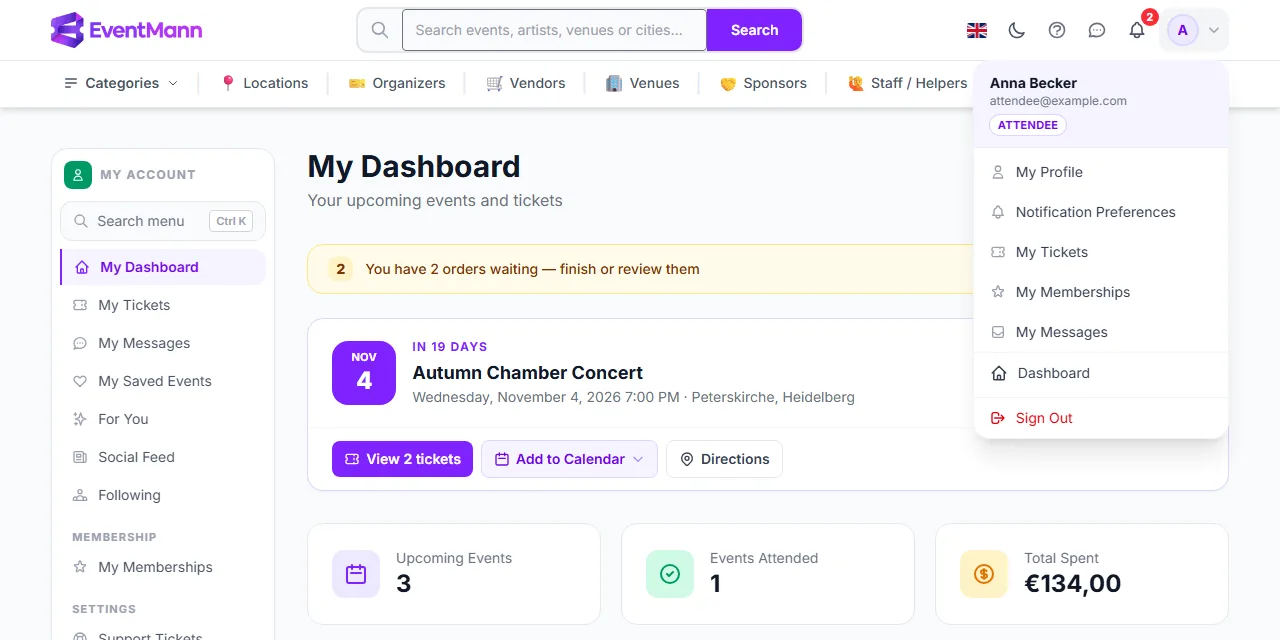
My Tickets is your list of every order you made with this account, paid or free: its tickets, its status and everything you can still do with it. Open it with My Tickets in the account sidebar or in the menu under your avatar.

My Tickets with a search box, a status filter and order cards with ticket buttons and a pending transfer

What you can do here

  • Search ① — by booking reference, event name or the attendee name on the order.
  • Filter ② — the list next to it shows All bookings, Upcoming, Past, or only orders that are Confirmed, Pending, Cancelled or Refunded. Search and filter work together; Clear filters resets them. Ten orders show per page.
  • Open or download a ticket — on a confirmed order every ticket is a row with a ticket icon (view the ticket and its QR code) and a download icon (PDF). When the order has several tickets, the main button reads Download all 3 tickets (PDF) ③ and gives one PDF with all of them.
  • See what happened to a ticket — a ticket you offered to somebody shows Transfer pending ④ with a Cancel Transfer link until they accept, then Transferred. A ticket given to you shows Received via transfer.
  • Pay for an order — an order you still owe shows Complete payment with the time left (see Pending Bookings).
  • Find your waitlist places — My Waitlists at the bottom lists events you are waiting for.

More actions

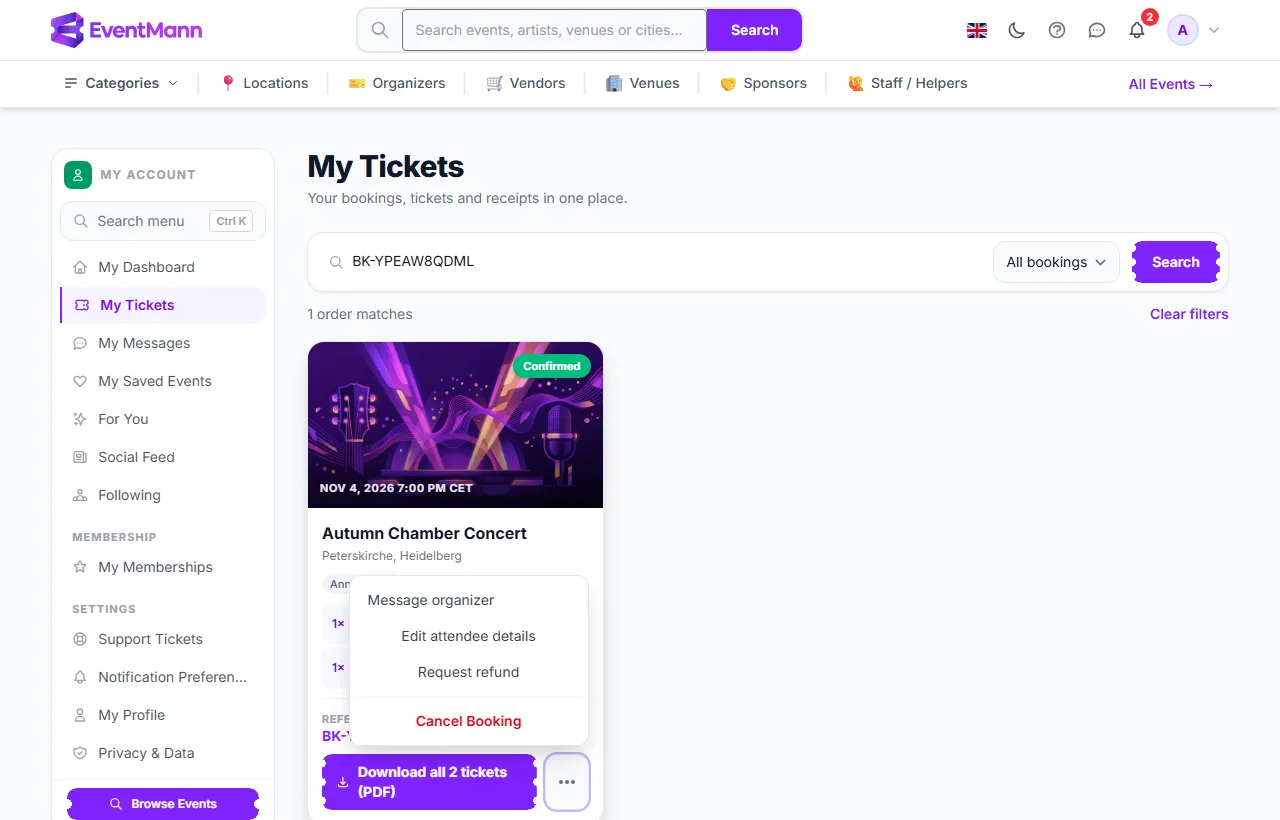
The three-dot button on an order opens a menu. Which entries you see depends on the order and on what the organizer allows.

The More actions menu on a paid, confirmed order
  • Message organizer ① — write to the organizer about this event (see How to Contact the Organizer).
  • Edit attendee details ② — change the name and email on each ticket before the event starts, if the organizer allows it.
  • Request refund ③ — ask the organizer for money back (see How to Get a Refund).
  • Cancel Booking ④ — cancel the whole order after a confirmation question. On a paid order the question says how much comes back, or that nothing does.
  • Invoice — the organizer’s invoice for a paid order, when they issue invoices.
  • Leave a review — once the event has started. It becomes Already reviewed after you wrote one.

Name the ticket holders

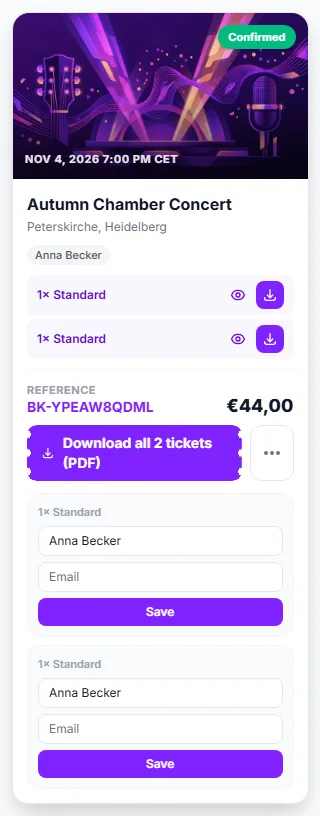
Choose Edit attendee details in the menu to open one small form per ticket.

The attendee details forms opened on an order, one name and email per ticket
  1. Change the Name ① and, if you wish, the Email ② for a ticket.
  2. Press Save under that ticket. Each ticket is saved on its own.

The name is printed on the ticket. This is offered while the organizer allows edits and until the event starts.

What the statuses mean

StatusMeaning
ConfirmedPaid, free or approved. Your tickets exist and can be viewed and downloaded.
PendingWaiting for the organizer’s approval, or for a payment to clear. No tickets yet.
Payment failedThe card was declined or the payment was not completed. The order is kept for a short while; Complete payment lets you try again.
CancelledThe order was cancelled. Money is only returned if the cancellation terms said so and a refund was started.
RefundedA refund was issued for the whole order. Its tickets no longer admit anyone.

The Pending filter shows every order still waiting: pending ones, orders the organizer approved that you still have to pay, and orders whose payment failed, each with its Complete payment button where you owe money.

Good to know

  • Cancel Booking and Request refund are only offered on confirmed orders for events that have not started and whose tickets have not been scanned. An organizer can switch cancelling off completely, and can set a deadline for it. If the deadline passed, the card says so and Request refund stays available when the terms still return something.
  • An order that includes a ticket you gave away or received by transfer cannot be cancelled or refunded from here.
  • An organizer can add a free ticket to your order after you booked, for example a child’s place. It appears as an extra ticket on the same order.
  • A pass covering several events appears as one order per event, with a note that it also covers the others.
  • Only orders placed while signed in to this account are listed. A guest order is reached with the link in its email, or with Email me my bookings on the contact page.

Troubleshooting

  • The page says I have no bookings — you are signed in with another account than the one you booked with, or you booked as a guest.
  • I cannot see Download on a ticket — the order is not confirmed yet, or the ticket was transferred away or cancelled.
  • My search finds nothing — a filter may still be set; press Clear filters.
  • There is no Cancel Booking button — see the conditions above; Request refund may still be there.

Related

2.2 Ticket Details

Every ticket has its own page. It shows the ticket as the organizer designed it, with a QR code that is scanned at the door, and buttons to download, print or pass it on. You get there with the ticket icon on an order in My Tickets, with View Ticket on the confirmation page, or with the link in your confirmation email.

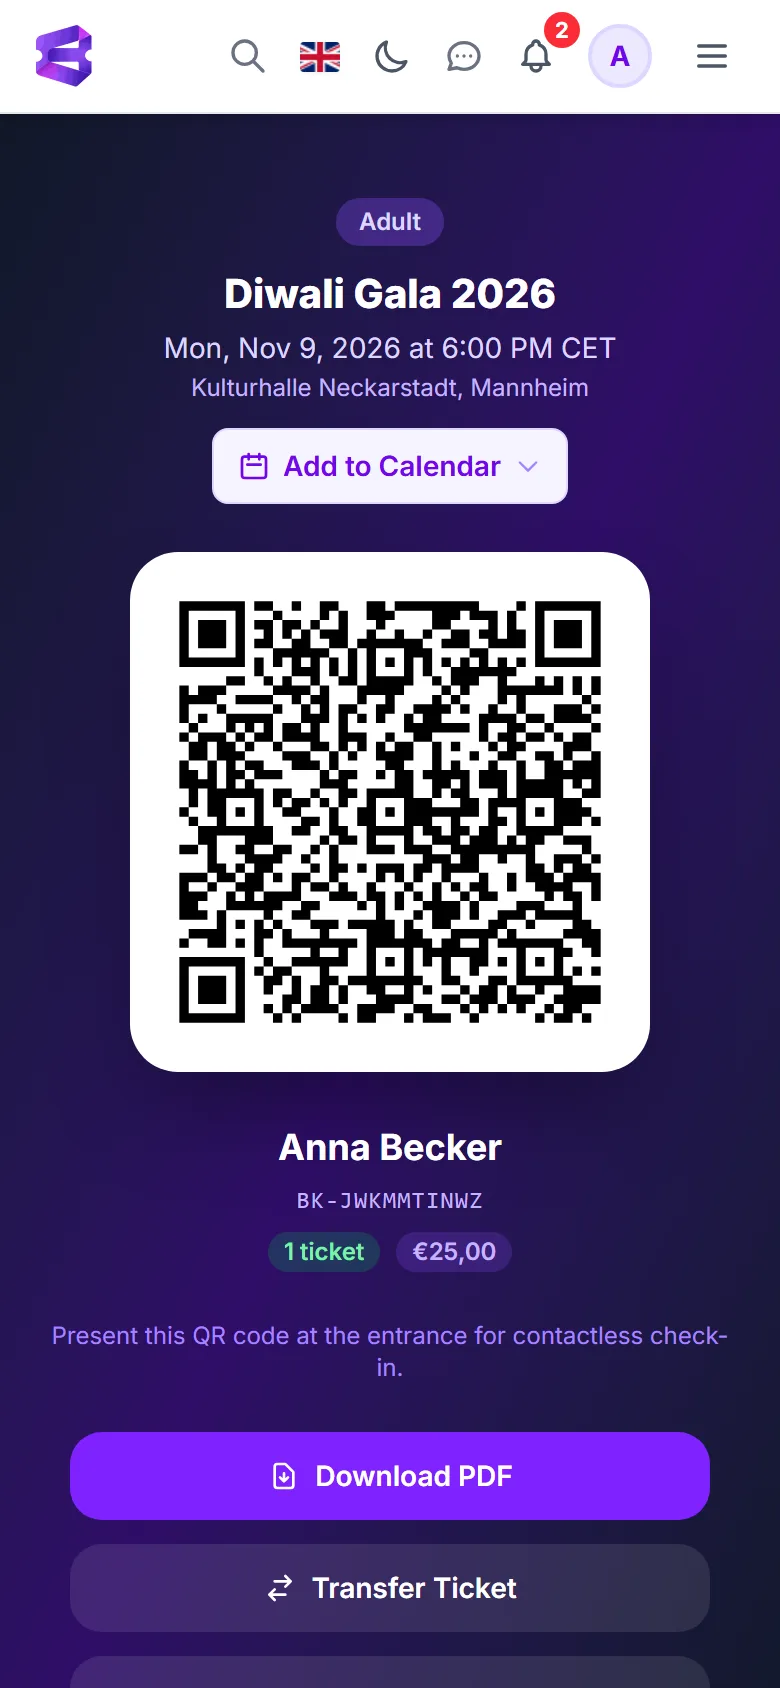
A ticket on a phone with the QR code, the Download PDF button and the Transfer Ticket button

What you can do here

  • Show the QR code — on a phone, open the page and hold the screen towards the scanner. The page tells you to present the QR code at the entrance. Each code is unique to one ticket. Turn the screen brightness up if the scanner has trouble.
  • Download the PDF ① — the same ticket you received by email, ready to save or print. If the organizer updates the ticket design, downloading again gives you the current design.
  • Print / Save PDF — on a computer, a second button opens the PDF in the browser so that you can print it.
  • Transfer the ticket ② — Transfer Ticket sends it to someone else by email, where the organizer allows it. See How to Transfer Tickets.

What is on the ticket

The event title, date, time and venue, the ticket type, the name of the attendee, the price, your booking reference and the QR code. Each organizer designs the look, so an event may also show the organizer’s logo, sponsor and partner logos and the seat for a seated event. The ticket PDF is printed in the language of your account.

Good to know

  • Treat the ticket link like cash. Anyone who has the link can open the page and see the QR code. That is what lets a friend hold your phone at the door, but do not post the link or a screenshot of the code anywhere public. The first scan admits the holder; a second scan of the same code is refused.
  • The page is not shown for an order that is not confirmed, or for a ticket the organizer cancelled on its own.
  • When you transfer a ticket and the recipient accepts, it gets a new code. The old link and QR stop working for you and the new holder opens it from their own account.
  • A ticket that was already scanned cannot be transferred or cancelled any more.
  • The PDF and the page always show the same ticket, and the PDF attached to your email matches the download.

Troubleshooting

  • The page says the ticket cannot be found — the order is not confirmed any more (cancelled or refunded), or the ticket was transferred away, or the link was copied incorrectly.
  • The QR code will not load — check your connection or use Download PDF. It is wise to save the PDF before you leave home in case there is no signal at the venue.
  • I do not see Transfer Ticket — see How to Transfer Tickets for the conditions.
  • The name on the ticket is wrong — use Edit attendee details on the order in My Tickets, if the organizer allows edits and the event has not started.

Related

2.3 Where Are My Tickets?

You paid and cannot find your tickets. This is the most common question we get, and it almost always comes down to one of the causes below. Work through them in order; the first two fix most cases.

1. Look in My Tickets, not in your inbox

If you were signed in when you booked, open My Tickets from the account sidebar or the avatar menu. A Confirmed order shows every ticket with its own view and download buttons, and Download all for the whole order. You do not need the email at all. If the list is empty, you probably booked with a different account or as a guest (see 3 and 4).

2. Wait a few minutes, then check the email

The confirmation email carries your tickets as a PDF. The PDF is built after the booking confirms, so on a busy moment the email can take a few minutes.

  • Check your spam or junk folder, and tabs such as Promotions or Updates.
  • Check the address you typed at checkout. The email goes to the address on the order, which is not always the address of the account you were signed in with.
  • Check Notification Preferences: if Email is switched off for Booking confirmed, the confirmation email is not sent.

3. Booked as a guest? Ask for a link

Orders made without signing in are not listed in My Tickets. You can have links to your recent bookings sent to you:

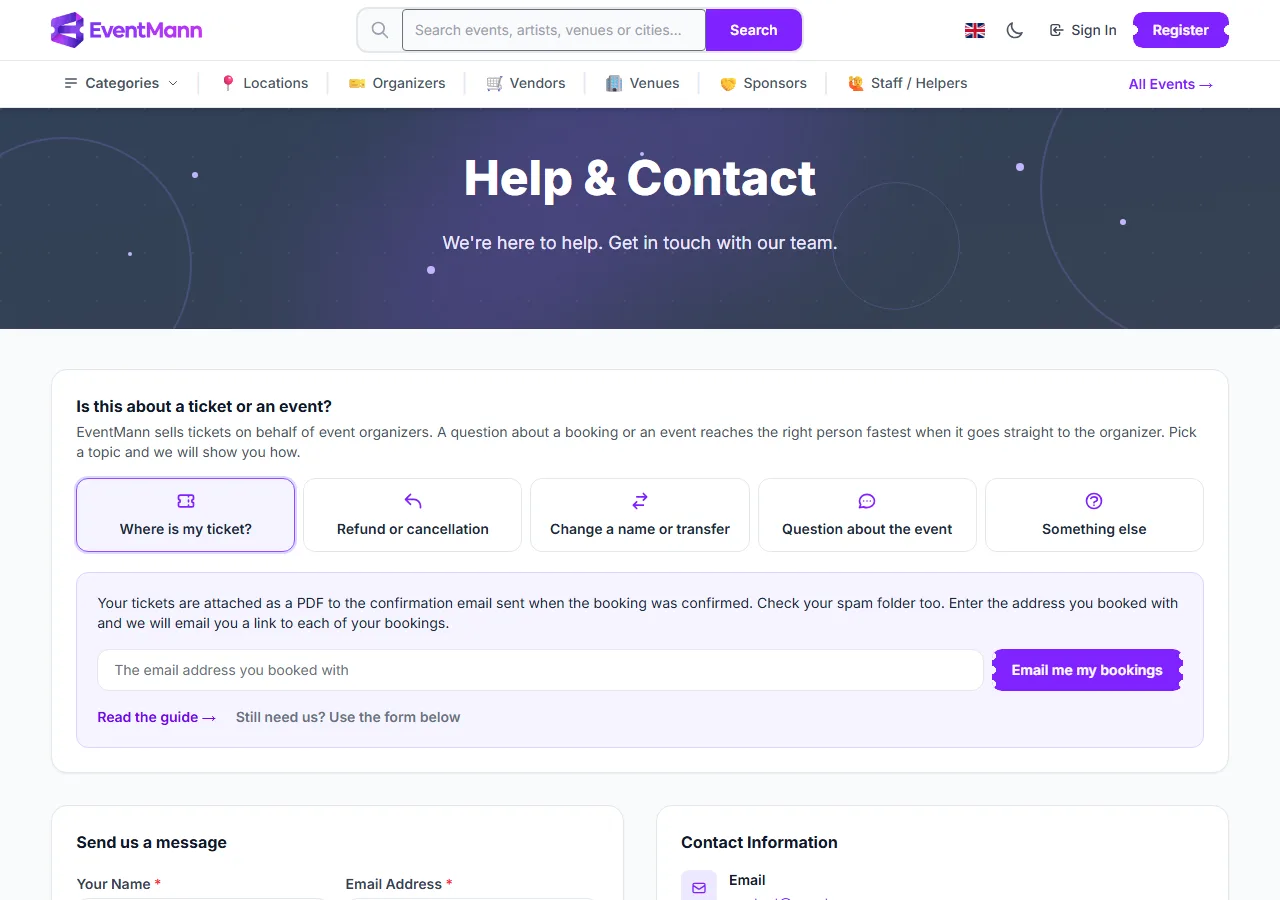
The Where is my ticket? topic on the Help & Contact page with the Email me my bookings form
  1. Open Contact in the footer. The Help & Contact page opens with the question Is this about a ticket or an event?
  2. Choose Where is my ticket? ①.
  1. Enter the email address you booked with and press Email me my bookings ②.

If bookings exist for that address, one email lists each of them with a link. The page always answers the same way, so it does not reveal whether an address has bookings, and it sends at most one email per address every ten minutes. Only confirmed or approved bookings for events from the last 180 days are included.

4. Your booking might still be pending

Tickets exist only once an order is confirmed. If My Tickets shows Pending or Complete payment, nothing can be downloaded yet: the organizer has not approved the order, or the payment has not finished. See Pending Bookings.

5. The link in your email says it has expired

For your privacy, links to a booking stop working 90 days after the event. The page then offers Email me a new link; the new link goes to the address on the booking.

Your booking reference

Every order has a reference starting with BK-, shown on the order card, on the confirmation page and in the email. Door staff, the organizer and Support all use it to find your order; there is no separate ticket number.

If you still cannot get in

  • Use Message organizer on the order and quote the reference. The organizer can resend the confirmation from their side. Messaging is open from 90 days before the event until it ends.
  • At the venue, ask the door staff to find you by name or booking reference.
  • For a payment that the organizer cannot resolve, write to Support with the reference.

Troubleshooting

  • The PDF will not open from my mail app — save it to your device first, then open it from your files.
  • I booked for someone else — the email went to the address entered at checkout. Ask that person, or open the order in My Tickets if you were signed in.
  • The order shows Cancelled or Refunded — tickets are not available for either state.
  • No signal at the venue — save the PDF to your phone beforehand, or take a screenshot of the QR code.

Related

2.4 How to Get a Refund

Whether you get money back, and how much, is decided by the organizer’s cancellation terms for the event, not by a platform-wide rule. The organizer is the seller of your ticket and the refund comes from them. There are two ways to ask, and it matters which one you choose, so read the next two sections before you press anything.

Before you buy: read the cancellation terms

Every paid event states its terms on the event page in the Ticket conditions box, and again on the checkout page. They tell you what you get back depending on how close to the event you cancel.

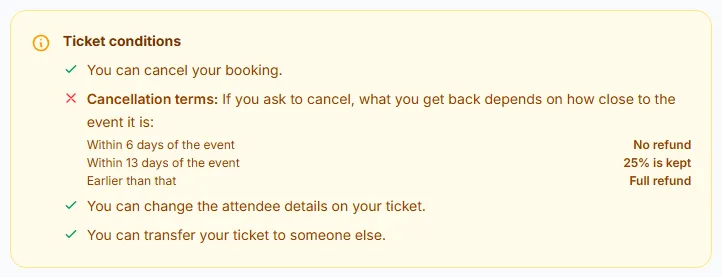
The Ticket conditions box with a cancellation schedule, editing and transfer rules
  • The Cancellation terms ① list steps such as Within 6 days of the event: No refund, Within 13 days: 25% is kept and Earlier than that: Full refund. “Kept” is the share the organizer keeps; the rest is yours.
  • The other rows say whether you can change the attendee details ② and transfer your ticket ③.
  • If an event says Bookings cannot be cancelled, neither route below is offered, and the terms are not shown. The organizer can still refund an order, and if they cancel the event you are refunded in full.

The terms you saw when you bought are saved with your order. The organizer changing them later does not change what applies to you.

Way 1: Cancel Booking

  1. Open My Tickets and find the order.
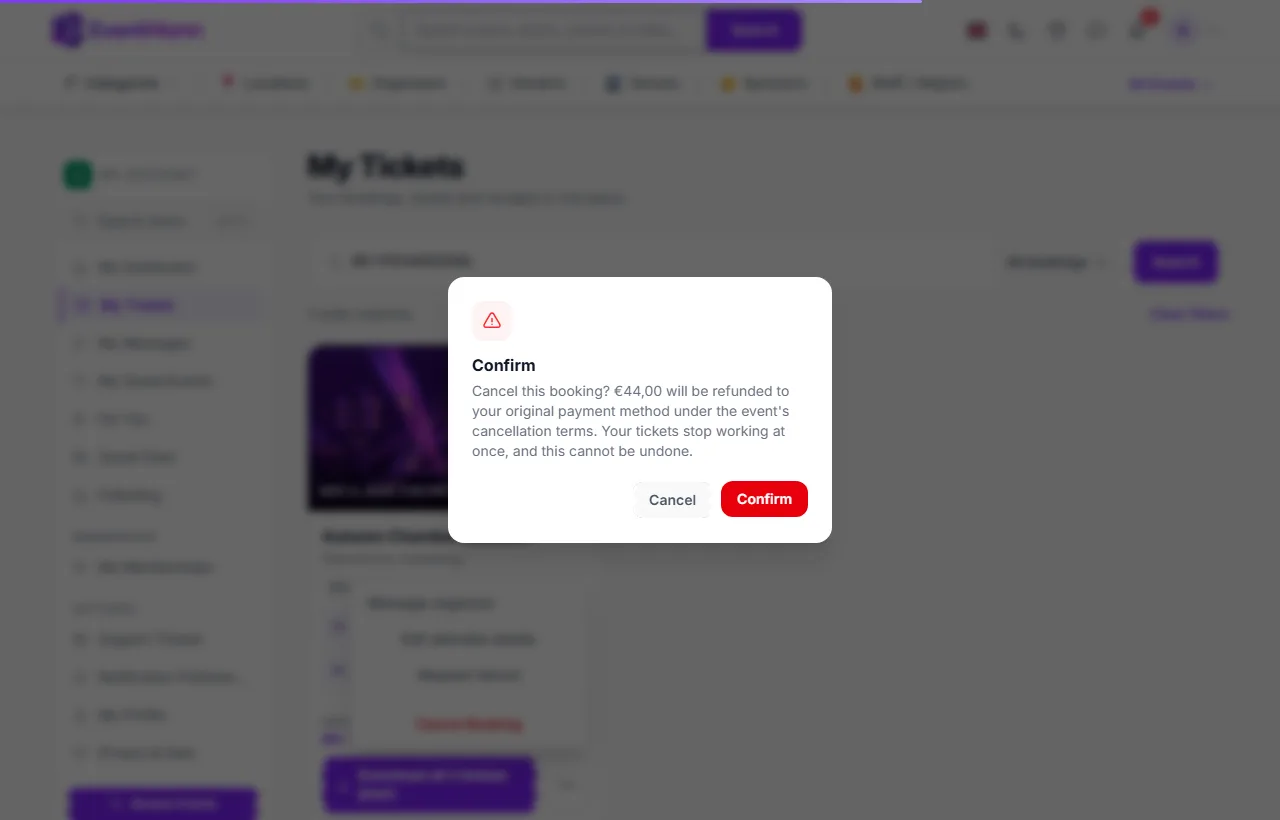
  2. Open the three-dot menu and choose Cancel Booking. Read the dialog, then press Confirm. On a paid order it tells you what happens to your money: the amount that will be refunded, or that you will not get any money back.
The confirmation dialog for Cancel Booking

This cancels the whole order at once and frees the seats. If you paid, the organizer allows automatic refunds, and the cancellation terms return something at this moment, the refund starts automatically for the amount the terms allow. If automatic refunds are not switched on for the event, the order is cancelled and no money is returned — the dialog says so before you confirm, and points you to Request refund when that is still open to you. Once cancelled, the order is no longer confirmed, so you cannot ask for a refund afterwards.

Way 2: Request refund

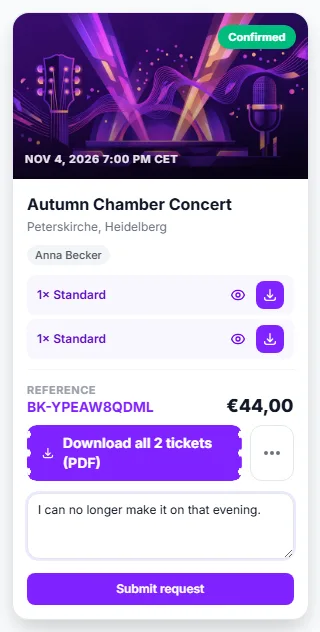
The refund request form on an order, with a reason and a Submit request button
  1. On the order, open the three-dot menu and choose Request refund.
  2. Write the reason ① (at least five characters) and press Submit request ②.
  1. The card shows Refund requested — pending review. Your order stays confirmed and your tickets still work.
  2. The organizer approves or declines. You are notified either way. An approval refunds what the terms allow.

Only one request can be open at a time. After a refund has been issued or approved for an order, further refunds on it are up to the organizer. A declined request can be sent again if your situation changed.

When the buttons are not there

  • The event has started or ended, or any ticket on the order has already been scanned.
  • The organizer switched cancelling off, or the terms would return nothing right now (for example No refund in the last days).
  • The organizer’s cancellation deadline passed. The card then says Cancellations closed on …. You can still request a refund below, and Request refund remains while the terms return something.
  • The order contains a ticket you transferred away or received. Transferred tickets cannot be cancelled; transfer the ticket instead.
  • The order was not paid (a free order has nothing to refund).

If the organizer cancels the event, or changes it

  • If the organizer cancels the event, every paid booking is refunded automatically and you receive an email. You do nothing.
  • If the organizer changes the date, venue or format after you booked, you are told, and the confirmation page shows This event changed after you booked. Your ticket stays valid. If the change does not suit you, ask the organizer for a refund with Message organizer or their contact form.

How long the money takes

The refund goes back to the payment method you used. It is sent to the payment provider and confirmed later, so it does not show on your statement the moment the app says Refunded. Allow several business days. A partial refund keeps the order confirmed; a full one marks it Refunded and the tickets stop admitting anyone.

Good to know

  • Memberships have their own rule: a 14-day right of withdrawal with a full refund. See Memberships.
  • The amount is worked out from the order total, once: the total minus what the terms say the organizer keeps, less anything already refunded.
  • You can always write to the organizer about an order that the buttons do not cover.

Troubleshooting

  • I cancelled and did not get money back — the event does not refund automatically, or the terms returned nothing at that point; the cancel dialog said so. Write to the organizer and explain.
  • Request refund says a request is already open — wait for the organizer’s answer.
  • The organizer has not answered — ask in the order’s message thread; if the order has been stuck a long time, raise a support ticket.
  • It says my refund cannot be processed online — in rare cases the organizer must handle it by hand. Contact them with your reference.

Related

2.5 How to Transfer Tickets

Cannot make it to an event? If the organizer allows transfers, you can hand any single ticket to someone else by email, from the ticket page. The new holder accepts it in their own account and gets their own ticket. Whether an event allows it is stated in the Ticket conditions box on the event page (You can transfer your ticket to someone else); organizers have to switch it on, it is off until they do.

Before you start

The Transfer Ticket button is shown only when all of this is true:

  • you are the person whose account made the booking;
  • the organizer allows transfers for this event;
  • the order is confirmed and the event has not ended;
  • the ticket has not been scanned at the door and has not already been transferred;
  • no other offer is pending on that ticket.

Send a ticket

  1. Open the ticket: the ticket icon on the order in My Tickets, View Ticket on the confirmation page, or the link in your email.
  2. Press Transfer Ticket.
The transfer form on a ticket: recipient email and an optional message
  1. Enter the Recipient Email ① and, if you like, a Message (optional) ② of up to 500 characters.
  2. Press Send Transfer Request. You see Transfer request sent successfully!

You cannot send a ticket to your own email address, and each ticket takes one offer at a time. Tickets are transferred one by one: for an order with three tickets, send three offers if you want to give three away.

What the recipient does

  • They receive an email with a button to accept. The offer is valid for 7 days.
  • They must sign in, or create an account, with exactly the email address you typed, and that address must be verified. If someone else is signed in, they are told the offer was sent to a different address (shown partly hidden) and asked to sign in with the right one. A forwarded link is useless to anyone else.
  • On acceptance the ticket moves to their account. It gets a new code: the QR code and link you had stop working, and they open the ticket from their own My Tickets. You are told by email and, if you use it, by a push message.

While the offer is open

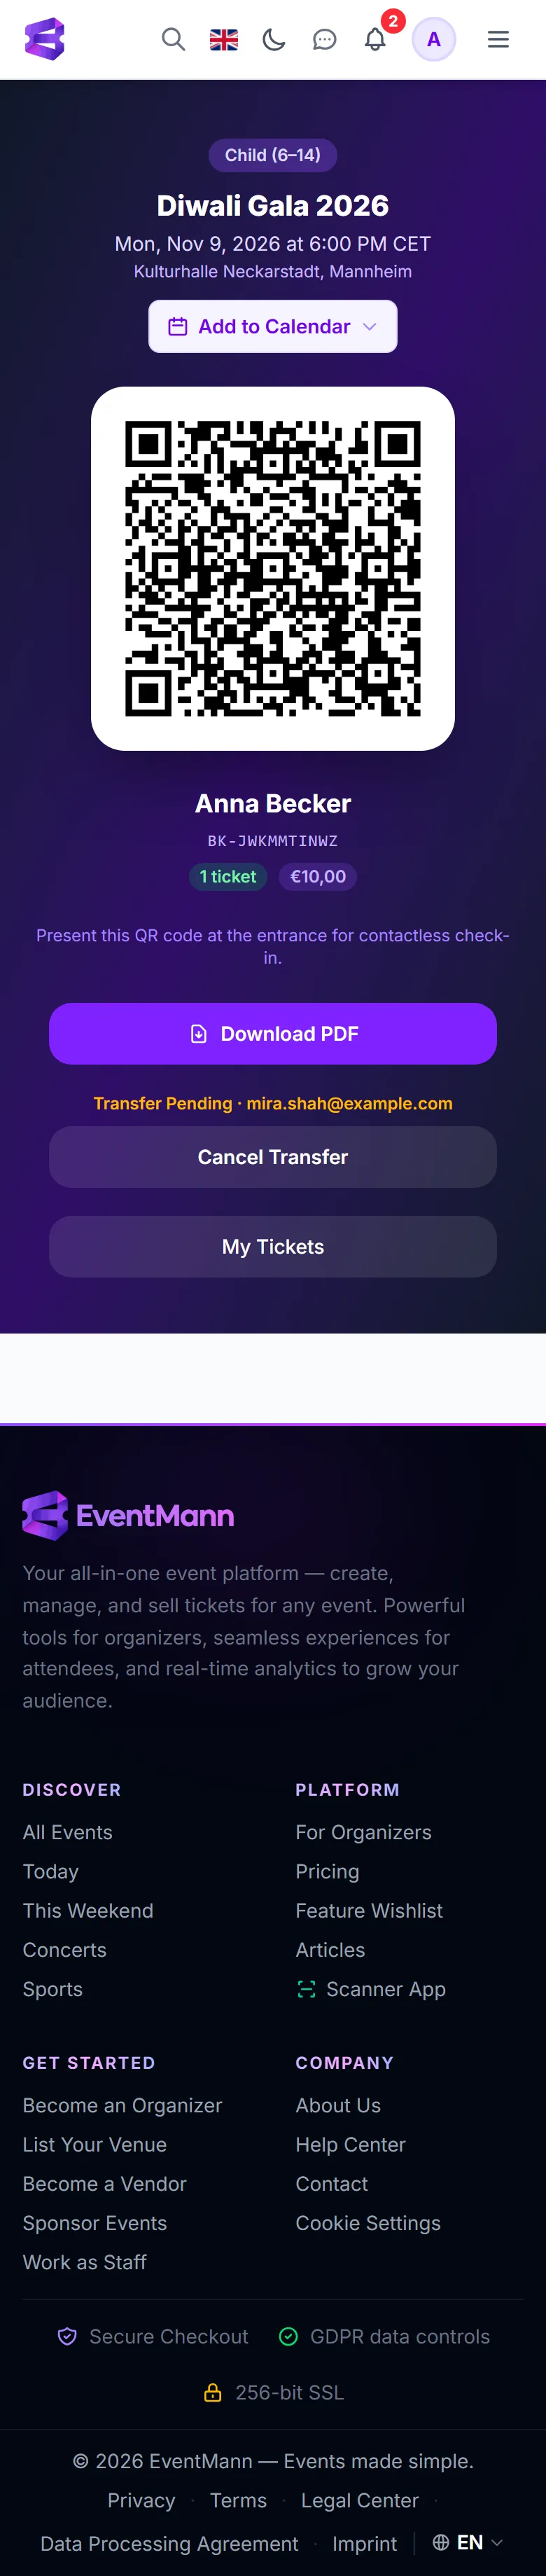
Your ticket is not locked: until the recipient accepts, it is still yours and the old code still works. On My Tickets the ticket shows a Transfer pending badge in place of its buttons, with the recipient’s address as a tooltip, and a Cancel Transfer link next to it. After it is accepted the badge changes to Transferred, and the ticket no longer counts as yours.

Cancel an offer

A ticket with a pending transfer and a Cancel Transfer button
  1. Press Cancel Transfer next to the Transfer pending badge in My Tickets, or open the ticket page (from the confirmation page, your dashboard or your email) and press Cancel Transfer ① there.
  2. Confirm. The recipient’s link stops working at once and you can send the ticket again, to the same or another address.

This only works while the offer is pending. An offer that is not accepted within 7 days simply expires, and the ticket stays with you.

Good to know

  • Transferring is handing a ticket over, not selling it. EventMann does not move money between people, so anything you agree with the recipient is between the two of you.
  • An order that contains a ticket you gave away, or one you received, cannot be cancelled or refunded from My Tickets. Transfer the ticket instead.
  • Checks are repeated when the recipient accepts: if you were refunded, the ticket was scanned, the event ended or the organizer switched transfers off in the meantime, the offer is refused with This ticket can no longer be transferred.
  • You are not told by email if the recipient never answers; the offer simply lapses after 7 days.

Troubleshooting

  • There is no Transfer Ticket button — the organizer has not enabled transfers, the ticket was already transferred or scanned, an offer is pending, the event has ended, or you are not the account that made the booking.
  • The recipient says the link does not work — they must sign in with the address you entered; a typo or a different address blocks it. Cancel the offer and send a new one to the correct address.
  • The recipient did not get the email — ask them to check spam; the offer can also be accepted from the link again within the 7 days.
  • It says a transfer is already pending — cancel the open offer first, or wait for it to expire.

Related

2.6 How to Contact the Organizer

Questions about parking, access, dietary needs or what is included are best asked of the organizer, who runs the event and sold you the ticket. There are two ways: a message thread for people who hold a booking, and a contact form that anyone can use.

1. Messages (for ticket holders)

If you hold a confirmed or approved booking, you get a private thread with the organizer for that event, like a small inbox. Open My Messages in the account sidebar or the avatar menu, or choose Message organizer in the menu of the order in My Tickets.

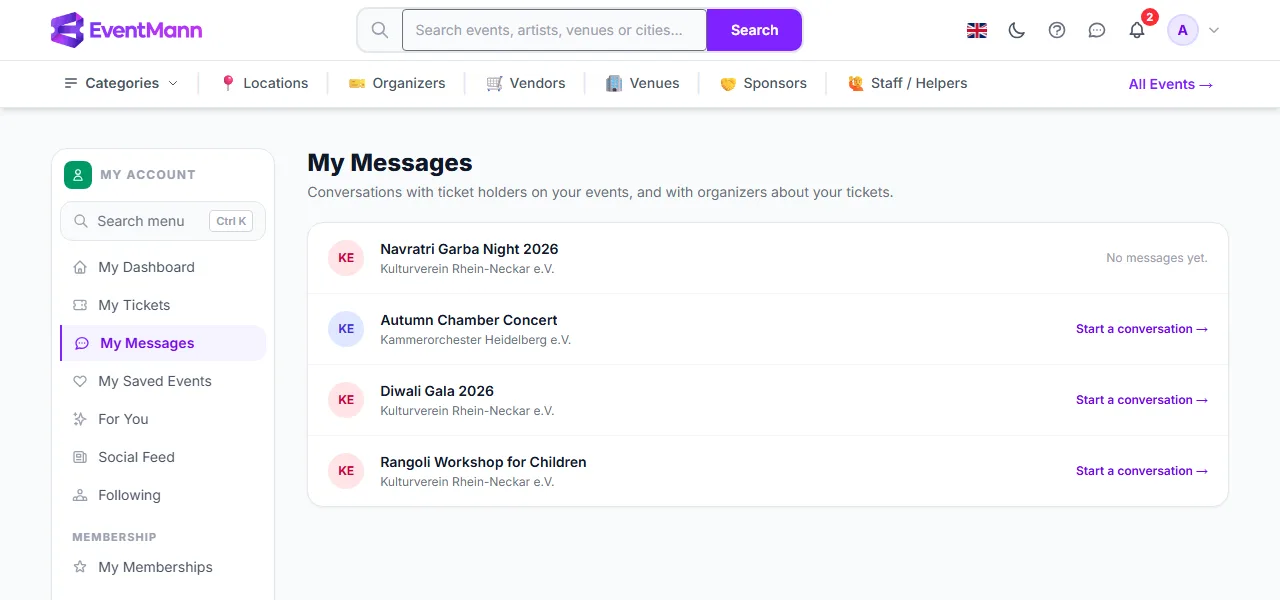
My Messages: one row per event you hold a booking for, with a link to start a conversation
  1. Find the event. Events with messages show the time of the last message and an unread count; the others offer Start a conversation → ①.
  2. Open the thread, type your message and send it.
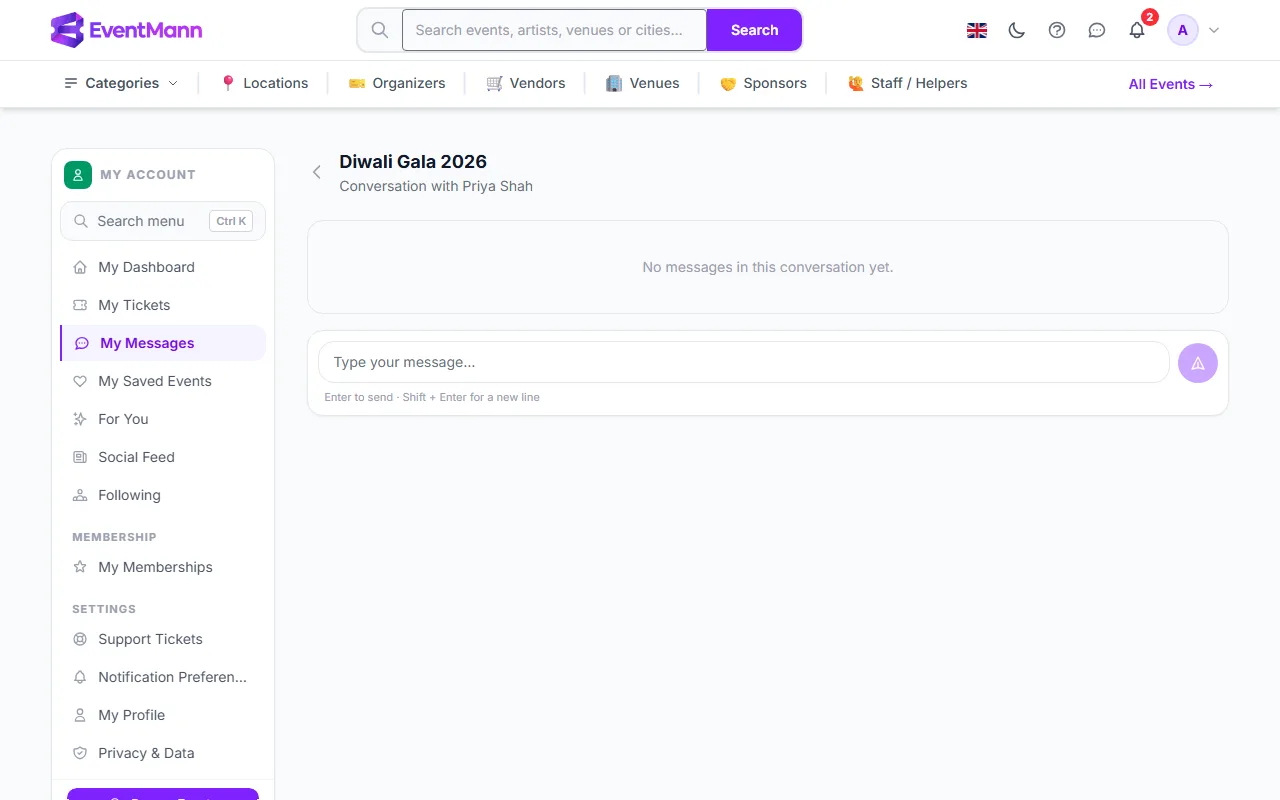
A conversation with the organizer about an event, with the message box at the bottom
  • Write in the box ① and press Enter to send (Shift+Enter starts a new line), or use the send button. The organizer sees it in their own inbox for that event, and their reply appears in this thread.
  • The thread opens 90 days before the event and closes when the event ends, or if the organizer cancels it. Afterwards you can still read the conversation but not add to it.
  • You can send up to 10 messages per hour per event.
  • An organizer can switch direct messaging off for an event. You then see a note instead of a message box.

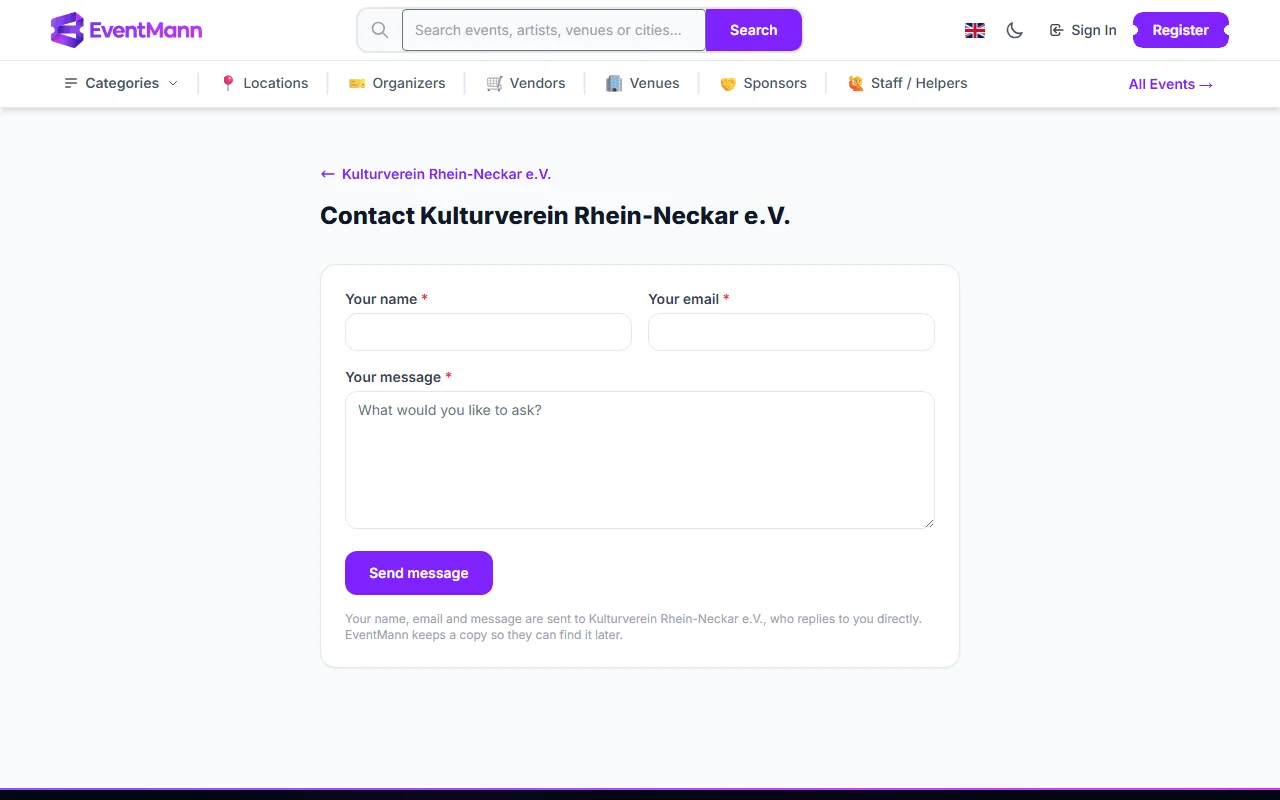
2. The contact form (anyone)

The organizer’s email address is never shown on public pages. Instead, press Contact next to Organized by on an event page, or on the organizer’s own page. You do not need an account or a booking.

The organizer contact form with name, email and message
  1. Enter Your name ① and Your email, then your Your message ②.
  2. Press Send message ③.

Your name, email and message go to the organizer, who replies to you directly by email. EventMann keeps a copy so that they can find it later. Some organizers state how quickly they usually answer, and the form shows that. If the page was opened from an event, the message names the event. You can send a few messages in a short time before the form asks you to wait.

Which one should I use?

SituationUse
I have a confirmed order and the event is within 90 daysMessages
I have not bought yet, or I booked as a guest and cannot sign inContact form
The event is far away or has endedContact form
A problem with my account, a payment or the websiteSupport

Good to know

  • Replies come from the organizer, not from EventMann. How fast they answer is up to them.
  • Your messages are deleted if you erase your account (see Privacy & Data).

Troubleshooting

  • I cannot find Message organizer — your order may still be pending, not confirmed, or the event is more than 90 days away. Use the contact form instead.
  • The message box is replaced by a note — the event has ended, was cancelled, or the organizer turned messaging off.
  • It says I sent too many messages — the limit is 10 an hour for an event. Wait a little.
  • The Contact link leads to a page not found — that organizer has switched the contact form off. Try the event’s message thread if you hold a booking.

Related

2.7 Surveys, Polls & After-Event Emails

After an event, organizers often ask for your opinion with a short survey or a one-question poll, and some send a thank-you email with photos, a feedback link and their next events. This article explains where you meet these, how to answer, and how to stop receiving them.

Where you find a survey

  • On your dashboard — open surveys for events you booked appear under Your feedback is requested with a Fill in survey link, until you answer them (see My Dashboard).
  • In an email and the bell — an invitation arrives some time after the event, with a button that opens the survey. If you do not answer, you get one reminder, a few days later, and never a second one.
  • From a shared link — an organizer may post an open survey link for a group chat. Anyone who has it can answer, signed in or not.

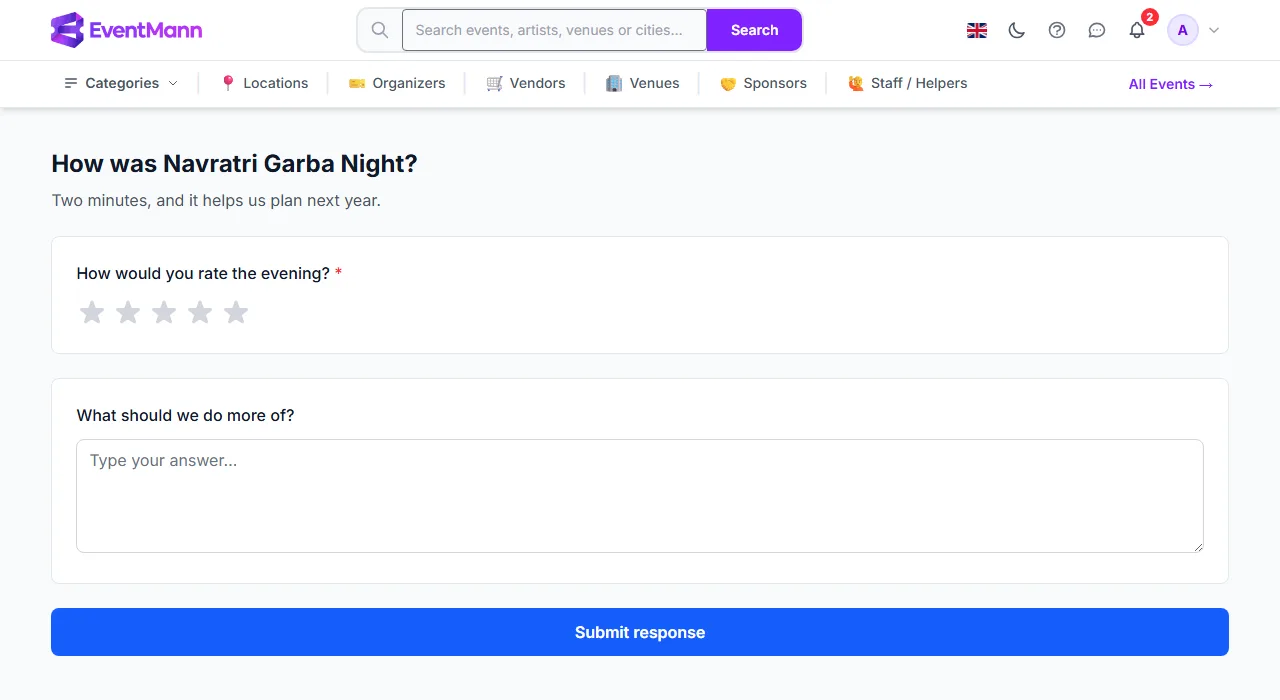
Answer a survey

A survey with a required rating question and an optional text question
  1. Open the survey. Questions marked with a red star are required ①.
  2. Answer each question. Depending on what the organizer chose, you give a star rating, a score from 0 to 10, a face, a number on a scale, pick one or several options, or write text.
  3. Press Submit response ②. You get a message that your response was recorded.
  • You can answer each survey once. Opening it again shows that you already responded.
  • Your answers go to the organizer, who uses them to improve their events.
  • If the organizer has closed the survey, the page says This survey has closed and is no longer accepting responses instead of showing questions.

Polls

A poll is a survey with one question, for example “Which date works best for the next workshop?” You choose an answer and submit. If the organizer switched it on, you then see how everyone voted (totals and averages only; written answers are never shown to other people).

After-event emails

An organizer can send a message after the event to everyone who booked, only to those who attended, or only to those who did not arrive. It may contain:

  • a survey or poll — the answers appear as tappable options. Tapping one only opens the survey with that answer already selected; nothing is sent until you press Submit, so a mail program that opens links by itself cannot vote for you;
  • links to photos or videos the organizer shares, and the organizer’s social profiles;
  • up to three of the organizer’s next events.

The same message may also be available as a web page via a link the organizer can share, for example in a group chat.

Stop receiving them

  • Every such email carries an unsubscribe link and the one-click unsubscribe option of your mail program. The page you reach first only shows a button; unsubscribing happens when you press it, so your mail program’s link check cannot unsubscribe you.
  • If you have an account, you can switch Marketing off in Notification Preferences.
  • Asking for feedback or showing upcoming events counts as advertising, so these emails respect your opt-out and the unsubscribe lists. Messages about your own orders, such as tickets and payment links, are not affected.

Good to know

  • A survey sent to your email address opens through its personal link without signing in. Opening it from the dashboard needs a signed-in account that booked the event.
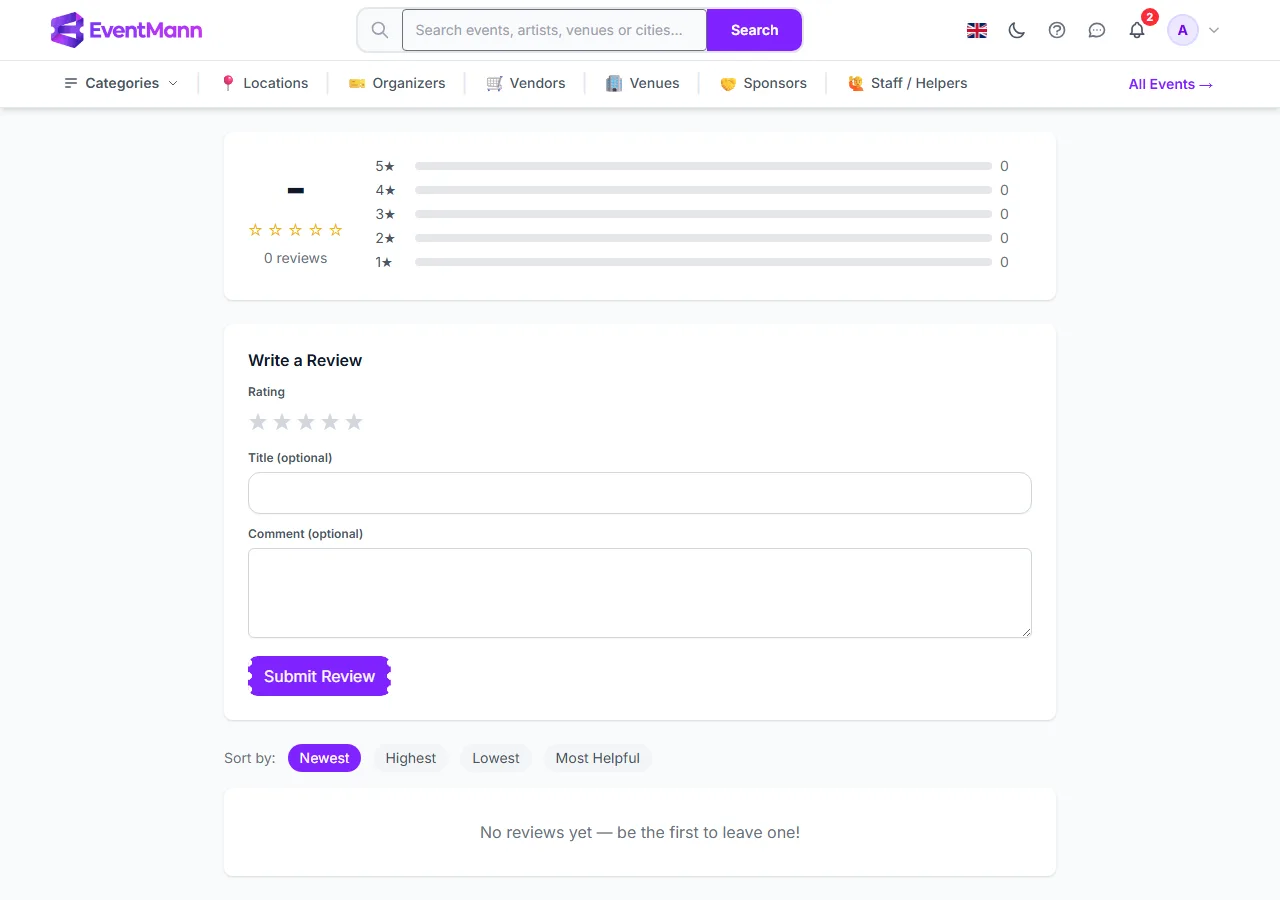
  • Reviews (stars and a comment on the event page) are separate from surveys. See Event Details.

Troubleshooting

  • The survey link does not open — the survey may be closed, or you are signed in with an account that did not book that event. Use the link from your email, or sign in with the account that bought the tickets.
  • I answered but the dashboard still shows the survey — reload the page. A survey you answered disappears from the list.
  • I clicked an answer in an email and nothing was recorded — that is intended: press Submit response on the page it opened.
  • I get emails from an organizer I do not remember — use the unsubscribe link in the email.

Related

Chapter 3

Your account

3.1 My Dashboard

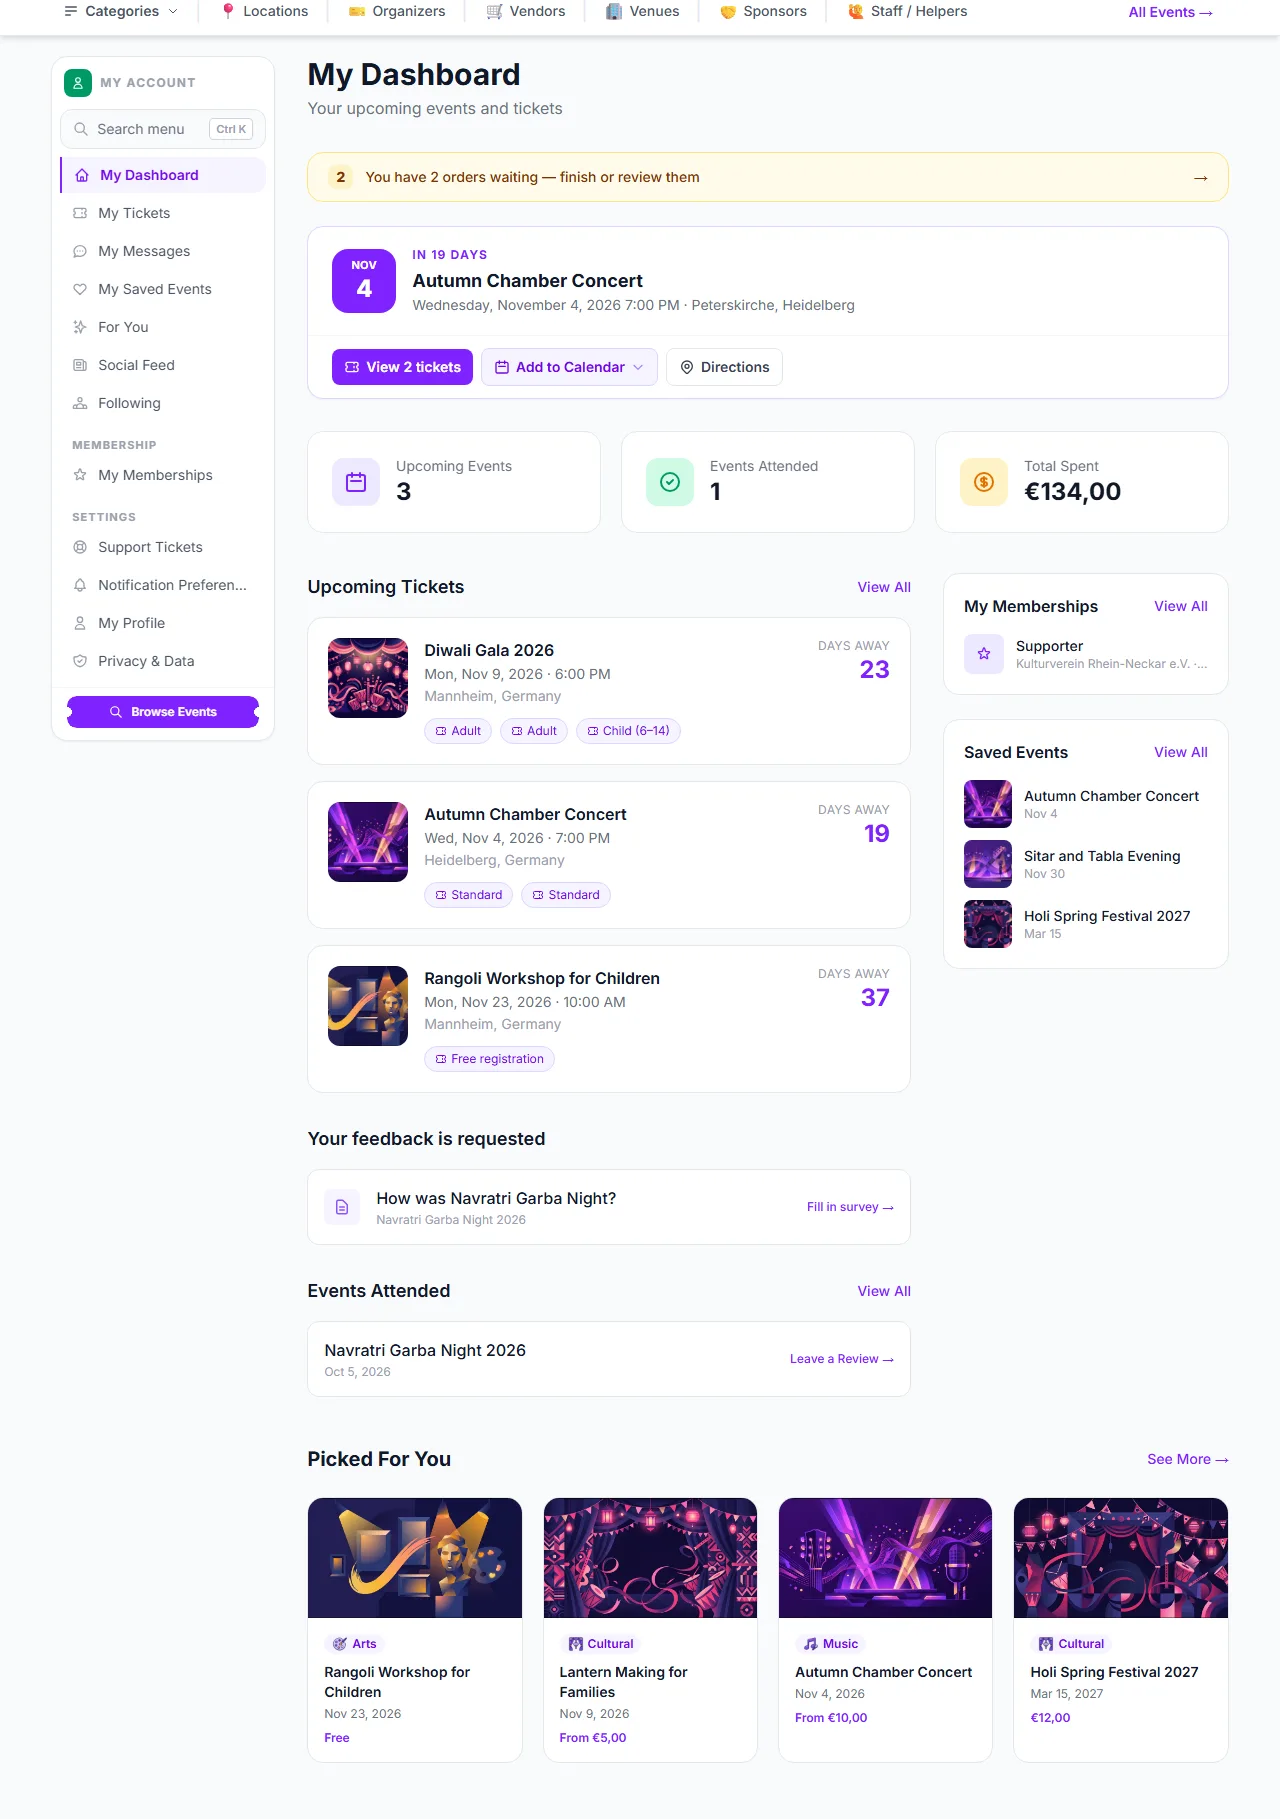
The dashboard is the first page you see after signing in with an attendee account. It gathers your next event, your tickets, anything waiting for an answer from you and a few suggestions in one place. Open it from My Dashboard at the top of the account sidebar.

The attendee dashboard: orders waiting, next event, totals, tickets, survey, memberships and saved events

What you can do here

  • Finish or review waiting orders — when you have orders that are not confirmed yet — waiting for the organizer, for payment to clear, or for you to complete payment after an approval or a declined card — a yellow strip tells you how many ①. It opens My Tickets with the Pending filter already set (see Pending Bookings).
  • See your next event — the card under the strip shows the soonest event you hold confirmed tickets for, with a countdown. View 2 tickets ② opens the order, Add to Calendar offers a calendar file and Directions opens the venue in Google Maps.
  • Check your totals ③ — three figures: Upcoming Events (the upcoming bookings listed below, at most three), Events Attended (events you held a confirmed booking for that have already taken place, each counted once) and Total Spent (all your confirmed bookings, including ones for events still to come).
  • Open your tickets — Upcoming Tickets lists your next three confirmed bookings in the order you bought them. Each ticket type is a small button that opens that ticket.
  • Answer a survey ④ — when an organizer has an open survey for an event you booked and you have not answered it yet, it appears under Your feedback is requested with a Fill in survey link (see Surveys & Polls).
  • See your memberships ⑤ — active memberships are listed in a side card with the organizer and the date they end. View All opens My Memberships.
  • Pick up saved events and suggestions ⑥ — the three most recent saved events, and a row of events under Picked For You (see For You).
  • Review past events — events you have already been to are listed with Leave a Review →, or Reviewed once you have written one.

Good to know

  • The dashboard is for attendee accounts. If you are signed in as an organizer, vendor, staff member, sponsor or venue owner, My Dashboard takes you to that role’s own dashboard instead. Switch roles from your avatar menu.
  • Only confirmed bookings are counted. An order that is still pending, waiting for payment or waiting for the organizer’s approval shows in the yellow strip, not in the totals.
  • A review can be written once the event has started and you hold a confirmed booking for it; you do not have to have been scanned at the door. You can write one review per event.
  • Picked For You is built from the events you booked, your preferences and the organizers you follow. It never suggests an event you already hold tickets for.

Troubleshooting

  • A booking I just made is missing — it only appears here once it is confirmed. Check My Tickets for its status.
  • The dashboard sent me somewhere else — your active role is not attendee. Use the role switcher in the avatar menu to switch back.
  • No survey is shown although I got an email — the survey may be closed, or you may have answered it already. Closed surveys show a short note instead of questions.

Related

3.2 Saved Events

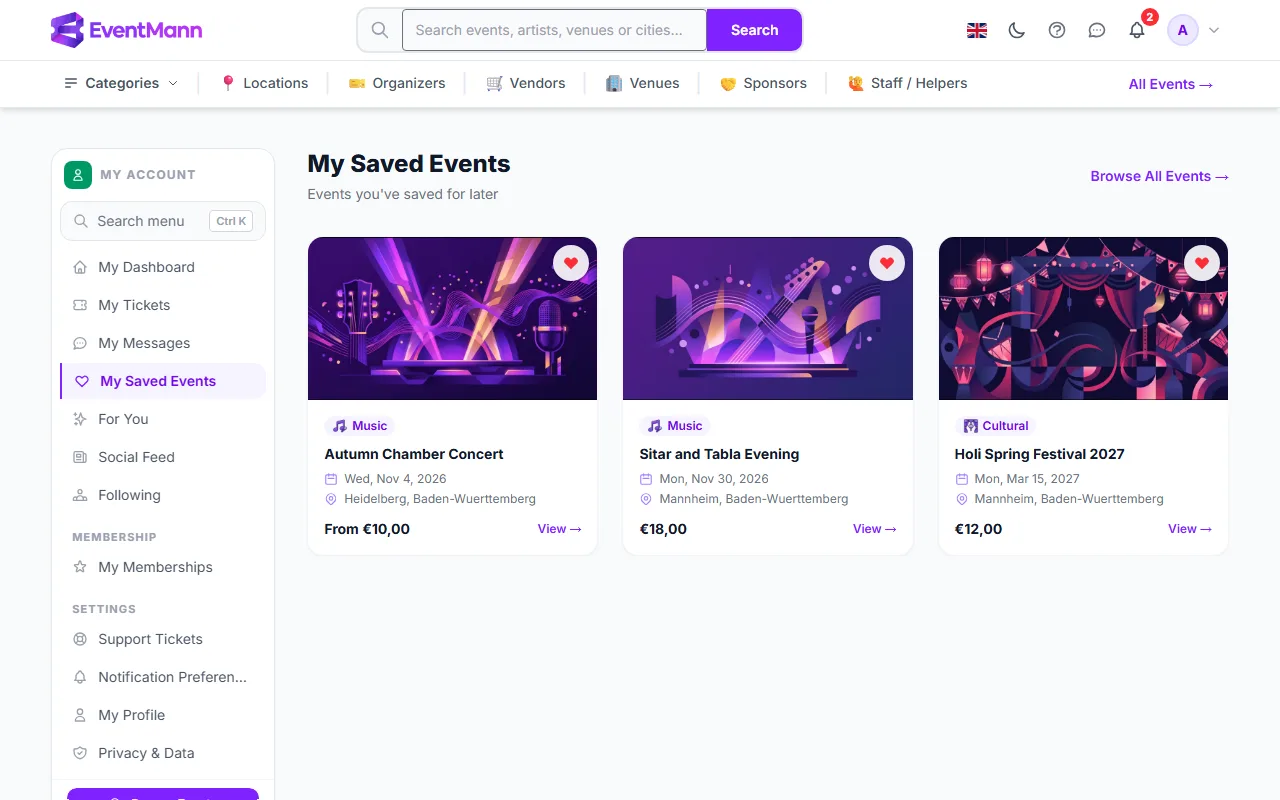
Saved Events is your shortlist: events you want to come back to before you decide to buy. Save an event with the Save button on its page; find your list under My Saved Events in the account sidebar.

My Saved Events with three saved events, each with a heart to remove it

Save an event

  1. Sign in, then open the event page.
  2. Click Save under the date and venue. The heart fills in.
  3. Click it again to remove the event from your list.

The Save button is only shown when you are signed in.

What you can do here

  • Open an event — click the card or View → ① to go to its page and buy tickets.
  • Remove an event — click the heart in the corner of the card ②. The card disappears at once; there is no confirmation and nothing is deleted from the event itself.
  • Browse for more — Browse All Events → at the top takes you to the event list.

Good to know

  • Saving does not reserve anything and does not send you reminders. It is a bookmark: you are not told when the price changes, when sales open or when tickets run low, so check back yourself.
  • Your three newest saved events also appear on your dashboard.
  • Your list is private to your account. Saving an event does not change what For You suggests; that is based on your bookings, preferences and the organizers you follow.
  • The list shows 12 events per page.

Troubleshooting

  • There is no Save button — you are signed out, or you are on a page that is not an event page. Sign in and open the event itself.
  • I removed an event by accident — open the event page and click Save again.
  • I saved an event on my phone and do not see it on my laptop — check you are signed in with the same account on both.

Related

3.3 For You

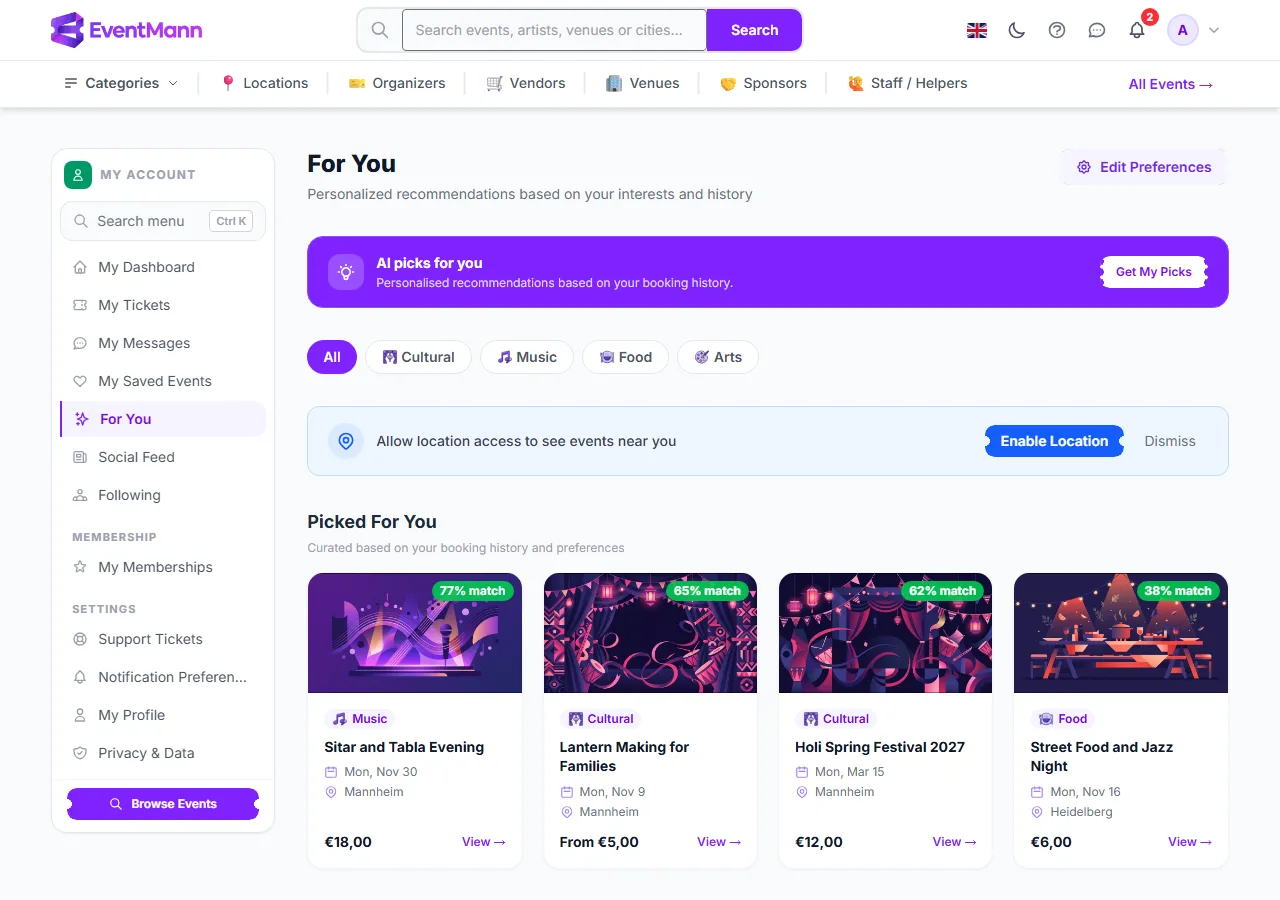
For You is a page of events picked for you from what you have booked, the preferences you set and the organizers you follow. Open it from For You in the account sidebar, or from See More under Picked For You on your dashboard. The page itself is at /for-you.

The For You page with the AI picks banner, category chips, a location prompt and events with a match percentage

What you can do here

  • Browse your picks ③ — Picked For You lists up to twelve upcoming events, best match first. The green badge on each card, for example 77% match, is how well the event fits your profile. Events you already hold tickets for are not suggested.
  • Narrow by category — the chips under the banner (All, Cultural, Music and so on) filter the page to one category.
  • See what is close to you — Enable Location asks your browser for your position, finds the nearest city and lists up to eight upcoming events there. Press Dismiss to hide the prompt. Nothing is shown if you refuse the browser’s permission request or no events are listed in that city.
  • Trending Now — events with the most confirmed bookings in the last seven days, with the number of bookings.
  • Because you like … — up to three rows, one for each category you book or prefer most, with four events each.
  • Ask for AI picks ② — where the platform has AI features switched on, a purple banner offers Get My Picks. It sends the titles and categories of your last ten confirmed bookings and a list of upcoming public events, never your name or contact details, and shows up to five suggestions with a one-sentence reason each. If AI is not available, the banner is not shown.

Set your preferences

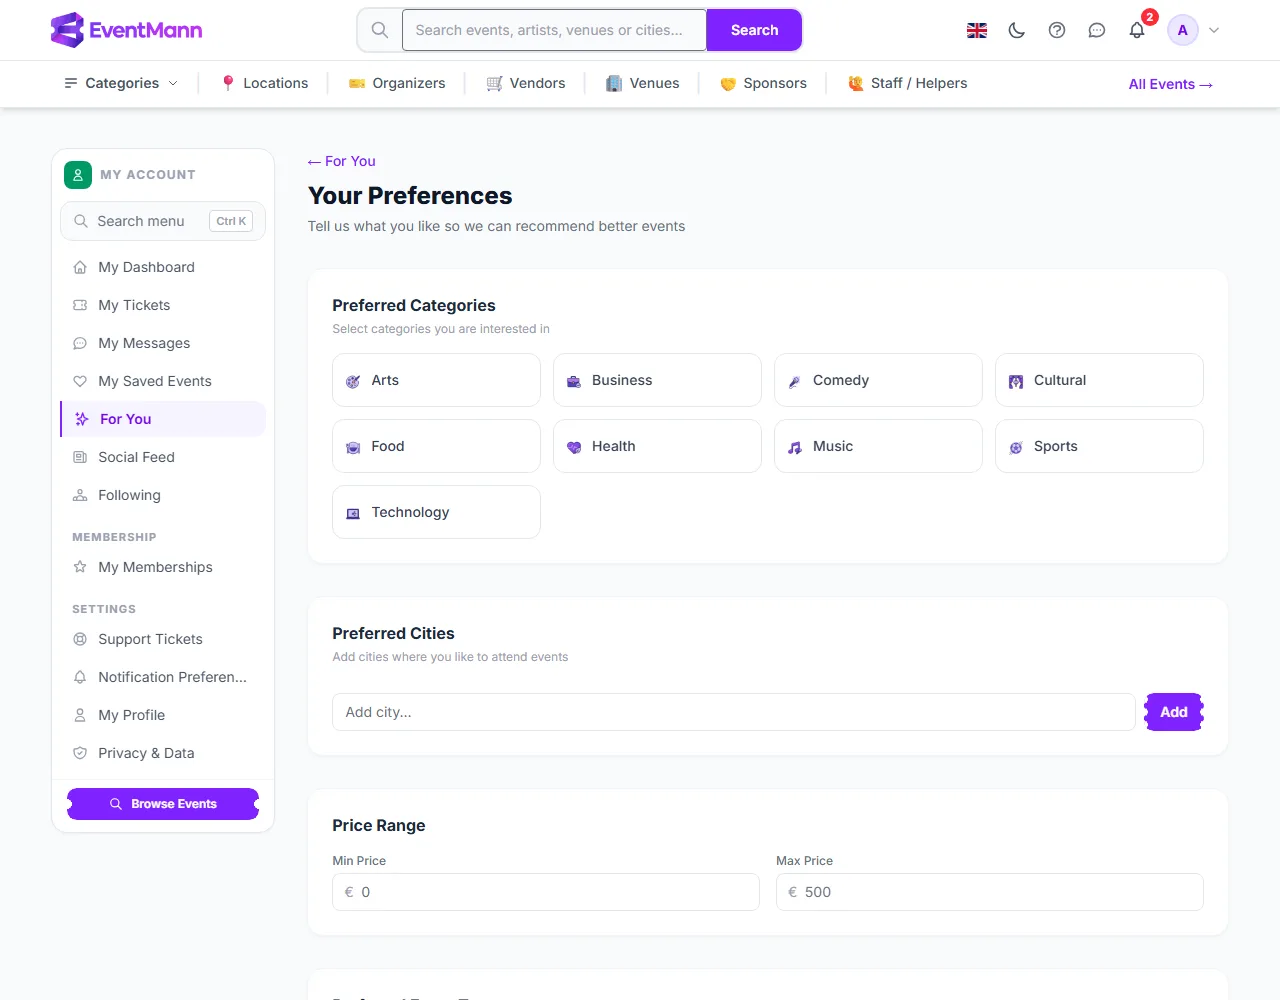
  1. Click Edit Preferences ① at the top right.
Preferences: categories, cities, price range, event types and days of the week
  1. Tick the categories you like ①, add the cities you are willing to travel to ② and, if you wish, a minimum and maximum price, event types and the days of the week you prefer.
  2. Click Save Preferences ③. You are taken back to For You and the list is rebuilt straight away.

Good to know

  • The match score weighs category, location, popularity, price, how soon the event is, whether an organizer you follow runs it, and a little variety so the list is not all one kind of event. You cannot see or edit the scores themselves.
  • Your ranking is remembered for an hour. Saving your preferences rebuilds it immediately; a new booking on its own can take up to an hour to be reflected.
  • Only events that are live, public and upcoming are suggested. An event the organizer pauses or makes private disappears from the page on your next visit.
  • The For You row in the sidebar is only shown when the platform’s AI features are on. The page and the Picked For You row on your dashboard work either way.
  • You do not need preferences for the page to work. With no bookings and no preferences, the Because you like rows use the categories that have the most upcoming events.

Troubleshooting

  • The page looks generic — that is normal for a new account. It sharpens as you book, follow organizers and fill in preferences.
  • Enable Location shows nothing — your browser may have blocked the location request, or no events in your city are listed. Use the category chips or Search instead.
  • I changed my preferences and nothing moved — check that you pressed Save Preferences; you are redirected to For You when it worked.
  • An event I expected is missing — you may already hold tickets for it, or it is not live and public.

Related

3.4 Social Feed

The Social Feed lists what the organizers you follow have been doing on EventMann lately. Open it from Social Feed in the account sidebar. It is a small, quiet page: it shows two kinds of activity, and it is empty until you follow someone.

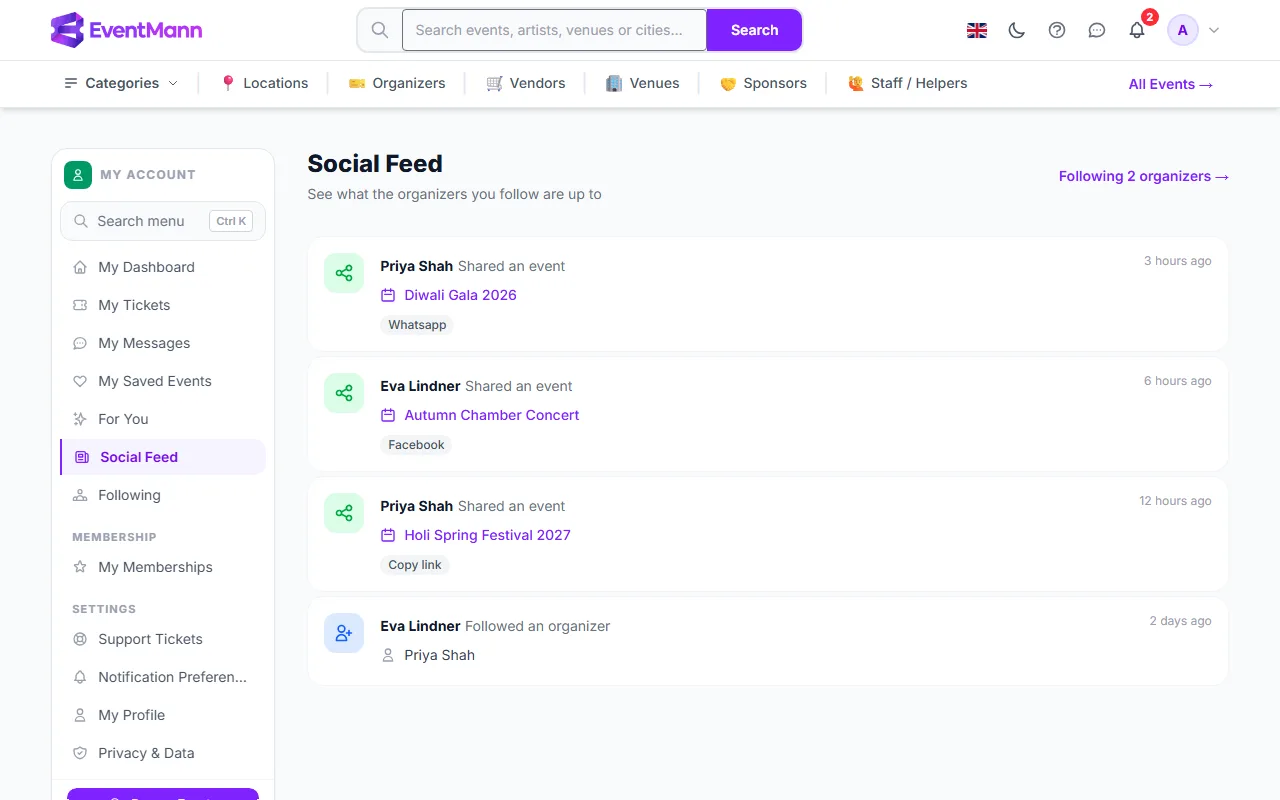
The Social Feed with shared events and a follow from organizers the attendee follows

What you can do here

  • Read the activity — each row names the organizer, what they did and when, for example Shared an event with the event title as a link and the channel they used (WhatsApp, Facebook, copy link and so on) ②. Click the title to open the event.
  • Jump to the people you follow — Following 2 organizers → ① at the top opens Following.
  • Find more organizers — a Suggested organizers panel lists organizers you might want to follow, with their follower counts.

What appears in the feed

Only two things are recorded and shown today:

  • Shared an event — the organizer used the share buttons on an event page while signed in.
  • Followed an organizer — the organizer followed another organizer.

Bookings, reviews and saved events are not published to the feed, so nobody can see what you buy or save.

Good to know

  • The feed shows the last 90 days of activity, newest first, 20 rows to a page.
  • Following an organizer does not send you an email, a push message or a bell notification when they publish an event. The feed is the only place their activity shows, so a quiet feed is normal. To hear about a specific event, save it and check back, or turn on the notifications that matter to you.
  • Events from organizers you follow get a small boost in your For You suggestions.
  • Your own actions appear in the feeds of people who follow you only if you are an organizer yourself.

Troubleshooting

  • The feed is empty — you follow nobody yet, or nobody you follow has shared an event or followed another organizer in the last 90 days. Follow organizers from their profile page or from the suggestions on this page.
  • I followed an organizer and got no email — following does not send notifications; see above.
  • The suggestions are the same organizers every time — they are organizers whose events you have booked first, then the most followed organizers who have a live event, minus the ones you already follow.

Related

3.5 Following

Following is the list of organizers you have chosen to follow. Open it from Following in the account sidebar. You can follow an organizer without buying anything, and unfollow at any time.

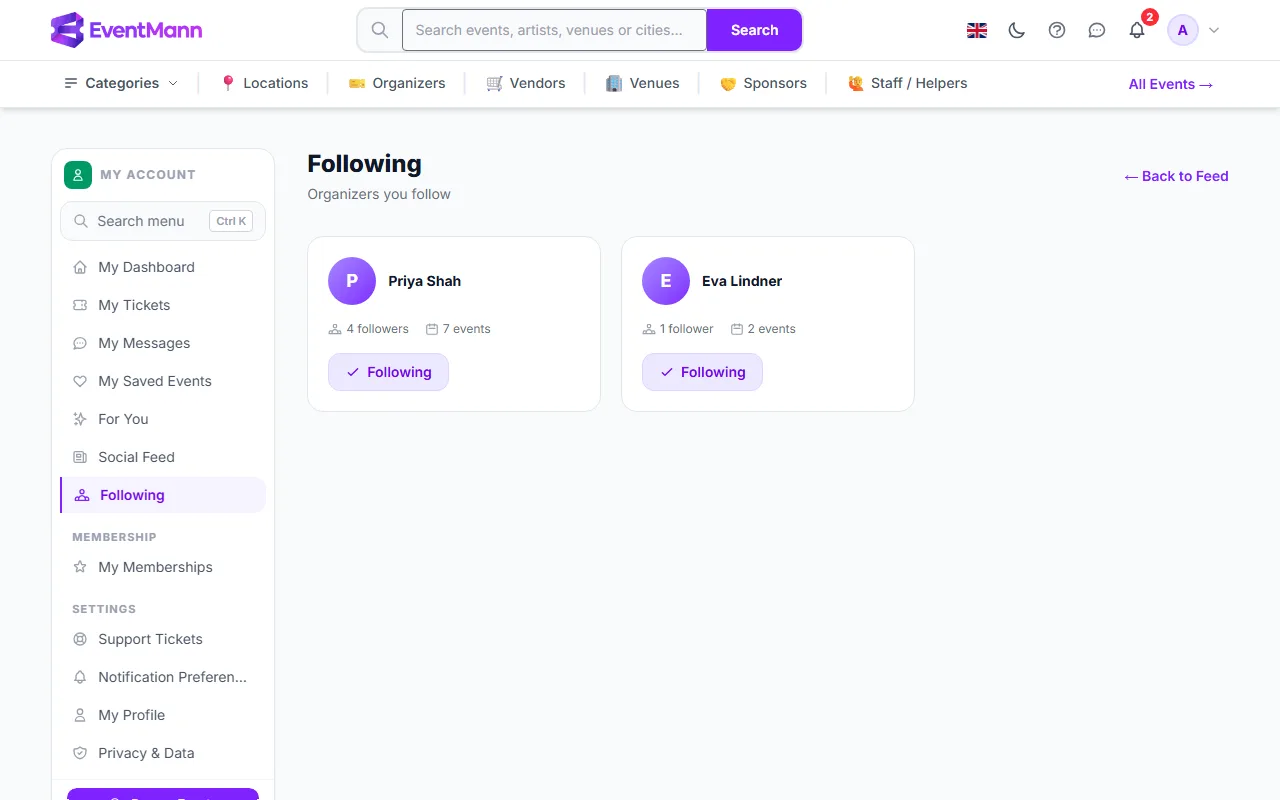
The Following page with two followed organizers, their follower and event counts, and a Following button on each

Follow an organizer

  1. Open an event and look at the Organized by card, or open the organizer’s own page.
  2. Click Follow. The button changes to Following and the follower count goes up by one.

You can also follow straight from the Suggested organizers panel on the Following page and on the Social Feed. You need to be signed in, and you cannot follow yourself.

What you can do here

  • Review who you follow — each card shows the organizer, how many people follow them and how many events they have run. Click a card to open the organizer’s page, with their upcoming and past events and, where they offer them, their membership plans.
  • Unfollow — click Following ② on a card. The organizer disappears from the list and from your feed straight away.
  • Go back to the feed — ← Back to Feed ① returns to the Social Feed.
  • Discover organizers — Suggested organizers lists organizers whose events you have booked, then popular organizers who have an event on sale.

What following does

  • Their activity (events they share, organizers they follow) shows in your Social Feed.
  • Events they run get a small boost in your For You suggestions.

It does not send you any email, push message or bell notification when they publish a new event, and it gives the organizer no access to your details. The organizer sees only a follower count.

Good to know

  • Only organizer accounts can be followed.
  • The list shows 12 organizers per page.
  • Following an organizer is separate from being a member of their organization. Memberships are paid passes with benefits and are managed under My Memberships.
  • The cards show the name on the organizer’s account. Their organization name is on their own page and on their events.

Troubleshooting

  • I do not see a Follow button — you are signed out, or you are looking at your own organizer page.
  • I followed someone and heard nothing — following is a bookmark for the feed and the suggestions, not a subscription.
  • The list is empty — you have not followed anyone yet. Use the suggestions at the bottom of the page.

Related

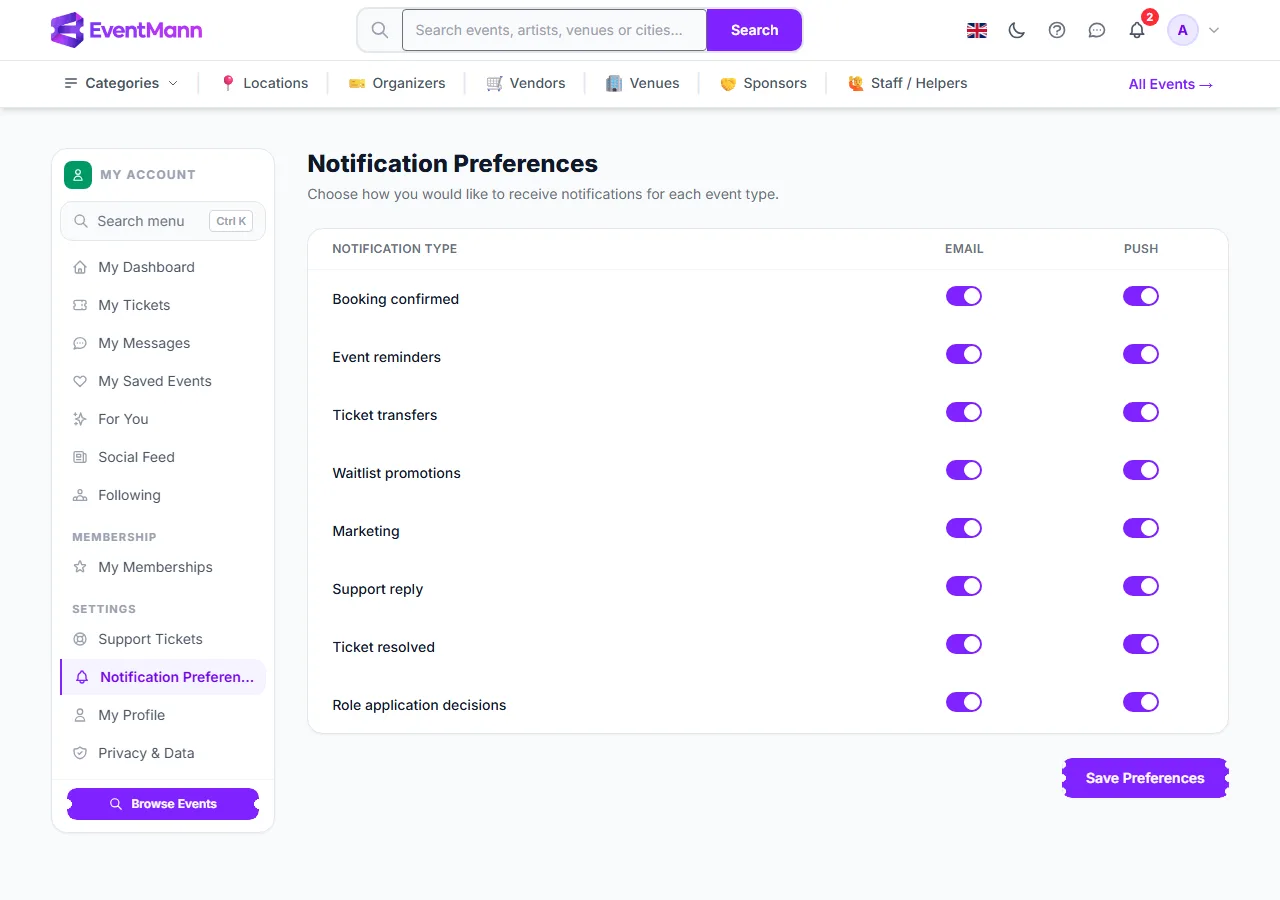
3.6 Notification Preferences

Notification Preferences decide which messages EventMann sends you by email and as browser push notifications. Open Notification Preferences in the account sidebar, or from your avatar menu. This article also explains the notification bell and the Notifications page, which hold the same messages inside the site.

The notification grid: one row per message type, with an Email and a Push switch

Change what you receive

  1. Find the message type in the left column. There is one row for each kind of message.
  2. Switch the Email column ① on or off for that row, and the Push column ② if you use browser push.
  3. Click Save Preferences ③. Nothing is changed until you save.

Settings explained

TypeWhat it covers
Booking confirmedThe confirmation email with your tickets, and the matching push message.
Event remindersThe reminder before an event, and notices when the organizer changes the date or venue of an event you booked.
Ticket transfersAn offer to receive a ticket, and the answer to an offer you sent.
Waitlist promotionsThe message that a place has opened for you on a waitlist.
MarketingNews and offers that organizers send you. You can also unsubscribe from the link in any such email.
Support reply / Ticket resolvedAn answer to, or the closing of, a support ticket you opened.
Role application decisionsThe outcome when you applied to be a vendor, sponsor or venue owner.

Browser push

Where your platform has push switched on, a card titled Browser push notifications appears above the grid. Click Enable on this device on each device and browser you want to be notified on, and allow notifications when the browser asks. Disable on this device turns it off for that device. The Push column then chooses which message types may use it. If your browser does not support push, the card says so.

The notification bell

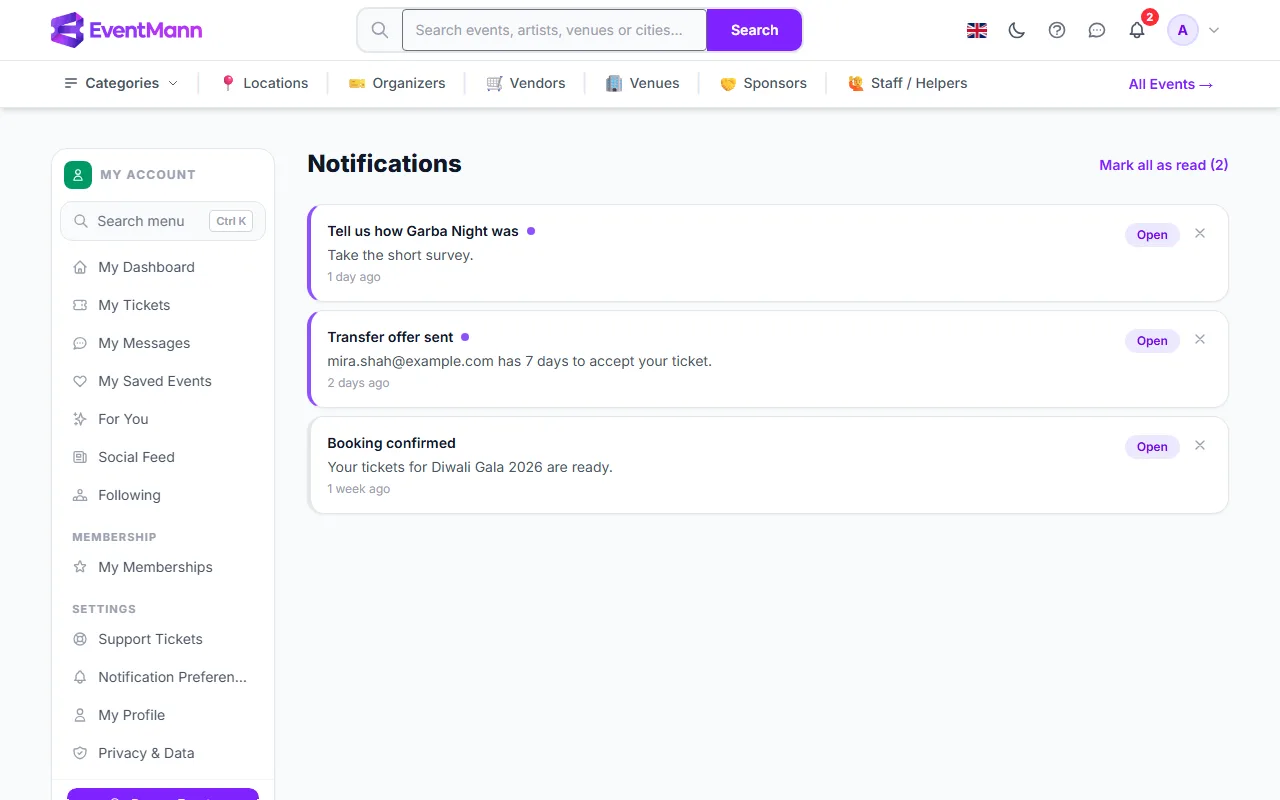
The bell in the top bar shows how many unread notifications you have. Click it for the latest ones, or View all notifications for the full page.

The Notifications page with a Mark all as read action and unread messages
  • Mark all as read ① clears the unread count.
  • Click a message, or its Open link ②, to jump to what it is about, for example a survey or a booking. Opening it marks it as read.
  • The bin icon on a message deletes it.

Good to know

  • Switching off Email for Booking confirmed means the confirmation email, and the tickets attached to it, are not sent to you. Your tickets are still in My Tickets, but keep this switch on unless you are sure.
  • These settings apply to your account. If you check out as a guest, you have no preferences and every email for that order is sent to the address you entered.
  • Emails that are part of a purchase you are making, such as a payment link, a password reset or a verification email, are not optional messages and are not controlled here.
  • Following an organizer does not create any notification; see Following.
  • Organizer and admin accounts are sent to their own settings pages for this; vendor, sponsor, staff and venue accounts see this grid with the extra message types that apply to their role.

Troubleshooting

  • I am not getting booking emails — check that Email is on for Booking confirmed, then check your spam folder. See Where Are My Tickets?.
  • I turned a switch off and still got an email — mail already queued before you saved can still arrive. Messages that belong to an order or a security action are not affected by these switches.
  • There is no Push column or push card — browser push is not available on this platform or in your browser.
  • I get no browser notifications — you must allow notifications for the site in the browser and press Enable on this device.

Related

3.7 Privacy & Data

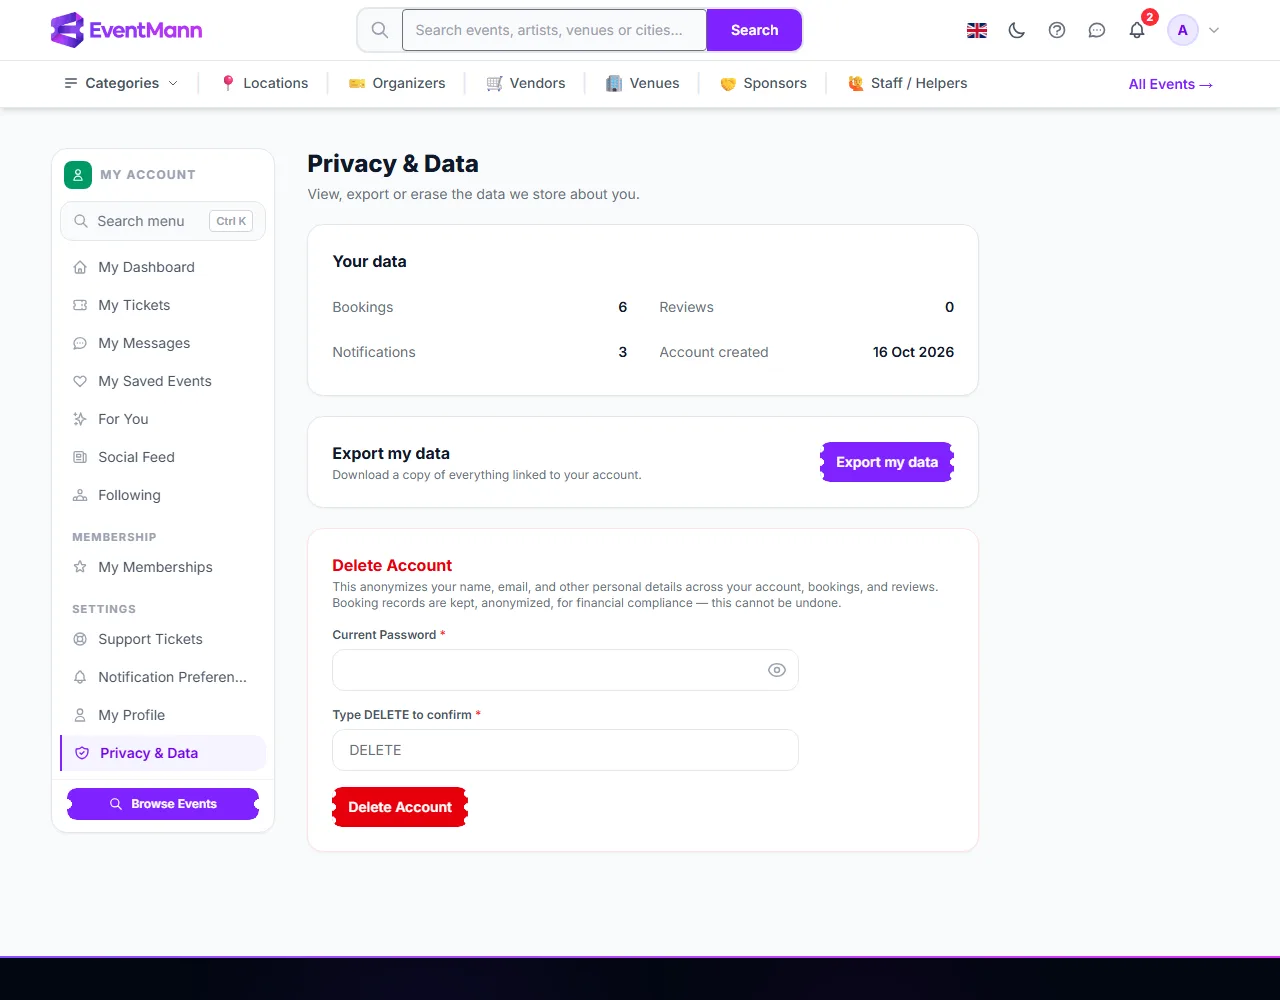
Privacy & Data is where you see what EventMann holds about your account, download a copy of it, and erase your personal details. Open Privacy & Data at the bottom of the account sidebar (the page is /privacy).

The Privacy & Data page: a summary of your data, the export button and the account deletion form

What you can do here

  • See a summary ① — four figures: how many Bookings, Reviews and Notifications are linked to your account, and the date the Account created.
  • Download your data ② — Export my data gives you a file named my-data-export.json straight away. There is no waiting and no email. Nothing is stored on the server afterwards.
  • Erase your personal details ③ — Delete Account anonymizes your account.

What is in the export

The file is plain JSON that you can open in any text editor. It contains:

  • your profile (name, email, phone, bio, time zone, when the account was created);
  • every booking with its tickets and the attendee names on them, plus the answers you gave to checkout questions;
  • reviews and ratings you wrote, and your messages with organizers;
  • your memberships (including gifts you bought) and invoice summaries;
  • survey answers, waitlist entries and enquiries you sent to organizers;
  • marketing emails sent to you, your trusted devices, active sessions and push subscriptions;
  • your notifications and your account activity log.

Delete your account

  1. Cancel anything you still want money back for first. Deleting the account does not cancel orders, refund payments or end memberships.
  2. On the Privacy & Data page, scroll to Delete Account.
  3. Type your Current Password.
  4. Type DELETE in the confirmation field ③.
  5. Click Delete Account. You are signed out at once.

The same action is available under Danger Zone on your profile, where it asks for your password only.

What deletion does

  • Your name, email, phone, bio and photo are replaced, and the account is locked so nobody can sign in to it again. This cannot be undone.
  • Your bookings stay as records, because invoices and payments must be kept for tax and accounting, but the name, email, phone and address on them are replaced with “Deleted User” and a placeholder, and the names on individual tickets are blanked.
  • Your answers to checkout questions, your messages with organizers, your notifications, push subscriptions and trusted devices are deleted.
  • Your reviews are hidden and their text replaced, and the organizers’ stored contact entries for your email address are erased.
  • The network address and browser details are removed from your account activity log.

Good to know

  • Download the tickets you still need before you delete: after erasure you can no longer sign in to open them from My Tickets.
  • If you bought tickets as a guest, you have no account to log in to this page. Ask for an export or erasure through Support or the organizer, quoting your booking reference.

Troubleshooting

  • Delete Account says my password is wrong — use the current password. If you signed up with Google, Facebook or LinkedIn you have no password you ever chose; set one first with Forgot your password? on the sign-in page.
  • The confirmation is rejected — type DELETE in capital letters, exactly.
  • The export file looks empty in places — sections with nothing to report, such as no reviews, are empty lists.

Related

3.8 Account Settings & Password

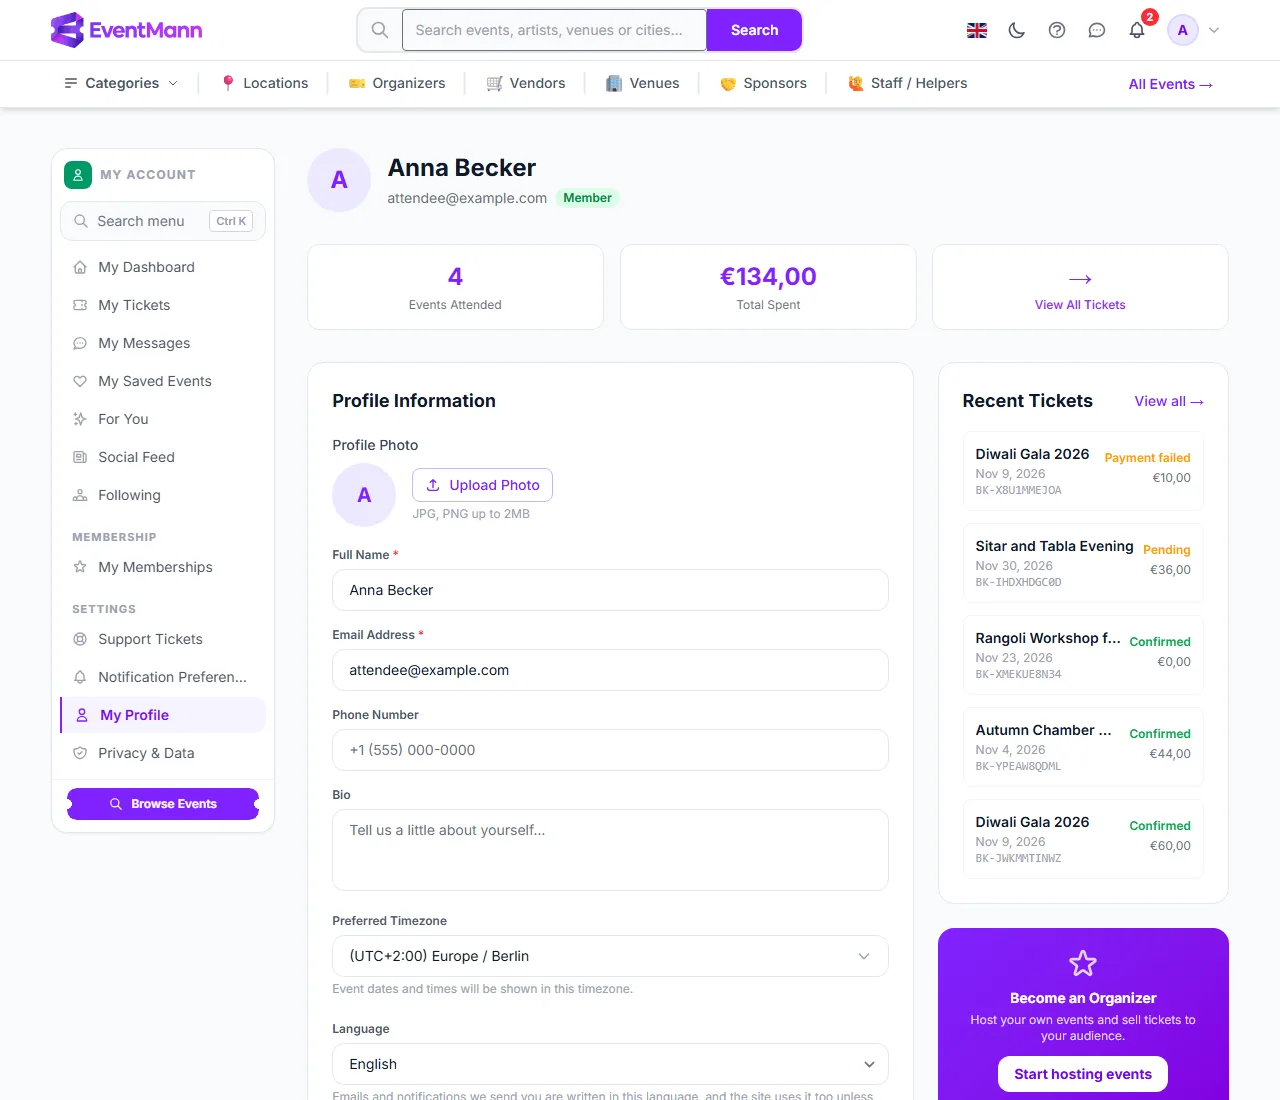
Your profile page holds your personal details, language, password, two-factor authentication and the option to delete your account. Open it with My Profile in the account sidebar or in the menu under your avatar in the top right. For the shared basics every role has, see My Profile.

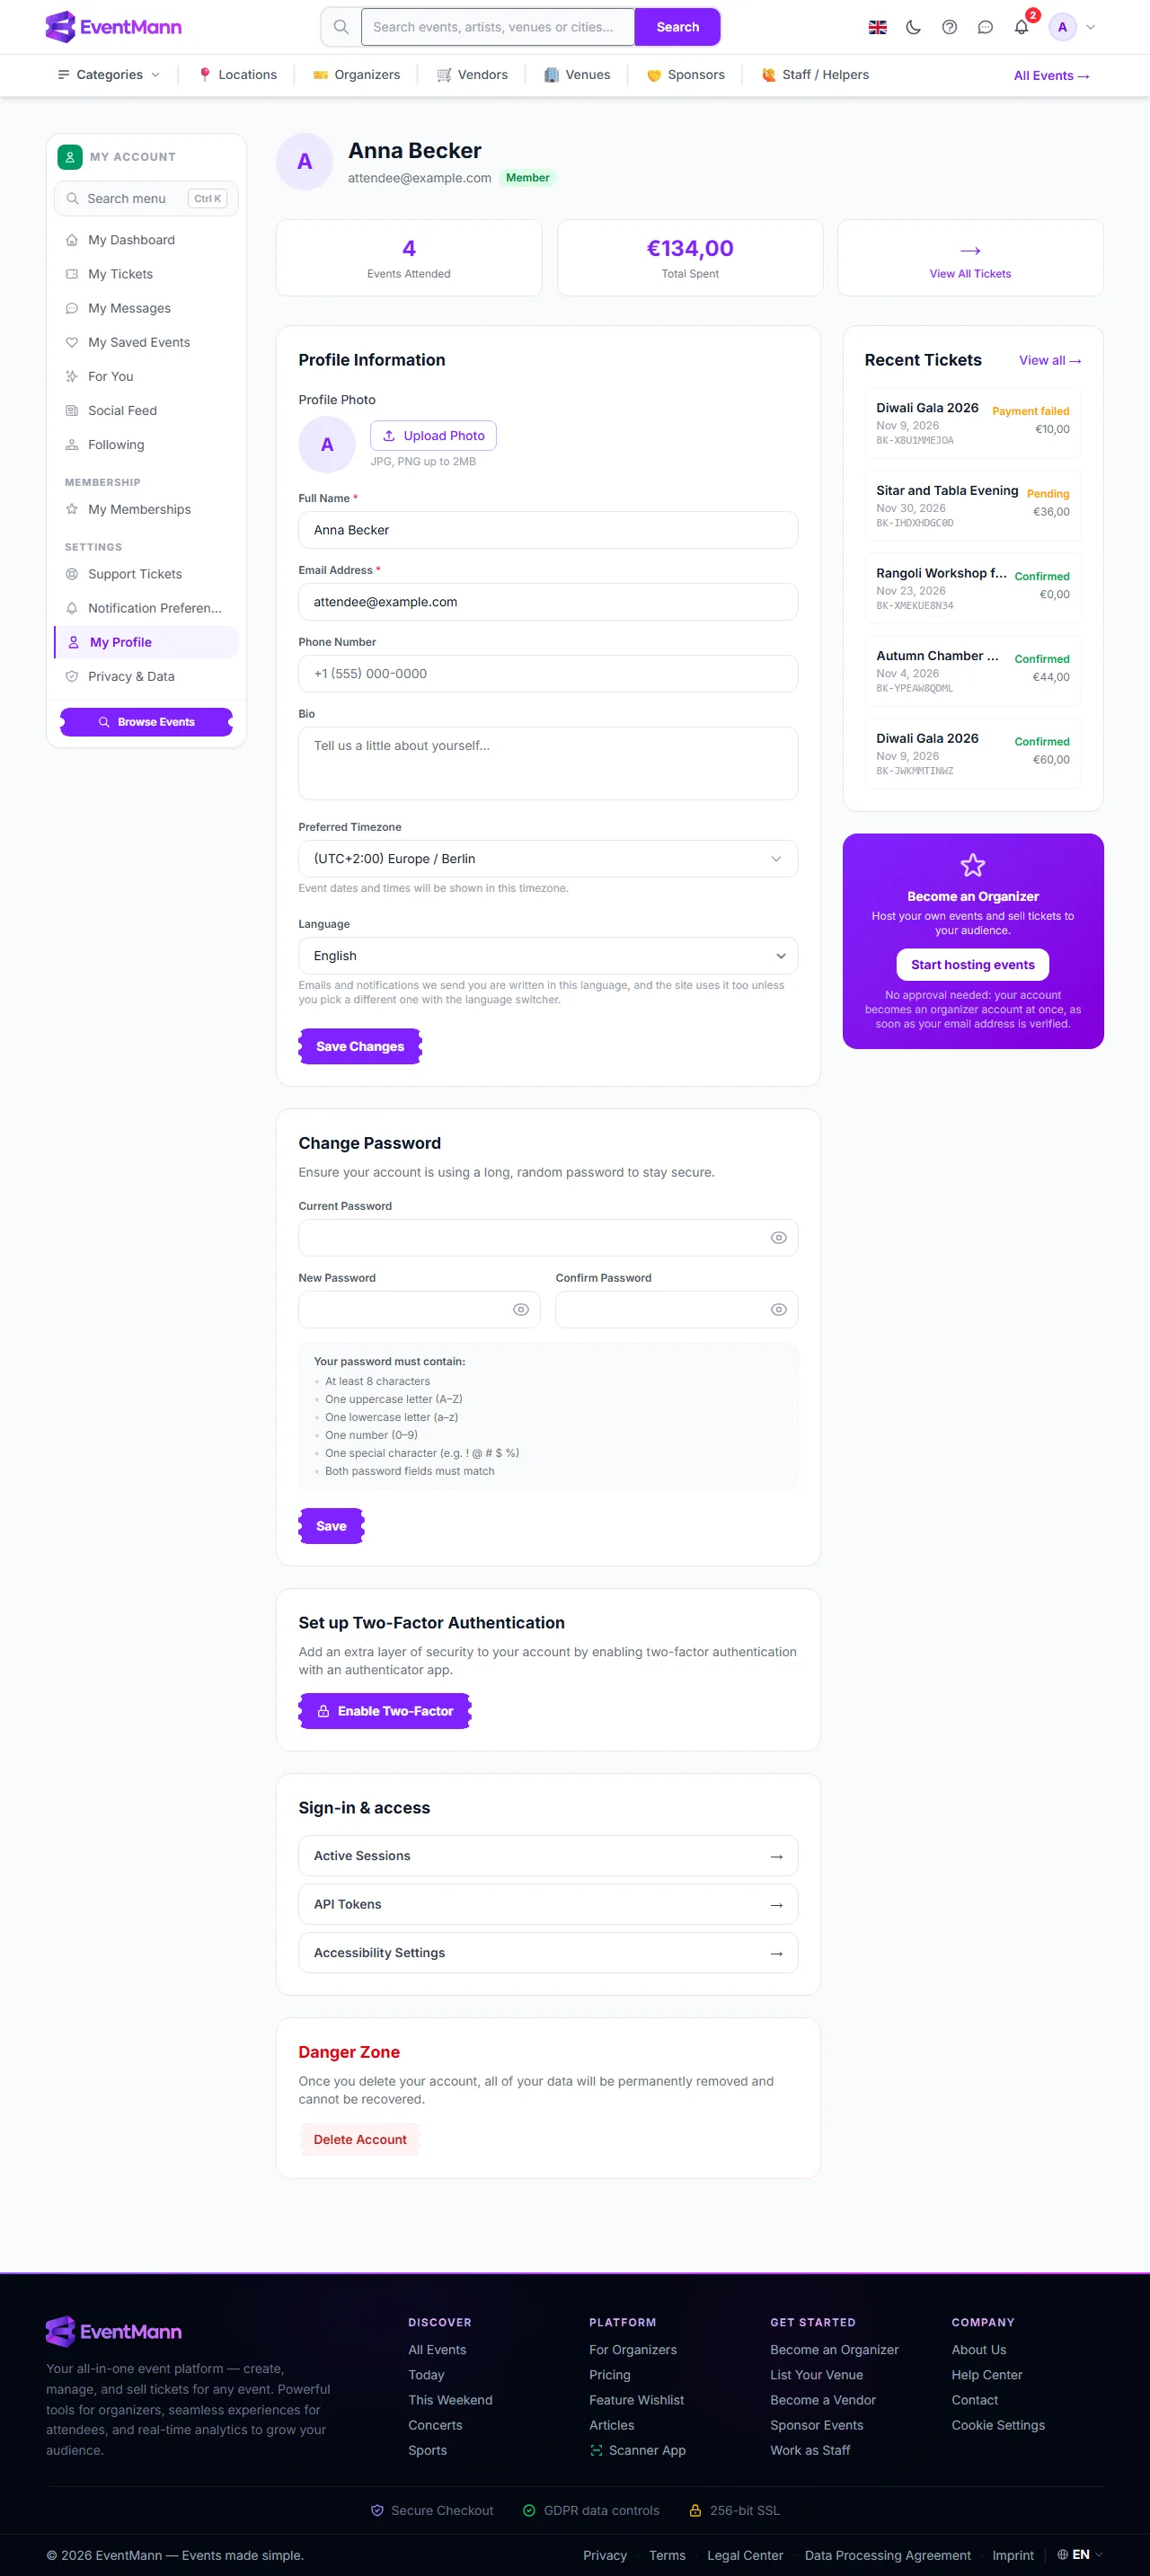
My Profile: photo, name, email, language and the Save Changes button

Change your details

  1. Open My Profile.
  2. To change your photo, click Upload Photo ① and choose a JPG or PNG up to 2 MB. Use the remove option next to it to go back to your initial.
  3. Edit Full Name, Phone Number and Bio as you like. Name and email are required.
  4. If you change your Email Address ②, your email becomes unverified until you click the link in the message we send to the new address. Until then, features and messages that need a confirmed address pause (see below).
  5. Choose your Preferred Timezone. Event times are shown in this zone; it never moves an event, which always runs on its own venue’s time.
  6. Choose your Language ③. The site, the emails and notifications we send you and your ticket PDFs use it. The choice applies on all your devices; the language flag in the top bar still lets you change the page language for a visit.
  7. Click Save Changes ④.

Change your password

The Change Password form, the Enable Two-Factor button and the Danger Zone
  1. Scroll to Change Password ①.
  2. Enter your Current Password, then the New Password twice. The checklist under the field shows what is still missing: at least 8 characters, an uppercase letter, a lowercase letter, a number and a special character.
  3. Click Save.

If you signed up with Google, Facebook or LinkedIn, you never chose a password, so the form does not ask for the current one and you can simply set a new one. If you are locked out, use Forgot your password? on the sign-in page; the reset link in the email is valid for 60 minutes.

Turn on two-factor authentication

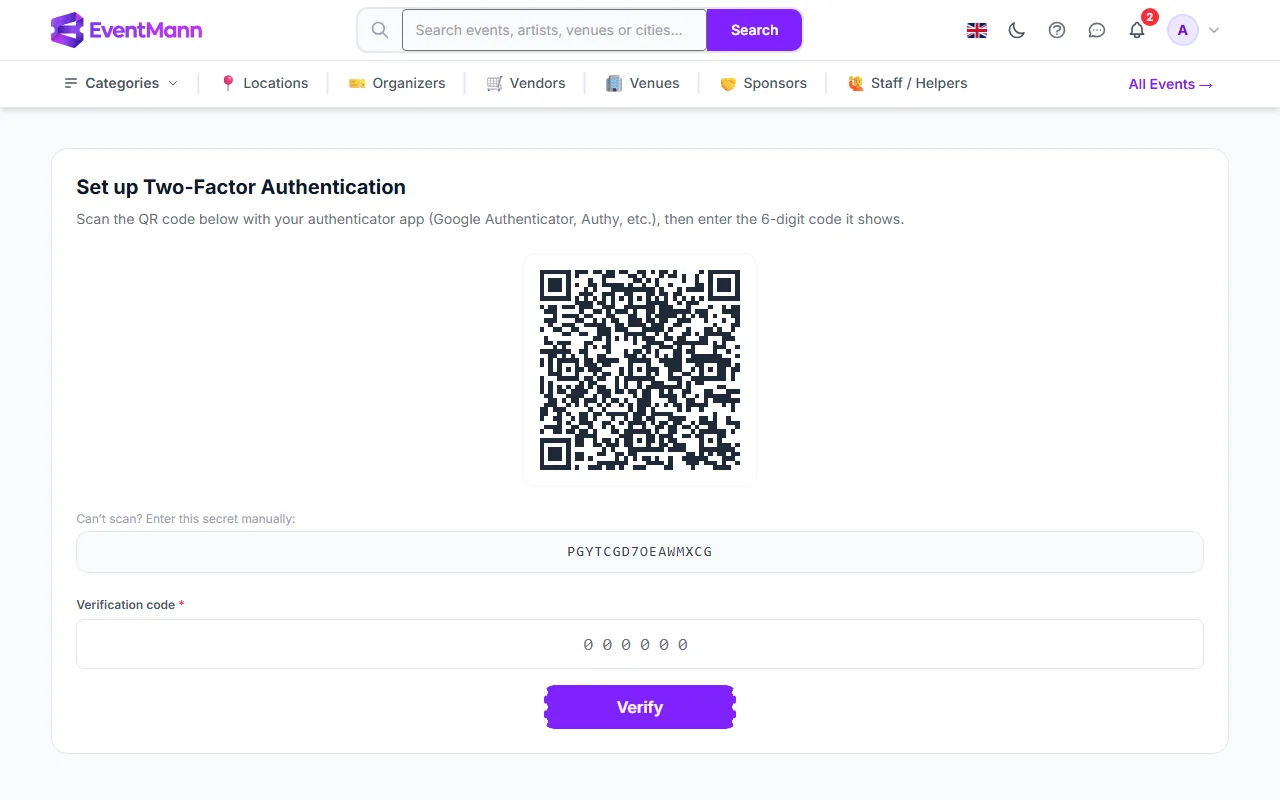
  1. Click Enable Two-Factor ②. A page with a QR code opens.
  2. Scan the code with an authenticator app such as Google Authenticator or Authy, or type the secret shown under the code if you cannot scan.
  3. Enter the 6-digit code from the app and press Verify.
  4. Save the 8 recovery codes shown once on the next screen. Each works once if you lose your phone.

The full explanation, including what to do if you lose your phone, is in Account Security & Two-Factor Authentication.

Danger Zone

Delete Account ③ asks for your password and then anonymizes your account for good. Read Privacy & Data first: it says what is kept and what is erased, and where to download your data beforehand.

Good to know

  • The cards at the top show how many bookings you have and how much you have spent, and Recent Tickets lists your five latest orders with their status.
  • A theme switch (the moon icon in the top bar) toggles light and dark mode; your choice is saved to your account.
  • Active sessions (signed-in browsers), API tokens and accessibility settings are linked from the Sign-in & access card on the profile page; sessions are described in Account Security.
  • A session that is idle for a while is signed out automatically. The bell polling in the background does not keep it alive.

Troubleshooting

  • I changed my email and stopped getting some messages — open the verification email sent to the new address and click the link. It is valid for 72 hours; ask for a new one from the notice that appears in the site if it expired.
  • My authenticator code is always rejected — the codes are time based. Set your phone’s clock to automatic and try the next code.
  • The password form has no current password field — your account was created with a social sign-in.
  • The language did not change in an email — emails use the language saved here, not the page language you picked with the flag.

Related

Chapter 4

Volunteering

4.1 Volunteering at an event

Organizers on EventMann can ask you to help at their events for free, and some events let you offer your help from the event page. Everything about it — your invitations, your shifts, your tasks, your details and your thank-you ticket — is under My Volunteering in your account. This article is the map; each part has its own article.

My Volunteering on a phone: today’s event with a finished shift, a shift ready for check-in and your tasks

What you can do here

  • Answer an invitation — the organizer’s email asks “Can you help?”. Open it and choose Yes or No. A no needs nothing; a yes needs a free EventMann account on that address, which you create or sign in to right there. See Answering an invitation.
  • Offer your help — when an event page says “Would you like to help at this event?”, or a team leader sends you a join link. See Sign up or join a team.
  • See your shifts, check in and out, take or give back a shift — see My Volunteering: shifts and check-in.
  • Work through your tasks — status, checklist and comments. See Your volunteer tasks.
  • Run part of an event — if the organizer gave you a role, such as volunteer coordinator or box office, or you lead a team. See Volunteer roles and My work and Team lead guide.
  • Get your volunteer ticket — if the organizer offers one, My Volunteering shows a Get my ticket button that opens the event page. Only confirmed volunteers can buy it, signed in. It is free or reduced, usually one each.

Where to find it

  • Sign in and choose My Volunteering in the menu of your account. The entry appears once an organizer has your email address on a volunteer roster, or you have signed up.
  • The page needs a confirmed email address. Organizers invite you by email; invitations are linked to your account only when that address is confirmed.

Good to know

  • You can change your answer: say yes after an earlier no, or step back if you can no longer come. Stepping back frees your shifts and hands your tasks back to the team.
  • You get an email when you are put on a shift or given a task, and a reminder about a day before each shift. A task with a start time sends a reminder shortly before it.
  • Volunteering is unpaid. Your name, email, phone number and skills are shared with the organizer so they can organise the team.
  • Every invitation carries a link to stop that organizer’s invitations. Other organizers are not affected.
  • Times on shifts and tasks are in the event’s own time zone.

Troubleshooting

  • My Volunteering is empty — sign in with the address the invitation was sent to, and make sure it is confirmed.
  • I cannot check in — check-in opens an hour before the shift starts and closes when it ends. Ask your lead or the organizer to check you in from their rota if you arrive outside that time.
  • I cannot see the volunteer ticket — it appears once you are confirmed for that event and signed in. If the event has none, the organizer has not set one up.

Related

4.2 Answering an invitation

When an organizer invites you to help at an event, you get an email “Can you help at …?” with a button Answer the invitation. The button opens a page just for you. Saying no takes one click and needs nothing else. Saying yes means having a free EventMann account on the address the invitation was sent to: that account is where you see your shifts, your tasks and the team. The link is personal: do not forward it.

The invitation page on a phone, with the answer buttons, the account note and the opt-out link

Answer the invitation

  1. Open the link in the email. The page shows the event, when and where it is, and your current answer (Invited).
  2. Tap Yes, I’ll help ① to join the team, or No, not this time ② to decline. The line under the buttons ③ tells you what a yes needs from you.
  3. What happens after Yes depends on your account:
    • No account on that address yet — the page opens a short account form, described below.
    • You already have an account — you are taken to the sign-in page with your address filled in. After signing in you come straight back to the invitation, and your yes is recorded.
    • You are already signed in with that address — your yes is recorded at once.
    • Your address is not confirmed yet — you are asked to confirm it first. Your yes is recorded when you come back to the invitation.
    • You are signed in as somebody else — the page says so and offers Sign out and continue. A yes is never recorded for a different account.
  4. Once your yes is recorded you see a thank-you, the organizer is told, and you receive an email “You’re on the team”. The organizer then puts you on shifts and gives you tasks, and you are told by email each time.

Create your account and say yes

The account form that completes a yes, on a phone
  1. Under Create your free account to say yes check your name ①; the email address is fixed to the one the invitation was sent to.
  2. Choose a password ② and repeat it.
  3. Tap Create account and say yes ③.
  4. You are signed in and land on My Volunteering, already on the team. The account is confirmed straight away, because you reached it through the link sent to that address.

A link can never set a new password for an account that already exists: if somebody already has an account on that address, the page sends them to sign in instead.

Confirmed by the organizer

Sometimes the organizer or a team lead confirms you without waiting for your answer, because you already said yes on the phone. If you have no account yet, your “You’re on the team” email says so and its button Set up my account opens the same account form. The organizer can also send you that link again with Send sign-up link. Until you set up the account you are on the team, but you cannot see your shifts and tasks.

Change your mind

  • Open the same link again. After a yes the button reads I can’t make it after all; you are asked to confirm and your shifts are freed for somebody else.
  • After a no that you gave yourself, you can still choose Yes — with your account, as above. A sign-up the organizer declined cannot be reopened by you, and neither can an invitation that was removed.
  • Once the event is over or cancelled the page takes no more answers.

Stop receiving invitations

The line Don’t invite me to …’s events again ④ at the bottom stops volunteer invitations from this organizer, after you confirm. It needs no account. An invitation still open is declined. It does not affect other organizers. If you later sign up yourself on one of their event pages, that lifts the opt-out again.

Good to know

  • The organizer is told about your yes only once it is recorded — after you have created your account or signed in. Until then you are still Invited on their list.
  • The account is an ordinary, free EventMann account. You can use it to book tickets too.
  • The link works from any device. Saying no or opting out needs no sign-in.
  • My Volunteering lists the same invitation with the same two buttons while you have not answered.

Troubleshooting

  • “That answer is no longer possible here” — the organizer already changed your status, for example removed you. Contact them.
  • No Yes button — you already said yes, the sign-up was declined, the event is over, or you are signed in as somebody else (sign out first).
  • I signed in but my answer is still Invited — you signed in with a different address. Sign out and sign in with the address the invitation was sent to, then open the link again.
  • I forgot the password of my existing account — use Forgot your password? on the sign-in page, then open the invitation link again.
  • The link says not found — the event was deleted, or you opened a shortened or altered link. Use the button in the email.

Related

4.3 My Volunteering: shifts and check-in

My Volunteering is your page for everything you do as a volunteer. Sign in and choose My Volunteering in the menu of your account. There is one card per event, coming events first and finished events after them. Each card shows the event, the date, the organizer, your team and your status.

If you are a core member of one of the organizer’s standing teams, the page starts with a block Your teams: one card per team with all of the team’s tasks and a link to the team’s Inventory. See Your volunteer tasks and Your team’s inventory. If you lead a team, the block is called Teams you lead instead.

What a card tells you

  • Invited — the card asks you to answer with Yes, I’ll help or No, not this time.
  • Applied — your sign-up is with the organizer. You get an email when they decide.
  • Confirmed — you are on the team. The card shows the organizer’s thank-you, your shifts and tasks, open shifts you may take, your availability and your hours.

On an invited card, tap Yes, I’ll help ① or No, not this time ②.

A card for an event you were invited to, with the two answer buttons

Check in and out

Your hours count from check-in to check-out, so do both.

  1. Open the card of today’s event; its title ① names the event. Each shift lists its title, time and place.
  2. Under Shifts find the shift ② and tap Check in ③ when you arrive. The button is available from an hour before the shift starts until it ends.
  3. When you finish, tap Check out. The shift then shows the hours you worked.
  4. Your total for the event is at the bottom of the card.
Today’s event: a finished shift with its hours, and a shift ready for check-in

A shift never checked out counts nothing until you or the organizer closes it.

Give a shift back

When the organizer lets volunteers choose their own shifts, you see Give back ② next to each of your shifts.

Two shifts of the Diwali Gala, each with a Give back link
  1. Tap Give back beside the shift ① and confirm.
  2. Your team’s leads and the organizer are told that the shift has a gap again.

You can give back until the cutoff the organizer set, 24 hours before the shift by default, and never after you have checked in. After that, talk to your lead; the button is gone on purpose.

Take an open shift

If the organizer switched on Volunteers choose their own shifts, the card has the block Open shifts you can take.

  1. Read the block ① — it says how long before the start you can still give the shift back.
  2. Tap Take ② on the shift you want.
Open shifts you can take, with the places that are left

You see your own team’s shifts and shifts that belong to no team, only those that have not started and still have places. A shift is refused if it overlaps one of yours, is full by the time you tap, or belongs to another team.

Say when you can help

The field When can you help? on each card is free text for the organizer or your lead, for example “Saturday afternoons”. Type it and tap Save.

Enter your text ① and tap Save ②. It holds up to 500 characters.

The availability field on an event card

Good to know

  • Change my answer at the bottom of a card opens your invitation page, while the event still takes answers.
  • The volunteer ticket appears as a note with Get my ticket while the event has not ended.
  • You get a reminder email about a day before each shift, with the tasks for that shift.

Troubleshooting

  • No Check in button — it opens one hour before the shift. Outside that window ask your lead to check you in.
  • No Give back button — the event does not allow it, the cutoff has passed, or you have already checked in.
  • No open shifts — the organizer has not switched self-service on, or nothing is left for your team.
  • No Your teams block — you are not a core member of a team, or you lead it (then you see Teams you lead). Ask the organizer.

Related

4.4 Your volunteer tasks

Tasks are the jobs you are asked to do for an event, such as “Set out 420 chairs”. They are on your card in My Volunteering under Tasks. You can tick them off, move them along, work through a checklist and write comments, all from your phone.

Which tasks are yours

  • Tasks given to you by name, alone or together with others.
  • Tasks for a shift you work: everyone on that shift sees it.
  • Tasks for your team at that event, when your team is set.
  • Tasks left open to the whole volunteer team.
  • Tasks from the organizer’s own task board, when the organizer handed one to you by name.
  • If you are a core member of a team: every task of that team, under Your teams at the top of the page.

Work on a task

  1. Read the title, the start and due time and the description under it.
  2. When you are done, tap the square ① in front of the task. Tap it again to reopen the task.
  3. To show how far you are, change the status ②. Your own list offers Open, In progress, Blocked and Done; choose Blocked when you are waiting for something. The change saves by itself.
  4. If the task has a checklist, tap each line ③ as you finish it. The heading says “2 of 4 done”.
  5. Open comments ④ to read what the team wrote and add your own. The list opens by itself when somebody wrote in the last day.
The tasks of the Diwali Gala: a board task, a task with a checklist and comments, and two team tasks

Tasks from the organizer’s task board

A task the organizer gave you on their own task board looks the same, with its own statuses: Pending, In Progress, Blocked and Completed.

Tick it ①, or move it along with the status ②.

A task from the organizer’s board, with its status and checklist

Your team’s tasks (core members)

A core member of a standing team sees the whole team’s work, not only their own. At the top of My Volunteering, the block Your teams has one card per team you are core in, with the tasks of that team at the events you are confirmed for, grouped by event. Coming events come first; an event stays there for 30 days after it ends, so a follow-up such as finding missing items is still in reach.

  1. Find the card of your team ①. Inventory ② opens the team’s stock.
  2. Under each task you see who it is for ③: named people, everyone on a shift, or the whole team.
  3. Tick a task, change its status ④, work through its checklist or comment, exactly as on your own tasks. You can do this on any task of your team, for example to help a teammate who is stuck.
The Hall management card under Your teams: all of the team’s tasks at the Diwali Gala

Adding, deleting and handing tasks to people stays with the team lead and the organizer. A task that is also yours appears both here and on the event card; a change in one place shows in the other.

Good to know

  • A task shared by a shift or a team is a single task for many people. The organizer sees who ticked it.
  • You can only touch tasks that are yours, or tasks of a team you are a core member of. Everything you do on a task is checked against your confirmed place on that event.
  • If you step back from an event, tasks that were given to you by name go back to the team.
  • Tasks with a start time send you an email shortly before it begins; tasks for a shift appear in the shift reminder.

Troubleshooting

  • “No tasks yet” — nothing has been given to you or your team. Ask your lead.
  • A comment does not save — it must not be empty, and is at most 2,000 characters.
  • I ticked a task by mistake — tap the square again.

Related

4.5 Sign up or join a team

There are two ways to offer your help yourself instead of waiting for an invitation: the sign-up on an event page, and a join link that a team leader shares in their group chat. Both need an account with a confirmed email address.

Sign up from the event page

If the organizer switched on volunteer sign-up for a live event, its page shows “Would you like to help at this event?” with the link Volunteer with us. The link is also shown at the volunteer-only ticket.

The volunteer sign-up note on an event page
  1. Sign in and click Volunteer with us ①.
  2. Read the organizer’s text above the form: what helping involves, when to arrive, who to ask.
  3. Check the form. Your email address is fixed. Optionally add a Phone number ①, your Skills ② separated by semicolons or commas, and a message under Anything the organizer should know? ③.
  4. Tap Volunteer with us ④.
The sign-up form with the organizer’s introduction

Your application goes to the organizer, who accepts or declines. You get an email either way, and the application shows as Applied under My Volunteering until then. Nobody is accepted automatically. If you had already been invited, signing up counts as your yes.

Join a team with a link

A team lead can post a join link for their team at an event. It works even when public sign-up on the event page is off.

  1. Open the link and sign in if asked.
  2. The page names the team you are joining ①.
  3. Fill in the form as above and tap Volunteer with us ②.
The join page for the Registration team, with the team badge

You land in that team as an applicant, and the team lead accepts you. If you were already on the event without a team, the link puts you in that team.

Good to know

  • Your phone number is added to the organizer’s roster only if it had none; skills are noted only when you are new to that organizer’s roster.
  • Signing up also lifts an earlier “do not invite me” from that organizer.
  • If you are already on the event, the page says so and shows your status.

Troubleshooting

  • The page is not found — sign-up is off, the event is not live, it has ended, or the join link was switched off by the lead.
  • I am sent to sign in — the pages need an account with a confirmed email address.
  • I never heard back — ask the organizer or the team lead; applications wait for their decision.

Related

4.6 Volunteer roles and My work

Some volunteers do more than help: an organizer can give you a role for one event, such as Volunteer coordinator, Box office, Door / check-in, Venue manager, Marketing or Finance, or one of their own custom roles. The role opens the organizer’s screens for that event, and only the ones the role needs.

How you notice a role

  1. On the event’s card in My Volunteering you see a lilac note: You help run this event as: Volunteer coordinator ①, with the button Open My work ②.
  2. In the menu of your avatar, the row Event work lists your roles and links to My work. On a phone it is in the menu as My work.
The note on an event card that tells a coordinator which role they hold

My work

My work lists every event where you hold a role, with the role as a badge and the organizer and date. Each row has one button for the thing that role is for: Scan for the door, Orders, Volunteers, Task Management, Analytics or Overview.

  1. Find the event and read the role badge ①.
  2. Click the button ② to open that event’s screens.
My work for a volunteer coordinator, with the role badge and one button

What a coordinator sees

A volunteer coordinator opens the event’s Volunteers pages with every tab — People, Shifts, Tasks, Run sheet, Live, Messages, Settings and Roster — and the task board. They invite and confirm people, plan shifts and tasks, send messages and, for the roles they hold themselves, hand roles to other volunteers. They also see the event overview and its packing lists. They do not see orders, money or settings that their role does not carry.

Only this event is open to you ①; the other events of the organizer stay closed.

The Volunteers page as a coordinator sees it: only the event they coordinate

Good to know

  • A role is for one event. It ends 30 days after the event, so finance work can be finished after the doors close.
  • It counts only while you are confirmed for the event and signed in with the confirmed address the organizer has on file. If you step back from the event, the roles end.
  • Nobody can hand out a role they do not fully hold themselves, so a coordinator can make another coordinator but cannot give out Finance.
  • Leads of standing teams also get a role by being a lead, and may get an extra one the organizer attached to the team (for example Box office for the Registration leads). See Team lead guide.
  • An email tells you when a role is given. If you have no account yet for that address, it points you to set one up.

Troubleshooting

  • No My work row — you hold no live role: the event ended more than 30 days ago, you are not confirmed, or you are signed in with another address.
  • A page says access denied — your role does not include it. Ask the organizer to change your role.

Related

4.7 Team lead guide

A team lead runs one standing team of an association, such as Registration or Hall management, at every event. As a lead you recruit people into your team, confirm them, plan the team’s shifts and tasks, write to your people, and look after the team’s stock. You do this from your account, not from an organizer panel of your own. This guide is the overview; each part links to its details.

What you can do here

  • Recruit from the organizer’s roster, with a join link or by adding somebody new.
  • Confirm applicants and decide whether somebody you invite is confirmed at once.
  • Plan shifts and tasks for your team and put your people on them.
  • Follow the day on the run sheet and the live page, and message your team.
  • Look after your team’s inventory: items, shopping list, purchases and receipts. See Your team’s inventory.

Open your events

  1. Open the menu of your avatar. Under Event work, choose your role, or open My work.
  2. Click the button on the event: Volunteers, or another button if your team also carries a role such as Box office.
  3. In the sidebar choose Volunteers. A lead sees the tabs People, Shifts, Tasks, Run sheet, Live, Messages and Roster. There is no Settings tab: event-wide settings stay with the organizer.

Recruit people

On People, the block Teams at this event shows each team you lead: how many are confirmed against what the team needs, and how many have not answered yet.

  1. Set how many people your team needs in Needs and tap Save.
  2. Under Join link ② create a link and use Copy or Share on WhatsApp. People who open it sign in and apply to your team; you accept them. Switch off stops the link; a new link replaces the old one. See Sign up or join a team.
  3. Click Invite from your roster ③ at the top of the page to ask people the organizer already knows.
The People page of a team lead: their team, its target and its join link

Invite from the roster: invite or confirm now

  1. Choose people in the list (search, Select all shown), or — in the first part ① — everybody who helped at one of the organizer’s earlier events.
  2. The Team ② lists only your teams. You must choose one.
  3. Leave Already confirmed (I asked them myself) ③ off to send the normal invitation “Can you help?”; the person answers Yes or No, and a yes asks them to create a free account or sign in before it counts. Tick it when somebody already agreed with you: they are confirmed straight away and receive “You’re on the team” instead of an invitation. If they have no account yet, that email carries a Set up my account button, and on People they show No account yet with a Send sign-up link button until they do.
  4. Click Invite them or Invite selected. A result line says how many were invited and how many skipped (already on the event or asked not to be invited).
Inviting from the roster into the Registration team, with the option to confirm at once

The same choice is on Add somebody new, which adds a person to the roster and invites them in one step. Invitations go out at the organizer’s hourly sending pace, so a large group is mailed over time.

Shifts and tasks

On Shifts you see every shift, but you add, change or fill only those of your teams. A new shift or task must be given to one of your teams.

  1. Open Add a shift ① and fill in what, when, where and how many people you need.
  2. Add confirmed members of your team to it. A person already on another shift at that time is skipped.
  3. On a shift of your team you can check people in or out, or Take off ② someone.
The Shifts page: add a shift, and take people off the shifts of your team

On Tasks, add a task with Add task ①, for one person, a shift or the whole team, with a start time, a due time and a checklist. Tasks ② show their status, checklist and comments, which your people write from My Volunteering.

The Tasks page: add a task for your team, and see its checklist and comments

Read-only and editable

  • You see everything, you change your team. You see the whole People list and the roster — you recruit from it — but you confirm, decline, resend, remove, set a team and message only people in your own teams. You may claim people who have no team yet into your team with the bulk action Set team.
  • Messages can go to your own teams and their shifts only.
  • Roles you can give are limited to those you hold yourself.
  • Copying the setup of an earlier event, and the event settings (sign-up, thank-you text, self-service shifts), stay with the organizer or a coordinator.
  • On the organizer’s own pages you cannot change categories, move an item to another team or mark purchases as paid back.

Good to know

  • Leads are on the core team of their group: at each event a lead is added as confirmed automatically, with the invitations of the other core members sent once the event is published.
  • When one of your people gives a shift back, you and the organizer receive a notice.
  • If the organizer attached a role to your team (the lead role), you hold it at every event you work, for example Box office.

Troubleshooting

  • I see no join link — create one under Teams at this event; there is none until you do.
  • A person is greyed out or skipped — already on this event in some status, or asked the organizer not to invite them.
  • An action is refused — the person or shift belongs to another team.

Related

4.8 Your team's inventory

If you lead a team, you look after that team’s stock between events: what you have, where it is, what to buy and what was bought. It is on My Volunteering in the block Teams you lead, which has links for Inventory, Shopping list and Purchases. If you are a core member of a team, you see the same stock read-only, from the block Your teams; see Core members: see the team’s stock below.

What you can do here

  1. Find the block ① and the team you lead.
  2. Click Inventory ② for the team’s items, Shopping list ③ for what has fallen to its minimum, or Purchases ④ for the team’s purchases with their receipts.
The Teams you lead block on My Volunteering
  • The page title ① is Inventory: Registration. You see only your team’s items, never another team’s or the Shared pool.
  • Add Item ④ creates an item for your team. The team cannot be changed; it is yours.
  • Open an item with Edit to change it, say who holds it or where it is, restock it, log maintenance, record a purchase with its receipt, or delete it. The pages are the same as the organizer’s, see Items and Purchases.
  • The Shopping list ② has the text to copy into your team’s WhatsApp group.
  • QR labels prints labels for your team’s items.
The Registration team’s inventory in a lead’s account

Scan a label

When your phone opens a label of one of your team’s items, you land on the item page. If the item is on a packing list for a current or coming event, the top panel Booked at events shows how many are planned, taken and back.

The panel ① has Taken ② to mark everything planned as taken, and All back when it is out. Below it, Where is it tells who holds the item.

A scanned label opened on a phone: the item and its quick buttons

Core members: see the team’s stock

A core member who does not lead the team gets a read-only page of the team’s items, so you know what exists and who has it before you go and fetch something.

  1. On My Volunteering, under Your teams, click Inventory on your team’s card. The page is called Inventory: Hall management.
  2. Each item shows its type, condition and category, how many are available of the total, and who holds it (With …) or where it is stored (At …). Items you hold yourself are highlighted with You hold this ①.
  3. An item at or below its minimum shows its figures in red with the minimum ②; the heading counts how many items are low.
  4. Below the items, Packing lists ③ shows what the team takes to each coming event you are confirmed for: the planned quantity, how many were taken and how many came back.
The Hall management stock as a core member sees it, with the item they hold and the Gala packing list

Nothing on this page can be changed. Editing an item, saying who holds it, restocking and recording a purchase stay with the team lead and the organizer, so tell your lead when you take or return something.

Packing lists for your events

For an event you work, the packing list of your team is the Event Inventory page in the event’s Manage sidebar. You see and change only the lists of the teams you lead. See Event packing lists. After an event, missing items become a task for your team on My Volunteering.

Good to know

  • The organizer reimburses volunteers who paid out of their own pocket. You see that a purchase is To pay back but you cannot mark it paid back.
  • Receipts are private to the organizer and to you.
  • Categories are the organizer’s; you can pick one for an item but not add or remove them.
  • Items of other teams are not visible, and borrowing between teams happens by asking each other, outside the platform.

Troubleshooting

  • No Teams you lead block — the organizer has not marked you as lead of a team, or your roster entry is not linked to your confirmed email address.
  • No Inventory link under Your teams — you are not a core member of that team. Ordinary members do not see the team’s stock; ask your lead or the organizer.
  • The packing list is empty — nothing is planned for your team at a coming event you are confirmed for yet.
  • A scan is refused — the item belongs to another team or the Shared pool.

Related

Chapter 5

Memberships

5.1 Memberships

Some organizers sell memberships: a pass for a month, a year or a season that gives you benefits at their events. My Memberships is the page where you see what you hold, show your member card, renew, download invoices, follow the gifts you gave and, within 14 days of buying, cancel for a full refund. Open it with My Memberships in the account sidebar. To buy one, see Buy, Renew or Give a Membership; to see what a membership gets you, see Member Benefits.

My Memberships with an active Supporter membership, its actions, the organizer’s events and the Gifts you gave tab

What you can do here

  • Check a membership — each card shows the plan, the organizer, the price and interval, the start and end dates and a reference (it starts with MB-). A badge says Active, Expired or Revoked. A membership bought for a later season shows the day it starts.
  • Cancel & refund ① — available for 14 days after purchase (see below).
  • Show your member card ② — opens a card with a QR code (see below).
  • Download the invoice ③ — every purchase comes with an invoice from the organizer, also attached to the confirmation email.
  • Renew — the Renew button appears when the membership has 60 days or less left and the plan can still be bought. Memberships never renew by themselves.
  • See what it is good for — under the card, the organizer’s upcoming events are listed, with badges for Members only, Member price and Early access where they apply.
  • Follow your gifts ④ — Gifts you gave lists memberships you bought for others, with Not yet claimed or Claimed by … and a Resend the claim email button while they are unclaimed.

The member card

The member card on a phone with the plan, the holder and a QR code

Press Member card to open a card that carries your name, the plan, the date it is valid until and a QR code. At a members-only event, staff can scan the code, which opens a page that shows whether the membership is active right now. They are asked to compare the name with an ID. There is a Print button if you prefer paper. The code works only while the membership is active.

Cancel within 14 days

  1. On the membership card press Cancel & refund (it is only there for 14 days after purchase).
  2. Read the dialog: You are within your 14-day right of withdrawal (until …). The full purchase is refunded to your payment method and the membership ends immediately.
  3. Confirm. You see Membership cancelled. The full amount is on its way back to your payment method.
The confirmation dialog for cancelling a membership within 14 days
  • The refund is complete whether or not you used any benefits. You do not have to give a reason.
  • The money comes from the organizer, who sold you the membership. If the refund cannot be processed at that moment, you see Your membership is unchanged — please try again shortly or contact the organizer, and nothing is lost.
  • After 14 days the button is gone. Contact the organizer if you want to end a membership earlier; they can end it and refund you.
  • The buyer of a gift has the same 14 days.

Good to know

  • No membership renews automatically and nothing is charged again without you buying it again. You get reminders by email 14 and 7 days before the end, and a note after it has lapsed. Renewing early adds the new term after the one you hold, so you lose no days.
  • A membership stays usable for 7 days after its end date, as a grace period.
  • The price you paid includes VAT where it applies; the invoice shows the tax.
  • Benefits apply to the account that holds the membership. Sign in with that account when you buy tickets.
  • An organizer can also add you to their member list. You then get an email with a link to activate your account; the membership is yours from the start.

Troubleshooting

  • I do not get the member price — check that you are signed in with the account that holds the membership, that it has not ended, and that the ticket type has a member price. See Member Benefits.
  • There is no Cancel & refund button — more than 14 days have passed since the purchase, or the membership was already cancelled.
  • The gift link does not work — it may already be claimed. The person who bought it can send the email again from Gifts you gave.
  • My membership shows Revoked — the organizer ended it. Their message to you says why; refunds in that case come from the organizer.

Related

5.2 Buy, Renew or Give a Membership

The Membership section of an organizer page with three plans, their benefits and Become a member buttons

An organizer that offers memberships lists its plans on its own page, in a Membership section ①, with a Become a member button at the top. Buying one is a short checkout, separate from buying event tickets. You need a signed-in account with a verified email address.

Choose a plan

Each plan card ② shows the price and how long it lasts (/ year, / month, or a fixed season), what it includes and the benefits the organizer lists. Things you may see on a card:

  • 2 free tickets per term — a number of tickets you may take free of charge during the membership (see Member Benefits).
  • First year €12,00, then €20,00 ③ — an introductory price for your first term. It applies if you have never held or been given this plan; renewals and gifts pay the regular price.
  • Sales open on …, Sold out — the organizer can open sales on a date, close them, or cap the number of members. A plan that is full offers Join the waitlist (see below).
  • A plan for one season has the same start and end date for everybody. Buying in the middle of the season does not backdate it; after it ended, the plan is not for sale.

Buy a membership

  1. Open the organizer’s page and press Become a member ④ under the plan you want.
The membership checkout with a coupon field, a gift switch, the withdrawal note and the Pay button
  1. If you have a code, enter it in Coupon code ① and press Apply. You see how much you save. A code cannot take the price below the minimum card charge of €0.50, and cannot be used past its limit or expiry.
  2. Read the notes: the 14-day right of withdrawal ③, and that payment goes directly to the organizer, who is the seller.
  3. Press Pay ④ with the amount and complete the secure Stripe payment, as in Checkout Process.
  4. You land on My Memberships and receive an email with your invoice. The membership starts at once, and the member price and other benefits apply from your next checkout.

The price includes VAT where the organizer charges it. A membership exists only after the payment succeeded, so a failed or abandoned payment leaves nothing behind.

Renew

Memberships do not renew by themselves; nothing is charged again unless you buy again. Press Renew on the card in My Memberships (shown when 60 days or fewer remain) or on the organizer’s page. Renewing while you are still a member starts the new term when the current one ends, so you lose nothing: the checkout says The new term starts when your current one ends on …. If your membership lapsed, the new term starts today. You are reminded by email 14 and 7 days before the end.

Give a membership

  1. On the checkout page switch on Buy this as a gift.
The gift section of the membership checkout with the recipient’s email and a message
  1. Enter the Recipient email and, if you like, a Message (optional).
  2. Pay as usual. You pay the regular price; the introductory price does not apply to gifts.
  • The recipient gets an email with a link and the text A membership gift for you. They sign in or create an account and press Claim membership. Their term starts on the day they claim it and runs for one full period.
  • You cannot claim a gift you bought yourself, and you cannot gift a membership to your own address.
  • Until it is claimed, the gift is listed under Gifts you gave in your My Memberships, with Resend the claim email. You keep the invoice and the 14-day right to cancel and be refunded.

When a plan is full

If the organizer capped the number of members and the plan is full, press Join the waitlist. You are emailed when a place opens. It is not reserved for you, so buy it soon. Leave the waitlist removes you. A current member renewing never needs a free place.

Good to know

  • Only organizers with working payments can sell memberships. If they cannot, the plan page says why instead of offering a button.
  • You can cancel within 14 days for a full refund, whether or not you used any benefit (see Memberships).
  • You can hold memberships with several organizers; each has its own card.

Troubleshooting

  • There is no Become a member button — the organizer sells no memberships, sales are closed or not open yet, or the plan is full or has ended.
  • It asks me to verify my email — memberships can only be bought with a verified email. Use the verification email, or send a new one from your profile.
  • My coupon is refused — it may be for another plan, expired, used up, already used by you as often as allowed, or it would bring the price under the minimum.
  • The payment failed — nothing was bought. Try again or use another method.

Related

5.3 Member Benefits

A membership with an organizer can give you better prices, free tickets, access to tickets other people cannot buy and a head start on sales. Which of these you get depends on the plan and on what the organizer set for each event. This article shows where each benefit appears and how it is applied. All of them apply automatically at checkout when you are signed in with the account that holds the membership.

The ticket panel of an event as a member: a member price, a free-ticket allowance, a volunteers-only row and a members-only seat

Where benefits show up

  • Member price — a ticket type can carry a lower price for members. The panel shows your price with the normal price struck through and the discount, for example €20,00 beside €25,00. Everybody else sees the normal price and a line such as Members pay €20,00 — become a member. The member price can only lower what you pay: if a flash sale or other price is lower than the member price, you pay that.
  • Free tickets ① — if your plan includes a free-ticket allowance and the ticket type counts toward it, the panel says 2 free tickets left on your membership. At checkout the allowance appears as a Member allowance line that takes the price of those tickets off. Where several tickets qualify, the most expensive ones are covered first.
  • Members-only tickets ③ — some ticket types, or a whole event, are only for members. Everyone sees them as a locked row, which says Available to members of … — become a member. You can buy them while your membership is active. A members-only event shows a banner, This event is for members of …, so that members can find it.
  • Early access — the organizer can let members book a number of hours before the public sale starts. While sales are not open for you yet, the panel shows when they open to everyone and, if you are a member, As a member you can book from …. Other visitors see Members of … can book from … — become a member. Once your window opens, the panel works like any other.

How the free-ticket allowance works

Checkout for a member: the member price on Adult, a Member allowance line that covers two tickets, and a total of zero

On the checkout page the member price ① is already in the price, the Member allowance line ② takes the covered tickets off and the Total ③ shows what is left to pay.

  • It counts per membership term. A plan with 2 free tickets covers 2 tickets in that term, not 2 per order.
  • It only applies to ticket types the organizer marked as counting toward the allowance, and not to tickets inside a bundle.
  • It is worked out from your real orders: tickets of orders that are confirmed, approved or still pending count against it. If you cancel an order, the tickets come back to your allowance. There is no separate counter that can get out of step.
  • It is applied before a promo code, so the code only discounts what is left to pay.
  • When the allowance covers the whole order, the total is €0,00 and checkout reads Complete Booking; there is no payment page.

Member early access in practice

The ticket panel of an event before sales open: the public opening date and the earlier date for members
  1. Open the event page. Before your window opens, the panel names the day and time when you can start, and when sales open to everyone.
  2. From that moment the panel shows the ticket types and the booking button; check out as described in How to Buy Tickets.

Volunteer-only tickets

Some events offer a thank-you ticket, free or cheap, for the people who help on the day. It shows as Volunteers only with the text For this event’s confirmed volunteers. Everybody sees the row, but only people who are confirmed volunteers for that event can buy it, and only one each unless the organizer allows more. If you are not a volunteer, you cannot select it, and it never counts toward the event’s displayed price. See My Volunteering.

Good to know

  • Benefits apply for as long as the membership is active, plus 7 days of grace after the end date. After that you pay the normal prices.
  • An early renewal stacks, so you are never without benefits while you renew in time.
  • Waitlists respect members-only rules: someone who is not a member cannot be admitted to a members-only ticket.
  • A gift membership works for the person who claims it from the day they claim it, not for the buyer.

Troubleshooting

  • I do not see the member price — you are signed out, you are signed in with another account, your membership ended, or the ticket type has no member price.
  • The free ticket was not applied — the allowance is used up for this term, or the ticket type does not count toward it.
  • I cannot select a members-only ticket — your membership is not active on this account. Check My Memberships.
  • My early access time has passed but I cannot book — sales may be closed, sold out or limited per person; the page says which.

Related

Chapter 6

Using EventMann

6.1 Getting Started with EventMann

EventMann is a platform for finding and booking event tickets, and for the organizers, vendors, sponsors, staff and venues that make those events happen. This page is the map: read it first, then follow the link that fits what you want to do. If you only want to look at events, you do not need an account at all.

Create an account

The registration page with Google, Facebook and LinkedIn buttons and the email form
  1. Open Register at the top right.
  2. Press Google ①, Facebook or LinkedIn to sign up with that account, which skips choosing a password. Or fill in the form: Name ②, Email, Password and Confirm Password.
  3. Press Create account ③.
  • The ordinary registration page creates an attendee account, the one for browsing and buying tickets. Organizer, vendor, sponsor and venue accounts are created from their own sign-up pages, linked from the footer.
  • You are signed in straight away. We send you an email with a link to verify your address; it is valid for 72 hours. Some things, such as buying a membership, publishing as an organizer or accepting a ticket transfer, need a verified address.
  • A password needs at least 8 characters with an uppercase letter, a lowercase letter, a number and a special character.

Sign in

The sign-in page with social sign-in, email and password, Remember me and Forgot your password?
  1. Open Sign In and enter your email and password, or use one of the social buttons you registered with.
  2. Tick Remember me ③ if you want to stay signed in on this device.
  3. If you turned on two-factor authentication, enter the 6-digit code from your authenticator app (or a recovery code).

Forgot your password? Press Forgot your password? ② and follow the emailed link, valid for 60 minutes. An account you do not use is signed out after a period of inactivity.

Find your way around

The avatar menu with links to profile, notification preferences, tickets, memberships, messages, dashboard and sign out
  • The top bar — the search box, the language flag, a light/dark switch, the ? button that opens help for the page you are on, a messages icon, the notification bell and your avatar. Under it: Categories, Locations, Organizers, Vendors, Venues, Sponsors, Staff / Helpers and All Events.
  • Your avatar menu — My Profile, Notification Preferences, My Tickets, My Memberships, My Messages, your Dashboard and Sign Out. If your account has more than one role, a role switcher appears here.
  • Your account sidebar — the same places and more, shown on every attendee page, with a Search menu box (press Ctrl+K) that jumps to any page of your account.

Choose your path

You want to…Start here
Attend eventsMy Dashboard and How to Buy Tickets
Run eventsGetting started as an organizer
Offer services to organizersGetting Started as a Vendor
Sponsor eventsGetting Started as a Sponsor
Work shifts at eventsGetting Started as Staff
Manage a venueGetting Started as a Venue Owner

Good to know

  • One account, several roles. You can ask for another role without a second account. An organizer role is granted at once on a verified email; vendor, sponsor and venue requests are reviewed first. Staff members are added by an organizer. Switch between roles you hold from the avatar menu.
  • You can browse and search without an account. A checkout asks you to sign in only if that event’s organizer requires it.
  • EventMann is operated by ChetsApp UG in Fellbach, Germany, and is available in several languages: choose one with the flag in the top bar or in your profile.
  • Everything about your data is in Privacy & Data.

Troubleshooting

  • I signed up but do not see my dashboard — check your email for the verification message, including spam. The Dashboard link opens the dashboard for your current role.
  • I want to become an organizer, vendor, sponsor or venue owner — use the Become an Organizer or Become a Vendor style links in the footer while signed in; you do not need a new account.
  • I was hired to help at someone’s event — the organizer adds you to their team; the invitation email gives you access to that event.
  • I cannot sign in — use Forgot your password?; if you registered with Google, Facebook or LinkedIn, use that button instead.

Related

6.2 Browse Events

The Events page lists everything currently on sale, soonest first. Use it when you want to look through a category or a time window rather than search for something specific. Open it with All Events at the right end of the top bar, or from the footer. You do not need an account.

The Events page filtered to the Music category, with the category and date lists above the results

What you can do here

  • Filter by category ① — the Category list contains the categories that have at least one upcoming event.
  • Filter by date ② — Today, This Weekend, This Week or This Month narrows the list to events that start in that window.
  • Search within the list — the search box matches the event name, the city and the venue name, not the description. For a fuller search with prices and dates, use Search.
  • Combine them — category, date and words work together. When any filter is active, a link next to the search bar clears it.
  • Open an event — click a card or Get Tickets. Each card shows the date, venue, the organizer and the lowest ticket price.

How results are ordered

  • Soonest start date first.
  • Twelve events per page, with page links under the list.

Which events are listed

  • Only events that are Live and public and have not started yet. A draft, a paused event or an event set to private is not listed. A private event still opens for people who have its link.
  • The list is narrowed to the country your connection appears to be in, because events elsewhere are rarely useful for a purchase. If there are no events for your country, you see all events. This also applies to the home page, Locations and the organizer and vendor directories. It does not apply to Search, and any event link opens from anywhere.
  • If an organizer pauses a live event, it disappears from the list at once, but the direct link still works for people who have it.

Good to know

  • Browsing never needs an account. Signing in adds Save on event pages so that you can keep a shortlist (see Saved Events).
  • The Locations link in the top bar opens a map with popular cities and countries, and a page for each place that has events.

Troubleshooting

  • An event I expected is missing — it may not be live yet, may be paused or private, or its date may fall outside the date window you chose. Clear all filters first. Try Search too, which is not limited to your country.
  • A category I know is missing — categories without upcoming public events are left out of the list.
  • There are no results — broaden the date window or remove the category. The empty page offers a link back to the full list.

Related

6.3 Search

Search is the finder to use when you know roughly what you want: a word, a city, a date range or a budget. It lives at /search: open it with Advanced search next to the result count on the Events page, which carries your search words along. It puts every filter in one place. No account is needed. The search box in the top bar is a lighter tool: it opens the Events page filtered by your words, which match the event name, city and venue only.

Search results for “concert” with the extra filters open: dates and price range

What you can filter by

  • Keyword ① — matches the event title, description, venue and city.
  • Categories and City — two lists that only offer values that currently have upcoming events, with the number of events next to each category.
  • Free ③ and Online — check boxes. Free keeps events that have at least one free ticket type on sale; Online keeps online events.
  • More filters — a From and To date, and a Min price and Max price. The price range keeps events with at least one ticket type on sale inside it.
  • Sort ② — Soonest first, Latest first, Title A–Z, Price: low to high and Price: high to low. Price sorting goes by the cheapest ticket type on sale for each event.

How to search

  1. Type a keyword in the box ① and press Search, or leave it empty and use only the filters.
  2. Set any filters. Press + More filters for dates and prices.
  3. The page shows how many events were found, twelve to a page. Use Clear filters to start again.

Good to know

  • Only events that are live, public and not yet started are found. A private event (direct link only), a draft or a paused event never appears.
  • Search is not narrowed to your country, unlike the Events page. See Browse Events.
  • The filters are kept in the page address, so you can bookmark a search or send it to someone.
  • When a search finds nothing, the page shows a short list of events that have been booked a lot in the last seven days, so you are not left with a blank page.
  • Members-only and volunteer-only ticket types do not influence the price shown or the price filters, so an event is never listed as free only because of a thank-you ticket for volunteers.

Troubleshooting

  • I get no results for a word I know exists — a filter from an earlier search may still be set (price, dates, Free, Online). Press Clear filters.
  • The price filter seems odd for an event with several tiers — an event matches when any ticket type on sale falls in your range; the card then shows its lowest price.
  • An event I can open directly is missing — it is private, not live or already started.
  • The category list lacks a category — categories without upcoming public events are left out.

Related

6.4 Event Details

The event page is where a listing turns into a decision: it has everything you need to know about the event, the organizer’s rules and every ticket type on offer. You get there from any list, a search result, a shared link or the organizer’s page.

A whole event page: summary, description, location, organizer, ticket conditions, reviews and the ticket panel

What is on the page

  • Header — the cover picture (a generated picture for the category when the organizer uploaded none), the category, a Featured badge, an age badge when there is a minimum age, the title, the date and time and the venue address. Times are shown in the event’s own time zone, with the zone shown next to them. An online event says that the link is shared after you book.
  • Save and share ① — Save adds the event to My Saved Events (signed in only). The round buttons share it by Facebook, X, LinkedIn, WhatsApp, email or copy its link.
  • About this event — the organizer’s description, and, where they added one, an agenda by day.
  • Location — the venue and a map with Open in Maps for directions.
  • Organized by ② — the organizer’s name and logo, how many followers they have, Follow or Following and Contact. The organizer’s email address is never printed; Contact opens a form (see How to Contact the Organizer). A Payments verified badge means they finished setting up payments.
  • Ticket conditions ③ — what you may do with a ticket after buying: cancel, what you get back (the cancellation terms), change the attendee details and transfer it. Read this before you buy; see How to Get a Refund.
  • Sponsors — sponsors the organizer chose to show.
  • Reviews ④ — the average score, how many people gave each star count, and written reviews with the organizer’s reply under them. Only confirmed attendees can leave a review after the event.
  • The ticket panel ⑤ — Ticket Types with a quantity chooser, described below.
  • More events like this — other events in the same category. Report this event at the bottom opens the contact page with the event already filled in.

The ticket panel

The panel lists every ticket type you may see, with its price and a status: Available, Selling Fast, Filling Up, Only 3 left! or Sold Out. A price struck through with a smaller one beside it is a discount that applies now, for example a time-limited sale, and the price shown is the price you pay.

  • Set a quantity with + and −. When you choose something, the order total appears; fees are only listed when the organizer passes them on to you.
  • The button under the panel reads Select Tickets until you choose something, then Book Now with the total. It takes you to checkout with your quantities (see Checkout Process).
  • Some rows are locked for you: Members only tickets, and Volunteers only thank-you tickets. See Member Benefits.
  • If members may book earlier than everybody else, the panel says when you can start.
  • For a seated event you choose seats on the checkout page, not here.
  • Where the event has a waitlist and a type is sold out, you can join it at checkout.

Write a review

After the event has started, open Reviews from the event page, or Leave a review from your order or your dashboard.

The review page with the rating summary, the Write a Review form and the sort options
  1. Choose the stars under Write a Review ①.
  2. Add a Title and a Comment if you like (both optional) and press Submit Review ②.

You can write one review per event, and only if you hold a confirmed booking for it. Reviews can be sorted by Newest, Highest, Lowest and Most Helpful, and the organizer may reply under yours.

Good to know

  • If the ticket button is greyed out or missing, sales have not opened yet or have closed, or everything is sold out. The page tells you which.
  • Prices already include the active discounts. A free ticket for volunteers does not make an event look free in lists or search.
  • You can follow the organizer and write to them without buying anything.
  • You can write a review once the event has started and you hold a confirmed booking for it. You can write one review per event, with a star rating and an optional title and comment, under Reviews or from your order in My Tickets.

Troubleshooting

  • All ticket types say Sold Out — the booking button stays disabled. Check whether the organizer offers a waitlist.
  • The price changed since my last visit — prices follow the organizer’s rules and time-limited sales, and the panel always shows the current price.
  • I cannot find where to review — the form only appears after the event has started and only for people with a confirmed booking.
  • I want to report a problem with the listing — use Report this event.

Related

6.5 Vendor Marketplace

The vendor marketplace is where organizers find the businesses that help run an event — catering, photography, sound and lighting, décor, entertainment, rentals, security and marketing — and where those businesses get discovered. It is not a place to buy or sell tickets: tickets are sold by the organizers on their own event pages. You reach the marketplace with Vendors in the top bar, which opens the vendor page; the marketplace is the section Browse our vendor marketplace lower down.

The vendor marketplace with featured vendors, search and filters, and a list of vendors

Who it is for

  • Vendors build a public profile once: services with prices, specializations and a bio. Organizers find them through search and filters instead of the vendor pitching to each organizer.
  • Organizers (and admins) browse the profiles and send a quote request from a vendor’s page.
  • Anyone can browse. Visitors from other roles see the same listing but not the quote button.

What you can do here

  • See featured vendors ① — up to six vendors highlighted by EventMann appear at the top while no filter is active.
  • Search and filter — by keyword, Category, Specializations tag, Price range and minimum star rating (the rating list’s first entry, Any, is the unfiltered option).
  • Sort ② — Newest, Highest Rated, Name A-Z, Price: Low to High or Price: High to Low. Press Apply Filters ③ to run it, or Clear Filters to reset.
  • Switch the view — the toggle above the results shows vendors as a grid or as a list.
  • Compare — tick the box on up to three vendors, then open Compare Selected to see them side by side: rating, number of reviews and price range.
  • Open a profile with View Profile.

A vendor profile

A vendor profile with its services and prices and the Request Quote button
  • The company name, a Featured badge where it applies, the average rating and review count, the bio and the specializations.
  • Services ① — each with its price and how it is charged: fixed, hourly, daily, or on request. “Starting from” on a vendor card is the lowest active service price, not a quote.
  • Reviews — ratings from organizers the vendor worked for, with comments.
  • Request Quote ② — for signed-in organizers and admins. Write what you need (up to 2,000 characters), optionally name one of your events, and send it. The vendor gets a notification with your message. Pricing, scope and booking are then agreed directly between you; there is no quote or contract workflow on this page.

Good to know

  • Only approved vendors are listed. A new vendor profile appears after it has been reviewed.
  • Like the event lists, the marketplace shows vendors in your country when there are any; a vendor page opens from any link.
  • Signed out, the quote section asks you to sign in. A signed-in attendee does not get a quote button, because quotes are for organizers.
  • If you are a vendor yourself, your profile and services are managed in the vendor portal, not here (see Getting Started as a Vendor).

Troubleshooting

  • I do not see Request Quote — you are signed out or not signed in as an organizer or admin.
  • A vendor I know is missing — the profile may still be waiting for approval, it may be in another country, or your filters (price, rating, specialization) exclude it.
  • The compare box is disabled — three vendors is the limit; untick one first.

Related

Chapter 7

Account and security

7.1 My Profile

Every account on EventMann, whatever roles it holds, keeps the same core details on one page: My Profile. Open it from your avatar menu in the top right corner, or from My Profile in the sidebar of your portal. This article covers what lives there for everybody. Attendee-specific details are in Account Settings & Password.

The profile form with photo, name, email, language and Save Changes

What you can do here

  • Profile photo ① — upload a JPG or PNG up to 2 MB, or remove your photo to go back to your initial. The old file is deleted when you replace or remove it; there is no undo beyond uploading again.
  • Full Name — required. It appears on your bookings and, for organizers, may appear with the events you publish.
  • Email Address ② — required. Changing it makes your address unverified until you confirm the new one with the emailed link (valid 72 hours); messages and features that need a verified address pause until then.
  • Phone Number and Bio — optional. For organizer accounts the bio may be shown publicly.
  • Preferred Timezone — the zone in which event times are shown to you. It never changes an event’s actual schedule, which always runs on the venue’s own time.
  • Language ③ — the language for the site, the emails and notifications we send you and your ticket PDFs. The flag in the top bar changes the language for the page you are on without saving anything.
  • Save Changes ④ stores the form. The light/dark switch (the moon icon in the top bar) is separate: it saves at once.

Below the form

  • Change Password, Set up Two-Factor Authentication and the Danger Zone (delete account). See Account Security & Two-Factor Authentication and Privacy & Data.
  • What else the page shows depends on your role: an attendee sees a ticket count, the total spent and recent tickets; an organizer sees event totals; an admin sees platform figures.
  • A card invites attendees to become an organizer. Its Start hosting events button turns your account into an organizer account at once, with no approval, as soon as your email address is verified (see Getting Started).

Other places that belong to your account

  • Notification Preferences — in your avatar menu. See Notification Preferences.
  • Active Sessions — the browsers signed in to your account; linked from the Sign-in & access card on your profile page. See Account Security.
  • API Tokens — personal tokens for scripts or the scanner app, in the same card. A token is shown once when you create it; copy it then.
  • Accessibility Settings — contrast, text size and motion, also in that card. See Accessibility.
  • Role switcher — if you hold more than one role, switch from the avatar menu.

Good to know

  • Your account has one name and one email for every role.
  • Social sign-in accounts (Google, Facebook, LinkedIn) have the same profile page. Their password form does not ask for a current password.

Troubleshooting

  • I changed my email and stopped getting some mail — confirm the new address with the verification email.
  • My timezone change did not move an event — expected: it only changes how times are shown to you.
  • The photo will not upload — use a JPG or PNG under 2 MB.
  • I cannot find Active sessions or API tokens — they are not in the menus; open the addresses above.

Related

7.2 Account Security & Two-Factor Authentication

Your password protects your account, and the settings in this article add layers on top of it. It explains each one: what it does, where to find it and what happens if you lose access. Most of it is on My Profile, reached from your avatar menu.

Password

On My Profile: the Change Password form, the two-factor button and the Danger Zone

Change it under Change Password ① on your profile. You enter your current password and the new one twice; the new one needs at least 8 characters with an uppercase letter, a lowercase letter, a number and a special character. If you registered with Google, Facebook or LinkedIn, you never chose a password, so the form does not ask for the current one.

If you are locked out, press Forgot your password? on the sign-in page. The emailed reset link is valid for 60 minutes; ask for a new one if it ran out.

Email verification

New accounts start unverified. Click the link in the verification email, valid for 72 hours, to confirm your address. It works on any device because it does not need you to be signed in there. Some features need a verified address, for example buying a membership, accepting a ticket transfer or publishing an event. If the link expired or never came, ask for another from the notice on the site or from your profile. Changing your email address makes it unverified again.

Two-factor authentication (2FA)

2FA adds a second step at sign-in: after your password you enter a 6-digit code from an authenticator app such as Google Authenticator or Authy.
The two-factor setup page with the QR code, the manual secret and the verification code field
  1. On your profile press Enable Two-Factor ②. The setup page opens with a QR code.
  2. Scan the code with your app. If you cannot scan it, type the secret shown under Can’t scan? Enter this secret manually ① into the app.
  3. Enter the 6-digit code that your app now shows in the Verification code field ② and press Verify.
  4. You are given 8 recovery codes, shown once. Save them somewhere other than the phone with your authenticator app, such as a password manager or a printout.
  • From then on every sign-in asks for a code, after your password. At that screen, Use recovery code lets you enter a recovery code instead. Each recovery code works once and is then removed.
  • After 5 wrong codes in a row, 2FA sign-in is locked for 15 minutes.
  • To turn 2FA off, use the same section of your profile and confirm with your current password. The secret and the remaining recovery codes are deleted.
  • If you lose both your authenticator app and your recovery codes, there is no way to get back in yourself: that is the point of a second factor. Contact Support and be ready to prove who you are in another way.

Active sessions

Active Sessions: this browser marked as current and two other devices with a Sign out all others button

Open Active Sessions from the Sign-in & access card on your profile page (or go to /profile/sessions) to see every browser or device signed in to your account, with its IP address, browser and how long ago it was last active. Your current one is marked Current ①. Use the sign-out icon on a row to end that session, or Sign out all others ② to end every session except the one you are using. An account can hold at most 5 sessions; signing in on a sixth device signs out the least recently used one.

New device alerts

The first device you sign in with is trusted automatically. When you later sign in from a device we have not seen, we email you a New sign-in to your EventMann account message with the device and, when available, the location. Press Yes, this was me to confirm it. If it was not you, use the link in the email to secure your account and change your password at once.

Automatic sign-out

A session that has been idle for 30 minutes (the default) is signed out, so an unattended browser does not stay signed in. Background activity such as the notification bell does not count as activity.

Restrictions an administrator can apply

  • IP allow-listing — an administrator can limit an account to certain IP addresses. From another address you get an access-denied message instead of the sign-in screen. Ask whoever manages the account.
  • Suspension — a suspended account is signed out the next time it makes a request and cannot sign in until the suspension is lifted. Contact Support if you think it is a mistake.

Good to know

  • 2FA and your password are independent: changing your password does not turn 2FA off, and 2FA does not change the password rules.
  • Your 2FA secret and recovery codes can only be changed by the enable, confirm and disable steps above.
  • Deleting your account (Danger Zone) asks for your password and cannot be undone; see Privacy & Data.

Troubleshooting

  • My authenticator code is rejected — codes are time based. Set your phone’s clock to automatic and use the next code.
  • I lost my phone — sign in with a saved recovery code, then set 2FA up again on the new phone.
  • I used all my recovery codes and lost my app — contact Support.
  • I get no verification or reset email — check spam and the address on your account, then ask for a new link; old ones expire.
  • I was signed out on one device after signing in on another — you reached the limit of 5 sessions.

Related

7.3 Accessibility

EventMann has four settings you can adjust for yourself, and a set of accessibility features that are built into the pages. This article says what is there today and how to report something that does not work for you. The settings page is linked as Accessibility Settings from the Sign-in & access card on your profile page, and is also at /accessibility/settings, which works without signing in.

Accessibility Settings with High Contrast Mode, Reduce Animations, Screen Reader Optimised, a font size slider and Save Settings

The settings

  • High Contrast Mode ① — increases the contrast between text and background colours.
  • Reduce Animations ② — minimises motion effects and transitions. Nothing stops working; only the movement around it is removed.
  • Screen Reader Optimised — shows clearer focus outlines and keeps the skip links visible when they get keyboard focus.
  • Font Size ③ — a slider from Small to Extra Large (the default is Medium) that changes the text size across the platform.
  1. Open Accessibility Settings from your profile page, or go to /accessibility/settings.
  2. Switch on what you need and move the slider.
  3. Press Save Settings ④. The page confirms and the setting applies on every page.

When you are signed in, your choices are saved to your account and follow you to other devices. When you are signed out, they are kept for your current browser session only. They are separate from the light and dark theme, so you can combine both.

Built into the platform

  • Keyboard use — interactive elements can be reached and used without a mouse, and focus is visible.
  • Structure — semantic page structure and landmarks so screen readers can move through a page.
  • Forms — inputs have labels, and errors are described in text next to the field, not only in colour.
  • Accessible seating — organizers can mark seats and whole sections as wheelchair-accessible. Those seats carry a wheelchair symbol on the seat map and in the seat list, and you can filter to show only accessible seats. The organizer enters this information, so ask them if it matters for your booking.
  • Keyboard seat choice — every seat map has a seat list of real buttons that announce section, row, price, accessibility and availability. The picture of the map itself is pointer-only; the list is the full equivalent.

Known limitations

  • Images and descriptions added by organizers may lack alternative text or structure; that depends on the organizer.
  • PDF tickets contain text but are not optimised for every screen reader. The ticket page in the browser shows the same information.
  • Content from other providers, such as maps and payment forms, is outside our direct control.

Our aim is to conform to the Web Content Accessibility Guidelines (WCAG) 2.1 at level AA. The page Accessibility Statement, linked from the settings page, describes our approach and these limits.

Report a problem

If you meet a barrier, such as a control you cannot reach by keyboard, text that does not resize or something a screen reader mishandles, open a support ticket or use the contact details on the Accessibility Statement. Name the page and describe what happened. Accessibility reports are treated as faults, not as feature requests.

Good to know

  • The settings page works signed out as well, so you can adjust the site before you create an account.
  • Your browser’s own zoom works as usual; the settings here are in addition to it.

Troubleshooting

  • I cannot find the accessibility menu — it is not in the top menu; open it from the Sign-in & access card on your profile page, or go to /accessibility/settings directly.
  • My font size did not stick — press Save Settings. When signed out, the choice lasts only for the browser session.
  • The seat map cannot be used with my keyboard — use the seat list beside it.

Related

7.4 Supported Browsers & Devices

EventMann is a web application built for current browsers, so how well it runs depends mostly on how up to date your browser is. This article says what to expect, what must be switched on, and a limit that matters if you check people in with an iPhone.

Recommended browsers

  • Chrome, Firefox, Safari and Edge — the latest version of each is recommended.

The site uses modern web features, and the interactive parts (ticket quantities, menus, the payment form) rely on JavaScript, which must be enabled. An old browser is far more likely to cause trouble than any particular version number. Updating is the most reliable fix for layout or button problems.

Devices

The site adapts to desktop, tablet and phone screens. There is no EventMann app for attendees: you buy tickets, show them and manage your account in a browser on any device. Your tickets are web pages and PDFs, so a phone with a browser is enough at the door. A separate scanner app and an installable scanner web page exist for the people who check tickets (see below).

What has to be on

  • JavaScript — without it most pages cannot work.
  • Cookies — signing in and checkout use the site’s own cookies. The cookie banner lets you choose what else is allowed; refusing optional cookies does not stop you from buying.
  • Access to Stripe’s payment form — the card and payment form is loaded from our payment provider. If an ad blocker or a strict network prevents it, the page says The payment form could not load. Please disable any ad blocker for this page, or reload it.
  • Location (optional) — only if you ask for events near you on the For You page.
  • Notifications (optional) — only if you turn on browser push in Notification Preferences.

Check-in scanner on iPhone

Organizers and door staff can install the check-in page as a home-screen web app from the check-in page itself. There is no App Store listing, because iOS offers no install prompt for web apps. In Safari press the Share button and choose Add to Home Screen. This needs iOS 16.4 or later: on earlier versions the installed app cannot use the camera, so scan from the Safari tab instead. Android and desktop Chrome show a normal install button.

  • The installed scanner contains only the scanner. Signing in again, if your session ended, opens in your normal browser.
  • An Android scanner app is also offered as a direct download, linked as Scanner App in the site footer.

Good to know

  • Attendees do not need to install anything to show a ticket: open the ticket page or the PDF.
  • The light and dark appearance follows the switch in the top bar; text size and contrast are in the accessibility settings.

Troubleshooting

  • The scanner cannot use the camera after I installed it on my iPhone — check that iOS is 16.4 or later. Otherwise use the Safari tab version.
  • A button does nothing or the layout looks broken — update your browser, then reload. Also try without extensions that block scripts.
  • No page shows interactive content — check that JavaScript is enabled.
  • The payment form does not appear — disable the ad blocker for the page or try another network.

Related

7.5 Support

Use Support for anything about the platform itself: your account, a payment, a technical error, or a problem that the organizer cannot solve. Questions about a specific event, such as directions, the programme or what is included, are faster to answer if you ask the organizer (see How to Contact the Organizer). Open Support Tickets in your account sidebar. You need to be signed in; guests can use the Help & Contact page.

Support tickets with a status filter, a New ticket button and one open ticket

Raise a ticket

  1. Open Support Tickets and press New ticket ①.
The new support ticket form with subject, category, priority and description
  1. Write a short Subject ①.
  2. Choose a Category ②: Billing, Technical, Event, Refund or General.
  3. Choose a Priority ③: Low (no rush), Medium (within a few days), High (needs attention) or Urgent (blocking issue). Pick honestly: it helps the right things get looked at first.
  4. Describe the problem in the Description (up to 5,000 characters). The tips beside the form suggest what to include: your booking reference, the steps to reproduce the problem, and your browser and device.
  5. Press Submit ticket ④.

Always give the booking reference (it starts with BK-) for anything about a purchase: it is how we find your order. You find it on your confirmation email and on the order in My Tickets.

Follow a ticket

A support ticket with the question, a Close ticket button and a reply box
  • The list shows each ticket’s number, subject, status, priority and last reply. Filter it with All, Open, In progress, Waiting, Resolved or Closed.
  • Open a ticket to read the conversation. Type under Add reply ② and press Send reply. New answers appear in the thread without reloading the page.
  • Close ticket ① ends the conversation when you no longer need help.
  • You are notified of a reply and when a ticket is marked resolved, in the bell and by email, according to your Notification Preferences (Support reply and Ticket resolved).

What the statuses mean

StatusMeaning
OpenYour ticket is in the queue and has not been answered yet.
In progressThe support team has replied and is working on it.
WaitingOn hold while the ticket waits for further information.
ResolvedThe team believes the issue is dealt with. If you reply, the ticket reopens automatically.
ClosedFinished; no more replies are expected.

Good to know

  • Only you, the person handling the ticket and administrators can see a ticket. It is not public.
  • Replying to a resolved ticket reopens it; you do not need to open a new one.
  • There is no fixed response time. A correct priority and a clear description speed things up.
  • Support cannot decide a refund for an organizer’s event: the organizer decides, under their cancellation terms. See How to Get a Refund.

Troubleshooting

  • My ticket has been Open for a while — it moves to In progress when someone replies. Until then it is waiting in the queue.
  • I forgot something — open the ticket and add a reply with the missing information.
  • It says Resolved but it is not — reply on the same ticket and it reopens.
  • I cannot reach the support form — sign in first. If you cannot sign in, use the contact page.

Related